Using Microsoft Azure as a backup data center
High availability of Hyper-V virtual machines (VMs) can be achieved in various ways. One such method, Hyper-V Replica, allows you to replicate business-critical VM companies to another physical location, such as a backup data center. In this case, we implement a disaster-proof solution, and even the loss of the entire data center will not lead to the loss of the VM. But how many companies can afford to have a backup data center? And if it is not there, but is resilience at the site level still necessary? The Azure Site Recovery service has recently been updated so that you can now set up a replica of your VM directly to the Microsoft cloud using Microsoft Azure as a “backup data center”. Here you can see how it looks. We will further consider possible scenarios and the implementation of one of them.
Hyper-V Replica, first introduced in Windows Server 2012, is an asynchronous VM replication mechanism. In a minimal configuration, Hyper-V Replica requires two hosts with an elevated Hyper-V role connected by a data link. After replication is configured for the selected VM, a copy of this VM is created on the target host (in the off state), and then changes from the original host are transferred from the source host at a certain interval. In Windows Server 2012, the replication interval is 5 minutes, in Windows Server 2012 R2, it can be selected from three acceptable values: 30 seconds, 5 minutes, 15 minutes.
')
If the original VM is unavailable due to a host crash or any other problems, the administrator initiates a switch to the replica. On the target host, this will start the replicated VM, and then it remains to switch clients to this VM, which may have a different IP, different VLAN settings, etc. With such unplanned failover, asynchronous replication may result in data loss (since the last replication until failure). We can also use planned failover (planned failover), for example, to perform any service tasks on the source server or in the main site. In this case, Hyper-V Replica guarantees the transfer of all changes since the last replication, before it stops the original VM and starts the replicated one.
Building disaster-proof solutions is one of the main applications of Hyper-V Replica. Indeed, there are no special hardware requirements for hosts; everything is done using Windows Server tools. There are no special requirements for the communication channel either. Its thickness is determined by the number and volume of replicated VMs and the frequency of replication. Evaluation of various parameters for a specific configuration can be done using Capacity Planner for Hyper-V Replica . But there are several fundamental points to keep in mind:
The Azure Site Recovery cloud services suite (formerly Azure Hyper-V Recovery Manager) was originally conceived as such an orchestrator of replication and switching processes in the event of planned or unplanned downtime.
To ensure resiliency, we need at least:
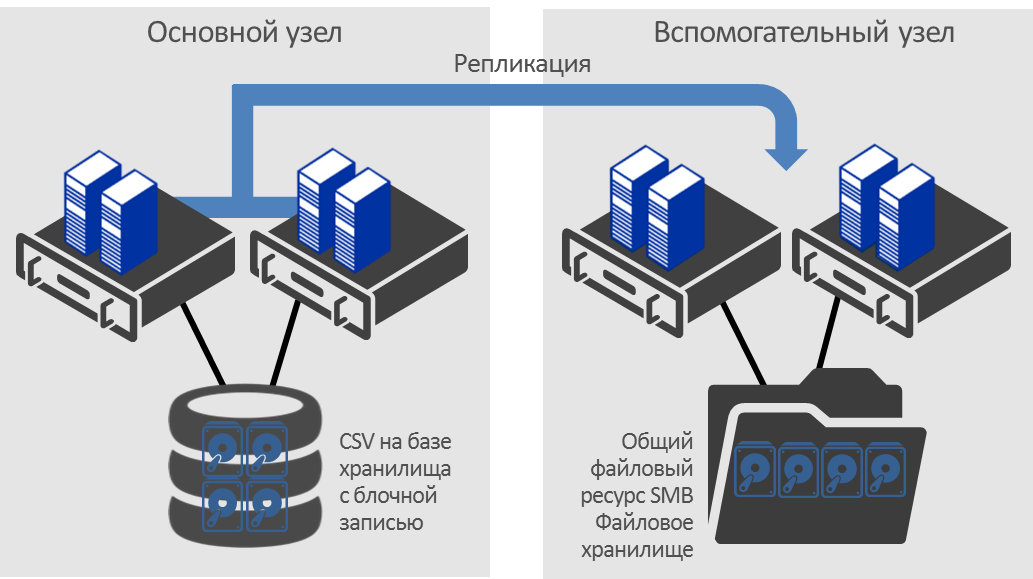
The architecture of this solution is as follows:

Note that links to Azure are used to configure, monitor, and control when switching between sites. Replication traffic is not transmitted through the cloud, but through the channels between the data centers that you use.
Thanks to ASR, we have a third point of observation / orchestration, which Microsoft provides with high availability. Moreover, you do not need to configure replication on hosts first. Once the Azure link is configured — the data center — right in the Azure Management Portal, you can see information about your private clouds, hosts, and VMs, and set up replication from here. Azure channel - the data center is secured using certificates, connection setup through proxy servers is supported, and these connections are outgoing to your infrastructure. Finally, the recovery plan allows you to describe the logic of failover, including running scripts that can perform the widest range of tasks - from opening ports to changing virtual machine parameters. All components of the recovery plan, including scripts, are also stored in Azure, which ensures their high availability. Speaking figuratively, by setting up Azure Site Recovery, we received an “emergency button”, which you can click and thereby start the recovery process from anywhere where there is Internet access.
The architecture described above implies that the organization has at least two data centers. Once we are talking about using Hyper-V Replica, it is assumed that the virtualization environment is managed by System Center Virtual Machine Manager (VMM). So in the very first implementation of Azure Site Recovery, the connection between Azure and the data center was the connection between Azure and VMM, for which a special provider was installed on VMM. Using the VMM provider, Azure reports on the configuration of the physical and virtual environments and receives monitoring requests and control commands from Azure, for example, with the administrator-defined replication parameters that VMM applies to the required Hyper-V hosts and VMs.
Multiple sites and the mandatory use of VMM obviously limited the scope of Azure Site Recovery. Recent updates to this service now allow you to implement new scripts. Let's look at them.
At the time of this writing, the following options are available for using Azure Site Recovery to protect your VMs.
These options and the corresponding local infrastructure requirements are described in more detail here . We will look further at a simple example of the implementation of the 4th scenario - VMM-managed VM replication to the Microsoft Azure cloud.
I will not describe the process of setting up replication. If the VMM infrastructure is deployed, private clouds are created, VMs are running, you can use a very good step-by-step tutorial here . I will note only a few important points.
First, only the latest VMM version is supported - System Center 2012 R2 Virtual Machine Manager, while on the hosts it manages, Windows Server 2012 and Windows Server 2012 R2 can be used. A lot of useful information on migration from older versions of mono found here in this collection of materials.
Secondly, replication in Azure can be configured only for first-generation VMs (Generation 1), and it’s not important that they use VHD or VHDX files as virtual hard disks.
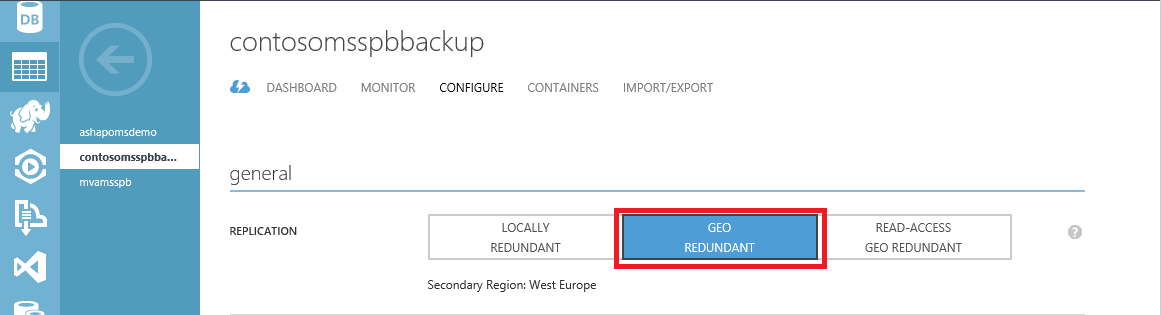
Configuring replication begins with creating a so-called recovery vault repository in the Azure management portal, which will contain all the Azure Site Recovery settings, including recovery plans, but not VM replicas. The latter, like any other VM in Azure, are created in storage accounts. For the storage account that will be used as a replica, the geo-replication option must be enabled, and this account must be located in the same region (location) as the recovery vault.
After installing the provider on VMM and agents on the Hyper-V hosts, you will see information on all the clouds created in VMM on the Azure portal. Protection must first be enabled for the cloud,
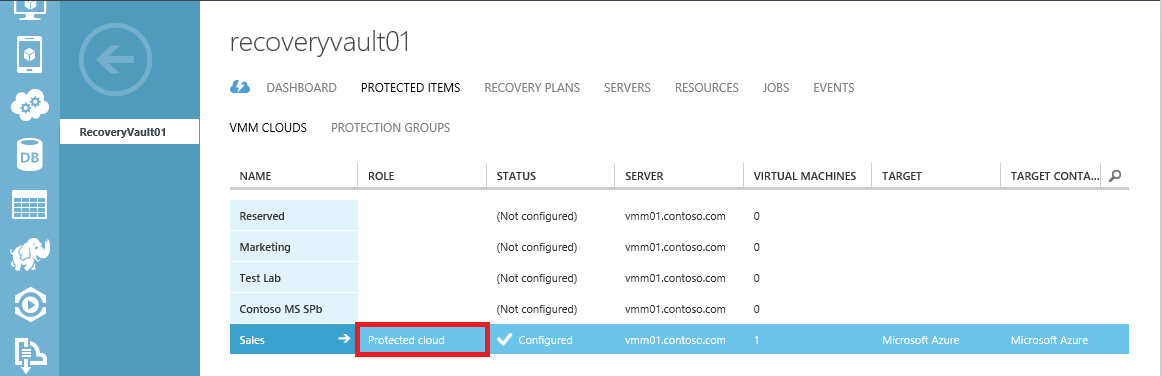
and then for the necessary VMs in this cloud.
In other words, the VMs that you want to replicate to Azure should be associated with VMM clouds.
When setting up replication for a specific VM, the master will suggest a VM template in Azure (target size) that is most suitable for the protected machine. Although this parameter you can change at your discretion. In my example, a D2 template was proposed for a dual-core machine with 4 GB of RAM. I note that the protected VM uses dynamic memory, 4 GB is the maximum amount in the dynamic memory settings. This is what Azure focuses on when choosing a template.

At the bottom of the picture you see another basic setting - network mapping. With this mechanism, you actually specify to which virtual network Azure connects the replicated VM when a planned or unscheduled failover occurs. At least the address space is set in the parameters of this virtual network, in this example 10.2.1.0/24. But other than that, you can set up a VPN tunnel between this virtual network and your infrastructure. Then, after a failover, the VM in Azure can communicate through the tunnel with other machines on your network. Of course, except for the situation where the tunnel connected Azure with the very data center that we lost after the crash.
I would like to emphasize once again that after installing the provider and agents, all configuration steps are carried out on the Azure portal. After you set up replication, you can verify that Hyper-V Replica really turned on (turned off by default) on all Hyper-V hosts of the protected cloud, and the changes are regularly replicated to Azure. You can check this in the JOBS section of the Azure portal logs, here’s one example:
Also directly in the Hyper-V console on the host where the protected VM is running:

The last important point is the recovery plan. In my simplest demo scenario, this plan looks like this:
There is only one VM group - Group 1, which owns only one protected VM - Web-App01. If you run this plan for execution, Azure will try:
In a more complex scenario, an application that we ultimately protect by replication can be distributed across several VMs — front-end, back-end, etc. These VMs need to be run in a certain sequence when failover, for which they need to be distributed by relevant groups in the created recovery plan. Additional tasks may be required, for example, opening ports through which users will connect to the VM. To do this, you can add prepared scripts to the right place of the recovery plan.

Finally, real situations can be arbitrarily complex, and it will not be possible to fully automate the process of switching to backup VMs. Some steps will require the intervention of IT staff. In the recovery plan, you can add such "manual" actions.
Then the execution of the recovery plan will be suspended at this step until the administrator completes the necessary actions and clicks the button, confirming the completion of this step. After that, the implementation of the plan will continue.
Suppose the recovery plan is completely ready, what next? Further, it is highly recommended to perform a failover testing. The great advantage of Hyper-V Replica is that you can perform such testing without disrupting the replication process that is already configured. The Test Failover operation actually creates a snapshot of the replicated VM and, on its basis, creates and runs a copy of the replicated VM named Name_VM-Test . It makes sense to connect this VM to an isolated network segment and check how the application behaves inside, how test clients can connect to it, etc. At the same time, the actual replication between the original and replicated VM continues. Exactly the same opportunity provides Azure Site Recovery when replicating VMs to the Microsoft cloud. We can create some test virtual network in Azure, then select a recovery plan, click the TEST FAILOVER button below and select the network to which a copy of the replicated VM will be connected.
When the creation of the VM is complete, we can perform all the necessary checks and tests. We must notify Azure by completing the test by clicking The test failover is complete , after which the test VM will be automatically deleted.
Now that everything is ready, the checks have been completed, and we got the very “emergency button” that can be used for planned or unplanned switching.

And I strongly wish that for the latter option you would not need to click on it.
Additional Information:
Hyper-V Replica and disaster recovery?
Hyper-V Replica, first introduced in Windows Server 2012, is an asynchronous VM replication mechanism. In a minimal configuration, Hyper-V Replica requires two hosts with an elevated Hyper-V role connected by a data link. After replication is configured for the selected VM, a copy of this VM is created on the target host (in the off state), and then changes from the original host are transferred from the source host at a certain interval. In Windows Server 2012, the replication interval is 5 minutes, in Windows Server 2012 R2, it can be selected from three acceptable values: 30 seconds, 5 minutes, 15 minutes.
')
If the original VM is unavailable due to a host crash or any other problems, the administrator initiates a switch to the replica. On the target host, this will start the replicated VM, and then it remains to switch clients to this VM, which may have a different IP, different VLAN settings, etc. With such unplanned failover, asynchronous replication may result in data loss (since the last replication until failure). We can also use planned failover (planned failover), for example, to perform any service tasks on the source server or in the main site. In this case, Hyper-V Replica guarantees the transfer of all changes since the last replication, before it stops the original VM and starts the replicated one.
Building disaster-proof solutions is one of the main applications of Hyper-V Replica. Indeed, there are no special hardware requirements for hosts; everything is done using Windows Server tools. There are no special requirements for the communication channel either. Its thickness is determined by the number and volume of replicated VMs and the frequency of replication. Evaluation of various parameters for a specific configuration can be done using Capacity Planner for Hyper-V Replica . But there are several fundamental points to keep in mind:
- Hyper-V provides switching from the original VM to the replica and, if necessary, in the opposite direction. But does not contain any tools for switching clients (load) on the VM.
- Hyper-V monitors replication members. But unlike Failover Clustering, it does not contain any built-in logic for automatic failure handling, for example, if the connection with the main site is lost. The decision to switch must be made by the administrator.
- Even if we have prepared scripts for automatic switching, (of course, PowerShell cmdlets for managing Hyper-V Replica are available), these scripts need to be stored somewhere and run somewhere from the X hour. According to the canons of reliability, this "somewhere" should not be the main site or the backup site. Need a third point - an observer or orchestrator.
Azure Site Recovery (ASR)
The Azure Site Recovery cloud services suite (formerly Azure Hyper-V Recovery Manager) was originally conceived as such an orchestrator of replication and switching processes in the event of planned or unplanned downtime.
To ensure resiliency, we need at least:
- To provide Azure with the main and backup sites, these channels of communication will be used to monitor the status of protected objects.
- Specify which VMs need to be protected using replication, what are the replication parameters.
- Create a recovery plan in which to reflect all the necessary steps to switch to the backup site, including the VM startup sequence in the backup data center, possible scripts and their startup sequence, etc.
The architecture of this solution is as follows:
Note that links to Azure are used to configure, monitor, and control when switching between sites. Replication traffic is not transmitted through the cloud, but through the channels between the data centers that you use.
Thanks to ASR, we have a third point of observation / orchestration, which Microsoft provides with high availability. Moreover, you do not need to configure replication on hosts first. Once the Azure link is configured — the data center — right in the Azure Management Portal, you can see information about your private clouds, hosts, and VMs, and set up replication from here. Azure channel - the data center is secured using certificates, connection setup through proxy servers is supported, and these connections are outgoing to your infrastructure. Finally, the recovery plan allows you to describe the logic of failover, including running scripts that can perform the widest range of tasks - from opening ports to changing virtual machine parameters. All components of the recovery plan, including scripts, are also stored in Azure, which ensures their high availability. Speaking figuratively, by setting up Azure Site Recovery, we received an “emergency button”, which you can click and thereby start the recovery process from anywhere where there is Internet access.
The architecture described above implies that the organization has at least two data centers. Once we are talking about using Hyper-V Replica, it is assumed that the virtualization environment is managed by System Center Virtual Machine Manager (VMM). So in the very first implementation of Azure Site Recovery, the connection between Azure and the data center was the connection between Azure and VMM, for which a special provider was installed on VMM. Using the VMM provider, Azure reports on the configuration of the physical and virtual environments and receives monitoring requests and control commands from Azure, for example, with the administrator-defined replication parameters that VMM applies to the required Hyper-V hosts and VMs.
Multiple sites and the mandatory use of VMM obviously limited the scope of Azure Site Recovery. Recent updates to this service now allow you to implement new scripts. Let's look at them.
Use scenarios for Azure Site Recovery
At the time of this writing, the following options are available for using Azure Site Recovery to protect your VMs.
- Hyper-V site to Azure protection with Hyper-V replication . Replicate VMs from one or more Hyper-V servers to Azure. VMM is not required.
- VMM site protection with Hyper-V replication . VM replication between hosts or sites managed by VMM. This is the originally implemented version, which we considered above.
- VMM site protection with SAN replication . VM replication between VMM-managed Hyper-V clusters. Unlike previous scenarios, here replication is not performed using Hyper-V Replica, but through the mechanisms provided by the SAN. This scenario is intended primarily for organizations that are already using hardware storage replication.
- On-premises VMM site to Azure protection . VM replication from one or more VM-managed Hyper-V servers to Azure. Looks like the first script, but applies if VMM is locally deployed.
- On-premises VMware site with on-premises VMware site with InMage . Replication between VMware sites using InMage Scout components.
These options and the corresponding local infrastructure requirements are described in more detail here . We will look further at a simple example of the implementation of the 4th scenario - VMM-managed VM replication to the Microsoft Azure cloud.
VM replication between VMM and Microsoft Azure
I will not describe the process of setting up replication. If the VMM infrastructure is deployed, private clouds are created, VMs are running, you can use a very good step-by-step tutorial here . I will note only a few important points.
First, only the latest VMM version is supported - System Center 2012 R2 Virtual Machine Manager, while on the hosts it manages, Windows Server 2012 and Windows Server 2012 R2 can be used. A lot of useful information on migration from older versions of mono found here in this collection of materials.
Secondly, replication in Azure can be configured only for first-generation VMs (Generation 1), and it’s not important that they use VHD or VHDX files as virtual hard disks.
Configuring replication begins with creating a so-called recovery vault repository in the Azure management portal, which will contain all the Azure Site Recovery settings, including recovery plans, but not VM replicas. The latter, like any other VM in Azure, are created in storage accounts. For the storage account that will be used as a replica, the geo-replication option must be enabled, and this account must be located in the same region (location) as the recovery vault.
After installing the provider on VMM and agents on the Hyper-V hosts, you will see information on all the clouds created in VMM on the Azure portal. Protection must first be enabled for the cloud,
and then for the necessary VMs in this cloud.
In other words, the VMs that you want to replicate to Azure should be associated with VMM clouds.
When setting up replication for a specific VM, the master will suggest a VM template in Azure (target size) that is most suitable for the protected machine. Although this parameter you can change at your discretion. In my example, a D2 template was proposed for a dual-core machine with 4 GB of RAM. I note that the protected VM uses dynamic memory, 4 GB is the maximum amount in the dynamic memory settings. This is what Azure focuses on when choosing a template.
At the bottom of the picture you see another basic setting - network mapping. With this mechanism, you actually specify to which virtual network Azure connects the replicated VM when a planned or unscheduled failover occurs. At least the address space is set in the parameters of this virtual network, in this example 10.2.1.0/24. But other than that, you can set up a VPN tunnel between this virtual network and your infrastructure. Then, after a failover, the VM in Azure can communicate through the tunnel with other machines on your network. Of course, except for the situation where the tunnel connected Azure with the very data center that we lost after the crash.
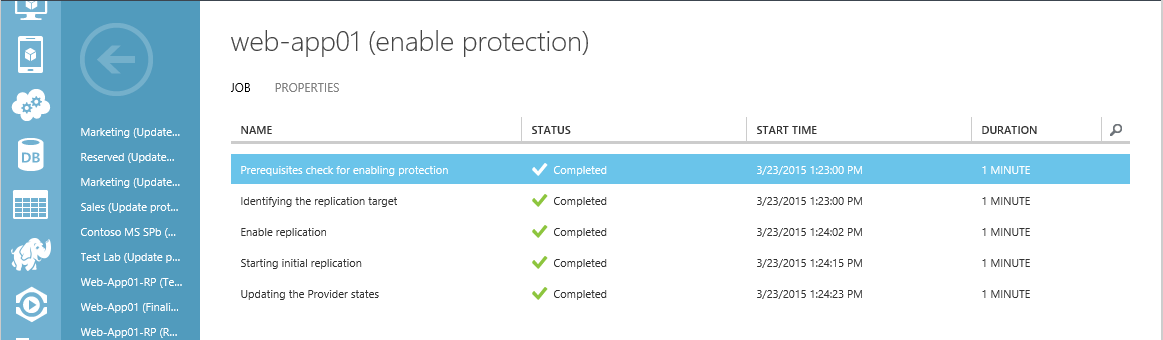
I would like to emphasize once again that after installing the provider and agents, all configuration steps are carried out on the Azure portal. After you set up replication, you can verify that Hyper-V Replica really turned on (turned off by default) on all Hyper-V hosts of the protected cloud, and the changes are regularly replicated to Azure. You can check this in the JOBS section of the Azure portal logs, here’s one example:
Also directly in the Hyper-V console on the host where the protected VM is running:
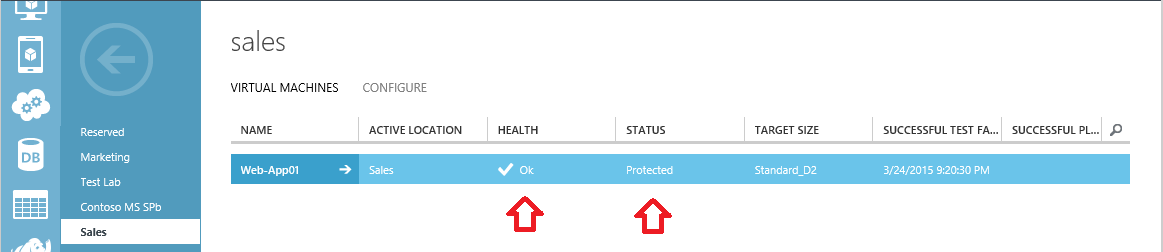
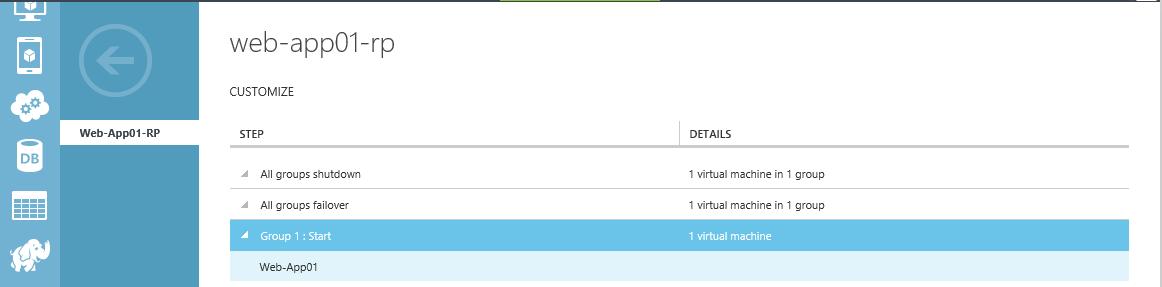
The last important point is the recovery plan. In my simplest demo scenario, this plan looks like this:
There is only one VM group - Group 1, which owns only one protected VM - Web-App01. If you run this plan for execution, Azure will try:
- Shut down all VMs in the group (with an unplanned failure, this step most likely will not be possible, as the connection with the data center is probably lost).
- Run failover, i.e. indicate that the replica now becomes the main machine.
- Run the VM in the group.
In a more complex scenario, an application that we ultimately protect by replication can be distributed across several VMs — front-end, back-end, etc. These VMs need to be run in a certain sequence when failover, for which they need to be distributed by relevant groups in the created recovery plan. Additional tasks may be required, for example, opening ports through which users will connect to the VM. To do this, you can add prepared scripts to the right place of the recovery plan.
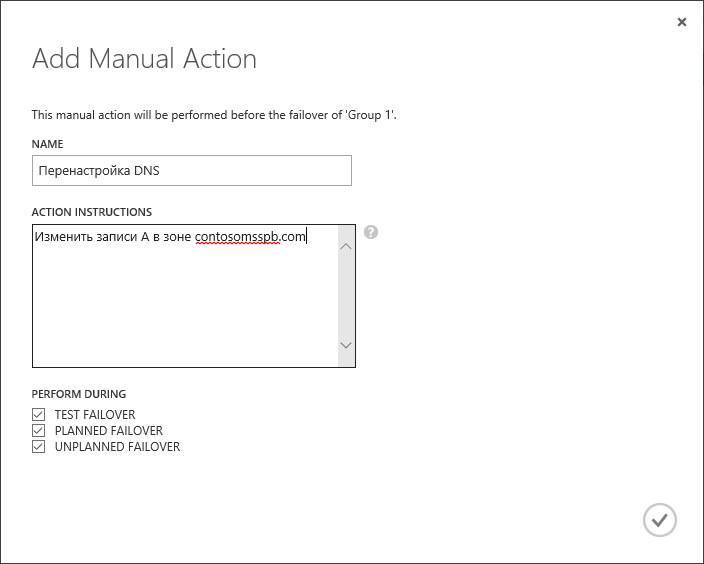
Finally, real situations can be arbitrarily complex, and it will not be possible to fully automate the process of switching to backup VMs. Some steps will require the intervention of IT staff. In the recovery plan, you can add such "manual" actions.
Then the execution of the recovery plan will be suspended at this step until the administrator completes the necessary actions and clicks the button, confirming the completion of this step. After that, the implementation of the plan will continue.
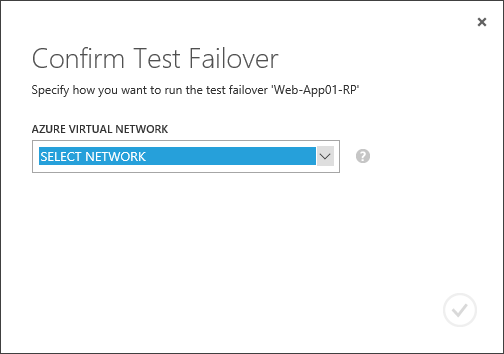
Suppose the recovery plan is completely ready, what next? Further, it is highly recommended to perform a failover testing. The great advantage of Hyper-V Replica is that you can perform such testing without disrupting the replication process that is already configured. The Test Failover operation actually creates a snapshot of the replicated VM and, on its basis, creates and runs a copy of the replicated VM named Name_VM-Test . It makes sense to connect this VM to an isolated network segment and check how the application behaves inside, how test clients can connect to it, etc. At the same time, the actual replication between the original and replicated VM continues. Exactly the same opportunity provides Azure Site Recovery when replicating VMs to the Microsoft cloud. We can create some test virtual network in Azure, then select a recovery plan, click the TEST FAILOVER button below and select the network to which a copy of the replicated VM will be connected.
When the creation of the VM is complete, we can perform all the necessary checks and tests. We must notify Azure by completing the test by clicking The test failover is complete , after which the test VM will be automatically deleted.
Now that everything is ready, the checks have been completed, and we got the very “emergency button” that can be used for planned or unplanned switching.
And I strongly wish that for the latter option you would not need to click on it.
Additional Information:
Source: https://habr.com/ru/post/256535/
All Articles