Designing a Web API in 7 steps
 Web API development is more than just a URL, HTTP status codes, headers, and request content. The design process - how your API will look and be perceived - is very important and is a good investment in the success of your business. This article briefly describes the methodology for designing an API based on the advantages of the web and the HTTP protocol in particular. But do not think that this is applicable only for HTTP. If for some reason you need to implement the work of your services using WebSockets, XMPP, MQTT and so on - by applying most of all the recommendations, you will get almost the same API that will work well. In addition, the resulting API will make it easier to develop and maintain work on top of several protocols.
Good design affects URLs, status codes, headers and query content.
Typically, Web API design guides focus on general concepts: how to design URLs, how to correctly use HTTP status codes, methods, what to send in headers, and how to design content design that is represented by serialized data or an object graph. These are all very important implementation details, but not so much in the sense of a general API design. Designing an API is how the very essence of the service will be described and presented, something that makes a significant contribution to the success and usability of the Web API.
A good design process or methodology provides a set of consistent and reproducible steps for creating service components that will be available as a Web API. This means that such a transparent methodology can be used by developers, designers and architects to coordinate their actions in software implementation. The methodology used can also be refined over time as the process improves and automates without prejudice to the details of the methodology. In fact, implementation details may vary (for example, platform, OS, frameworks, and UI style) regardless of the design process , when the two activities are fully separated and documented.
Designing an API in 7 steps.
The following is a brief overview of the methodology described in the book " RESTful Web APIs " by Richardson and Amundsen (Richardson and Amundsen). The article does not imply a detailed analysis of each step, but will try to give a general understanding of what is being done at each step. Also, readers can use this review as a guide for developing a Web API design process that takes into account the specifics of your knowledge and business goals.
')
Marginal notes: Yes, the seven-step guide may look big enough, but in reality there are only 5 design steps and 2 as additions regarding the implementation and publication of services. These two additions are built around processes and describe the entire process from start to finish.
In your plan, you should consider the possible iterative nature of the service creation process. For example, you can go through Step 2 (Creating state diagrams) and understand that you need to do something else in Step 1 (List all components). When you write code (Step 6), you may find that you missed a couple of points in Step 5 (Creating a semantic profile), and so on. The key point is to use the guide to find as many details as possible and want to go back a step or two to describe the missing points. Iteration is the key to building the most complete view of your service and how it can be used by client applications.
Step 1: List all components
The first step is to list all the types of data that the client application may want to receive or transmit using the service. We call this a semantic description. Semantic - because it displays the value of the data in the application, and the description - because it contains a description of what happens in the application itself. Note that you should work from the point of view of the client application, not the service . It is important to develop a convenient API for use by the client.
For example, a simple to-do list application, you can find the following semantic descriptions:
- id - a unique identifier for each entry in the system
- title - the title for each "case"
- dateDue - the date by which the "case" should be completed
- complete - “yes / no” checkbox that indicates whether the “case” is completed
In this application, there may be a lot of items for displaying such concepts as the category of "cases" (work, family, garden, etc.), user information and other things. Now it's better to stop at such a simple list so that you can focus on the process itself.
Step 2: Draw a state diagram
The next step is to draw a state diagram for the intended API. Each block in the diagram represents a possible state — a document that includes one or more semantic descriptors found in the first step. You can use arrows to indicate transitions from one block to another, from one state to the next. These transitions are triggered by queries.
Do not worry about what method is used for each transition. Just specify whether the transition is secure (HTTP GET), insecure / non idempotent (HTTP POST) or insecure / idempotent (PUT)
Marginal notes: Idempotent actions are those that can be repeated without unexpected side effects. For example, HTTP PUT is idempotent because the specification says that the server must use the state values received from the client to replace any values in the target resource. While HTTP POST is not idempotent, since the HTTP specification indicates that the values sent using POST should be added to existing resources, not replaced.
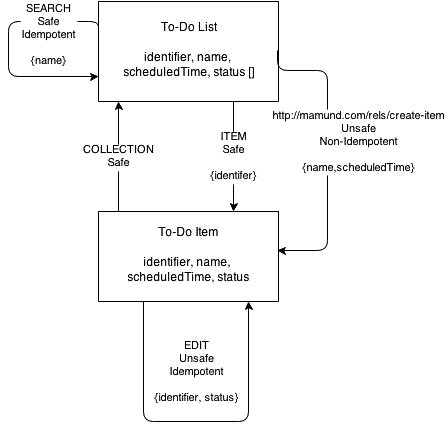
In our case, the client application for the simplest “To-do list” may require access to the list items, the ability to filter, view individual items and mark them as completed. Many of these actions use state values to transfer data between the client and the server. For example, the “add item” action allows the client to pass the state and titleDEDDate values. Below is a diagram that illustrates the main steps:

The actions shown in the diagram and listed below are also semantic descriptors - they describe the semantics of actions for the service.
- read-list
- filter-list
- read item
- create-item
- mark-complete
While working on the diagram, you may find that you have missed some actions or data that are required by the client. In this case, this is a great opportunity to go back a step and enter the missing data and improve the diagram in step 2.
Once you go through these two steps a couple of times, you will have a good understanding of all the data and actions that the client needs to interact with your service.
Step 3: Matching Magic Strings
The next step is to agree on all the "magic lines" in the interface of your service. In our case, the “magic strings” will be all descriptor names - they do not make sense outside the scope of the task, they simply represent the actions or data elements to which clients will access when communicating with the service. Coordination of names means bringing them to widely used terms, using, for example, the following resources:
These are all repositories for well-defined, widely used names. When you use the names of these services, make sure that the developers will understand them just like you. Such a process can significantly improve the usability of your API.
Marginal notes: Using common names for descriptors may be a good idea for the external interface, but nobody forces you to use them for your internal needs. Means, for example, names for databases. The service itself can use the map of correspondences between external and internal names without any problems.
For the To-Do service from the example, I managed to find acceptable existing names for all but one of the descriptors - “create-item”. In this case, I turned to creating a unique URI based on the rules from the Web-Linking RFC 5988 . When choosing a convention interface name, compromises will always haunt you. It is rare when it is possible to find the perfect hit to internal names, and this is normal.
Here's what I got:
- id -> identifier from Dublin Core
- title -> name from Schema.org
- dueDate -> scheduledTime from Schema.org
- complete -> status from Schema.org
- read-list -> collection from IANA Link Relation Values
- filter-list -> search from IANA Link Relation Values
- read-item -> item from IANA Link Relation Values
- create-item -> http://mamund.com/rels/create-item using RFC5988
- mark-complete -> edit from IANA Link Relation Values
So, this is how the diagram began to look after using name matching:
Step 4: Select the type of hypermedia
The next step in the design process of your API is to select the type of data that will be used to transfer messages between the server and the client. One of the distinctive signs of the network is that data is transmitted by standardized documents through a common interface. It is very important to choose a type that supports the same data descriptors (“identifier”, “status”) and actions (“search”, “edit”). There are few such formats.
Here are some of the hypermedia formats from the top of the list (the order does not matter in this list):
- HyperText Markup Language ( HTML )
- Hypertext Application Language ( HAL )
- Collection + JSON ( Cj )
- Siren
- JSON-API
- Uniform Basis for Exchanging Representations ( UBER )
The choice should also be influenced by how well the chosen hypermedia format works with the data transfer protocol. Most developers prefer the HTTP protocol for the services interface. However, WebSockets , XMPP , MQTT, and CoAP are also used — especially for high-speed implementations, with short messages, point-to-point connections.
For our example, I will use HTML as the message protocol and HTTP as the communication protocol. HTML already has support for the necessary descriptors (<UL> for lists, <LI> for elements, and <SPAN> for data). It also has adequate support for action descriptors (<A> for safe links, <FORM method = "get"> for safe transitions and <FORM method = "post"> for unsafe transitions).
Marginal notes: The state diagram now shows “editing” as idempotent (HTTP PUT), but HTML still has no built-in support for PUT . However, I can add an extra field to emulate idempotent HTML POST .
Great, now I can "test" the interface based on the states in the diagram. For our example, we only need to describe two things: “To-Do List” and “To-Do Item”:
Collection “ To -Do List ” in HTML view
<html> <head> <!-- for test display only --> <title>To Do List</title> <style> .name, .scheduledTime, .status, .item {display:block} </style> </head> <body> <!-- for test display only --> <h1>To-Do List</h1> <!-- to-do list collection --> <ul> <li> <a href="/list/1" rel="item" class="item"> <span class="identifier">1</span> </a> <span class="name">First item in the list</span> <span class="scheduledTime">2014-12-01</span> <span class="status">pending</span> </li> <li> <a href="/list/2" rel="item" class="item"> <span class="identifier">2</span> </a> <span class="name">Second item in the list</span> <span class="scheduledTime">2014-12-01</span> <span class="status">pending</span> </li> <li> <a href="/list/3" rel="item" class="item"> <span class="identifier">3</span> </a> <span class="name">Third item in the list</span> <span class="scheduledTime">2014-12-01</span> <span class="status">complete</span> </li> </ul> <!-- search transition --> <form method="get" action="/list/" class="search"> <legend>Search</legend> <input name="name" class="identifier" /> <input type="submit" value="Name Search" /> </form> <!-- create-item transition --> <form method="post" action="/list/" class="> <legend>Create Item</legend> <input name="name" class="name" /> <input name="scheduledTime" class="scheduledTime" /> <input type="submit" value="Create Item" /> </form> </body> </html> Collection "To-Do Item" in HTML view
<html> <head> <!-- for test display only --> <title>To Do List</title> <style> .name, .scheduledTime, .status, .item, .collection {display:block} </style> </head> <body> <!-- for test display only --> <h1>To-Do Item</h1> <a href="/list/" rel="collection" class="collection">Back to List</a> <!-- to-do list collection --> <ul> <li> <a href="/list/1" rel="item" class="item"> <span class="identifier">1</span> </a> <span class="name">First item in the list</span> <span class="scheduledTime">2014-12-01</span> <span class="status">pending</span> </li> </ul> <!-- edit transition --> <form method="post" action="/list/1" class="edit"> <legend>Update Status</legend> <input type="hidden" name="etag" value="q1w2e3r4t5y6" class="etag" /> <input type="text" name="status" value="pending" class="status" /> <input type="submit" value="Update" /> </form> </body> </html> Remember that while working with an exemplary implementation of your state diagram, you may find that something is missing and you need to go back a step or two. This is normal and do not be afraid of this. Now is the time to test all this in test examples - before you start to implement everything in code.
When you are satisfied with how everything is presented, the last step before starting the coding is to create a semantic profile .
Step 5: Creating a Semantic Profile
A semantic profile is a document that lists all the descriptors in your solution and describes the details of each of them to help developers create both client and server implementations.
It should be clearly understood that this is an implementation guide , not an implementation guide.
Service Description Formats
Formats for describing a service have been around for a long time and come in handy when you want to generate code or document an existing implementation of a service.
The main formats that fight for the hearts of developers:
- Web Service Definition Language ( WSDL )
- Atom Service Description ( AtomSvc )
- Web Application Description Language ( WADL )
- Blueprint
- Swagger
- RESTful Application Modeling Language ( RAML )
Profile description formats
There are only a few formats to describe the profile at the moment. And here are the ones I recommend:
Both formats are fairly new. The JSON-LD specification received the status of the W3C Recommendation at the beginning of 2014. Hydra is still in the state of an unofficial draft (as of this writing), but has an active developer community. ALPS is also in early draft.
Since the idea of the document is to describe the real aspects of the problem area (and not a particular solution), the format is very different from the typical descriptive formats:
<html> <alps version="1.0"> <doc> ALPS profile for InfoQ article on "API Design Methodology" </doc> <!-- data descriptors --> <descriptor id="identifier" type="semantic" ref=" /> <descriptor id="name" type="semantic" ref=" /> <descriptor id="scheduledTime" type="semantic" ref=" /> <descriptor id="status" type="semantic" ref=" /> <!-- action descriptors --> <descriptor id="collection" type="safe" ref=" /> <descriptor id="item" type="safe" ref="> <descriptor href="#identifier" /> </descriptor> <descriptor id="search" type="safe" ref="> <descriptor href="#name" /> </descriptor> <descriptor id="create-item" type="unsafe" ref="> <descriptor href="#name" /> <descriptor href="scheduledTime" /> </descriptor> <descriptor id="edit" type="idempotent" ref="> <descriptor href="#identifier" /> <descriptor href="#status" /> </descriptor> </alps> You probably noticed that the document looks like a general dictionary of all possible values for fields and actions from the interface of the “To-do” service - and this is the essence of the idea. Services that agree to adhere to this profile can make their own decisions about the protocol, message format, and even the URL. Clients who agree to accept this profile will be created in such a way as to understand and, if possible, activate the descriptors.
This is also a great format for:
- generating documentation in a readable format for people
- analysis of similar formats
- tracking which profiles are most commonly used,
- even for generating a state diagram.
But this is a topic for another article.
Now that you have a complete list of descriptors with consistent names, brief notes for the state diagram and a semantic profile, you are ready to start writing code for the service and the client.
Step 6: Write some code
From this point on, you can transfer your work (state diagram and semantic profile) to the server-side and client developers to perform a specific implementation.
The HTTP server must implement the diagram from the second step, and requests from the client must trigger transitions between service states. Each presentation transferred from the service should be in the format selected in step 3 and should include a link to the profile created in step 4. Answers should include the corresponding hypermedia controls that implement the actions from the state diagram and are described in the document profile. Client and server developers can write relatively independent code from now on, but remember to run tests for compliance with the state diagram and profile.
After you have written and stabilized your code, the last step remains from the list: Publication.
Step 7: Publish Your API
Web API should publish at least one URL that will always respond to customer requests - even in the distant future. I call it the “billboard URL” –the one everyone knows. It would also be a good idea to publish a profile document so that new implementations of the service can refer to it in the responses. You can also publish readable documentation, lessons and other information at this address that can help developers understand and use your service.
In the end, you should have a well-designed, stable, affordable and running service that is usable.
Finally
This article focuses on a set of steps for building an API for the web. The main focus is on obtaining the correct data descriptors and actions. Documenting them for machine reading to make it easier for people to write client and server parts even if they do not communicate directly.
Once again, 7 steps:
- List all parts
Specify all types of data that the client needs to communicate with the service. - Draw a state diagram
Document all actions (transitions between states) that are available for service. - Reconcile magic variables
Bring the names in your public interface to accepted standards - Choose the type of hypermedia
Select the message format that most fully reflects the transitions in the service, taking into account the selected protocol. - Creating a semantic profile
Write a document that will contain and define all the descriptors used in the service. - Write implementation
Spread the semantic profile and state diagram among the server and client developers so that they can write code in accordance with the recommendations and edit the profile / diagram as necessary. - Publish your API
Publish the billboard URL and semantic profile so that others can use them to create new services and / or client applications.
Most likely you will need to go back to some steps and go through them again, to enter the missing data or to display the trade-offs found during the design process. The sooner this happens, the better. It is also possible that you will be able to use these API practices at some point in the future to create new implementations with new formats and protocols that will be required by developers.
In the end, this methodology is only one of the ways to create a reliable, reproducible, consistent and seamless process for designing a Web API. In the process of considering this example, you can decide that in your case some steps need to be added, some shortened and, of course, decisions on the choice of data exchange format and protocol can vary greatly from project to project.
I hope this article has given you food for thought about how to build an optimal methodology for creating an API in your organization or team.
The article was written by Mike Amundsen, API lead architect at Layer 7 Technologies . He is also known as a book author and speaker, travel consultant in the USA and Europe.
If the topic of the article is close to you or you want to learn more about how to design, support and work with the API correctly, come to our API & Backend conference!
If you have something to tell, we are waiting for your stories !
Source: https://habr.com/ru/post/256495/
All Articles