Ionic Framework - working with the camera

According to the survey results from the first topic, I continue a series of articles on the Ionic Framework (hereinafter referred to as IF). Today we will talk about working with the camera device and in addition consider the work with localStorage. As a basis, we take the application from the previous topic and add the necessary functionality.
- Adding ngCordova
- Connecting the plug-in to work with the camera
- Creating a service for working with the camera
- Editing templates
- Adding routes, controllers and factories
- Conclusion
Adding ngCordova
For the installed plugins to work, you must add the ngCordova module. It is put simply (for a start we will update our tools, a lot of time has passed since the publication of the first article ...):
')
sudo npm i -g cordova ionic bower bower install ngCordova Next, ngCordova connects to index.html :
<script src="lib/ngCordova/dist/ng-cordova.min.js"></script> and depending on the application (app.js):
angular.module('starter', ['ionic', 'ngCordova', 'starter.controllers', 'starter.services']) otherwise the train will not be able ... It is also advisable to connect a couple more plug-ins to work with the FS device:
ionic plugin add cordova-plugin-file ionic plugin add cordova-plugin-file-transfer In theory, it would be possible to connect only file-transfer, since along with him he also pulls the file, but sometimes this method is fraught with the appearance of incomprehensible bugs ...
Connecting the plug-in to work with the camera
In order for IF to be able to access the device's camera, you need to add a plug- in to the Cordova project that implements this functionality :
ionic plugin add cordova-plugin-camera The plugin provides the only method:
navigator.camera.getPicture(SuccessCallback, ErrorCallback, Options); Where SuccessCallback and ErrorCallback are our handler functions in which we are free to write whatever we want, but the Options object is much more interesting to consider:
Camera Settings
That's basically all you can tell ...
- quality (Number): The quality of the saved image, in the range from 0 to 100, where 100 is uncompressed mode. The default value is 50.
- destinationType (Number): The format of the return value. The default is FILEURI. The setting is determined by the navigator.camera.DestinationType types:
Camera.DestinationType = { DATA_URL : 0, // base64 FILE_URI : 1, // URI NATIVE_URI : 2 // URI (assets-library:// iOS content:// Android) }; - sourceType (Number): The source of the image. Default is CAMERA. The setting is determined by the navigator.camera.PictureSourceType types:
Camera.PictureSourceType = { PHOTOLIBRARY : 0, CAMERA : 1, SAVEDPHOTOALBUM : 2 }; - allowEdit (Boolean): Enables simple edit mode before passing to a function.
- encodingType (Number): File format. By default, "you have a JPEG." The configuration is determined by the navigator.camera.EncodingType types:
Camera.EncodingType = { JPEG : 0, // JPEG PNG : 1 // PNG }; - targetWidth (Number): Width. No comments. To scale. It is better to use in conjunction with the coefficient with targetHeight.
- targetHeight (Number): Height.
- mediaType (Number): The type of multimedia content. The default is PICTURE. Works with PictureSourceType PHOTOLIBRARY or SAVEDPHOTOALBUM. The setting is determined by the types nagivator.camera.MediaType:
Camera.MediaType = { PICTURE: 0, // . VIDEO: 1, // ( FILE_URI) ALLMEDIA : 2 // }; - correctOrientation (Boolean): Rotate the image to compensate for the orientation of the device during shooting.
- saveToPhotoAlbum (Boolean): Save to album after shooting.
- popoverOptions: iOS-only parameter specifying the location of the popover on the iPad. The setting is determined in CameraPopoverOptions.
- cameraDirection (Number): Camera to use (front or rear). The default is BACK. The setting is determined by the navigator.camera.Direction types:
Camera.Direction = { BACK : 0, // Use the back-facing camera FRONT : 1 // Use the front-facing camera };
That's basically all you can tell ...
Creating a service for working with the camera
Let's make service for our convenience so that work with the camera is comfortable. To do this, I propose to implement a factory with a promise object that will handle camera events using our callbacks. Open the services.js file (in the last topic, we have already made a factory of cities there) and bring it to this form:
services.js
angular.module('starter.services', []) .factory('Cities', function() { // ... }).factory('Cam', function($q) { return { getPic: function(opt) { var q = $q.defer(); navigator.camera.getPicture(function(res) { q.resolve(res); }, function(err) { q.reject(err); }, opt); return q.promise; } }; }); So, in this setting, using Angular $ q.defer () , we return the promise , which we later pass to the event handlers from the camera (SuccessCallback, ErrorCallback) and the settings object (Options). Do not close the file, we will return to it!
Editing templates
Open the file tabs.html and add another tab . I got this:
<ion-tab title="Options" icon-off="ion-gear-a" icon-on="ion-gear-a" href="#/tab/opt"> <ion-nav-view name="tab-opt"></ion-nav-view> </ion-tab> Now in the folder with templates we will create another template (for example, tab-opt.html ) and make a small form of application user settings, for example:
tab-opt.html
<ion-view view-title=""> <ion-content class="padding"> <div class="list-item"> <img class="full-image" ng-src="{{user.ava || './img/ionic.png'}}"> <label class="item item-input"> <i class="icon ion-person placeholder-icon"></i> <input type="text" placeholder=" " ng-model="user.name" ng-keyup="setUser();" /> </label> <label class="item item-input item-select"> <div class="input-label"> </div> <select ng-model="user.city" ng-change="setUser();"> <option ng-repeat="city in cities" ng-value="city.id">{{city.name}}</option> </select> </label> <button class="button button-full button-positive" ng-click="getPic(1);"> </button> <button class="button button-full button-calm" ng-click="getPic(0);"> </button> </div> </ion-content> </ion-view> As you can see, we tied the user model to the fields and when the html field value changes, the corresponding object field will change in the model. Also for events when the key is released (by the way, you can use debounce here) and for changing the choice of the city, the setUser handler was attached, this will be described in the next step. Can't wait to run and see? But we have not yet configured routing, controllers, and working with localStorage, so we'll have to wait a bit more ...
Adding routes, controllers and factories
Let's take the start routes. Open app.js and add routing for our new tab:
hint
.state('tab.opt', { url: '/opt', views: { 'tab-opt': { templateUrl: 'templates/tab-opt.html', controller: 'OptCtrl' } } }) Ok, now let's go to controllers.js and add the necessary controller:
OptCtrl
.controller('OptCtrl', function($scope, $ionicPopup, Cities, Cam, LS) { $scope.cities = Cities.all(); $scope.user = LS.getIt('user') || {}; $scope.showAlert = function(title, text) { $ionicPopup.alert({ title: title, template: text }); }; $scope.setUser = function() { LS.setIt('user', $scope.user); }; $scope.getPic = function(source) { var opt = { sourceType: source }; Cam.getPic(opt).then(function(res) { $scope.user.ava = res; $scope.setUser(); }, function(err) { $scope.showAlert("", err); }); } }) Oops, what kind of LS in controller dependencies !? Do not be afraid of anything, this is just a method for working with localStorage , and it is time to implement it ( services.js ):
LS
.factory('LS', function() { return { getIt: function(item) { var it = false; try { it = JSON.parse(localStorage.getItem(item)); return it; } catch(e) { console.err(e); return it; } }, setIt: function(item, obj) { try { localStorage.setItem(item, JSON.stringify(obj)); return true; } catch(e) { console.err(e); return false; } } }; }) And we should add more cities, add your own:
{ id: 555312, name: '', desc: ' ', emblem: 'https://upload.wikimedia.org/wikipedia/commons/8/8f/Coat_of_Arms_of_Ivanovo_oblast.png' } You are now probably thinking "why so many gestures?". And imagine that a user set up a city (automatically saved in localStorage) and when you restart the application, it will immediately be thrown over to the weather in your hometown, cool! The final touch, change two of our controller, written in the last article:
CityCtrl, CityDetailCtrl
.controller('CityCtrl', function($scope, Cities, LS) { $scope.cities = Cities.all(); $scope.user = LS.getIt('user') || {}; if ($scope.user.city) { window.location.href = '#/tab/city/'+$scope.user.city; } }) .controller('CityDetailCtrl', function($scope, $http, $stateParams, $ionicPopup, $ionicLoading) { $scope.data = {}; $scope.id = $stateParams.id; $scope.showAlert = function(title, text) { $ionicPopup.alert({ title: title, template: text }); }; $scope.refresh = function() { $ionicLoading.show(); $http.get('http://api.openweathermap.org/data/2.5/forecast/daily?id='+$scope.id+'&appid=2de143494c0b295cca9337e1e96b00e0') .success(function(data, status, headers, config) { $scope.data = data; $ionicLoading.hide(); $scope.$broadcast('scroll.refreshComplete'); }) .error(function(data, status, headers, config) { $ionicLoading.hide(); $scope.showAlert(status, data); $scope.$broadcast('scroll.refreshComplete'); }); }; $scope.refresh(); }) We added a condition for the user to be thrown onto a customized city, and also implicitly indicated in the dependencies the $ ionicLoading components to show the waiting window during the request. I hope I did not miss anything, everything is ready, you know what to do (ionic serve --lab, if you forgot):
It works!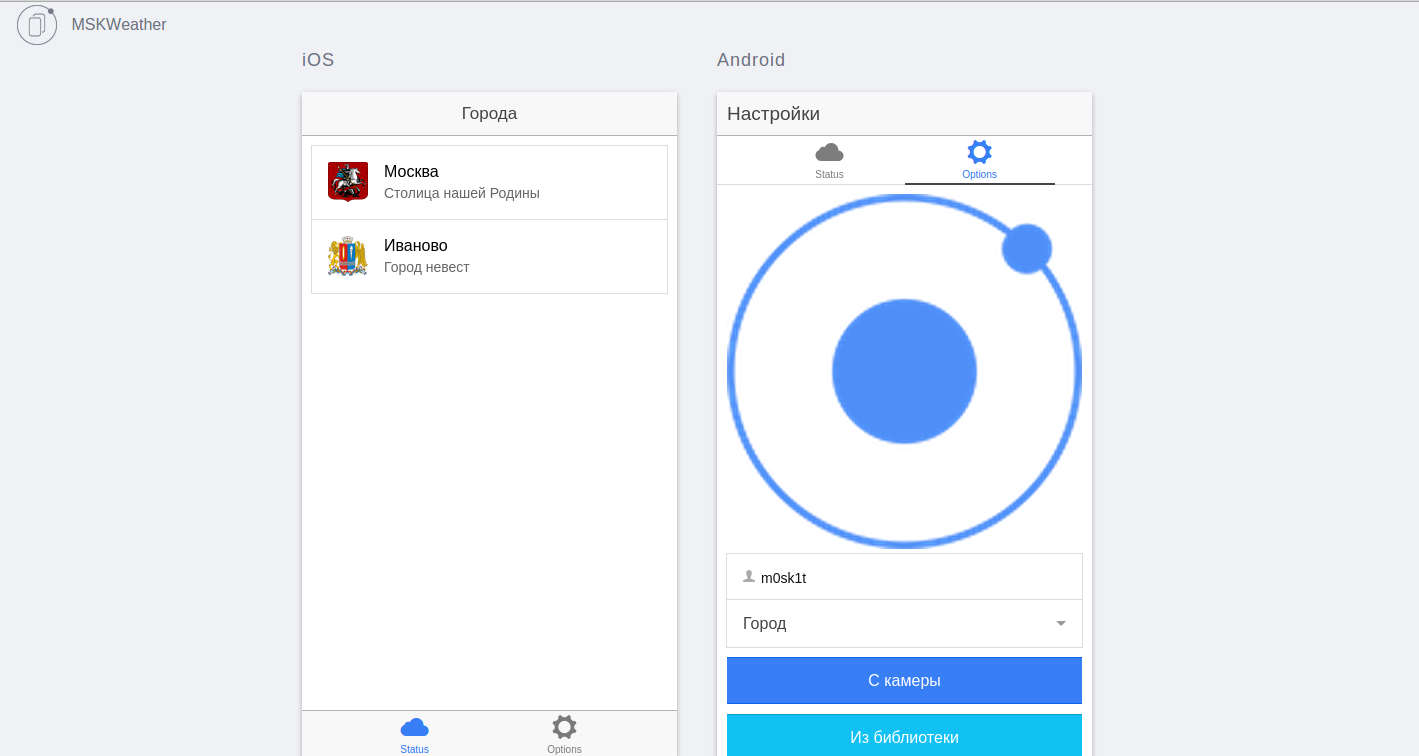
Conclusion
In principle, at the moment, it is becoming more and more convenient to work with IF, so I can safely say that this is one of the best frameworks for prototyping, and even for production applications. Dare! In the next article I want to describe creating a chat using socket.io and working with something else interesting. If you have any difficulties, questions or suggestions for the following articles - you are welcome to BOS!
Source: https://habr.com/ru/post/256387/
All Articles