Unity3d The implementation of visibility and audibility
Good day, Habra.
Today I will talk about how you can implement the system of visibility and hearing for your projects. It turned out something similar to the game Commandos.
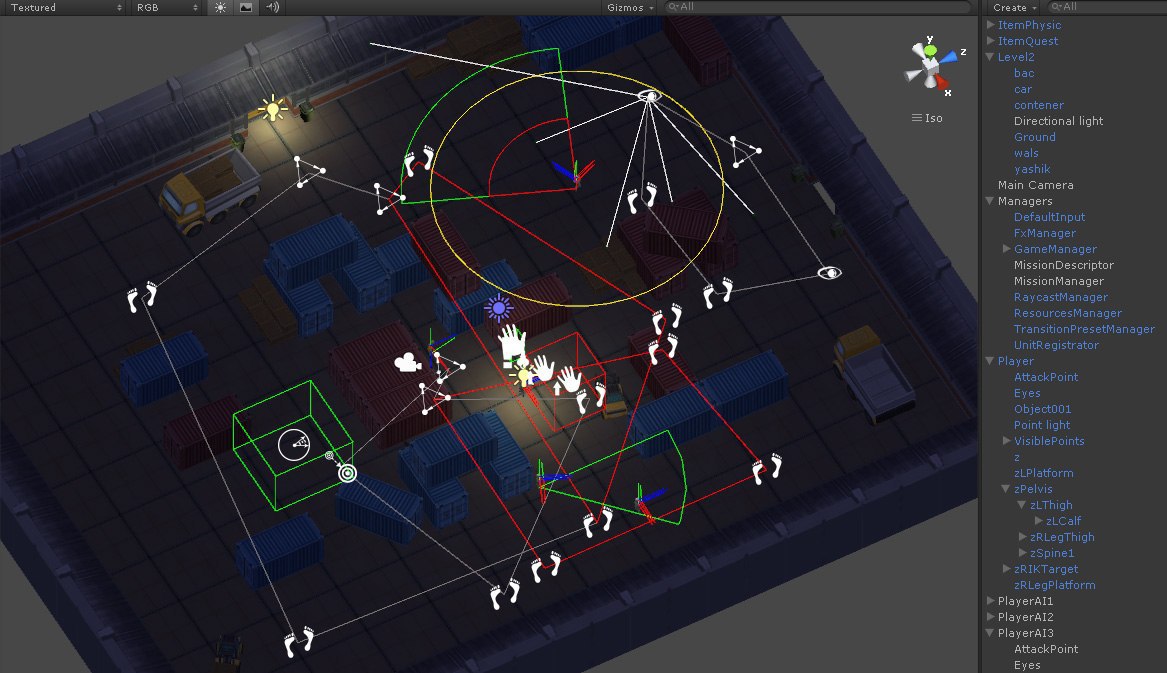
Some screenshots.
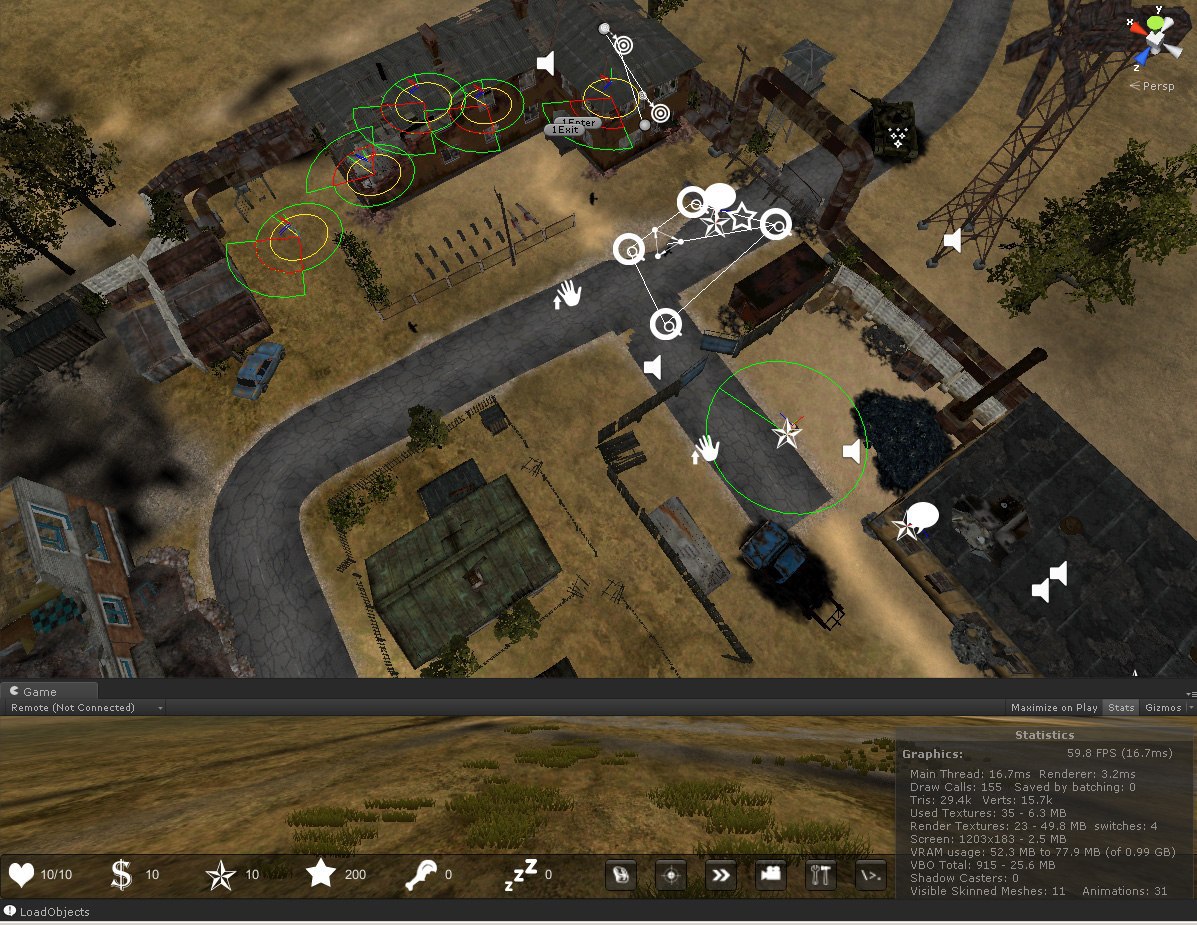
More visibility.
How can I see the object? Options can list many. There are options with visibility by colliders, image analysis through render texture, rays by points, etc. In this example, consider the variant of the rays by points.
Therefore, we need a base class with points for the visibility system.
Now. We need to formulate the requirements for the system of visibility.
Obviously, a unit (no matter what it is, a friend, an enemy, or a video surveillance camera) must have a viewing angle and the distance at which it distinguishes between objects. Nearsighted and far-sighted, too, can be. And the character can, for example, put on glasses and see further. Maybe something to accept and see a little wider side vision. Therefore, the parameters we need are aim, eyes, range and angle of view.
LayerMask - needed for rays. For example, a bullet will react to the window but not the sight. The same with fences or other objects. Consequently, visibility ignores unnecessary or transparent objects. And hiding in the foliage, you can reset the list of visible points. You can also expand or narrow the list of points, depending on the logic of the game itself. For example, camouflage or something else.
')
Here you should pay attention to the condition (hit.collider.gameObject == target). About why it looks like this, it will be clear on the example of use. We poison the desired unit with the system, and check if we can actually see it. That which we want.
There were no tricks with magnitude or angle conversion. Find the scalar product. If 1, then the points are directed in one direction and the angle can be omitted, otherwise we get an angle and check the limits.
With the system of hearing everything is much easier. For any sound, we iterate over all permissible units (omit how it is implemented. The main thing is that in the current zone or the entire location, there is a certain number of units) and transmit the noise point, its radius, and in this case also the type of noise. For example, the sound of a shot and the sound of a falling stone may react differently. It depends on how you implement it.
The audibility system is ready. Go ahead.
Well, as without an example.
We will need a method for obtaining available units. Which in essence will be the entry point.
GetVisibleUnits is the method that will return all visible units to you, and then your immediate logic, what to do about it.
It is worth paying attention. In this example, there are eyes and possible sensors. Sensors can work as you wish, for example, receiving data from a satellite or from surveillance cameras, by smell or something else. We do not consider them in this example.
For an existing system, additionally generate a mesh. So as in the commando it was possible to determine where the enemy is looking. Below is the mesh generation code (Repeating the terrain topology of the task has been moved beyond the current one).
We will not dwell on the details of the code. Here is the usual mesh generation algorithm.
We are coming to an end.
Some things are not considered (Sensors or gizmo in the editor) but you will not be difficult to implement them separately. I hope this article helped you or threw a couple of ideas.
Unity scripting
Today I will talk about how you can implement the system of visibility and hearing for your projects. It turned out something similar to the game Commandos.
Some screenshots.
More visibility.
I see you
How can I see the object? Options can list many. There are options with visibility by colliders, image analysis through render texture, rays by points, etc. In this example, consider the variant of the rays by points.
Therefore, we need a base class with points for the visibility system.
public abstract class UnitBase : GameObjectBase { public List<Transform> visiblePoints; ... } Now. We need to formulate the requirements for the system of visibility.
Obviously, a unit (no matter what it is, a friend, an enemy, or a video surveillance camera) must have a viewing angle and the distance at which it distinguishes between objects. Nearsighted and far-sighted, too, can be. And the character can, for example, put on glasses and see further. Maybe something to accept and see a little wider side vision. Therefore, the parameters we need are aim, eyes, range and angle of view.
public static bool IsVisibleUnit<T>(T unit, Transform from, float angle, float distance, LayerMask mask) where T : UnitBase { bool result = false; if (unit != null) { foreach (Transform visiblePoint in unit.visiblePoints) { if (IsVisibleObject(from, visiblePoint.position, unit.gameObject, angle, distance, mask)) { result = true; break; } } } return result; } LayerMask - needed for rays. For example, a bullet will react to the window but not the sight. The same with fences or other objects. Consequently, visibility ignores unnecessary or transparent objects. And hiding in the foliage, you can reset the list of visible points. You can also expand or narrow the list of points, depending on the logic of the game itself. For example, camouflage or something else.
')
public static bool IsVisibleObject(Transform from, Vector3 point, GameObject target, float angle, float distance, LayerMask mask) { bool result = false; if (IsAvailablePoint(from, point, angle, distance)) { Vector3 direction = (point - from.position); Ray ray = new Ray(from.position, direction); RaycastHit hit; if (Physics.Raycast(ray, out hit, distance, mask.value)) { if (hit.collider.gameObject == target) { result = true; } } } return result; } Here you should pay attention to the condition (hit.collider.gameObject == target). About why it looks like this, it will be clear on the example of use. We poison the desired unit with the system, and check if we can actually see it. That which we want.
public static bool IsAvailablePoint(Transform from, Vector3 point, float angle, float distance) { bool result = false; if (from != null && Vector3.Distance(from.position, point) <= distance) { Vector3 direction = (point - from.position); float dot = Vector3.Dot(from.forward, direction.normalized); if (dot < 1) { float angleRadians = Mathf.Acos(dot); float angleDeg = angleRadians * Mathf.Rad2Deg; result = (angleDeg <= angle); } else { result = true; } } return result; } There were no tricks with magnitude or angle conversion. Find the scalar product. If 1, then the points are directed in one direction and the angle can be omitted, otherwise we get an angle and check the limits.
And now I also hear you
With the system of hearing everything is much easier. For any sound, we iterate over all permissible units (omit how it is implemented. The main thing is that in the current zone or the entire location, there is a certain number of units) and transmit the noise point, its radius, and in this case also the type of noise. For example, the sound of a shot and the sound of a falling stone may react differently. It depends on how you implement it.
public virtual void ApplyNoise(Vector3 target, float radius, NoiseType type) { List<AIHearlingBase> aiObjects = AIManager.Instance.GetAIObjects<AIHearlingBase>(); foreach (AIHearlingBase ai in aiObjects) { if(Vector3.Distance(ai.unit.Position, target) <= ai.hearingRadius + radius) { ai.ApplyHearling(target, type); } } } The audibility system is ready. Go ahead.
An example of using the visibility system
Well, as without an example.
We will need a method for obtaining available units. Which in essence will be the entry point.
public virtual List<T> GetVisibleUnits<T>(Comparer<T> comparer) where T : UnitBase { List<T> result = new List<T>(); foreach (T unit in UnitsManager.Instance.GetUnits<T>()) { if (unit != null && unit != this.unit && unit.enabled && comparer(unit) && IsVisibleUnit(unit)) { result.Add(unit); } } return result; } public virtual bool IsVisibleUnit<T>(T unit) where T : UnitBase { bool result = ViewUtility.IsVisibleUnit(unit, CurrentEyes, visibleAngle, visibleDistance, visibleMask); // SENSORS if (!result) { foreach (AISensorBase sensor in sensors) { if (sensor != null) { if (sensor.DetectTarget<T>(unit)) { result = true; break; } } } } // END SENSORS return result; } GetVisibleUnits is the method that will return all visible units to you, and then your immediate logic, what to do about it.
It is worth paying attention. In this example, there are eyes and possible sensors. Sensors can work as you wish, for example, receiving data from a satellite or from surveillance cameras, by smell or something else. We do not consider them in this example.
Additionally
For an existing system, additionally generate a mesh. So as in the commando it was possible to determine where the enemy is looking. Below is the mesh generation code (Repeating the terrain topology of the task has been moved beyond the current one).
public class FragmentMeshCreator : MeshCreatorBase { public virtual void Create(float angle, float distance, float step = 10f) { List<Vector3> vertices = new List<Vector3>(); List<int> triangles = new List<int>(); List<Vector2> uvs = new List<Vector2>(); Vector3 right = ViewUtility.GetRotation(Vector3.forward, angle) * distance; Vector3 left = ViewUtility.GetRotation(Vector3.forward, angle) * distance; Vector3 from = left; vertices.Add(Vector3.zero); vertices.Add(from); uvs.Add(Vector2.one * 0.5f); uvs.Add(Vector2.one); int triangleIdx = 3; for (float angleStep = -angle; angleStep < angle; angleStep += step) { Vector3 to = ViewUtility.GetRotation(Vector3.forward, angleStep) * distance; // from = to; vertices.Add(from); uvs.Add(Vector2.one); triangles.Add(triangleIdx - 1); triangles.Add(triangleIdx); triangles.Add(0); triangleIdx++; } vertices.Add(right); uvs.Add(Vector2.one); Mesh mesh = new Mesh(); mesh.name = "FragmentArea"; mesh.vertices = vertices.ToArray(); mesh.triangles = triangles.ToArray(); mesh.uv = uvs.ToArray(); mesh.RecalculateNormals(); myMeshFilter.mesh = mesh; } } // public static Vector3 GetRotation(Vector3 forward, float angle) { float rad = angle * Mathf.Deg2Rad; Vector3 result = new Vector3(forward.x * Mathf.Cos(rad) + forward.z * Mathf.Sin(rad), 0, forward.z * Mathf.Cos(rad) - forward.x * Mathf.Sin(rad)); return result; } We will not dwell on the details of the code. Here is the usual mesh generation algorithm.
We are coming to an end.
Some things are not considered (Sensors or gizmo in the editor) but you will not be difficult to implement them separately. I hope this article helped you or threw a couple of ideas.
Links
Unity scripting
Source: https://habr.com/ru/post/256273/
All Articles