Its cloud image storage in 30 minutes
In my line of business, I often have to keep a written report to my customers. And since further productive work with the client often depends on my reporting, I take the creation of reporting documents very seriously . It's no secret that boring monotonous text rarely attracts the attention of the reader, which cannot be said about formatting elements such as lists, tables, and of course images . About them that will be discussed in this article.

For several years of working closely with electronic documents, I came to the conclusion that there is no more effective way to interest the reader than the abundance of various graphs, screenshots and colorful diagrams in the document. The other side of the coin here is the fact that it will take a long time to create such a report, which I could not afford . As a result, I had the need to find high-quality software that would allow me:

I had no difficulties with the first four requirements, but as far as safety and shelf life were concerned, there were often problems. There were cases when graphic documents were indexed by search engines and became publicly available.
')
It is also important for me that customers can view any, even the oldest document at any time from the archive, and software developers keep your screenshots on their server for a limited time, thus you are “ attached ” to one service provider.
At the moment, there is a fairly large number of software that allows you to quickly create and edit screenshots, but I haven’t found an ideal solution for myself.
For a long time I used the most popular programs in runet - Lightshot, Joxi, Clip2net . In terms of speed of creation, they completely suited me, but they have very few tools for editing. Basically it is an opportunity to draw several arrows and put text on the image.
After a long time using various programs, I came across the FastStone Capture software that was ideal for me, which allowed me to quickly take screenshots and besides that I had the broadest toolkit for working with images.
At that time, I did not like only one thing - this program did not have the ability to save images to its cloud servers. Therefore, if it is necessary to promptly send an image to the client, it was necessary to save the image to the desktop and send it by letter.
However, I later turned this disadvantage into an advantage . Customers have repeatedly complained to me that screenshots depicting various graphs and data on their projects are stored on third-party servers, and they often said that after a while the screenshots disappeared somewhere. At that moment I had the idea to store screenshots on my own server with their upload via FTP.
Since the screenshots were viewed not only by me, but also by my clients, I did not treble to store images in this form:

I needed to write a couple of lines of code, and after 30 minutes I had my own image repository, which got there using the FTP protocol. Fortunately, the above program allows you to do this.
To begin, we will need any program that allows you to take screenshots and automatically upload them to your server via FTP. There are a lot of such programs, but I will show the example of FastStone Capture ( download from the official site). I note that I myself have nothing to do with this software, it’s just that its functionality completely suits me. From analogs known to me, I can only mention a couple of programs - Shotnes , JShot .
After installing the program, go to the program settings in the " FTP " tab:
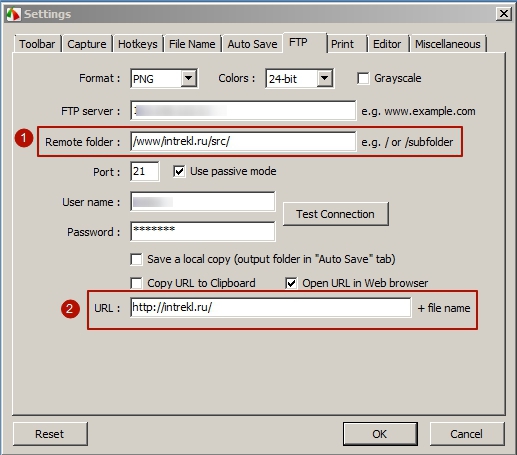
Enter the data for the FTP connection - address, login, password, port, if required , after which we will tick the box " Use passive mode ". For we specify a format of pictures - "PNG".
In order to immediately after downloading the image to the server, the page with it opens automatically - put a tick " Open URL in Web browser ".
Next, go to the most important thing:
1 - specify the download folder - " /www/intrekl.ru/src/ " and
2 - we indicate directly the URL itself, which the program will open in the WEB browser.
I draw your attention to the fact that you need to load images into a separate folder (in my example it is " / src / "), and not to the root of the resource. At the same time, the URL should be opened exactly as I indicated:
Earlier, I already casually mentioned the used domain - " intrekl.ru ", here I would only note that if your customers view your screenshots, then it is better to register some harmonious domain (for example, jpg4me.ru , etc.), in this one guide all the actions I will produce on my test domain intrekl.ru .
Initially, you need to create the following folder and file structure:
I'll start in order, create a .htaccess file. Here, the main task of the file is to configure the server so that any request is redirected to the index.php file. Comments for each action I will give in the code:
Next, create a robots.txt file. Its main task is to prevent search engine robots from indexing our screenshots:
Finally, create the main index.php file.
In the first part of this file, we parse the URL opened in the browser. Extract the name of the file from it and put it into a variable, then check the existence of the file, if there is no such file - we give the 404th error.
I note that in addition to the absence of a file on the server, the reason to give the 404th error is the opening of the main page , this was done to discourage curious search robots, ignoring the ban in the robots.txt file, climb our server.
In the second part of the file, we specify the path to the file with the styles and to the favicon; the $ url_img variable obtained earlier, containing the name of the screenshot, is also used here.
In the third part of the index.php file we place social buttons (I used share.pluso.ru ). In truth, I posted them for the sake of three quick links - send by email, add to bookmarks and send to print :

However, you can customize the set of buttons to your liking.
Next comes the main code: specify the link to the image:
To do this, we use the name of the directory where the images are saved, and the variable already familiar to us that contains the name of the image is $ url_img .
At the end, place a link to insert a screenshot in the forum posts for quick copy:
This completes the work with the index.php file.
Next, create the directory already familiar to us - " / src / ". The screenshots program will automatically upload images to this directory.
Create a directory " / syst / ", there will be files that are responsible for the visual design of our screenshots repository.
In order to improve visual design, we place favicon of our faviconka.ico service in this catalog. Now the name of the page in the browser window will look like this:

Next, transgress the choice of filling the page of our service. I chose the following:
ridge.gif

I found this pattern on the free fills website: www.dinpattern.com
Finally, create a file with styles.css styles .
Specify the previously selected fill pattern, font style and size:
Set the indent for the block with social buttons as well as the alignment and coordinates of the block that contains our screenshot:
Set the shadow and width for all parental block for the screenshot itself:
Finally, we draw up a block with a link to insert a screenshot into the forum posts:

This is where creating your own screenshots repository is complete; if you did everything right, you’ll have something like this:

intrekl.ru/2015-04-20_122621.png
You can download all my sources from Yandex.Disk .
If you have any questions, ask them in the comments, I will be happy to answer.
Formulation of the problem
For several years of working closely with electronic documents, I came to the conclusion that there is no more effective way to interest the reader than the abundance of various graphs, screenshots and colorful diagrams in the document. The other side of the coin here is the fact that it will take a long time to create such a report, which I could not afford . As a result, I had the need to find high-quality software that would allow me:
- one keystroke to take a screenshot of the screen area;
- automatically add image formatting elements (frames, watermarks, fillets);
- complete set of editing tools (arrows, text, shapes, etc.);
- saving, editing, sending to WEB, copying to the buffer in one click ;
- safety ;
- perpetual cloud storage of images.
I had no difficulties with the first four requirements, but as far as safety and shelf life were concerned, there were often problems. There were cases when graphic documents were indexed by search engines and became publicly available.
')
It is also important for me that customers can view any, even the oldest document at any time from the archive, and software developers keep your screenshots on their server for a limited time, thus you are “ attached ” to one service provider.
Variety of software
At the moment, there is a fairly large number of software that allows you to quickly create and edit screenshots, but I haven’t found an ideal solution for myself.
For a long time I used the most popular programs in runet - Lightshot, Joxi, Clip2net . In terms of speed of creation, they completely suited me, but they have very few tools for editing. Basically it is an opportunity to draw several arrows and put text on the image.
After a long time using various programs, I came across the FastStone Capture software that was ideal for me, which allowed me to quickly take screenshots and besides that I had the broadest toolkit for working with images.
At that time, I did not like only one thing - this program did not have the ability to save images to its cloud servers. Therefore, if it is necessary to promptly send an image to the client, it was necessary to save the image to the desktop and send it by letter.
However, I later turned this disadvantage into an advantage . Customers have repeatedly complained to me that screenshots depicting various graphs and data on their projects are stored on third-party servers, and they often said that after a while the screenshots disappeared somewhere. At that moment I had the idea to store screenshots on my own server with their upload via FTP.
Since the screenshots were viewed not only by me, but also by my clients, I did not treble to store images in this form:
I needed to write a couple of lines of code, and after 30 minutes I had my own image repository, which got there using the FTP protocol. Fortunately, the above program allows you to do this.
Create your own cloud image storage
Program setting
To begin, we will need any program that allows you to take screenshots and automatically upload them to your server via FTP. There are a lot of such programs, but I will show the example of FastStone Capture ( download from the official site). I note that I myself have nothing to do with this software, it’s just that its functionality completely suits me. From analogs known to me, I can only mention a couple of programs - Shotnes , JShot .
After installing the program, go to the program settings in the " FTP " tab:
Enter the data for the FTP connection - address, login, password, port, if required , after which we will tick the box " Use passive mode ". For we specify a format of pictures - "PNG".
In order to immediately after downloading the image to the server, the page with it opens automatically - put a tick " Open URL in Web browser ".
Next, go to the most important thing:
1 - specify the download folder - " /www/intrekl.ru/src/ " and
2 - we indicate directly the URL itself, which the program will open in the WEB browser.
I draw your attention to the fact that you need to load images into a separate folder (in my example it is " / src / "), and not to the root of the resource. At the same time, the URL should be opened exactly as I indicated:
"http://intrekl.ru/" + Work on the server
Earlier, I already casually mentioned the used domain - " intrekl.ru ", here I would only note that if your customers view your screenshots, then it is better to register some harmonious domain (for example, jpg4me.ru , etc.), in this one guide all the actions I will produce on my test domain intrekl.ru .
Initially, you need to create the following folder and file structure:
/ .htaccess robots.txt index.php /src/ 2015-04-19_112350.png 2015-04-19_135632.png ... /syst/ style.css ridge.gif faviconka.ico .htaccess
I'll start in order, create a .htaccess file. Here, the main task of the file is to configure the server so that any request is redirected to the index.php file. Comments for each action I will give in the code:
# RewriteEngine On # URL RewriteBase / # , robots.txt RewriteCond %{REQUEST_FILENAME} !\.ico|\.txt|\.css # index.php RewriteRule .* index.php [L,QSA] robots.txt
Next, create a robots.txt file. Its main task is to prevent search engine robots from indexing our screenshots:
# , Disallow User-agent: * # Disallow: / index.php
Finally, create the main index.php file.
In the first part of this file, we parse the URL opened in the browser. Extract the name of the file from it and put it into a variable, then check the existence of the file, if there is no such file - we give the 404th error.
<? // URL , trim $url_img = trim(parse_url($_SERVER['REQUEST_URI'], PHP_URL_PATH), ' /'); // $filename = dirname(__FILE__).'/src/'.$url_img; // , If (!file_exists($filename) or $_SERVER['REQUEST_URI'] == '/') { // - 404- header("HTTP/1.1 404 Not Found"); header("Status: 404 Not Found"); echo " "; die(); } ?> I note that in addition to the absence of a file on the server, the reason to give the 404th error is the opening of the main page , this was done to discourage curious search robots, ignoring the ban in the robots.txt file, climb our server.
In the second part of the file, we specify the path to the file with the styles and to the favicon; the $ url_img variable obtained earlier, containing the name of the screenshot, is also used here.
<!DOCTYPE html> <html> <head> <title> - <? echo $url_img ?></title> <link rel="stylesheet" href="/syst/style.css" type="text/css" /> <link rel="icon" href="syst/faviconka.ico" type="image/x-icon" /> </head> <body> In the third part of the index.php file we place social buttons (I used share.pluso.ru ). In truth, I posted them for the sake of three quick links - send by email, add to bookmarks and send to print :
However, you can customize the set of buttons to your liking.
Next comes the main code: specify the link to the image:
<img class="img_thumb" src="src/<? echo $url_img ?>" /> To do this, we use the name of the directory where the images are saved, and the variable already familiar to us that contains the name of the image is $ url_img .
<div id="wrapper"> <div id="social"> <!-- --> <script type="text/javascript"> (function() { if (window.pluso)if (typeof window.pluso.start == "function") return; if (window.ifpluso==undefined) { window.ifpluso = 1; var d = document, s = d.createElement('script'), g = 'getElementsByTagName'; s.type = 'text/javascript'; s.charset='UTF-8'; s.async = true; s.src = ('https:' == window.location.protocol ? 'https' : 'http') + '://share.pluso.ru/pluso-like.js'; var h=d[g]('body')[0]; h.appendChild(s); }})(); </script> <div class="pluso" data-background="transparent" data-options="big,round,line,horizontal,counter,theme=04" data-services="vkontakte,odnoklassniki,facebook,twitter,google,moimir,linkedin,email,bookmark,print"></div> </div> <div id="img_box"> <!-- --> <a href="src/<? echo $url_img ?>"> <!-- --> <img class="img_thumb" src="src/<? echo $url_img ?>" /> </a> </div> </div> At the end, place a link to insert a screenshot in the forum posts for quick copy:
<div id="texts"> <ul> <li> <span> :</span><br /> <span>[IMG]http://intrekl.ru/src/<? echo $url_img ?>[/IMG]</span> </li> </ul> </div> </body> </html> This completes the work with the index.php file.
/ src /
Next, create the directory already familiar to us - " / src / ". The screenshots program will automatically upload images to this directory.
/ syst /
Create a directory " / syst / ", there will be files that are responsible for the visual design of our screenshots repository.
faviconka.ico
In order to improve visual design, we place favicon of our faviconka.ico service in this catalog. Now the name of the page in the browser window will look like this:
ridge.gif
Next, transgress the choice of filling the page of our service. I chose the following:
ridge.gif
I found this pattern on the free fills website: www.dinpattern.com
style.css
Finally, create a file with styles.css styles .
Specify the previously selected fill pattern, font style and size:
body { font-family: Arial,Helvetica,sans-serif; background: url("ridge.gif") repeat scroll 0% 0% #241D1E; font-size: 11px; } #wrapper {margin: 0; padding: 0; width: 100%;height: 100%;} Set the indent for the block with social buttons as well as the alignment and coordinates of the block that contains our screenshot:
#social { margin: 15px; } #img_box { position: absolute; top: 60px; left: 0px; right: 0px; bottom: 40px; margin: 15px; text-align: center; } Set the shadow and width for all parental block for the screenshot itself:
.img_thumb { max-width: 100%; max-height: 100%; vertical-align: middle; box-shadow: 0px 0px 9px rgba(0, 0, 0, 0.30); } Finally, we draw up a block with a link to insert a screenshot into the forum posts:
#texts { box-shadow: 0px 2px 10px rgba(0, 0, 0, 0.30); background: none repeat scroll 0% 0% #F7F7F7; display: block; margin-top: 15px; position: absolute; bottom: 0px; left: 0px; right: 0px; height: auto; width: 25%; } This is where creating your own screenshots repository is complete; if you did everything right, you’ll have something like this:
intrekl.ru/2015-04-20_122621.png
You can download all my sources from Yandex.Disk .
If you have any questions, ask them in the comments, I will be happy to answer.
Source: https://habr.com/ru/post/256183/
All Articles