Intel Edison. First start
Last year, at CES 2014, Intel introduced the Linux Edison mini-computer for the Internet of Things. You can read briefly about the announcement of Intel Edison here . The Internet of Things is the absolute trend of this year. Now, not only a home computer, tablet, or smartphone can connect to the Internet. But the usual household things that we use every day. Intel Edison, not the company's response to the Raspberry Pi, but a new niche of miniature energy-efficient computers, in a module form factor. Any developer can take such a module, add various sensors, mechanics, and interactive tools to it, and get a new device.
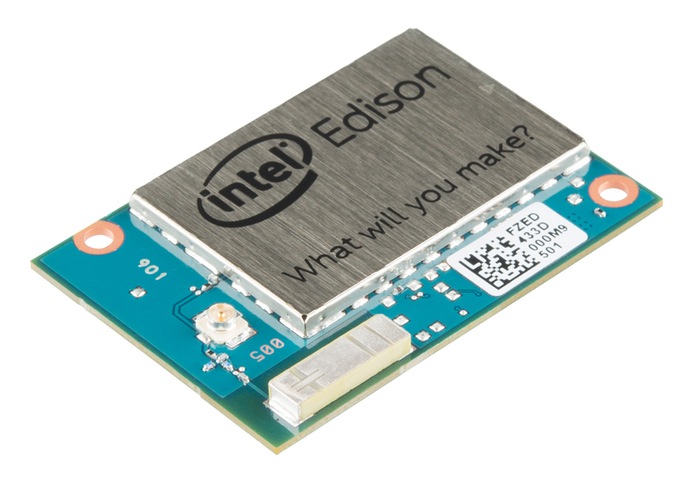
Intel Edison - a mini-computer with Linux on board, the basis for building a new world of things based on networking with each other.
')
Intel Edison Module Specification
- Processor: SoC "Tangier", includes two cores Intel Atom (Silvermont) processor (22nm) processor @ 500 MHz and 32-bit Intel Quark micro-controller @ 100 MHz
- RAM: 1 GB LPDDR3 (PoP memory) - 2 channel 32bits @ 800MT / sec
- User memory: 4 GB eMMC (v4.51 spec) + micro SD card slot
- Network: 802.11 a / b / g / n Wi-Fi (supporting 5 GHz, Broadcom 43340 chip) with built-in antenna or external, and Bluetooth 4.0
- USB: one micro USB connector
- Programmable contacts:
- 2x UART (1 full flow control, 1 Rx / Tx)
- 2x I2C, 1x SPI with 2 chip selects
- 1x I2S
- 12x GPIO including 4 PWM pins
- Connection of peripheral modules: 70-pin connector (Hirose DF40 series - 1.5, 2.0, or 3.0 mm stack height)
- Power supply: input from 3.3 to 4.5 V; output: 100mA @ 3.3V and 100 mA @ 1.8V
- Power Modes: Standby (no radio): 13 mW; standby (Bluetooth 4.0): 21.5 mW (BLE in Q4 2014); Standby (Wi-Fi): 35 mW.
- Dimensions: 35.5 × 25.0 × 3.3 mm
- Operating temperature range: 0 to 40 ° C
For the convenient development of their devices based on Edison, Intel prepared the Intel Edison Board for Arduino . Links to stores to purchase Intel Edison with Arduino Breakout Kit, at the end of the post.
Intel Edison Board for Arduino
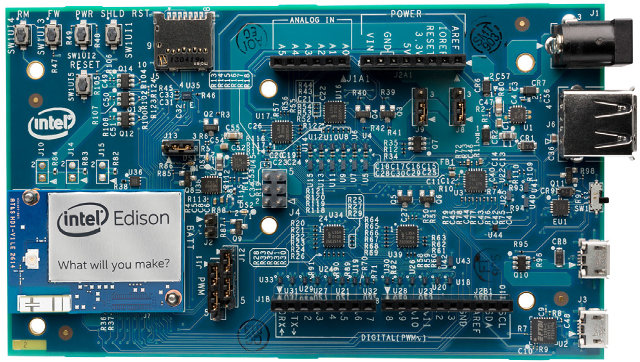
Contains:
- 20 digital input / output contacts, including 4 PWM output contacts
- 6 analog input pins
- 1 UART (RX / TX)
- 1 I2C
- 1 ICSP 6-pin header (SPI)
- Micro USB connector or (using a switch on the board) dedicated standard USB host Type-A
- Micro USB connector (for UART)
- SD Card Slot
- Standard DC power jack (7V - 15V DC input)
Software
Intel Edison includes the Intel Atom, which runs under Linux version Yocto 1.6, and Quark MCU under ViperOS (a truncated version of Wind River VxWorks). The developer’s tools include the Arduino IDE, Eclipse with C, C ++ support, Python support, and Intel XDK for Node.JS and HTML5 developers. Sufficient rich set of development tools.
General Development Toolkit
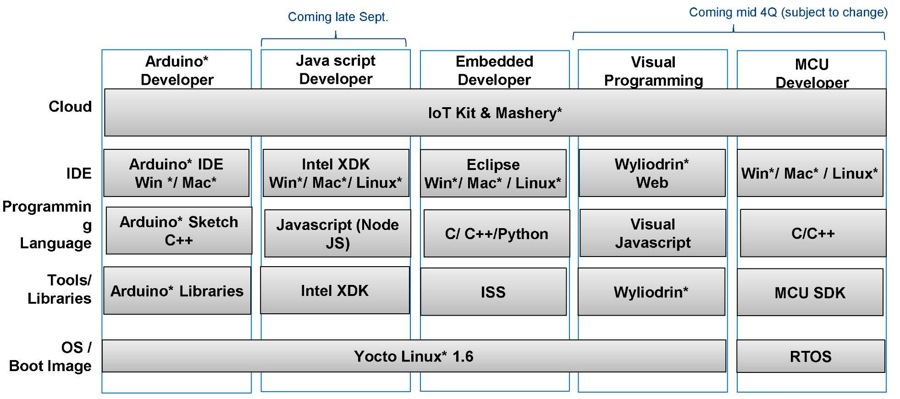
Poster showing the Intel Edison software stack
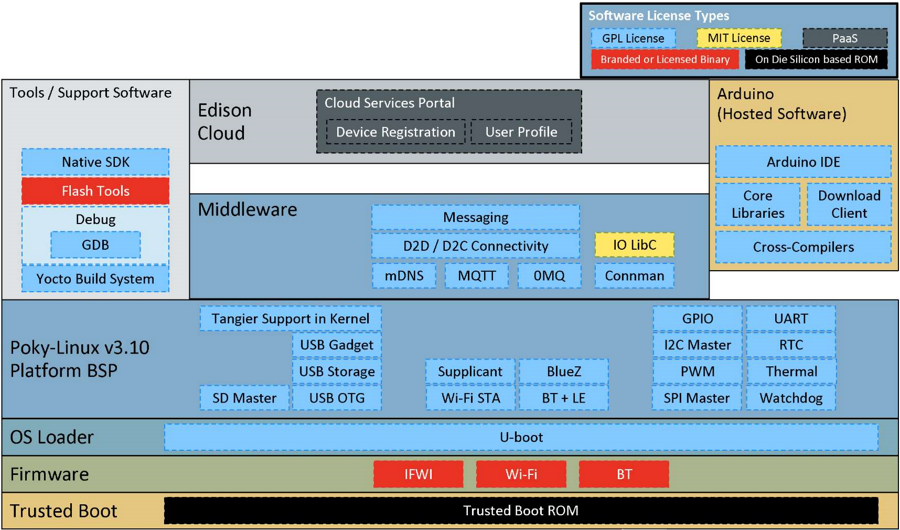
OS Boot: U-Boot version (2nd stage bootloader in source)
Kernel / BSP: Yocto Linux 1.6, Linux kernel v3.10.17
Native SDK: compilation (GCC 4.8.2), GLIB 2.38.2, debugging GDB 7.6.2
Developer Tools: Arduino IDE, Node.js (Supported by Intel® XDK), Python (This package is part of BSP)
WLAN / BT Interfaces (BCM43340): WiFi STA and BT + LE binary files, source code available for BRCM kernel drivers and WiFi Supplicant (+ BlueZ)
Cross-platform interaction: D2D and D2C (Networking, Messaging, privacy / security)
Cloud: Web portal, identity management, user profile, device registration, data download from the device and visualization.
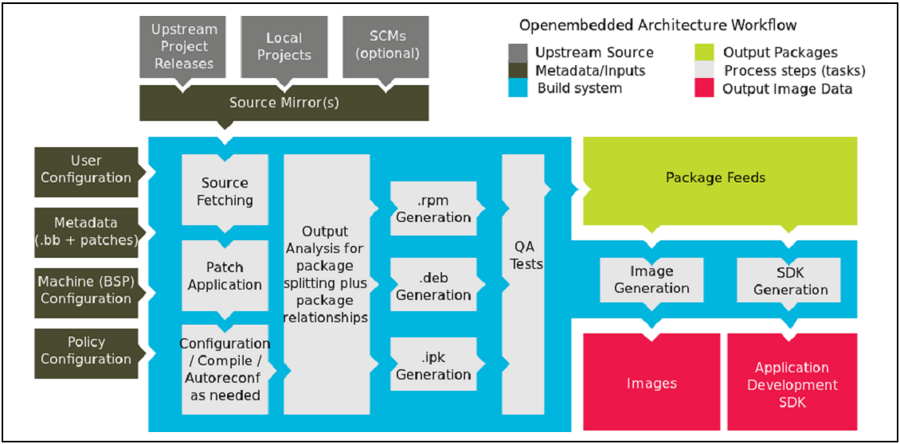
Yocto Project for Intel Edison
The Yocto Project is an open source project whose goal is to simplify the development of special Linux distributions for embedded systems and ensure their portability between different platforms.
Manual Intel Edison Board Support Package is designed for engineers who collect their images (images), kernels, develop low-level code.
Precompiled BSP images are available on the Intel website. Intel Edison BSP supports the following features:
- Image core is based on Linux kernel 3.10.17
- U-boot support, as the second OS boot method
- U-boot second stage bootloader
- Bluetooth and Wi-Fi
- Work with Intel Cloud
- Packages available as part of the Yocto project
Used in Intel Edison, the standard Linux OS is based on Yocto.
Build the image
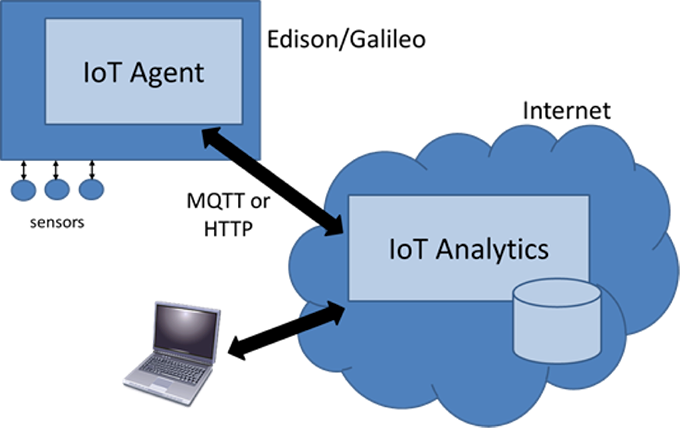
Intel IoT Analytics Platform (Beta)
To work with Edison and Galileo devices, Intel introduced a cloud-based service that works on the principle of Machine-to-Cloud. For data transfer protocols are used: HTTP and MQTT. Cloud service provides:
- Transferring data to remote servers from a device
- Data storage
- Data processing by its algorithms
- Formation of events and alerts
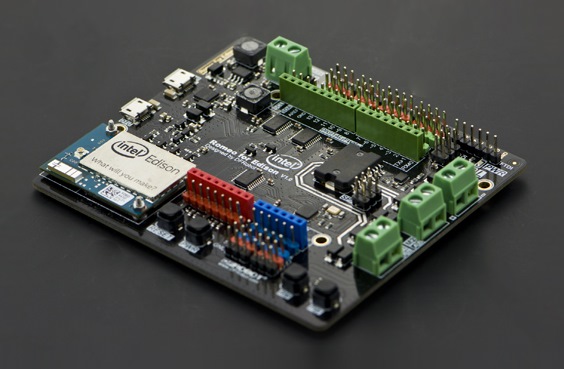
Expansion Boards for Intel Edison
According to Edison specifications, DFRobot.com for Intel Edison has developed a special Romeo platform for Edison Controller (With Intel Edison) . The platform is designed to build a robot, on the board already integrated engine drivers, servo drives.
Programming in the Arduino environment. First start
The fastest familiarization with Edison will be to work with the module as with an Arduino compatible card. The development of the code is carried out in the already familiar native IDE environment for Arduino. But in the base environment downloaded from the arduino.cc website there will be no module for working with Intel Edison. Therefore, the driver and environment must be downloaded from the Intel site .
- Windows driver
- Arduino Software 1.5.3 - Intel 1.0.4 software
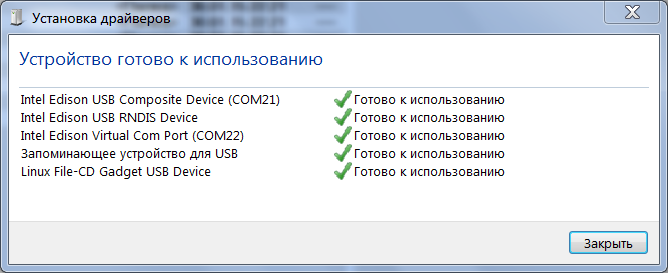
We connect Intel Edison Board using J16 connector to PC, and install drivers. After installing the drivers, this window should appear:
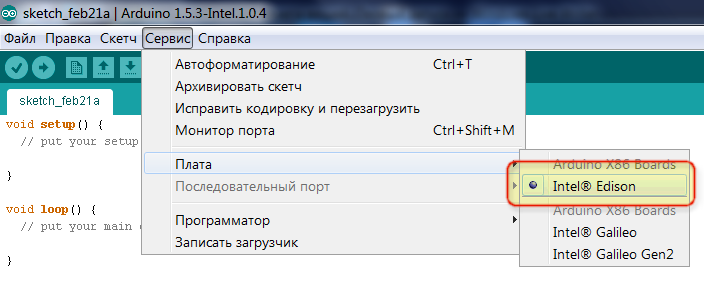
Launch IDE Arduino. After starting, you must select a board. Service-> Board -> Intel Edison menu
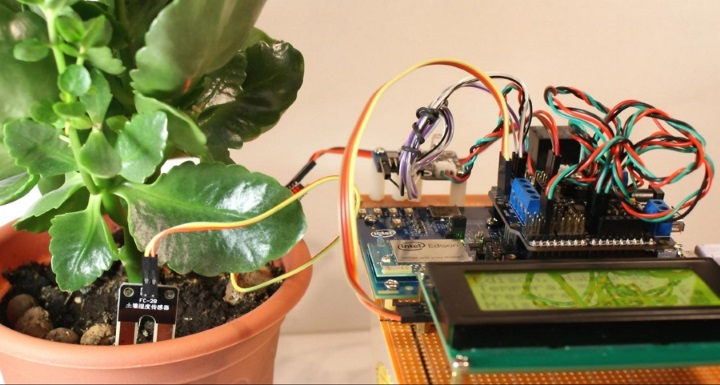
Demonstration of work
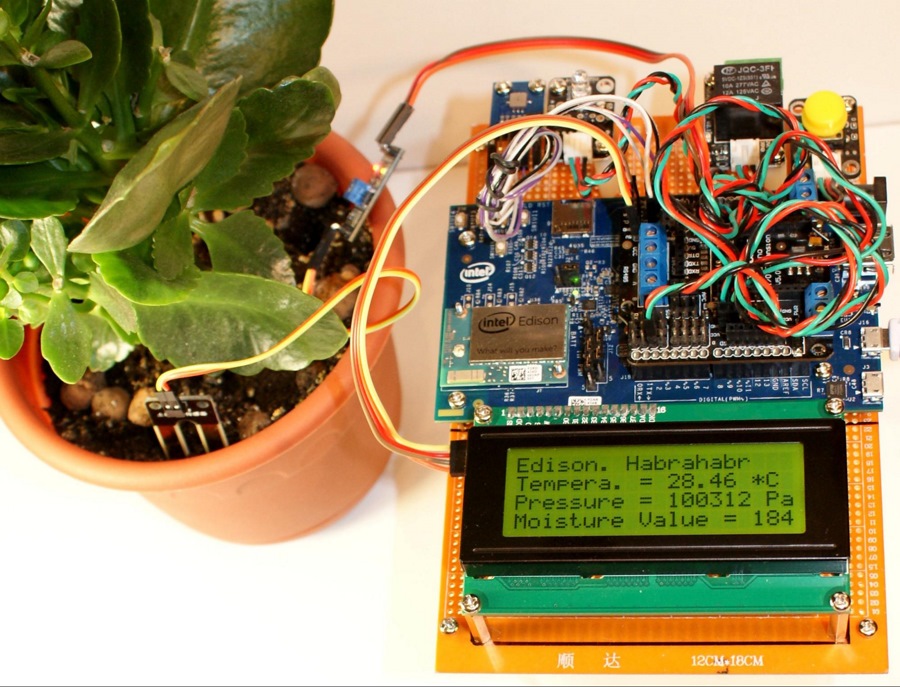
A small demonstration stand was assembled for work. To demonstrate how Intel Edison works like an Arduino, use:
- sensor BMP085 - measurement of temperature, pressure, height above sea level
- soil moisture sensor - done by measuring the resistance of the environment
- GY-IICLCD GY-LCD-V1 display with PCF8574T chip - four-line, on I2C
Environment for soil moisture sensor, flower pot with Kalanchoe kalandive .
It is required to periodically measure the level of soil moisture, ambient temperature, pressure and display values on the display.
For more convenient connection of buttons, LCD, relay, LED, IO Expansion Shield for Arduino is used .
Wiring diagram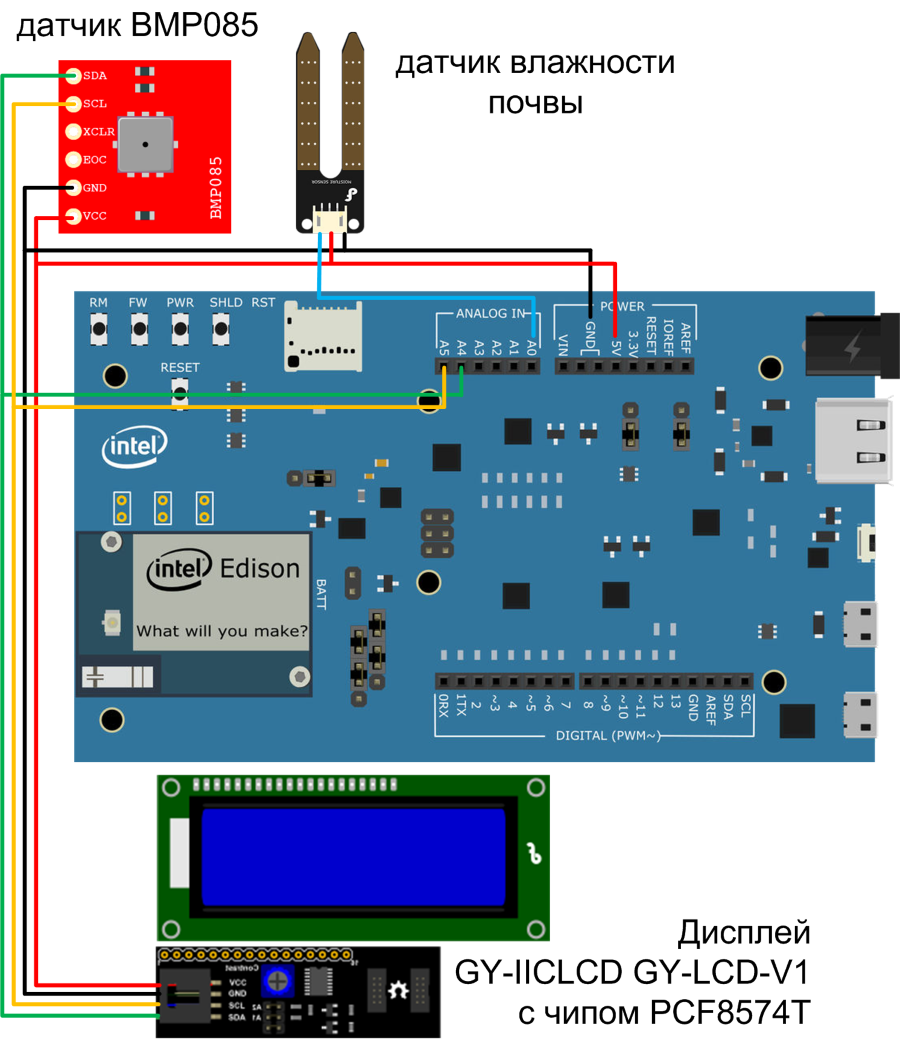
Soil moisture sensor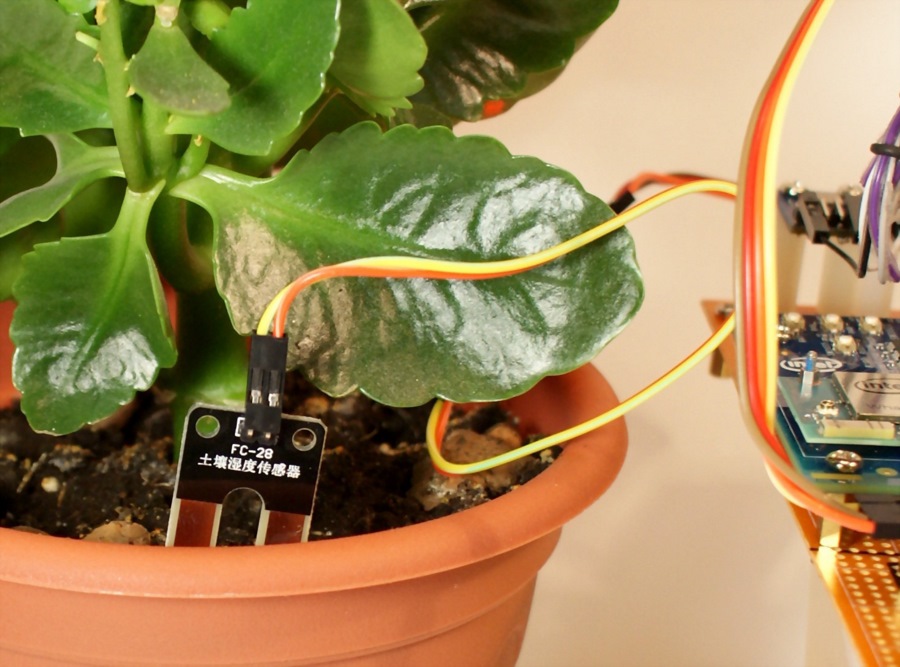
Demonstration stand with a flower
Sketch arduino code
Sketch arduino code
//LCD #include <Wire.h> #include <LCD.h> #include <LiquidCrystal_I2C.h> #define LCD_I2C_ADDR 0x20 // Define I2C Address where the PCF8574T is #define BACKLIGHT 7 #define LCD_EN 4 #define LCD_RW 5 #define LCD_RS 6 #define LCD_D4 0 #define LCD_D5 1 #define LCD_D6 2 #define LCD_D7 3 LiquidCrystal_I2C lcd(LCD_I2C_ADDR,LCD_EN,LCD_RW,LCD_RS,LCD_D4,LCD_D5,LCD_D6,LCD_D7); //BMP085 Barometric Pressure & Temp Sensor #include <Wire.h> #include <Adafruit_BMP085.h> Adafruit_BMP085 bmp; // void setup() { bmp.begin(); //init LCD lcd.begin (20,4); lcd.setBacklightPin(BACKLIGHT,NEGATIVE); // init the backlight lcd.setBacklight(HIGH); // Backlight on lcd.home (); // go home lcd.setCursor ( 0, 0 ); lcd.print("Edison. Habrahabr"); } void loop() { lcd.setCursor ( 0, 1 ); lcd.print("Tempera. = "); lcd.print(bmp.readTemperature()); lcd.print(" *C"); // lcd.setCursor ( 0, 2 ); lcd.print("Pressure = "); lcd.print(bmp.readPressure()); lcd.print(" Pa"); // lcd.setCursor ( 0, 3 ); lcd.print("Moisture Value = "); lcd.print(analogRead(0)); // delay(1500); // wait for a second } Video
Special features
Despite the Arduino compatibility of Intel Edison software, it’s not always possible to transfer the code to Arduino directly without changes. There are no problems with elementary functions, for example, sending a logical “1” or “0”, PWM, analog reading or writing, working with a Serial LCD. The code for modules running on the I2C and SPI interfaces has to be corrected. To start the LCD and the pressure sensor had a little "pokolovat"
Instructions on how to run a GY-IICLCD GY-LCD-V1 display with a PCF8574T chip on I2C
1) Along the path arduino-1.5.3-Intel.1.0.4 \ libraries, delete the folder LiquidCrystal, then it will be replaced
2) The display function requires the Malpartida's NewLiquidCrystal library library .
3) In the archive, the LiquidCrystal folder must be copied to arduino-1.5.3-Intel.1.0.4 \ libraries
4) For reference Communities.intel.com. How to interface a i2c LCD to Galileo i2c port. In the LiquidCrystal folder, the file is FastIO.cpp. find the line #include “FastIO.h” and add #define _BV (i) (1 << i) below it .
5) In this folder LiquidCrystal, delete the file LiquidCrystal.cpp, otherwise errors will be poured
6) The display will now work
Instructions on how to run the BMP085 sensor on I2C
1) For reference Communities.intel.com. BMP085 Library Error
2) Follow the instructions recommended in the forum thread or immediately download the modified gustafn / Adafruit-BMP085-Library · GitHub library
3) Be sure to rename the Adafruit-BMP085-Library library folder, be it a shorter example of AdaBMP085 , otherwise the Arduino IDE will complain that there are problems with the ASCII name.
4) Sensor will now work
To solve problems with connecting the sensor, you first need to look at communities.intel.com .
As expected, the connection of the standard two-line HD44780 display on I2C with PCF8574 using the standard library was not successful.
Libraries for connecting color LCD TFT 1.8 ", such as in the post https://learn.adafruit.com/1-8-tft-display , Adafruit_ST7735 library and Adafruit GFX Library , did not work.
Let's summarize. Some incompatibility with Arduino code is explained by the fairly recent appearance of Intel Edison, and developers have not yet had time to completely complete the work on the libraries. The Arduino project, this year marks its anniversary, 10 years have passed since the creation of the first Arduino. Arduino support is rather dictated by a more familiar and convenient development tool for most geeks. The strength of Intel Edison, in addition to the rich technical characteristics, is well-developed software support. Each developer using free tools can build his BSP Linux image based on the Yocto Project. Given the high performance of the module and a large number of already developed projects for Linux, the developer has ample opportunities to use this module. At the moment, code execution in C ++, Python, Node JS is provided. Upload code under Node JS can be removed, unlike Arduino, which is very convenient for the developer.
The next article will be devoted to the interaction of Intel Edison with the cloud service Intel IoT Analytics Cloud. What opportunities the cloud provides developers and end users.
While the article was being prepared, an interesting project was discovered. In geeks, there is a rather specific competition that involves launching a Doom game on a wide variety of devices, including printers. So at the end of last year, the Hackers played Doom on a printer. Now it's Intel Edison, Edidoom project, with a bluetooth gamepad support.
Links
Addition. Intel Edison Board for Arduino technical specification (translation from Intel Edison Board for Arduino Hardware Guide)
The contact pad complies with the Arduino Uno specification, provides connection of standard extension boards (Shield board).
Pulse width modulation ( PWM, eng. Pulse- width modulation (PWM))
Unlike the Arduino UNO, where 6 PWM pins are available, only 4 of the 6 available pins can be used on the Intel Edison Board.
The output frequency PWM and the fill factor can be determined by the formula:
Jumpers (jumpers) J11 and J12 are responsible for switching. More details on pages 15-16
Analog-to-digital converter ( ADC, English Analog-to-digital converter, ADC )
As an ADC, an ADS7951 A / D microcircuit is used, with the following characteristics:
Voltage ranges from 0 to 2.5 V or from 0 to 5 V, adjustable with a jumper (AREF or IOREF jumper on the J8 board)
USB interface
The board has three USB 2.0 ports. Port J3 is used as a UART interface. Port J16 is in device mode. Port J6 works in hub mode (host port, for connecting external devices). But ports J16 and J6 cannot work simultaneously; switch SW1 is used to switch the port. To enable the J6 USB HUB port, you need to move the switch towards this port. Otherwise, port J16 will be used, and Intel Edison will work as a USB device.
When switching the mode of operation of Intel Edison as USB HUB, external power must be supplied.
Power supply
Intel Edison is specifically designed for low power consumption. With an average load, the power supply usually does not exceed 200 mA, in the case of using Wi-Fi, the consumption increases to 430 mA. The Intel Edison Board for Arduino can operate from a USB port (in device mode) or from an external power source from 7 to 15 V.
For a low-power project, you can connect a Li-ion battery (Li-ion) (3.0 to 4.3 Vmax) to the J2 connector. In this mode, 3.3 V voltage will be applied to the expansion boards and the maximum current will be 100 mA.
More details on pages 17-20
Indicators (LEDs)
There are 3 indicators on the board:
Buttons
System reset - SW1UI5 button. A full reboot of Intel Edison, including all connected bleed.
Reset expansion card (Shield reset) - button SW1UI1. Reset the expansion board (Shield board), while the computational operations of Intel Edison are not interrupted.
Power supply (Power button) - SW1UI2 button. Pressing it once will put Intel Edison into sleep mode (low power consumption). Press again to turn off the module completely.
Buy
You can buy Intel Edison in stores:
Or in more accessible Chinese:
Pulse width modulation ( PWM, eng. Pulse- width modulation (PWM))
Unlike the Arduino UNO, where 6 PWM pins are available, only 4 of the 6 available pins can be used on the Intel Edison Board.
The output frequency PWM and the fill factor can be determined by the formula:
- Specified frequency ~ = 19.2 MHz * Base_unit value (set value) / 256
- PWM ~ = PWM_on_time_divisor / 256 fill ratio
Jumpers (jumpers) J11 and J12 are responsible for switching. More details on pages 15-16
Analog-to-digital converter ( ADC, English Analog-to-digital converter, ADC )
As an ADC, an ADS7951 A / D microcircuit is used, with the following characteristics:
- 12-bit A / D
- 8 channels
- 1 MHz sampling rate
- 70 SNR, dB
Voltage ranges from 0 to 2.5 V or from 0 to 5 V, adjustable with a jumper (AREF or IOREF jumper on the J8 board)
USB interface
The board has three USB 2.0 ports. Port J3 is used as a UART interface. Port J16 is in device mode. Port J6 works in hub mode (host port, for connecting external devices). But ports J16 and J6 cannot work simultaneously; switch SW1 is used to switch the port. To enable the J6 USB HUB port, you need to move the switch towards this port. Otherwise, port J16 will be used, and Intel Edison will work as a USB device.
When switching the mode of operation of Intel Edison as USB HUB, external power must be supplied.
Power supply
Intel Edison is specifically designed for low power consumption. With an average load, the power supply usually does not exceed 200 mA, in the case of using Wi-Fi, the consumption increases to 430 mA. The Intel Edison Board for Arduino can operate from a USB port (in device mode) or from an external power source from 7 to 15 V.
For a low-power project, you can connect a Li-ion battery (Li-ion) (3.0 to 4.3 Vmax) to the J2 connector. In this mode, 3.3 V voltage will be applied to the expansion boards and the maximum current will be 100 mA.
More details on pages 17-20
Indicators (LEDs)
There are 3 indicators on the board:
- DS1 is a working status indicator. On when Intel Edison is running, and off when the RESET_OUT processor is restarted # low
- DS2 is a standard indicator for Arduino boards. It corresponds to 13 digital contacts. Direct access from Arduino code.
- DS3 - battery charging indicator. Enabled while charging the connected battery.
Buttons
System reset - SW1UI5 button. A full reboot of Intel Edison, including all connected bleed.
Reset expansion card (Shield reset) - button SW1UI1. Reset the expansion board (Shield board), while the computational operations of Intel Edison are not interrupted.
Power supply (Power button) - SW1UI2 button. Pressing it once will put Intel Edison into sleep mode (low power consumption). Press again to turn off the module completely.
Buy
You can buy Intel Edison in stores:
Or in more accessible Chinese:
Table of contents
Source: https://habr.com/ru/post/256089/
All Articles