Develop a simple game in the game maker. Episode 0. First lines

If you like games, no doubt wondered how they are made. If you have (or will) a desire to make games, but no experience, in this article I will tell you how to get started.
I would like to talk about the Game Maker game engine and post several posts in which we will write a clone of a non-complicated game, for example, Plants vs Zombies. Perhaps we will add support for the gamepad and make, for example, the Android version.
The source codes will be open, but the graphics, if there is no one who wants to draw it for free and share it with the community, will be bought on GraphicRiver and will not be distributed for obvious reasons with the game. Well, the game will not have an abundance of animations either.
')
Introduction
Game Maker is an incredibly simple game engine that allows you to create games for a large number of platforms - Windows, Mac OS X, Ubuntu, Android, iOS, Tizen, Windows Phone, Windows 8, PlayStation 3, PS 4, PS Vita, Xbox One and HTML 5. There is support for SteamWorks. If your game succeeds, porting to another platform will not be a difficult task.
The speed of development, even with modest knowledge and minimal motivation, is subjectively faster than on other engines. Installation and setup for beginners is as simple as possible and does not require special knowledge. Compiling for other platforms does not require changing the game code and is done with one click (well, almost).
YoYoGames - the company that created Game Maker, was recently acquired by Playtech, which makes sure that Game Maker will continue to evolve. The announced Game Maker 2.0 will probably be even more friendly and simple, and it is also logical to assume that it will have even more features. As they say in a press release, GM 2.0 is one of the reasons for buying the company.
In this article I will briefly talk about Game Maker and we will make a simple sketch of the future project.
For whom is this engine and for what purpose can it be used?
For all. The goal is any 2D game. However, for those for whom programming is not a native element, as well as for rapid prototyping and creating a game with minimal effort for anyone who wants to make games and / or make money on them, Game Maker is ideal.
Pros Game Maker
- simple entry;
- familiar to all in Java / C / C # ... syntax;
- the possibility of easy compilation on different platforms;
- active community, which for many years has already solved many problems and wrote the code for you;
- standard functionality, thanks to which you do not need to write a large amount of code yourself;
- extensibility through extensions;
- Help (F1) is very simple and convenient with excellent explanations and examples.
Cons of game maker
- paid (when you grow up to the publication of the game, you have to buy a license);
- there is no auto substitution of user variables, only for standard and scripts;
- the high cost of the maximum license (however, not all need all the modules directly);
- technical support (twice applied to technical support, they did not answer me faster than in 2 weeks);
- there is no possibility of autoreflection.
Now to the creation of the game. I think installing Game Maker and creating an empty project is not a problem. In general, for the beginning it would be good to think over all the functionality, draw the schematics, think over the monetization, etc., but this is not the purpose of the article, so I will show you a way to create a project for a novice game developer.
Let's briefly go over the project structure:
- Sprites - folder with sprites (images, animations);
- Objects - objects with their own prepared events (for example, creation, drawing, clicking, etc.);
- Rooms - game rooms (screens). For each screen you need to make your room. Very comfortably;
- Background - backgrounds that can fill the room. Also used as tile set.
The rest does not interest us yet.
What is a sprite in Game Maker?
This is the image / animation used in the game. They have their own mask, the shape and size of which can be changed. A mask is an image area that responds to object collision events (if this sprite is assigned to an object), and clicks on it. You can set the draw point (Origin) - for example, from the center, corner or any other point.
You can also set a texture group for the sprite. It is necessary to optimize the rendering (for example, there is no need to keep in memory the texture pages with images that are used on the menu screen when we now have a game screen). For each Texture Group, you can specify the platform on which they will act. For example, for Android, you can have less detailed images than for Windows 8 tablets.
What is an object in Game Maker?
This is a description of an entity with its own methods (functions). Each object draws itself (unless otherwise specified), reacts to standard events - keystrokes, clicks on sprites, etc ... By analogy with OOP, this is a class (class).
What is an instance in Game Maker?
If an object is just a description of an entity, then an instance is an instance of an object, its implementation in the game itself. Having created an instance, you give it life and now all the events that are described in the object will begin to react.
By analogy with OOP, this is an object.
The first thing to do is create a new room (in the left pane, right click on Rooms - Create Room). Let's call it rm_game. Set the window size in the Settings tab - Width - 800, Height - 480, Speed - 60. Ie our game will take place in a 800x480 window, fps will not exceed and aim for 60 frames. Save, close.
Add some sprites. Right-click on the folder Sprites -> Create Sprite. Let's call it spr_unit_shooter, load the image (available on the githaba at the end of the article), for example, size 54x54 and center it (the Center button). The “OK” button and data are saved.

Now we need the first unit. Let it be a classic shooting plant. But before that we want to create an object that will be the parent for all user units (yes, about the same as inheritance in OOP). So you can avoid duplicate logic for all units, and as you will see below, it will be possible to apply to all types created by the game “children” of this object.
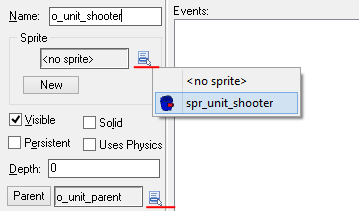
By the principle similar to sprites and rooms, we create an empty object. Let's call it o_unit_parent and don't do anything with it anymore. Now we will create o_unit_shooter and in the Parent column we select o_unit_parent. Let him sprite - spr_unit_shooter. To do this, use the button, which is under the name.
Call sprites, objects, rooms, etc. you can as you like, but in order not to get confused, it is better to immediately call things with their names, for example, sprites with the prefix spr_, obj_ or o_ objects, scripts - scr_, etc.
Now, every time you create an o_unit_shooter object in a room, it will draw the sprite of your choice (of course, if you don’t redefine this with the code).
Sprite can also be set programmatically, but in this case it will not be displayed in the Project Structure left preview. Now we add an event that will be triggered when an object instance is created. In this event, you must specify the initial initialization of variables, if any. Click Add Event. As you can see, Game Maker allows each object to catch a large number of events. We are interested in - Create.
As you can see on the right in the Actions container in several tabs there is a huge amount of drag'n'drop elements, with the help of which, in theory, you can create a completely full-fledged game without writing a single line of code. But this is for perverts and probably in Game Maker 2.0 this unnecessary functionality will finally be removed.
Go to the Control tab by dragging or right-click on the Execute code icon. A text editor will open in which you can place the game logic.
As you remember, units must shoot with a certain period. This can be done very easily. In the Create event, write this code: alarm [0] = room_speed * 2;
This means that we start alarm at number 0, which will work through room_speed * 2 steps (frames). room_speed is 60, which is approximately equal to a second. So alarm [0] will fire after 120 frames (2 seconds). Alarm is a function, or rather an object event, it fires as soon as the step counter reaches 0. Like all other events, it is added via the Add event. Now we need to register the logic that we add to alarm [0], but first let's create what our plant will shoot.
Create a new sprite spr_bullet, size 16x16 and center. Now we create a new o_bullet object and ask it with the newly created sprite. In the Create event, add the code hspeed = 7; just like with the previous object. With this line we specify that the object will move at a speed of 7 horizontally (hspeed = horizontal speed, if someone does not understand). This is a built-in property of each object. Assigning a non-zero value to it, this object will start moving for a given number of pixels (in our case, 7 to the right) each step (Step). If we set hspeed = -7; - the object will move by -7 pixels every step, i.e. will move from right to left.
That's all, let's go back to the o_unit_shooter object and create a new event - Alarm 0. The code that we write in this event will trigger when the counter that we created in the Create event is running. In the event of Alarm 0 we will create “bullets” (in the original - peas), which the plant shoots. Add this code:
/// shoot var b = instance_create(x + sprite_width/2, y, o_bullet); b.depth = depth + 1; alarm[0] = room_speed * 2; Let's sort this code.
/// shoot is just a comment that will be displayed when switching to an event. The default is “Execute piece of code”, which is not very informative. So it is recommended to write such comments in order not to waste time on transition to the code editor.
var b = instance_create (x + sprite_width / 2, y, o_bullet);
var b - we declare a local variable that will be available exclusively in this event. After the event is completed, the memory will be freed and you will not be able to access this variable.
instance_create (x + sprite_width / 2, y, o_bullet); - so we create a new instance of the object and put it in the coordinates x: x + sprite_width / 2, y - y. In this case, x and y are the coordinates of the parent object - o_unit_shooter. o_bullet is the object that we create.
b.depth = depth + 1; - this line means that the newly created instance of o_bullet will be 1 layer lower than o_unit_shooter.
The last line means that we start alarm [0] again - the plant must constantly shoot.
As you remember, in the original you can arrange vegetation only in certain cells. To visually understand the extent to which the plant can be placed, create a background and fill our room with it. Right-click on Backgrounds - Create Background - Load Background, select the desired image, say, 64x64 pixels, call bg_grass. Go to our room (rm_game), the Backgrounds tab, select the background created a second ago. We put a tick, if you do not stand on the image.

Now we need some kind of starting object that will do the initial initialization. Create a new object and call it, for example, o_game. Let this object reacts to a click on the field. To do this, add an event - Mouse -> Global mouse -> Global left released. A normal mouse-event means a direct click on an object, but since o_game does not have its own sprite + mask and since we need the player to click on any point on the playing field to catch all the events of the click. This is what Global Mouse does. Global left released means that somewhere inside the game window a mouse click was made or a touch on the touch screen (the event is triggered when the finger is released).
Add this code to this event:
var tBgWidth = background_get_width(bg_grass); var tBgHeight = background_get_height(bg_grass); var iX = mouse_x - mouse_x % tBgWidth + tBgWidth; var iX = mouse_x - mouse_x % tBgWidth + tBgWidth/2; var iY = mouse_y - mouse_y % tBgHeight + tBgHeight/2; if (instance_position(iX, iY, o_unit_parent) != noone){ exit; } instance_create(iX, iY, o_unit_shooter); A semicolon after the operation can not be set, the code logic does not change from this and will not cause errors. But if you can bet, why not do it. Yes, and familiar.
In the first four lines, we declare local variables. background_get_width, background_get_height are built-in functions that return the width and height of our background. As you can see, we need this data in order to calculate iX and iY. iX and iY - these will be the coordinates in which we will create an instance of the o_unit_shooter object. mouse_x, mouse_y are global variables embedded in Game Maker (i.e., those we can access from anywhere) that hold the current coordinates of the mouse cursor (finger). Since We are working in the Global left released event, they store the latest coordinates where the user released the left mouse button (released the finger). Mathematical operations, the results of which are assigned to variables iX, iY are needed to calculate the coordinates in which an instance of the o_unit_shooter object will be located exactly in the middle of the background cell of the bg_grass. Those. Remember that in Plants Vs Zombies a plant cannot be placed anywhere, only at a certain point, but you can click anywhere and the plant will be placed just in the right place. This is what the whole code above does.
Checking instance_position (iX, iY, o_unit_parent)! = Noone means that we are looking at the iX, iY coordinates for any instance (object instance) whose parent object is o_unit_parent. Since now we have only one inherited unit - o_unit_shooter, we check if there are no o_unit_shooter instances on the playing field, but we write o_unit_parent in the check in order for the code to work even when we add new user units. noone (from "no one") is an analogue of null in other languages.
exit - a code that terminates the execution of the event. Those. if some unit already exists in iX, iY coordinates, exit is triggered and the o_unit_shooter instance is not created, since we interrupt the execution of all subsequent code. It is necessary for us that in one cell there could not be 2 user units.
Well, it's time to add the first enemy. Create a new object and again create a base parent object. Let's call o_enemy_zombie and o_enemy_parent, which will be his parent. Create a sprite spr_enemy_zombie, center it and assign it to o_enemy_zombie.
According to how much the property of all enemies is the movement towards the plants, then we will create this code in the o_enemy_parent event in the Create event:
cHspeed = -4; hspeed = cHspeed; HP = 10; canAttack = true; cHspeed is a user variable, the value of which we assign to hspeed, which we have already met. Why not just write hspeed = -4; - see later.
We previously declared user variables through the var construct, but we are not doing this here. What is the difference between cHspeed = -4; and var cHspeed = -4 ;?
Everything is simple - in the first case the variable will be accessible from any point of the code of this object and it will be possible to access it from any other object, but just not forgetting to mention which object we are accessing. Now it is not necessary to delve into it. Remember that this variable exists for the entire lifetime of an object instance since it is declared. In the case of var cHspeed = -4; it will be available only for the duration of the event in which it was created.
In fact, it can also be accessed from another object, but if you access it from another object at the moment when the event in which it was created has already ended, it will cause an error — a familiar null pointer, because from memory it already unloaded.
If you don’t like the hspeed functions yourself, you can implement wspeed yourself by changing the x or y value in the Step event. These functions just do it for you.
HP is another variable in which we will store the number of enemies' life points. Each instance will “own” this variable, but the maximum number of life points for different types of enemies is different, i.e. need to somehow redefine / override this value. Or you can set all enemies the same number of lives, say, 100 and introduce the concept of defense on which the damage received by the enemy will depend, but now there is no sense to complicate, right? So let's do only one variable - HP.
Remember, gml - the language used in Game Maker case-sensitive, HP, hP, Hp and hp - will be different variables.
canAttack is just a variable, with which we assign the value true. For now, just write and forget about it.
Once we have a different HP value for each enemy, we need to somehow redefine this value. It is very, very simple. Go to the o_enemy_zombie object, create a reaction to the Create event and write the code:
event_inherited(); HP = 20; The event_inherited () function; and is engaged in inheritance. Those. now o_enemy_zombie will execute the code:
cHspeed = -4; hspeed = cHspeed; HP = 10; Which "imports" this function, and then the value is executed the line - HP = 20;
Those. in fact, at the end of the Create event, the o_enemy_zombie object will have the following properties:
cHspeed = -4; hspeed = cHspeed; HP = 20; If we forget about the event_inherited () function; or we will forget to specify the parent object to the o_enemy_zombie object, the enemy will not move, an error will appear when trying to access the cHspeed variable of this object.
Great, if we want to create another type of enemy, in the Create event we will write the same thing, changing to the number of HP needed:
event_inherited(); HP = 100; Once a zombie has hit points, it must be a plant. Add the object o_unit_parent code HP = 20; and the string event_inherited (); in the Create event of the o_unit_shooter object.
Do you know?
If you do not need to override and add anything to the Create event, add the code event_inherited (); no other logic in the event is needed - we will do it for you by Game Maker itself. The same applies to any other events, not just Create.
Great, our zombie is now going, but bullets do not take him and the plants do not slow him down. We first solve the first problem. Go to o_bullet and create a new reaction to the event - Add Event -> Collision -> o_enemy_zombie. This event will be triggered when o_bullet and o_enemy_zombie hit each other. Collision is checked by the mask, which you read at the beginning of the article. Add the code:
with(other){ HP -= 5; if (HP <= 0){ instance_destroy(); } } instance_destroy(); This is a very interesting point. The other is the instance of the object with which a collision occurs at this point in the event. Naturally, because Since this code is in a collision event with an instance of the o_enemy_zombie object, then in the other one there will only be an instance of o_enemy_zombie.
Using the with () {} construct, we refer to this other element. Everything that happens inside {} refers exclusively to this instance of the object. Thus, HP is = 5; - This is the subtraction of 5 points of life from the enemy. In if (hp <= 0) {} we compare the number of life points also with this object. Remember I talked a little bit higher about the difference between a regular variable declaration and a variable with var. This example should clarify the situation for you. Since HP variable is not declared by var, it is available at any time. So with the help of the with construct we can access it. An alternative way to refer to a variable of another object would look like this:
other.HP -= 5; if(other.HP <= 0){ with(other){ instance_destroy(); } } } instance_destroy(); But it is less convenient to access variables in this way, especially if there is more logic, but nevertheless it is applicable in some cases.
Don't forget, if you declared a variable not in the Create event, but in the code you access it before it is declared, this will cause an error if you try to read some data from it.
You do not need to have a great knowledge of English to understand that the function instance_destroy (); deletes this instance of an object (instance).
Thus, all this code means that in the event of a collision, we take away 5 points of life from a zombie, and if it gets them 0 or less, then we destroy it. Regardless of the result at the end, we remove our bullet. There is simply no place. In general, probably, it would be better to make the zombies independently monitor their health, but so far we are not interested. But that's
It would be wrong if our zombies could only take damage. It is necessary to add the ability to cause damage. First, add a new variable to the Create event of the o_enemy_parent object.
isActive = true; It's time to get acquainted with the Step event, which I mentioned earlier. This event is triggered every frame. It's simple. If room_speed is 60, then this event will fire approximately 60 times per second. Add this code to the Step event -> Step of the o_enemy_zombie object.
if (!isActive) exit; var tBgWidth = background_get_width(bg_grass); var leftCellCenterX = x - x % tBgWidth - tBgWidth/2; var frontEnemy = instance_position(leftCellCenterX, y, o_unit_parent); if (frontEnemy != noone){ var frontEnemySprtWidth; with(frontEnemy){ frontEnemySprtWidth = sprite_width; } if (x - sprite_width/2 - frontEnemy.x - frontEnemySprtWidth/2 <= 12){ hspeed = 0; if (!canAttack){ exit; } canAttack = false; alarm[0] = room_speed * 1.2; // cantAttack -> true; with(frontEnemy){ HP -= 5; if (HP <= 0){ instance_destroy(); } } } }else{ hspeed = cHspeed; } Nothing wrong with it, almost all the designs you already know.
if (! isActive) exit; - if the object is not active, that is, say, resting / recharging / swinging, this event will not be executed. In the next two lines we get the coordinates of the center of the cell to the left of the one on which the center of our instance is now (remember that x returns the coordinates of the Origin point, and we have it just in the center of the sprite). Next we look whether the user unit is located on the coordinates (leftCellCenterX, y). If there is something there is a subsequent logic, but about it in a second, if there is nothing there, we assign the hspeed value to the variable cHspeed, which we remember to create in the Create event. This is where it came in handy. The meaning behind this lies like this - if our zombie stopped in order to attack and destroy the plant, it is necessary that he continue on his way. You can, of course, not enter the variable cHspeed, but then you will need to remember where you set the speed of movement, and this is forgotten.
This is the case if there is nothing on the way of the zombie, now we return to the moment when we have to fight. The first lines are very interesting, with a trick. The fact is that by declaring the local variable frontEnemySprtWidth, we assign the value to it in the frontEnemy instance. Those who are familiar with programming will say, but in this case, we are accessing the variable frontEnemySprtWidth not of our zombie, but of a variable with the same name, but of the frontEnemy instance. So yes not so, the fact is that local variables (declared through var) become visible inside this event everywhere, even from inside the frontEnemy instance. Thus, there is no error in the code, we really refer to the variable that was declared local inside the zombie. If you do not understand this point, experiment or read the certificate, everything is perfectly explained there, and we go further.
We assigned the frontEnemySprtWidth value of the length (width) of the sprite unit of the user (plant), which is located on the cell to the left of our zombie. You will say, why do we need to build such a difficult for the first understanding construction, if you can do var var frontEnemySprtWidth = sprite_get_width (spr_unit_shooter) ;. The answer is simple - now we have one plant and we know which sprite to turn to, but when adding new types of units (sunflowers, etc.), we will have to fence the cumbersome switch construction to find out what kind of object is ahead of us, and so pretty just solved this poser.
Next we check if the distance between the rightmost point of the user unit and the leftmost point of our zombie is less than 12 pixels, then we stop our zombie, check whether our zombie can attack (check the value of the previously created in the Create event of the o_enemy_parent variable canAttack), continues to run the code in which we say that it is no longer possible to attack and that the next time it can be done through room_speed * 1.2 frames (after 60 * 1.2) - this is what we do in alarm [0] (add it yourself to the corresponding event (Alarm 0 ) o_ene object my_parent, where write the code canAttack = true;). If you can attack, we take 5 life points from the plant instance and check if it is still alive, if not - we destroy it.
Well, that's fine, the enemy is ready - he moves, attacks and continues to move, if he destroyed a plant, but he has one drawback - he does not exist. We have created only a description of our enemy; now we need to place zombies on the playing field. We return to the Create event of the o_game object. Add code
alarm [0] = room_speed; // generate enemies
Those. 60 frames will trigger Alarm 0 and a zombie will be created, right? Not. We have not created the logic for this Alarm. And the code here is also simple:
var tBgHeight = background_get_height(bg_grass); var eY = irandom(room_height - room_height % tBgHeight); eY = eY - eY % tBgHeight + tBgHeight/2; instance_create(room_width + sprite_get_width(spr_enemy_zombie)/2 + 1, eY, o_enemy_zombie); alarm[0] = room_speed * 3; Everything is simple - we will not complicate it and just every 3 seconds (60 frames * 3) create an instance of o_enemy_zombie on the X coordinates: room_width + sprite_get_width (spr_enemy_zombie) / 2 + 1 one pixel more to the right than the screen border, i.e. Y — . room_width room_height, , width height . Those. 800 480 .
, o_game - . — rm_game -> Objects -> o_game . — Settings -> Creation Code( — , ). instance_create(0,0, o_game);
. , Game Maker , rm_game « , Game Maker ?». — ( ). .
- :
. , . — , .
Game Maker, . , , . , , .
, Game Maker , , Game Maker . .
Source
:
— //
— //
— //
— // ()
— //
— //
— //
— / + /
, , , , .
Source: https://habr.com/ru/post/255995/
All Articles