We start the site on the cloud VPS from Infobox in 10 minutes
On the cloud VPS from Infobox, you can deploy the site without the need to manually install Linux, Apache, MySQL and PHP and without using the site control panels using the Ubuntu LAMP template.
You can use all the features of the cloud without the need for long-term OS configuration and installation of site hosting software If you use classic VPS, we have made the template available in this service as well .
Inside the Ubuntu 14.04 lamp template, the following software is preinstalled and configured:
You can immediately deploy the site, use FTP and PHPMyAdmin without additional settings.
')

In this article, we will look at this template in more detail and show how easy it is to transfer a site to the cloudy VPS from Infobox.
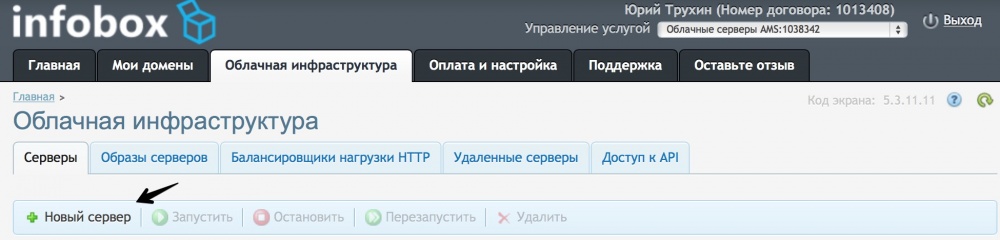
If you do not have a cloud-based VPS - order it . After ordering, go to the control panel and create a cloud server .
Set the necessary server parameters, do not check the box “Allow OS kernel management” . Allocate one public IP address to the server so that the server is accessible from the Internet. Do not forget to set the required network speed and click "Next".

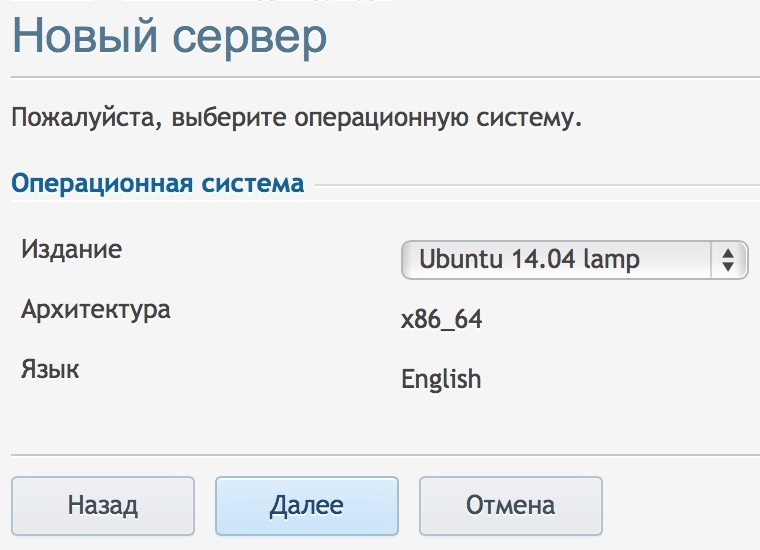
Select the “Ubuntu 14.04 lamp” template, as shown in the screenshot below, and complete the creation of the server. After creation you will receive the data for access to the server by email.
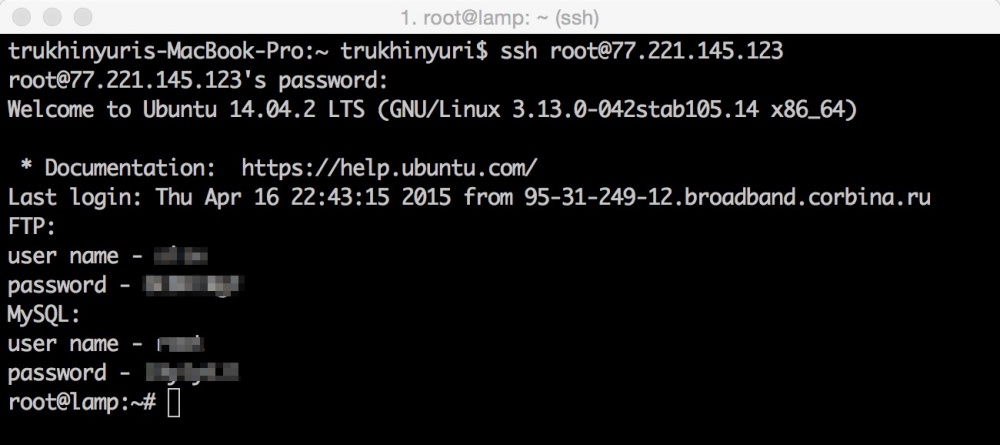
Connect to the server via SSH .
After connecting to the server, you will see the data for accessing the MySQL and FTP database. Save them.
First of all, install OS updates that will help fix all the problems found at the moment and make the server more reliable. To do this, enter the command:
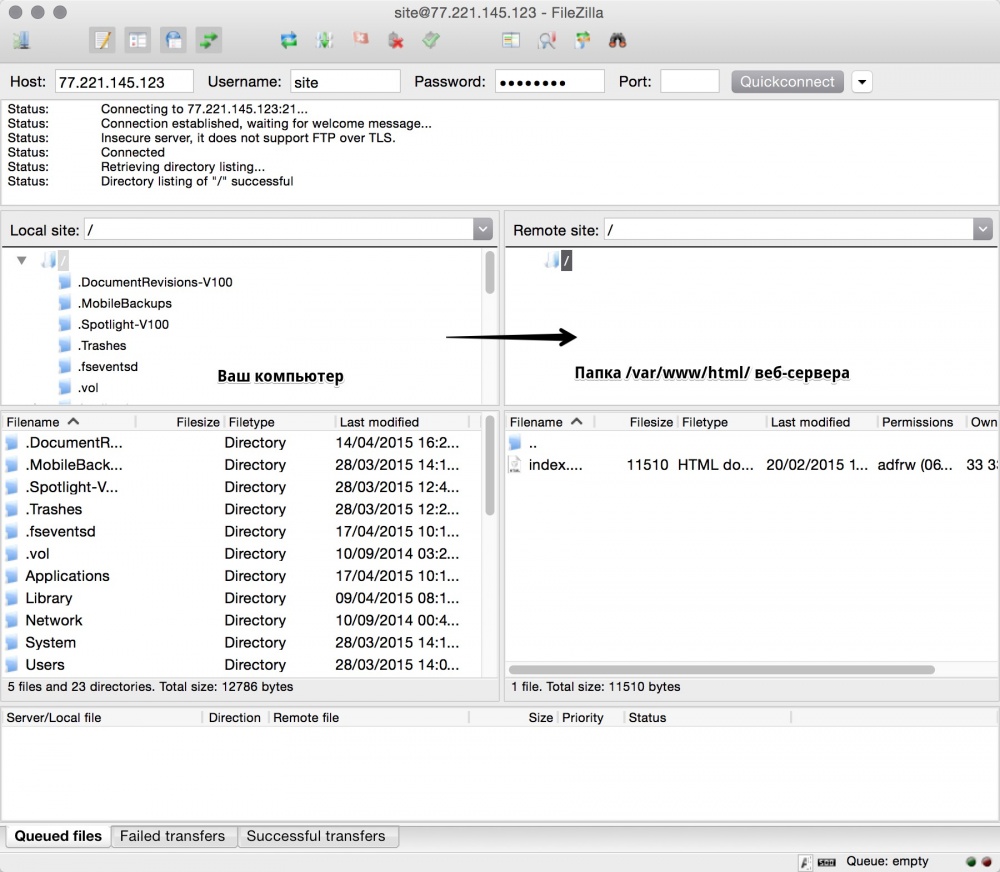
Let's connect to the server via FTP and put the site files on the server. To connect, you can use the Filezilla Client. Download and install it.
After startup, enter the external ip – address of the server (the same as you used when connecting via SSH), login and password. To connect, click QuickConnect.

The connection will be successfully established. Transfer the site files to the server.
For example, install MogutaCMS - an online store management system that has a free version. Download it , unzip the archive and put the site files on the server via Filezilla.
For ease of use Filezilla in the future, you can save data to access the server. To do this, open the Site Manager in Filezilla, as shown in the screenshot below.

Click New Site and enter a name for the site.
Enter the ip – address, select the login type “Normal”. Then enter the username and password from the site and click Connect.

In this case, you will not need to enter data for FTP access to the server each time.
By default, the server is configured to open index.html, if it does not exist - index.php. Our site is designed in php. The easiest option is to simply delete index.html on the server via Filezilla and the site will open. However, if there is also index.html in your CMS, apart from index.php, you need to enable the processing of index.php before index.html.
This is done very simply. In the SSH connection window, run the command to install the nano editor:
Then edit the configuration file by running the command:
Add a line:
As shown in the screenshot below:
To save the changes, press "Ctrl + X", then "Y" and then Enter.
Restart Apache with the command:
Open the public ip – address of the server in the browser. You will see the installation window for MogutaCMS.
Different CMS may have different requirements for hosting components, caching, etc. However, on a virtual server, unlike classic hosting, you can install everything you need.
MogutaCMS requires the libcurl library to be installed. Let's install it:
After that, the installation of MogutaCMS will be successfully completed.
At one stage, you must enter data to access the database. As a server, specify “localhost”, as the login and password, enter the data from the welcome message that is issued when you connect via SSH (and which we asked to save you earlier).
Some CMS can create a database if it does not already exist. MogutaCMS is not able and it is necessary to help her a little. Open PHPMyAdmin at:
Enter the database password (from the SSH welcome message) and click Ok.
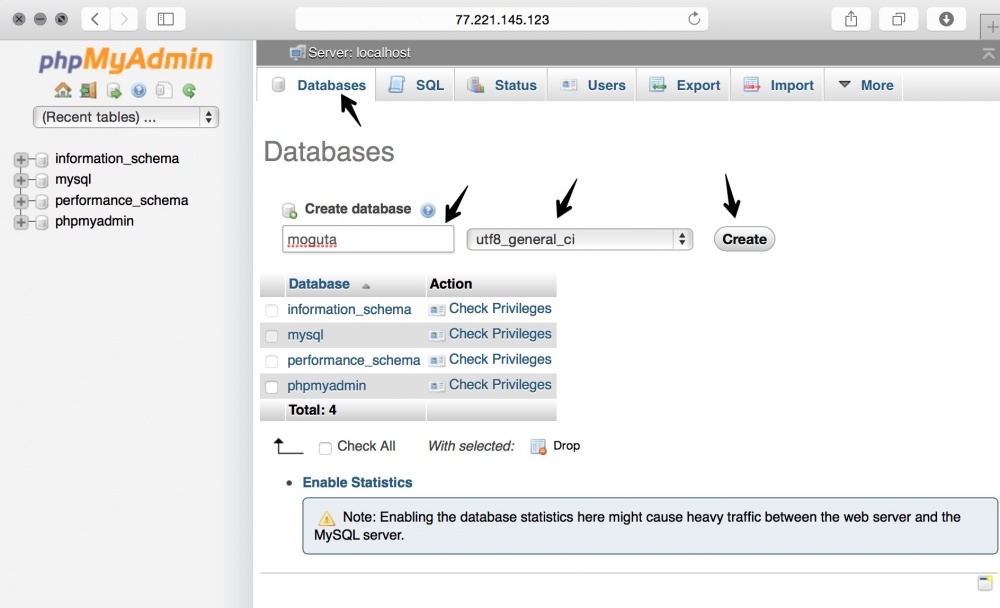
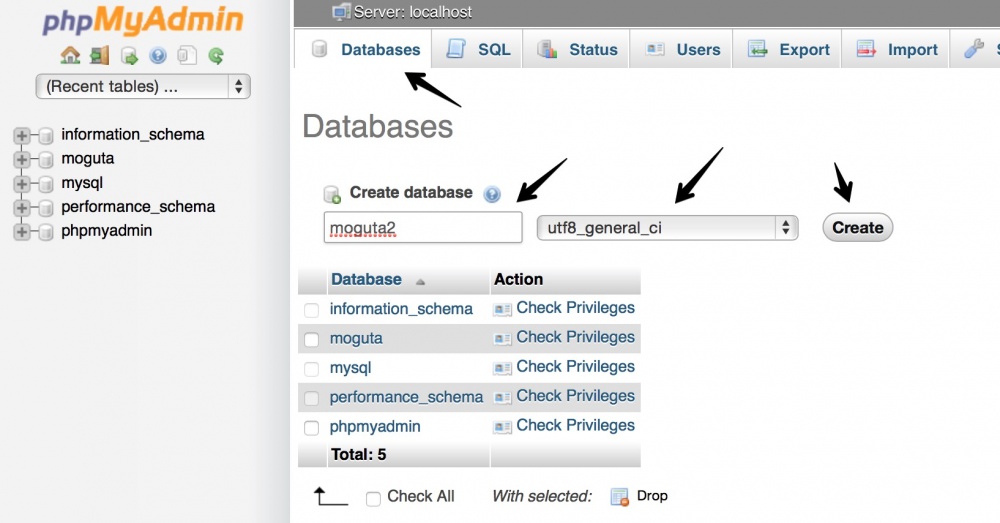
Go to the “Databases” section, enter the database name in English, select the encoding (utf8_general_ci, unless the CMS developer requests otherwise) and click Create.
Now the installation of MogutaCMS will continue successfully if you specify the database created.
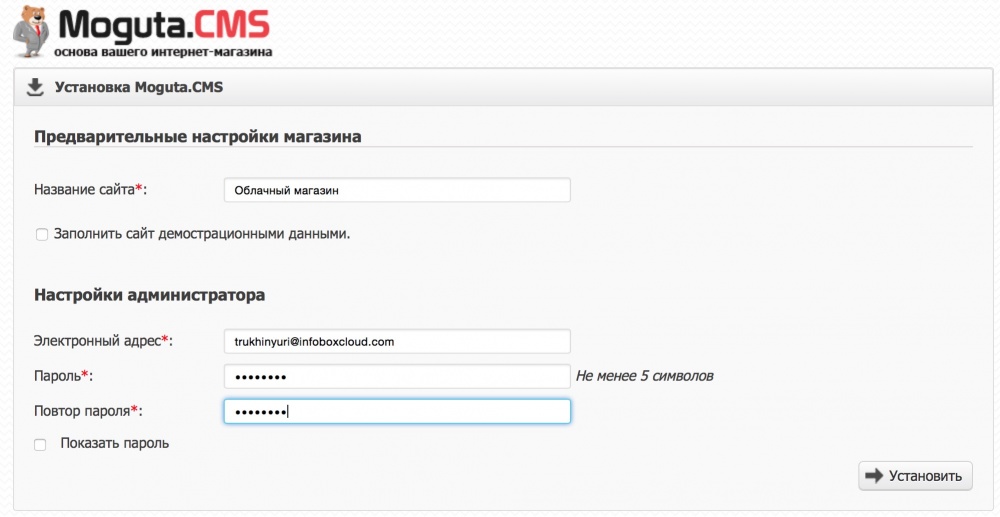
Enter the site name, your email and password. Click "Install".
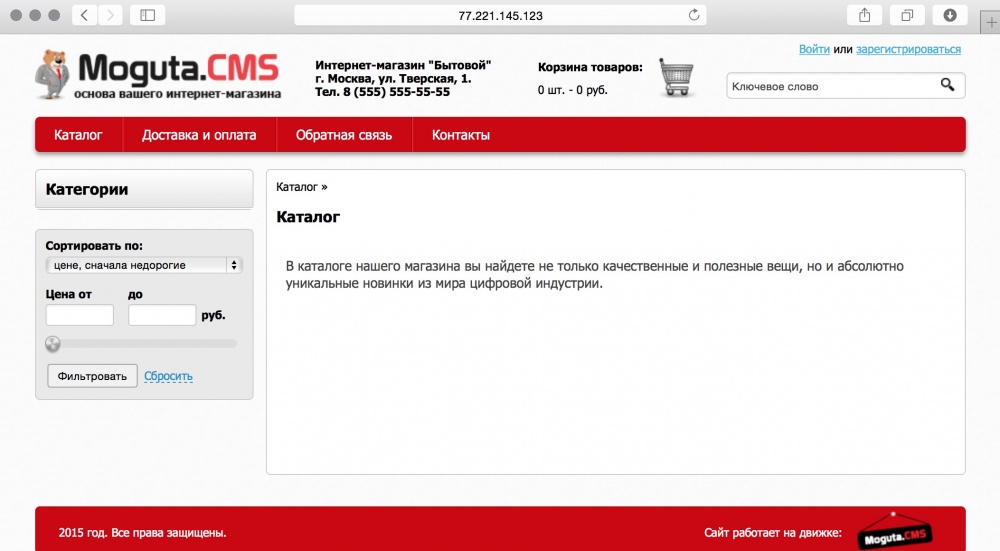
Now click "Go to site".

Your site has been successfully installed.
In this section, we will answer questions that arise when you use the Ubuntu 14.04 lamp pattern on cloud-based VPS . If during the site installation process you have any questions, write to us and we will add the answer to this section. You can easily install CMS on a cloud server, we will try to describe all the unclear points in the article.
Export the database from an existing hosting or server. If there, where the site is located now, there is access to PHPMyAdmin, export can be done as follows:
1. Log in to PHPMyAdmin on the old hosting or server.
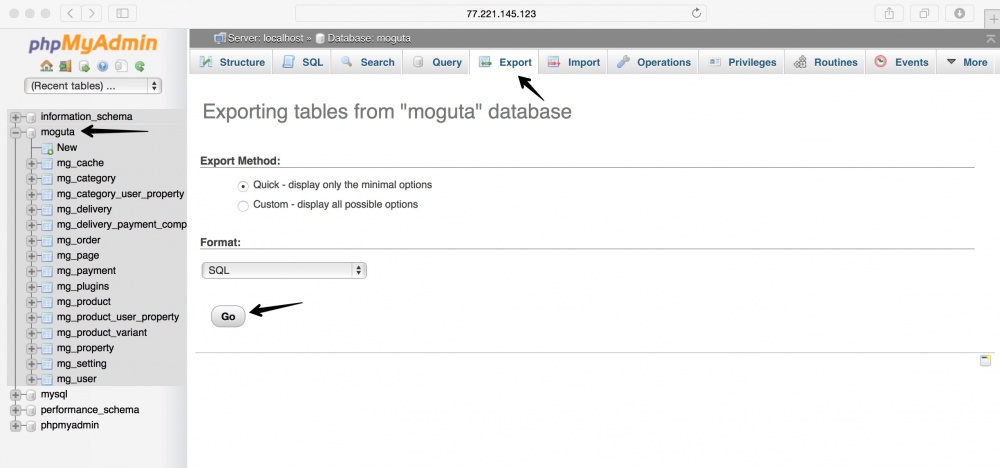
2. Select your database. Go to the “Export” section and click “Go”.
The browser downloads a database dump.
Now log in to PHPMyAdmin on the cloud server in the Infobox. Go to the “Databases” section and create an empty database.
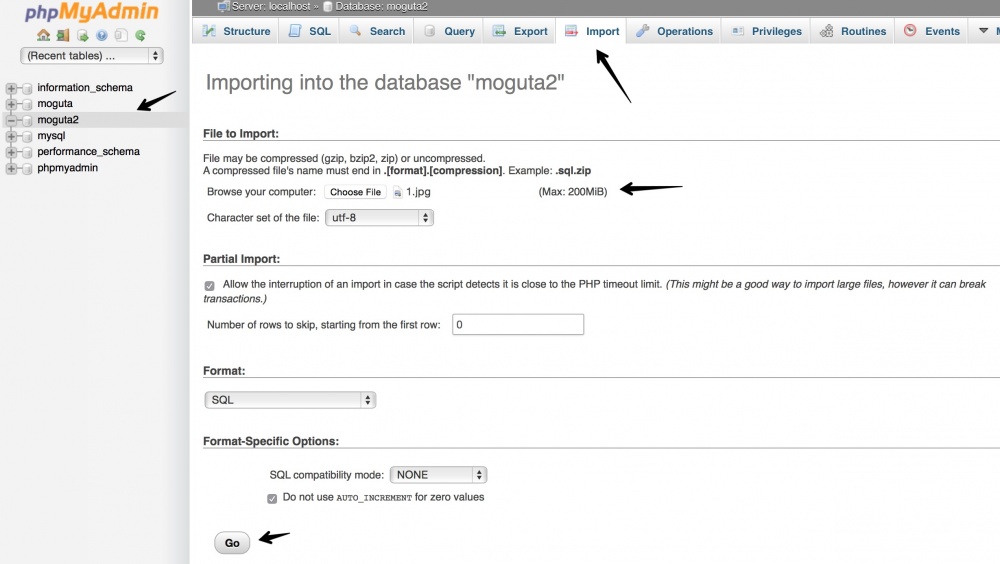
After creation, select it, go to the "Import" section. Click “Choose file” and select the dump database from your computer. Ensure that the encoding corresponding to the export encoding is specified. Click Go to complete the import.
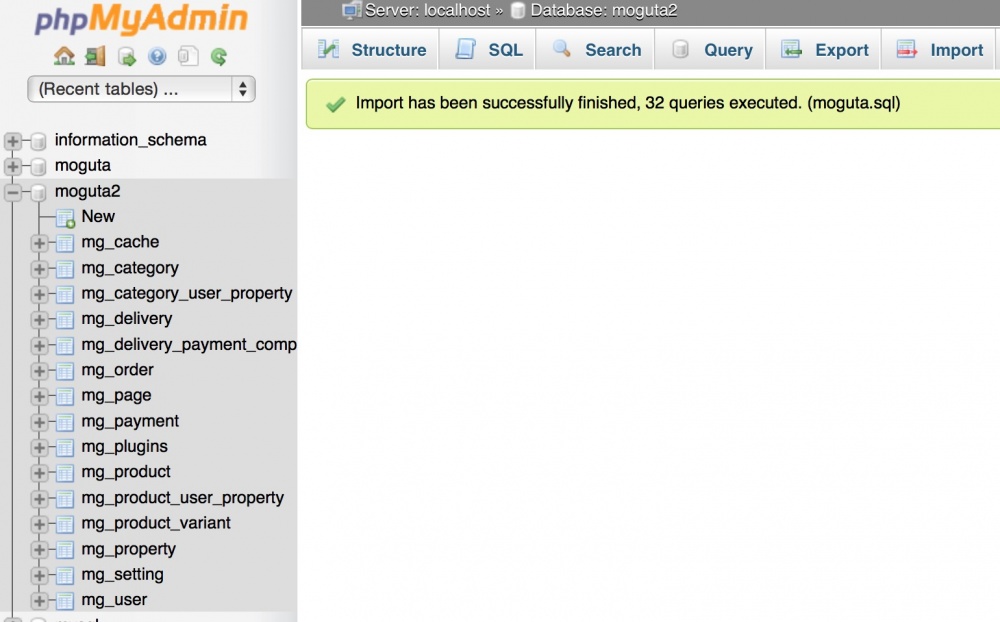
The database will be successfully imported.
Make sure that the dump of the .sql database is packaged in a zip, gzip or bzip2 archive. This will help to significantly reduce the size of the loaded database.
If the packed database is still more than 20 megabytes - increase the maximum allowed size of the downloaded file in nginx, as shown below.
To do this, edit the /etc/nginx/nginx.conf file, adding the parameter inside the http {} block (for example, under: # server_tokens off;) parameter:
In this case, nginx will allow file downloads of less than 200 megabytes.
You can edit the file using the nano editor. If it is not already installed, install with the command:
Now edit the file with the command:
and add the client_max_body_size value.

To save, press ctrl + x, Y, Enter.
To apply the changes, restart nginx with the command:
If the mysql database takes more than 200 megabytes in the archive or the process of restoring a database dump to mysql after loading takes more than a minute, using the phpmyadmin import dump is not a good idea. You can get errors like "Script timeout passed, if you want to finish, please." You can configure phpmyadmin and nginx timeouts to support lengthy operations and increase the nginx, apache, and php download limits, but it's better to use the native mysql tools to load such databases.
1. Copy the database dump to a remote server (for example, to the / root directory). This can be done using Filezilla.
Create a new SFTP connection. Enter the ip – address, login and password of the SSH – access to the server and click “Connect”.

Check the box, agreeing that you trust this server and click "OK".

The connection will be established.
Select the base dump on your computer in the left pane of the filezilla and move it to the right. The file will be copied to the / root directory of the server.

2. Connect to the server via ssh.
Create a new database. In the example below, my_db is the name of the database to be created.
You will need to enter a password from the database specified in the SSH welcome message.
When creating a database, you can specify the encoding:
Now import the database dump:
where database.sql is the name of the database dump for recovery.
The database will be successfully restored.
Using the template Ubuntu 14.04 lamp on cloud VPS from Infobox will allow you to quickly deploy your sites in the cloud and gradually learn how to administer the server for complete control over your site. We are always happy to help you, if it is not clear how to install or customize something on this image, please ask.
Successes!
You can use all the features of the cloud without the need for long-term OS configuration and installation of site hosting software If you use classic VPS, we have made the template available in this service as well .
Inside the Ubuntu 14.04 lamp template, the following software is preinstalled and configured:
- NGINX 1.4 (as reverse proxy)
- Apache 2.4
- PHP 5.5
- MySQL 5.5
- ProFTPD 1.3
- PHPMyAdmin 4.0
You can immediately deploy the site, use FTP and PHPMyAdmin without additional settings.
')
In this article, we will look at this template in more detail and show how easy it is to transfer a site to the cloudy VPS from Infobox.
Cloud VPS Creation
If you do not have a cloud-based VPS - order it . After ordering, go to the control panel and create a cloud server .
Set the necessary server parameters, do not check the box “Allow OS kernel management” . Allocate one public IP address to the server so that the server is accessible from the Internet. Do not forget to set the required network speed and click "Next".
Select the “Ubuntu 14.04 lamp” template, as shown in the screenshot below, and complete the creation of the server. After creation you will receive the data for access to the server by email.
Connect to the server via SSH .
Everything is ready to go.
After connecting to the server, you will see the data for accessing the MySQL and FTP database. Save them.
First of all, install OS updates that will help fix all the problems found at the moment and make the server more reliable. To do this, enter the command:
apt-key update && apt-get update && apt-get -y upgrade Upload files to the cloud server via FTP
Let's connect to the server via FTP and put the site files on the server. To connect, you can use the Filezilla Client. Download and install it.
After startup, enter the external ip – address of the server (the same as you used when connecting via SSH), login and password. To connect, click QuickConnect.
The connection will be successfully established. Transfer the site files to the server.
For example, install MogutaCMS - an online store management system that has a free version. Download it , unzip the archive and put the site files on the server via Filezilla.
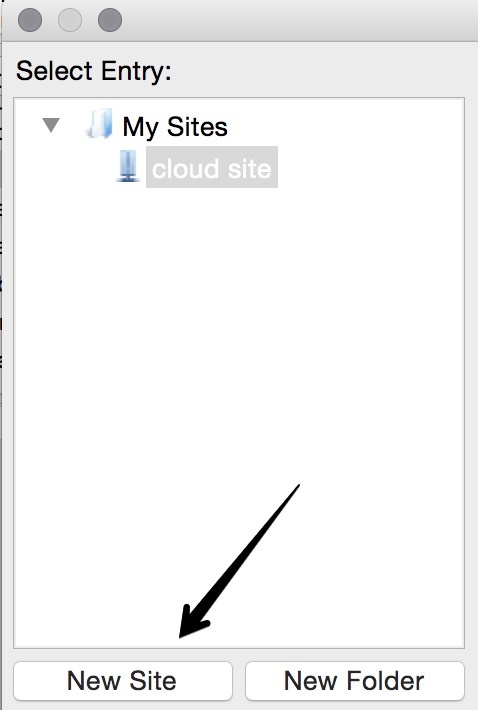
For ease of use Filezilla in the future, you can save data to access the server. To do this, open the Site Manager in Filezilla, as shown in the screenshot below.
Click New Site and enter a name for the site.
Enter the ip – address, select the login type “Normal”. Then enter the username and password from the site and click Connect.
In this case, you will not need to enter data for FTP access to the server each time.
Allowing the default execution of index.php
By default, the server is configured to open index.html, if it does not exist - index.php. Our site is designed in php. The easiest option is to simply delete index.html on the server via Filezilla and the site will open. However, if there is also index.html in your CMS, apart from index.php, you need to enable the processing of index.php before index.html.
This is done very simply. In the SSH connection window, run the command to install the nano editor:
apt-get -y install nano Then edit the configuration file by running the command:
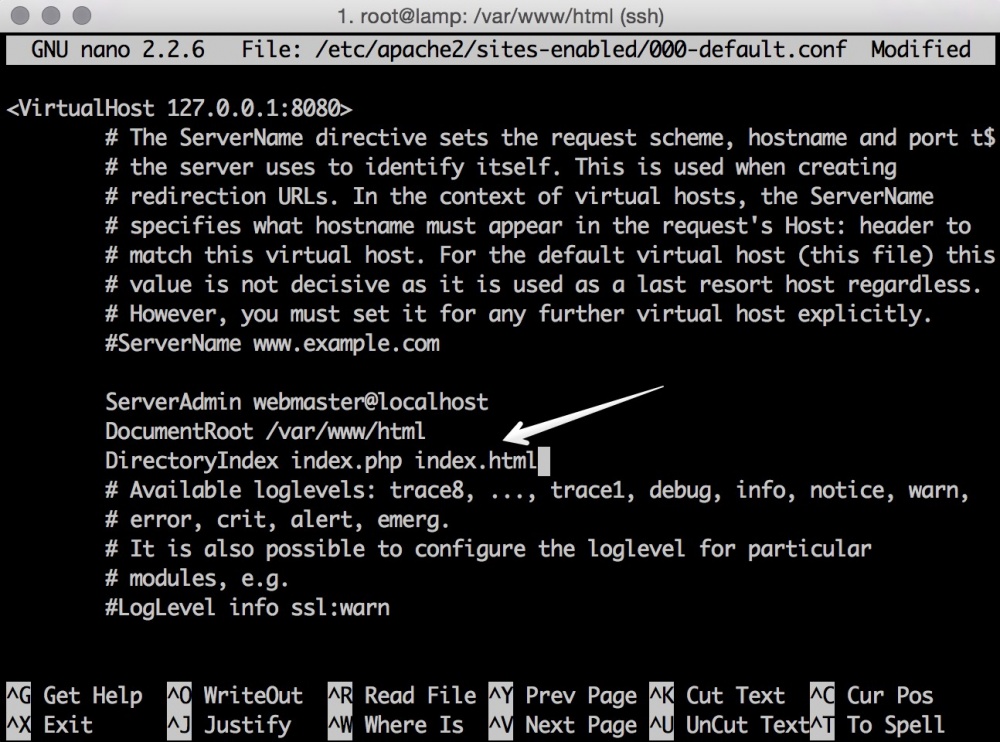
nano /etc/apache2/sites-enabled/000-default.conf Add a line:
DirectoryIndex index.php index.html As shown in the screenshot below:
To save the changes, press "Ctrl + X", then "Y" and then Enter.
Restart Apache with the command:
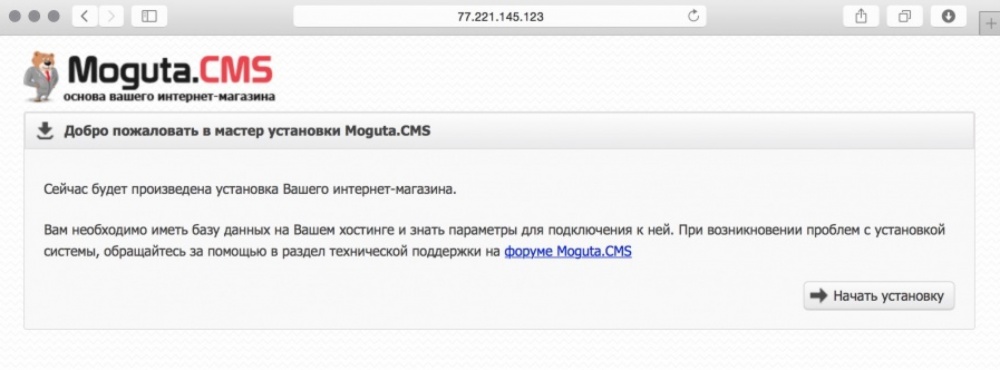
service apache2 restart Open the public ip – address of the server in the browser. You will see the installation window for MogutaCMS.
Install MogutaCMS
Different CMS may have different requirements for hosting components, caching, etc. However, on a virtual server, unlike classic hosting, you can install everything you need.
MogutaCMS requires the libcurl library to be installed. Let's install it:
apt-get install -y php5-curl service apache2 restart After that, the installation of MogutaCMS will be successfully completed.
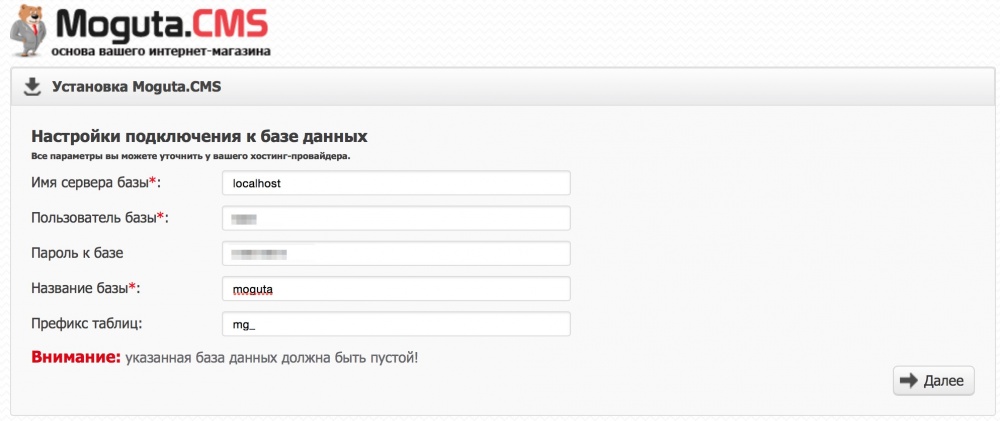
At one stage, you must enter data to access the database. As a server, specify “localhost”, as the login and password, enter the data from the welcome message that is issued when you connect via SSH (and which we asked to save you earlier).
Some CMS can create a database if it does not already exist. MogutaCMS is not able and it is necessary to help her a little. Open PHPMyAdmin at:
_ip_/phpmyadmin Enter the database password (from the SSH welcome message) and click Ok.
Go to the “Databases” section, enter the database name in English, select the encoding (utf8_general_ci, unless the CMS developer requests otherwise) and click Create.
Now the installation of MogutaCMS will continue successfully if you specify the database created.
Enter the site name, your email and password. Click "Install".
Now click "Go to site".
Your site has been successfully installed.
FAQ
In this section, we will answer questions that arise when you use the Ubuntu 14.04 lamp pattern on cloud-based VPS . If during the site installation process you have any questions, write to us and we will add the answer to this section. You can easily install CMS on a cloud server, we will try to describe all the unclear points in the article.
How to transfer a database of an existing site?
Export the database from an existing hosting or server. If there, where the site is located now, there is access to PHPMyAdmin, export can be done as follows:
1. Log in to PHPMyAdmin on the old hosting or server.
2. Select your database. Go to the “Export” section and click “Go”.
The browser downloads a database dump.
Now log in to PHPMyAdmin on the cloud server in the Infobox. Go to the “Databases” section and create an empty database.
After creation, select it, go to the "Import" section. Click “Choose file” and select the dump database from your computer. Ensure that the encoding corresponding to the export encoding is specified. Click Go to complete the import.
The database will be successfully imported.
What if the size of the base is too large and the base is not loaded into phpmyadmin?
Setting NGINX reverse proxy to load databases more than 20 MB and less than 200 MB
Make sure that the dump of the .sql database is packaged in a zip, gzip or bzip2 archive. This will help to significantly reduce the size of the loaded database.
If the packed database is still more than 20 megabytes - increase the maximum allowed size of the downloaded file in nginx, as shown below.
To do this, edit the /etc/nginx/nginx.conf file, adding the parameter inside the http {} block (for example, under: # server_tokens off;) parameter:
client_max_body_size 200m; In this case, nginx will allow file downloads of less than 200 megabytes.
You can edit the file using the nano editor. If it is not already installed, install with the command:
apt-key update && apt-get update && apt-get install -y nano Now edit the file with the command:
nano /etc/nginx/nginx.conf and add the client_max_body_size value.
To save, press ctrl + x, Y, Enter.
To apply the changes, restart nginx with the command:
service nginx restart Loading heavy databases into mysql
If the mysql database takes more than 200 megabytes in the archive or the process of restoring a database dump to mysql after loading takes more than a minute, using the phpmyadmin import dump is not a good idea. You can get errors like "Script timeout passed, if you want to finish, please." You can configure phpmyadmin and nginx timeouts to support lengthy operations and increase the nginx, apache, and php download limits, but it's better to use the native mysql tools to load such databases.
1. Copy the database dump to a remote server (for example, to the / root directory). This can be done using Filezilla.
Create a new SFTP connection. Enter the ip – address, login and password of the SSH – access to the server and click “Connect”.
Check the box, agreeing that you trust this server and click "OK".
The connection will be established.
Select the base dump on your computer in the left pane of the filezilla and move it to the right. The file will be copied to the / root directory of the server.
2. Connect to the server via ssh.
Create a new database. In the example below, my_db is the name of the database to be created.
mysql -u root -p -e 'CREATE DATABASE `my_db`;' You will need to enter a password from the database specified in the SSH welcome message.
When creating a database, you can specify the encoding:
mysql -u root -p -e 'CREATE DATABASE `my_db` CHARACTER SET utf8 COLLATE utf8_general_ci;' Now import the database dump:
mysql -u root -p my_db < database.sql where database.sql is the name of the database dump for recovery.
The database will be successfully restored.
Conclusion
Using the template Ubuntu 14.04 lamp on cloud VPS from Infobox will allow you to quickly deploy your sites in the cloud and gradually learn how to administer the server for complete control over your site. We are always happy to help you, if it is not clear how to install or customize something on this image, please ask.
Successes!
Source: https://habr.com/ru/post/255969/
All Articles