Build Embedded Linux from Yocto for QEMU x86 and the first application to it
This article is a quick start with pictures for those who need to build Embedded Linux using Yocto.
If you are going to build Embedded Linux for specific hardware, for example, for SoC on FPGA, then, probably, as I come across the Yocto project.
Yocto is a unifying project
I tried to describe the process so that you could spend less time on problems with setting up and preparing and get down to work as soon as possible.
Basis for assembly - article
"Yocto Project Quick Start" .
I will collect in a folder
A small digression:
Having launched the terminal, execute all commands in it, because in the course of the work, environment variables are created and used. If you closed the terminal and opened a new one, then go to
and have to repeat some commands. For example,
I create a git repository
now the current directory
now, according to Yocto terms, it came out
Source Directory - "poky"
local working area (local branch) - dizzy
First done
This command sets up the shell environment, creates an initial modifiable set of configuration files, and interacts with the BitBake system execution environment by using a script file that allows Poky to determine whether the minimum system requirements are met. The result of executing the command will either report problems, for example, missing packages, or the possibility to continue editing the conf / local.conf file.
Edit conf / local.conf:
Here you should specify the number of threads that will run the bitbake build tool. To make the most of the computational capabilities, the number of threads must match the number of processor cores. I pointed to 1 less, so that the computer during the assembly is more convenient to use.
I also added additional features useful for development.
Since we collect for the standard QEMU x86, the rest can not be changed.
')
Then you can choose a “recipe” - an assembly version with its own set of libraries, utilities, created files, images, etc.
A list of recipes with their brief descriptions can be found here:
openembedded-core recipes
Scroll down to recipes starting with core- ...
I do not advise to collect core-image-minimal for review. There are no ssh and other tools for debugging.
I chose core-image-sato. This is a SATO GUI build.
Actually, the assembly:
Be prepared to wait for the completion of the assembly, perhaps from 3 hours to 3 or more days. Fortunately, the process can be paused and resumed.
To pause, press + one (!) Times and wait until all the started operations are completed. Otherwise, perhaps, errors will appear and you will have to redo it. To resume, repeat
If the terminal is closed, then in the new terminal, before building, you will have to repeat the setting of the environment variables:
Upon completion of the assembly, you can check what happened by running the QEMU emulator
The xterm terminal window will appear, there you will need to enter the root password of the host to create the tap interface. There you can also see the IP host-machine on the tap interface and the IP of the emulated machine. I have 192.168.7.1 and 192.168.7.2, respectively.
Then, if the SATO is built, the graphical interface window should appear:
If the running emulator interferes, as long as it can be closed. Look through the arrows at the top of the GUI until the corresponding shutdown icon appears or enter poweroff via the SATO terminal or via ssh. Pro ssh will be later.
Do not close QEMU with a cross on the emulator main window. Close the regular means of the emulated machine. Otherwise, you will have ethX, tapX, virbrX interfaces on the QEMU system, which will have to be ifconfig ... ifdown, or how it is done on your OS. Or every time you start QEMU, there will be a new host IP and QEMU, which is inconvenient.
Used by Eclipse IDE for C / C ++ Developers, Luna version. This build contains plug-ins CDT, GNU ARM and some other plug-ins useful for cross-compiling and firmware development.
You can download from here:
Eclipse Luna SR2 .
We will build applications Hello, world!
First, the simple way, we collect the usual means of Eclipse: CDT + GNU ARM
If these plug-ins are not yet in your Eclipse, then add the CDT plugin from the standard Eclipse repository and hence the GNU ARM Plugin for Eclipse GNU ARM C / C ++ Cross Compiler and whatever else you want.
Create a new C ++ project:
Menu Eclipse File-> New-> Project ... -> C / C ++ -> C ++ Project
Need to choose
Project type: Executable-> Hello World C ++ Project
Toolchains: Cross GCC
fill in the Author field
Now the most important thing about the build system:
Cross compiller prefix: i586-poky-linux-
Cross compiler path: /home/.../My_Designs/Poky/poky/build/tmp/sysroots/x86_64-linux/usr/bin/i586-poky-linux
We compile the project
Project-> Build Project
The executable file should appear.
Since you compiled it for QEMU x86 Linux, it should also run on your host machine, if, of course, you are working on x86 Linux or compatible with it. I have run on IA64 Ubuntu.
Now, if you managed to close QEMU, then run again.
The xterm terminal window will appear, you will need to enter the root password to create the tap interface.
As you can see, I have a host IP of 192.168.7.1, IP qemu 192.168.7.2
A QEMU window with a graphical interface will then appear.
You can connect to QEMU via ssh and sftp. The first one is useful for running the program, the second one is for sending this program to the emulated machine.
I sent the file using the Krusader file manager. In Windows, you can use FileZilla or others.
In Krusader, I selected Tools-> New Net Connection ..., in the dialog you need to select sftp: //, enter IP and Username: root
I copied the executable file hello_cross_gcc_02 from the Debug folder of the project to the QEMU home folder.
Then you can open the terminal in the QEMU graphical interface and start the program for execution from there. It seemed to me more convenient to connect via ssh. In the terminal window of the host machine, run ssh
and run the newly copied executable:
It should work
Hello World!
Yocto provides the Application Development Toolkit (ADT), which contains:
Made on the basis of this: Yocto - Customize Eclipse
In Eclipse, you need plug-ins from the standard configuration:
Linux Tools
Mobile and Device Development
Programming languages
And you need to add a plugin from Yocto. Download from here: Yocto Plugin for Eclipse
For the organization of interaction with IDE and development tools, scripts are provided:
to run QEMU, the Yocto plugin needs rpcbind
need to edit the file / etc / default / rpcbind
unpack the root filesystem in the folder in sysroots, where the file system of the emulated machine is located. In our case, qemux86:
In Eclipse, the Windows menu-> Preferences, Yocto Project ADT
Cross Compiler Options
Build system derived toolchain
Toolchain Root Location:
/home/.../Poky/poky/build/
Sysroot Location:
/home/.../Poky/poky/build/tmp/sysroots/qemux86
Target Architecture: i586-poky-linux
Target Options:
QEMU
Kernel: /home/.../Poky/poky/build/tmp/deploy/images/qemux86/bzImage-qemux86.bin
Create a new project
New Project-> C ++ Project
Project name: hello_qemu_cmake_04
Project type: Yocto Project ADT CMake Project-> Hello World C ++ CMake Project
Next, Next, Finish
Build project
In the project -> Debug folder should be hello_qemu_cmake_04
Now you can run the application in the same way as it was with the project created via Cross GCC, except that QEMU is now launched in Eclipse via the menu
Run-> External Tools-> qemu_i586-poky-linux
Now configure Eclipse so that you can start and debug the application directly from the IDE.
The instruction is taken from here:
Downloading and debugging an application using ADT in Eclipse
For convenience, before configuring the remote machine must be running (Run-> External Tools-> qemu_i586-poky-linux, as in the previous section).
To set up debugging, select Eclipse from the menu.
Run -> Debug Configurations ...
In the list on the left you need to find “C / C ++ Remote Application”, there should be an item with the name of our project and virtual machine. I have this “hello_qemu_cmake_04_gdb_i586-poky-linux”. We must choose it.
The guide from Yocto suggests specifying the Remote Absolute File Path for C / C ++ Application. But now is not the best time for this. It will be more convenient to first set up communication with the remote machine.
In the meantime, in the right pane, select the Debugger tab, here you need to select remote gdb / mi from the Debugger drop-down list. This is my only list item, but you still need to select it. At the same time fill in some other form fields.

Go back to the Main tab and create a connection.
In the Connection section, select New .... In the New Connection window, select TCF. I have two of them. I do not know why the second, but the choice of the first exactly leads to a positive result.
In the Host name field, enter the IP of the machine in QEMU. The Connection name field can be left filled with IP. , ... In order to have less fuss later, you can also specify login when connecting. In the Connection section, click Edit ... and fill in the Default User ID. Root login

On the Main tab, select the connection you just created.
Now we specify the path to the file and the name of the file with which Eclipse will download the application being debugged to the remote machine.
If QEMU is running, you can click Browse ... and, if the connection is OK, you can see the file system of the remote machine and select the place where to download the application. You will not necessarily have the same picture as in the screenshot below. But what is important: you need to specify the file. If you are going to specify a folder in which there is no file with the name with which you want to download the executable file, then you will not be limited to this window. Click and add the file name in the Debug Configurations window.

The result should be something like this:

Now you can click.
In my Eclipse console window, “Remote Shell” was like this:
Then an invitation to switch to the Debug perspective. It makes sense to agree.
The debugger stopped at the string
Click Step Over (F6)
In the terminal
Now you can write a program. Bye for QEMU x86.
If you are going to build Embedded Linux for specific hardware, for example, for SoC on FPGA, then, probably, as I come across the Yocto project.
Yocto is a unifying project
- developer tools;
- assembly system;
- a set of software interfaces;
- a collection of meta-packages that extend the capabilities of the platform;
- plugins for Eclipse and Anjuta.
I tried to describe the process so that you could spend less time on problems with setting up and preparing and get down to work as soon as possible.
Build a Linux image
Basis for assembly - article
"Yocto Project Quick Start" .
I will collect in a folder
~/My_Designs/Poky A small digression:
Having launched the terminal, execute all commands in it, because in the course of the work, environment variables are created and used. If you closed the terminal and opened a new one, then go to
~.../poky and have to repeat some commands. For example,
source oe-init-build-env I create a git repository
$ git clone git://git.yoctoproject.org/poky $ cd poky $ git checkout -b dizzy origin/dizzy now the current directory
~/My_Designs/Poky/poky now, according to Yocto terms, it came out
Source Directory - "poky"
local working area (local branch) - dizzy
First done
$ source oe-init-build-env This command sets up the shell environment, creates an initial modifiable set of configuration files, and interacts with the BitBake system execution environment by using a script file that allows Poky to determine whether the minimum system requirements are met. The result of executing the command will either report problems, for example, missing packages, or the possibility to continue editing the conf / local.conf file.
Edit conf / local.conf:
$ nano conf/local.conf BB_NUMBER_THREADS ?= "3" PARALLEL_MAKE ?= "-j 3" EXTRA_IMAGE_FEATURES = "debug-tweaks eclipse-debug tools-debug debug-tweaks" Here you should specify the number of threads that will run the bitbake build tool. To make the most of the computational capabilities, the number of threads must match the number of processor cores. I pointed to 1 less, so that the computer during the assembly is more convenient to use.
I also added additional features useful for development.
Since we collect for the standard QEMU x86, the rest can not be changed.
')
Then you can choose a “recipe” - an assembly version with its own set of libraries, utilities, created files, images, etc.
A list of recipes with their brief descriptions can be found here:
openembedded-core recipes
Scroll down to recipes starting with core- ...
I do not advise to collect core-image-minimal for review. There are no ssh and other tools for debugging.
I chose core-image-sato. This is a SATO GUI build.
Actually, the assembly:
$ bitbake core-image-sato Be prepared to wait for the completion of the assembly, perhaps from 3 hours to 3 or more days. Fortunately, the process can be paused and resumed.
To pause, press + one (!) Times and wait until all the started operations are completed. Otherwise, perhaps, errors will appear and you will have to redo it. To resume, repeat
$ bitbake core-image-sato If the terminal is closed, then in the new terminal, before building, you will have to repeat the setting of the environment variables:
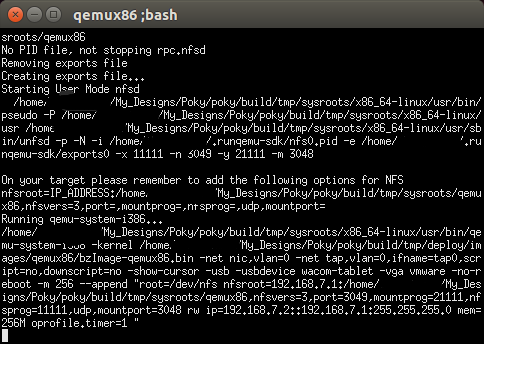
$ source oe-init-build-env Upon completion of the assembly, you can check what happened by running the QEMU emulator
$ runqemu qemux86 The xterm terminal window will appear, there you will need to enter the root password of the host to create the tap interface. There you can also see the IP host-machine on the tap interface and the IP of the emulated machine. I have 192.168.7.1 and 192.168.7.2, respectively.
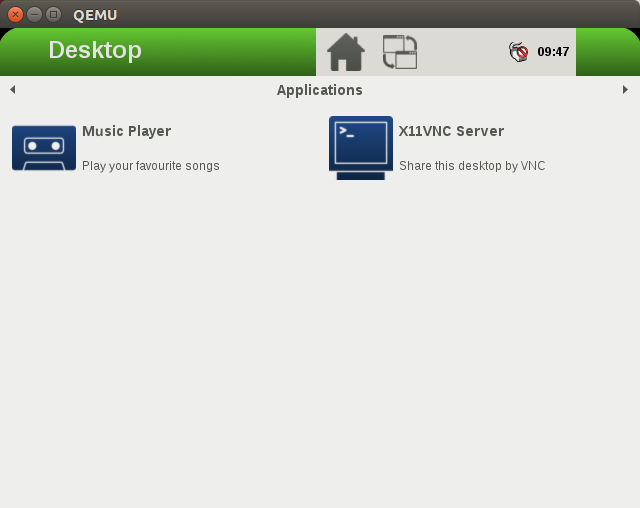
Then, if the SATO is built, the graphical interface window should appear:
If the running emulator interferes, as long as it can be closed. Look through the arrows at the top of the GUI until the corresponding shutdown icon appears or enter poweroff via the SATO terminal or via ssh. Pro ssh will be later.
Do not close QEMU with a cross on the emulator main window. Close the regular means of the emulated machine. Otherwise, you will have ethX, tapX, virbrX interfaces on the QEMU system, which will have to be ifconfig ... ifdown, or how it is done on your OS. Or every time you start QEMU, there will be a new host IP and QEMU, which is inconvenient.
Development tools
Used by Eclipse IDE for C / C ++ Developers, Luna version. This build contains plug-ins CDT, GNU ARM and some other plug-ins useful for cross-compiling and firmware development.
You can download from here:
Eclipse Luna SR2 .
We will build applications Hello, world!
Eclipse Cross GCC
First, the simple way, we collect the usual means of Eclipse: CDT + GNU ARM
If these plug-ins are not yet in your Eclipse, then add the CDT plugin from the standard Eclipse repository and hence the GNU ARM Plugin for Eclipse GNU ARM C / C ++ Cross Compiler and whatever else you want.
Create a new C ++ project:
Menu Eclipse File-> New-> Project ... -> C / C ++ -> C ++ Project
Need to choose
Project type: Executable-> Hello World C ++ Project
Toolchains: Cross GCC
fill in the Author field
Now the most important thing about the build system:
Cross compiller prefix: i586-poky-linux-
Cross compiler path: /home/.../My_Designs/Poky/poky/build/tmp/sysroots/x86_64-linux/usr/bin/i586-poky-linux
We compile the project
Project-> Build Project
The executable file should appear.
Since you compiled it for QEMU x86 Linux, it should also run on your host machine, if, of course, you are working on x86 Linux or compatible with it. I have run on IA64 Ubuntu.
Now, if you managed to close QEMU, then run again.
$ runqemu qemux86 The xterm terminal window will appear, you will need to enter the root password to create the tap interface.
As you can see, I have a host IP of 192.168.7.1, IP qemu 192.168.7.2
A QEMU window with a graphical interface will then appear.
You can connect to QEMU via ssh and sftp. The first one is useful for running the program, the second one is for sending this program to the emulated machine.
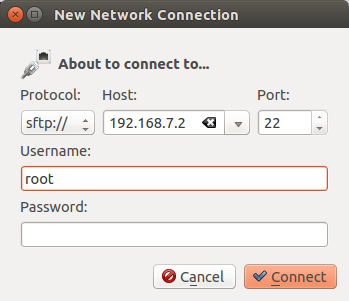
I sent the file using the Krusader file manager. In Windows, you can use FileZilla or others.
In Krusader, I selected Tools-> New Net Connection ..., in the dialog you need to select sftp: //, enter IP and Username: root
I copied the executable file hello_cross_gcc_02 from the Debug folder of the project to the QEMU home folder.
Then you can open the terminal in the QEMU graphical interface and start the program for execution from there. It seemed to me more convenient to connect via ssh. In the terminal window of the host machine, run ssh
$ ssh root@192.168.7.2 and run the newly copied executable:
$ ./hello_cross_gcc_02 It should work
Hello World!
Build in ADT
Yocto provides the Application Development Toolkit (ADT), which contains:
- architecture-oriented and sysroot cross-toolchain compiled by OpenEmbedded using Poky
- Yocto plugin for Eclipse IDE
- QEMU to emulate target equipment
- various development tools working in user-space
Eclipse preparation
Made on the basis of this: Yocto - Customize Eclipse
In Eclipse, you need plug-ins from the standard configuration:
Linux Tools
- LTTng - Linux Tracing Toolkit
Mobile and Device Development
- C / C ++ Remote Launch
- Remote System Explorer End-user Runtime
- Remote System Explorer User Actions
- Target Management Terminal
- TCF Remote System Explorer add-in
- TCF Target Explorer
Programming languages
- Autotools Support for CDT
- C / C ++ Development Tools
And you need to add a plugin from Yocto. Download from here: Yocto Plugin for Eclipse
Assembly preparation
For the organization of interaction with IDE and development tools, scripts are provided:
$ bitbake adt-installer $ bitbake meta-ide-support to run QEMU, the Yocto plugin needs rpcbind
$ sudo apt-get install rpcbind need to edit the file / etc / default / rpcbind
$ sudo nano /etc/default/rpcbind > OPTIONS="-i -w" unpack the root filesystem in the folder in sysroots, where the file system of the emulated machine is located. In our case, qemux86:
$ runqemu-extract-sdk ./tmp/deploy/images/qemux86/core-image-sato-qemux86.tar.bz2 ./tmp/sysroots/qemux86 Set up Yocto ADT in Eclipse
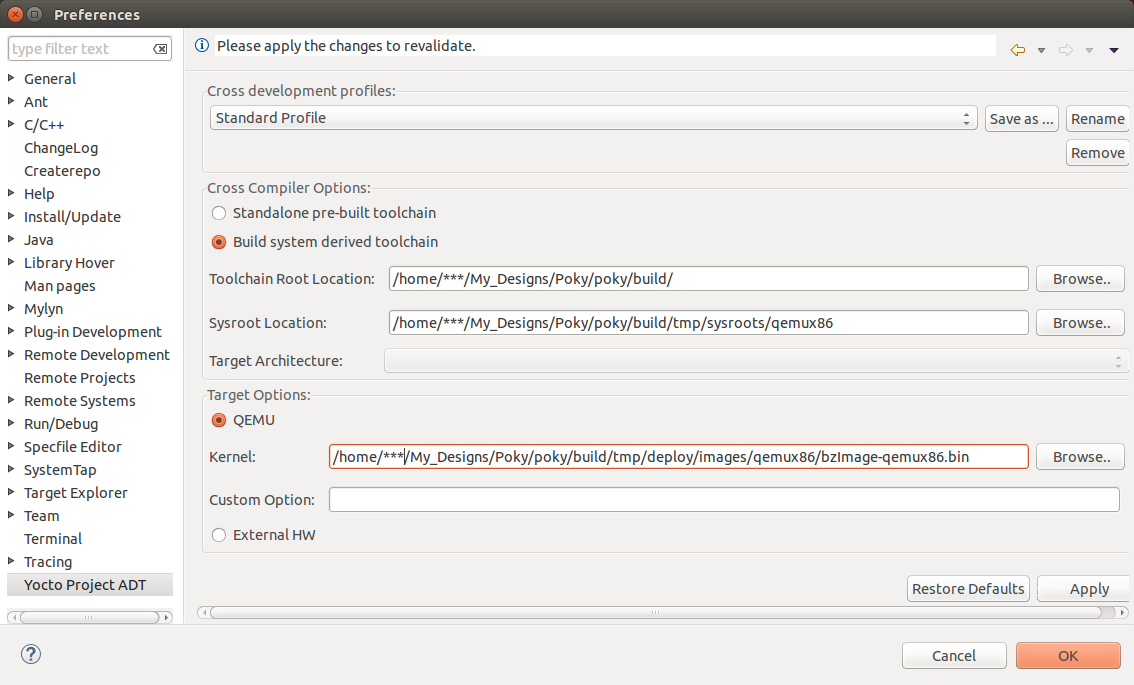
In Eclipse, the Windows menu-> Preferences, Yocto Project ADT
Cross Compiler Options
Build system derived toolchain
Toolchain Root Location:
/home/.../Poky/poky/build/
Sysroot Location:
/home/.../Poky/poky/build/tmp/sysroots/qemux86
Target Architecture: i586-poky-linux
Target Options:
QEMU
Kernel: /home/.../Poky/poky/build/tmp/deploy/images/qemux86/bzImage-qemux86.bin
Project Hello, World! in Eclipse with Yocto ADT
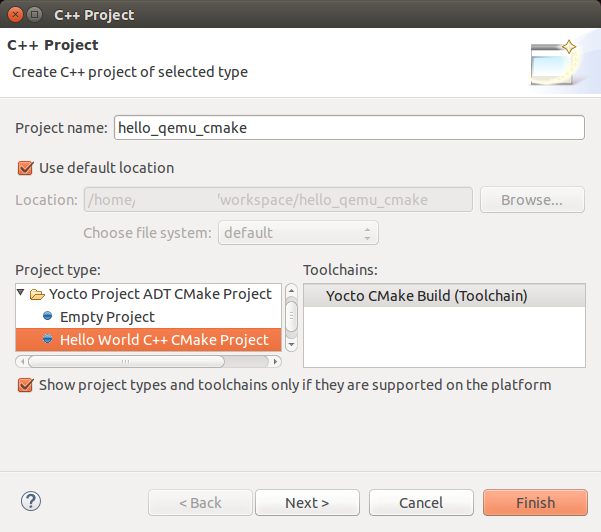
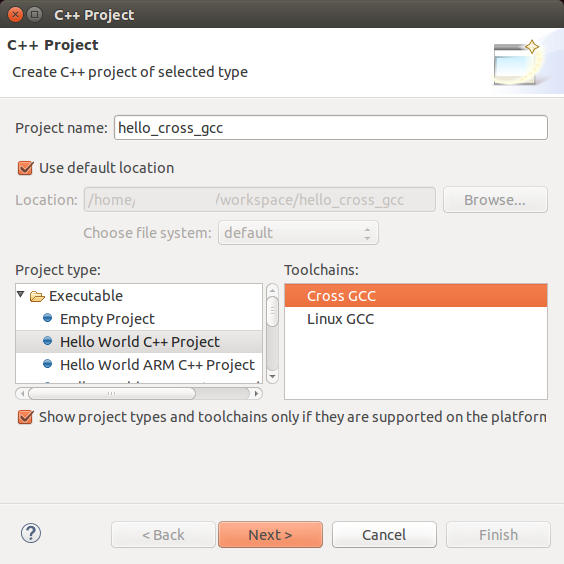
Create a new project
New Project-> C ++ Project
Project name: hello_qemu_cmake_04
Project type: Yocto Project ADT CMake Project-> Hello World C ++ CMake Project
Next, Next, Finish
Build project
In the project -> Debug folder should be hello_qemu_cmake_04
Now you can run the application in the same way as it was with the project created via Cross GCC, except that QEMU is now launched in Eclipse via the menu
Run-> External Tools-> qemu_i586-poky-linux
Running and debugging from the Eclipse IDE
Now configure Eclipse so that you can start and debug the application directly from the IDE.
The instruction is taken from here:
Downloading and debugging an application using ADT in Eclipse
For convenience, before configuring the remote machine must be running (Run-> External Tools-> qemu_i586-poky-linux, as in the previous section).
To set up debugging, select Eclipse from the menu.
Run -> Debug Configurations ...
In the list on the left you need to find “C / C ++ Remote Application”, there should be an item with the name of our project and virtual machine. I have this “hello_qemu_cmake_04_gdb_i586-poky-linux”. We must choose it.
The guide from Yocto suggests specifying the Remote Absolute File Path for C / C ++ Application. But now is not the best time for this. It will be more convenient to first set up communication with the remote machine.
In the meantime, in the right pane, select the Debugger tab, here you need to select remote gdb / mi from the Debugger drop-down list. This is my only list item, but you still need to select it. At the same time fill in some other form fields.
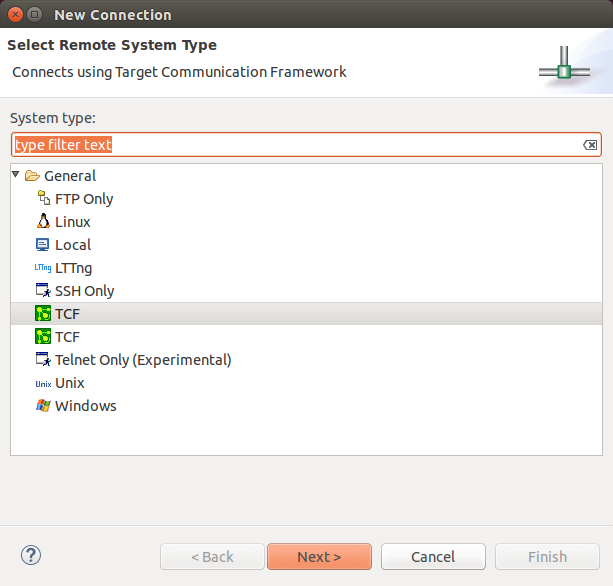
Go back to the Main tab and create a connection.
In the Connection section, select New .... In the New Connection window, select TCF. I have two of them. I do not know why the second, but the choice of the first exactly leads to a positive result.
In the Host name field, enter the IP of the machine in QEMU. The Connection name field can be left filled with IP. , ... In order to have less fuss later, you can also specify login when connecting. In the Connection section, click Edit ... and fill in the Default User ID. Root login
On the Main tab, select the connection you just created.
Now we specify the path to the file and the name of the file with which Eclipse will download the application being debugged to the remote machine.
If QEMU is running, you can click Browse ... and, if the connection is OK, you can see the file system of the remote machine and select the place where to download the application. You will not necessarily have the same picture as in the screenshot below. But what is important: you need to specify the file. If you are going to specify a folder in which there is no file with the name with which you want to download the executable file, then you will not be limited to this window. Click and add the file name in the Debug Configurations window.
The result should be something like this:
Now you can click.
In my Eclipse console window, “Remote Shell” was like this:
root@qemux86:/# e c h o $ P WD'>' /> … Then an invitation to switch to the Debug perspective. It makes sense to agree.
The debugger stopped at the string
printf("Hello World!\n"); Click Step Over (F6)
In the terminal
... Remote debugging from host 192.168.7.1 Hello World! Now you can write a program. Bye for QEMU x86.
Source: https://habr.com/ru/post/255917/
All Articles