Logiblocs Spytech kit overview

The “Spytech kit” from the Logiblocs set of radio constructors is an opportunity to introduce children to the basics of elementary electrical engineering, making it fun - by playing around with the use of bugs and security systems.
- Set contents
- Connection of parts and blocks
- “Actually we just turn on the light bulb!”
- The principle of the game with Logiblocks "Spytech kit"
- What would I change?
- findings
Set contents
')
The set of the designer contains 10 blocks-modules and, importantly, imputed and detailed instructions in Russian. Instead of a photo or text, the content of the Spytech kit is best shown by a picture from the manual:
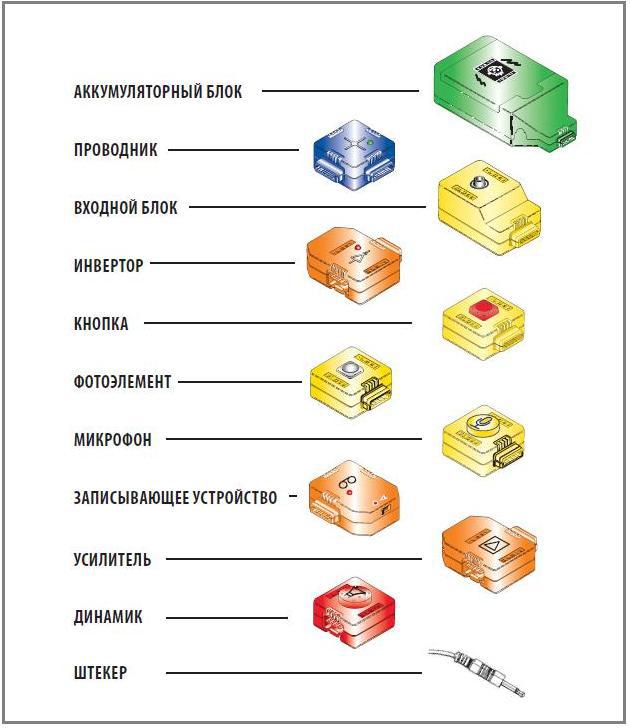
Ten Spytech kit multi-colored modules allow you to create a device for recording and playing a short voice clip (in other words, an MP3 player with a speaker) that connects to a power source (battery pack) and is activated in a variety of ways - using a button, photocell, responsive to light, contact sensor, etc. - how much fantasy is enough.
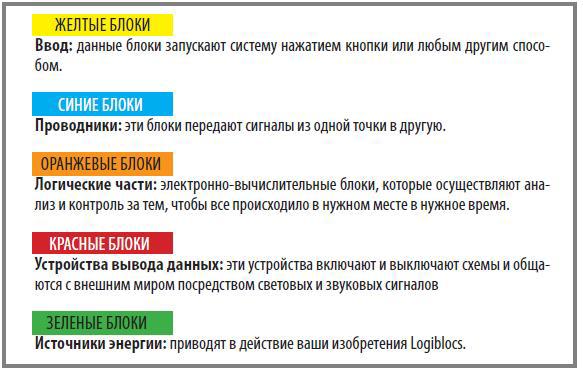
The color of the modules indicates their internal essence:
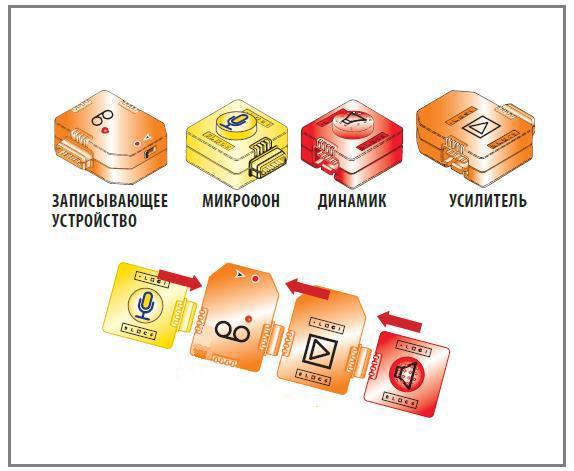
Actually, the four modules should immediately be merged into one - in this form they are used inextricably in any version of the game with the designer. The “voice block” consisting of 4 modules - the heart of the designer - is a recording device, amplifier, speaker and microphone connected together. They can be immediately assembled into a single line and no longer separate further:
It is also safe to connect the power supply unit and the blue block called “Explorer” once and for all - through it the “voice block” and various types of “activator” switches - a photocell, a button or a contact wire - are connected to the power supply.

The photocell does not operate on the principle of detecting light or shadow, but it does not work when CHANGE illumination changes from dark to light, and from light to dark. In other words, if you connect it to the circuit ON LIGHT, it will turn on the audio module when it is dimmed. And vice versa.

Interestingly, the simplest-looking blue switching unit is smart. This is not just a contact board for the connection, but, in fact, a waiting multivibrator. That is, it is controlled by an impulse of ANY duration (including very short) - a quick push of a button, a quick short circuit of wires, a quick change of light / shade on a photocell. But at the output, it delivers power with a LONG pulse sufficient to play a voice recording of any length that the audio module only allows.
Unclear? Speaking in a simple way - if you recorded a score from 1 to 10 in the device’s memory, and then pressed the button with a short touch sufficient to only play the word “one,” the audio module will still play the full recording duration.

Connection of parts and blocks
How modules are connected is not a trifle, but the most important technical aspect - the toy longevity and the positive depend on communication with it depend on the convenience and reliability of the connection node. Children's electronic and electrical constructors have been around for a long time, and I have met various types of switching elements and modules. Consider how this is implemented in the Logiblocks designer:

But modular modules are unified for all components of the set connectors "papa-mama". Connectors are flat, five-contact. For two of them from the unit to the unit there is a supply voltage of 6 volts from the battery pack, for the rest - signals. “Male” connectors are made on the principle of USB - the contact part is the protrusion of the printed circuit board inside the unit with conductive tinned tracks. The connector does not have a “key” for protection against improper activation - protection is implemented in the same way as in USB - the connector does not fit in the wrong position. Although, if you attach a bad zeal, I think you can and shove ... Connectors are also disconnected, like USB - you just need with a little effort to pull the blocks in opposite directions.
The mechanical strength of the connectors is very high - in addition to the contact function, they also carry out the "carrier" - they physically connect the individual modules into a single device. With prolonged use, of course, the strength may weaken and there will be backlash, but as of "out of the box" everything is very worthy!

And here and so it is not necessary to do - it is worth explaining to the child in the first place! Attempting to "bend" the chain of connected blocks, or sit on it when it lies on the sofa, will lead to breakage of the detachable part of the enclosures - it is unlikely that they will be able to reliably repair them!

By the way, as a radio amateur, connecting with case connectors is both a virtue and a disadvantage ... On the one hand, the connectors are convenient and simple, they have no extra connectors, there is nothing to lose. But when connected by wires, the ends of which, say, are clamped into spring contacts (this technology is often used in children's electronic designers), a better understanding of what is happening - the wires show the essence of the connections and the signal path more clearly ...
“Actually we just turn on the light bulb!”
If the child has elementary concepts about electricity and is familiar with the circuitry of at least an electric torch or doorbell, then this section of the review can be skipped and go directly to the “Principles of playing with Logiblocks” section. Even if there is no basic knowledge, then it is worth starting with a small introductory lecture for your child. Well, if it will be supported by a practical demonstration, but you can do with a felt-tip pen with paper!
Actually, the designer is, for all its internal complexity, extremely simple! Imagine a simple electrical circuit of three elements - a battery, a switch and a light bulb connected in series? So, Logiblocs "Spytech kit" is, by and large, such a simple chain! Only as a “light bulb” is a “black box” - an MP3 player with a speaker and the ability to record sounds. But, in the complex it is - the same elementary light bulb in essence! And from the intrinsic complexity of this “light bulb”, the GENERAL complexity of the simplest chain of three components does not change.

Playing with a designer in terms of developing a child’s thinking and fantasy is, in essence, inventing original ways of “igniting a light bulb” - including the sound of a voice recording. Just light a light bulb or some kind of thread that is simply boring for a child to get bored, but to turn on a device that knows how to say phrases is much more fun!
But it is desirable to begin, I repeat, with the simplest scheme with a battery, a light bulb and a switch. If components are available - assemble this chain, demonstrate how it works. Explain that the current source may be different (battery, battery group, battery, electrical outlet), a switch may be different (contact sensor, secret contact, wall button, pedal, etc.), and, of course, thousands of options loads - talking device, lamp, heater, electric motor, electromagnet, pump and much, much more. Tell that the exact same scheme has a desk lamp, a fan, an electric meat grinder, a doorbell. In this case, the child will not only have fun with the designer, but will also project his work into many familiar household electrical appliances, understanding how they work and what may break in them.
To understand the general structure is very important; if this is not done, the child will be absorbed in recording and playing back sounds on the audio module, and there will not be a complete understanding of the operation of the circuit. In this case, the designer will turn into a funny toy and will not give a learning effect ...
The principle of the game with Logiblocks "Spytech kit"
- First, 4 batteries are installed in the power supply (AA format, but AAA will also come with lumps of foil!). You can immediately connect the conductor switching block to it.
- Then you assemble the audio module. His assembly would be nice to accompany the comments, of which the child will understand how most of the musical gadgets. Stereo, karaoke, portable boombox, etc.
- Next, you connect an audio unit to the power supply unit, and write into it a certain voice excerpt - a word, phrase, several phrases. After that, you need to stop and explain to the child that it is possible to start playing the sound in different ways. As an organ of activation, a simple button that reacts to a light or a shadow of a photocell, or a contact wire that can be closed in this way and that can be used — the contacts on the door when it is opened, the contacts immersed in water, etc. can be used.

Demonstrating various switching options, you need to explain the role of the unit called “inverter”, which “overturns” the command. That is, if the wires connected to the contacts on the door turn on voice playback when closing (closing), then they are connected through an inverter, they will activate the system in reverse - when opened (opened).

Options for the inclusion of audio module included - three. Button, block with contact wire and photocell:

After the child has understood the principle of operation of the simplest battery-button-light-bulb circuit, and, accordingly, he caught on the fact that the Logiblocs Spytech kit works according to a related principle, you can put the designer kit at his disposal, leaving him to exercise fantasy himself! Not bad, for example, to hide the gadget in the fridge: “You promised not to eat after six!” - he will reproachfully tell anyone who opens the door, having lit the photocell with a light bulb ...

What would I change?
In this section, I will note some of the designer’s drawbacks that were found during the test — what I would change in the kit, if you were at the manufacturer’s site, and what you can easily do on your own.
Firstly , it would be good if the bundle had the aforementioned simple training circuit from a series-connected current source, load and switch, plus the corresponding chapter in the user's manual number 1, explaining the principle of operation of an elementary three-component electrical circuit. However, it is easy to do it yourself.
Secondly, I would, in the place of the creators of the designer, make the audio module one. Microphone, speaker, recorder and amplifier - in one unit. Honestly, its assembly does not have any special training aspects ... The monolithic version is stronger, more reliable and cheaper, is not subject to fracture in connectors, etc.
Thirdly , I would put in the set more various switching devices, expanding the flexibility of the game and the possibility of the application of fantasy! Several different buttons - with flexible tail contacts, combined with fasteners-clothespins, contact that is triggered by a coup, it would be nice to have a sound sensor that responds to a pop or a whistle, etc. But you can do some of this yourself - at least by extending the contact wire. With a long wire, the toy will not be so tied to the place, it will become easier to come up with application options! Well, you can buy different buttons on occasion!
findings
The designer is qualitatively made and very funny both from the nursery and from the parent point of view. Properly filed, it gives an understanding of the basic fundamentals of electrical engineering and develops imagination. However, if the “ancestors” of the humanities buy their child, who does not have any experience in electrical engineering, this set, then there will be no sense from him ... Without the notorious idea of the scheme of a banal electric flashlight, a child of five years old ( and oriented Logiblocs "Spytech kit"), will not receive useful skills and will play with him, not understanding the essence of what is happening.

Therefore, in order to realize the full potential of a toy, it is necessary to master it with parents who understand electrical engineering at least at grade 8 (or where Ohm's law and the simplest electrical engineering go there?) Ideally, learning Logiblocks ( you can buy a designer here ) It is desirable to combine with a book, like this:

This review was prepared by Evgeny Balabas as part of our program of cooperation with the authors.
===================
Invitation to test dadzhetov
The djadget invites authors interested in testing our devices and writing an objective review for cooperation. The device after the publication of the review remains with you. Read more about the offer here .
Source: https://habr.com/ru/post/255903/
All Articles