How to set up Mac OS X, iOS simulator and RAD Studio XE8 (Delphi, C ++ Builder)
Today, we will “make friends” or set up a MacBook and RAD Studio XE8 (or Delphi, or C ++ Builder, or Appmethod).
As a result, we will be able to run our applications not only in the Windows environment, but also on the MacBook and the iOS simulator from the same source code . These actions are the basis for setting up and connecting real iOS devices (the topic of a separate post).
Action plan:
- MacBook setting (xCode + PAServer);
- Configure RAD Studio XE8 (Profile + SDK);
- Launch your application on the MacBook and the iOS simulator.

')
In the previous article I described how to set up RAD Studio for developing applications for Android , and today we will talk about setting up a MacBook and an iOS simulator with RAD Studio.
In order to accomplish this task, I used:
- Dell Latitude E7240 (my laptop);
- MacBook Pro.
The setup process is simple, but on this topic they often ask questions, which prompted me to write this post. I will try to describe the configuration process in detail and show it step by step with screenshots.
- your PC should have the latest version of RAD Studio XE8 installed;
- make sure the MacBook and PC with RAD Studio XE8 installed “see” each other on the network.
I have this:
- laptop: Windows 8 64x + RAD Studio XE8;
- MacBook: OS X Yosemite 10.10.2;
- the laptop is connected via LAN to the router, and the MacBook is via WiFi to the router, both devices are on the same network.
I strongly recommend checking that you have the latest updates installed. This will save you from unnecessary problems during the installation process.

Go to the “App Store ...”

Using the search, we find xCode and click on the “install” button.

Then the installation process will go, wait until it is finished and do not proceed to the next stage until it is completed.

Make sure you have the latest xCode version. This will prevent you from “headache” at the next stages and in cases when you want to connect iOS devices in the future.
For example, my MacBook did not immediately upgrade to 6.2, but after updating it issued version 6.1, then I went back to the “App Store” and updated xCode to the latest version.

We start xCode and immediately see a message with a proposal to install additional components, click on the “Install” button.


After a short installation, we go further.
We find the PAServer application on our PC, where RAD Studio XE8 is installed.
C: \ Program Files (x86) \ Embarcadero \ Studio \ 16.0 \ PAServer \
PAServer16.0.pkg
Copy it to your MacBook. I did this with a usb flash drive (be careful, not all file systems see Mac OS).
We launch and install PAServer on the macbook.


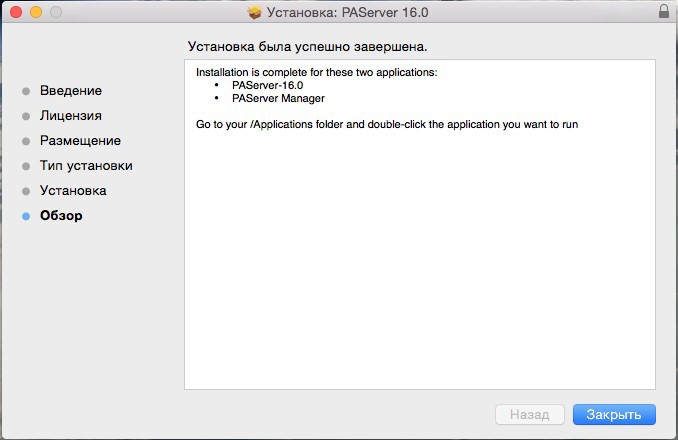
Find PAServer in the list of installed programs. You can start it right away, but I, as a rule, create a shortcut on the desktop for convenience and start the program with a shortcut.

When you first start the system asks for a username and password to start the application.

Further in the console you will be asked to enter a password to connect to PAServer, we will need this password when setting up RAD Studio.
A working PAServer will look like it is shown in the screenshot below, we find the port number in it, then, if necessary, the running PAServer can be minimized.
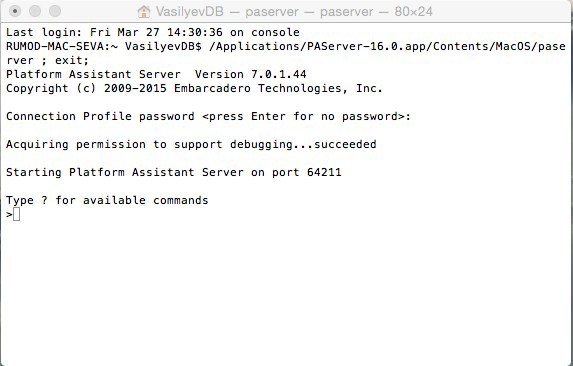
Find the IP-address through the form “Network”. It doesn't matter if you are using a LAN or WiFi, both are work. For example, I use WiFi for myself.

On this macbook, we leave and proceed to our PC, where RAD Studio XE8 is installed.
Launch RAD Studio XE8 and create a new project “Multi-Device Application”. We translate our view on the “Project Manager”, open the “Target Platforms” list there, find “OS X” in it, right-click on it and select “Properties ...” from the drop-down list.

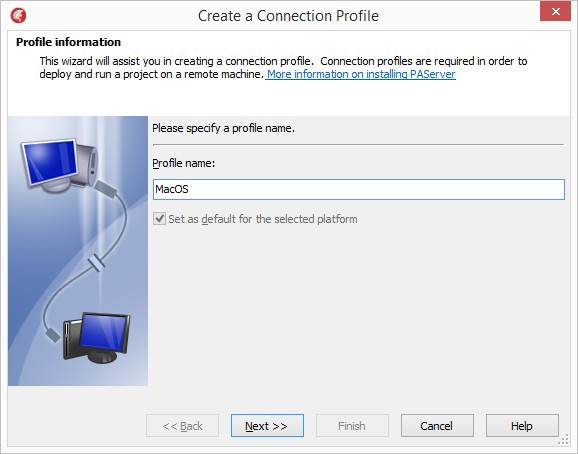
Create a new profile for our MacBook.

Specify the profile name, this is an arbitrary name, just for our convenience.
Now we specify the IP address of the MacBook, the port and the password that we set when running PAServer on the MacBook.

We check the connection with PAServer by clicking on the “Test Connection” button.

Profile is ready.

After setting up the profile, immediately proceed to setting up the SDK.

On this form, check the SDK version and profile.

Next, the installation process.

The SDK is configured and click on the OK button.

In the “Project Manager”, open the “Target Platforms” list, find the “iOS Simulator” in it, right-click on it and select “Properties ...” from the drop-down list.
Literally in a few clicks the setting is performed.


The SDK for the iOS simulator is configured and click OK.

We check in the “Project Manager” so that the name of our profile appears in front of “OS X” and a list of various iOS devices appears in the “iOS Simulator”.

After the first launch on the simulator of the iOS device, a message will appear indicating that the compilation is complete, you need to tick and click OK, so that this message will no longer appear in the future.

We launch our application on the MacBook and in the simulator “iOS Simulator”.

That's all!
Remember that when updating xCode, steps 9-10 may have to be repeated.
Remember that it is not necessary to run your application on a MacBook or an iOS simulator each time, you can debug all your logic in the Windows environment, and only then switch and launch your application on a MacBook or an iOS simulator.
No macbook?
- then MacBook will help you in the clouds www.macincloud.com/;
- install OS X on a virtual PC (for example, VirtualBox) and perform the same settings (but this is where the Apple license question arises).
PS I plan to write a post about connecting iOS devices to RAD Studio XE8. Your wishes, suggestions and topics for future posts, please write in a personal or email.
PPS before posting, I discovered that there was a new version of xCode 6.3 :)
Thank you all and good luck!
As a result, we will be able to run our applications not only in the Windows environment, but also on the MacBook and the iOS simulator from the same source code . These actions are the basis for setting up and connecting real iOS devices (the topic of a separate post).
Action plan:
- MacBook setting (xCode + PAServer);
- Configure RAD Studio XE8 (Profile + SDK);
- Launch your application on the MacBook and the iOS simulator.
')
In the previous article I described how to set up RAD Studio for developing applications for Android , and today we will talk about setting up a MacBook and an iOS simulator with RAD Studio.
In order to accomplish this task, I used:
- Dell Latitude E7240 (my laptop);
- MacBook Pro.
The setup process is simple, but on this topic they often ask questions, which prompted me to write this post. I will try to describe the configuration process in detail and show it step by step with screenshots.
1. Preliminary training.
- your PC should have the latest version of RAD Studio XE8 installed;
- make sure the MacBook and PC with RAD Studio XE8 installed “see” each other on the network.
I have this:
- laptop: Windows 8 64x + RAD Studio XE8;
- MacBook: OS X Yosemite 10.10.2;
- the laptop is connected via LAN to the router, and the MacBook is via WiFi to the router, both devices are on the same network.
2. Check and update on macbook.
I strongly recommend checking that you have the latest updates installed. This will save you from unnecessary problems during the installation process.
3. Install or update xCode.
Go to the “App Store ...”
Using the search, we find xCode and click on the “install” button.
Then the installation process will go, wait until it is finished and do not proceed to the next stage until it is completed.
4. Check the xCode version.
Make sure you have the latest xCode version. This will prevent you from “headache” at the next stages and in cases when you want to connect iOS devices in the future.
For example, my MacBook did not immediately upgrade to 6.2, but after updating it issued version 6.1, then I went back to the “App Store” and updated xCode to the latest version.
5. Installation of additional necessary components for xCode.
We start xCode and immediately see a message with a proposal to install additional components, click on the “Install” button.
After a short installation, we go further.
6. Install PAServer.
We find the PAServer application on our PC, where RAD Studio XE8 is installed.
C: \ Program Files (x86) \ Embarcadero \ Studio \ 16.0 \ PAServer \
PAServer16.0.pkg
Copy it to your MacBook. I did this with a usb flash drive (be careful, not all file systems see Mac OS).
We launch and install PAServer on the macbook.
7. Run PAServer on the macbook.
Find PAServer in the list of installed programs. You can start it right away, but I, as a rule, create a shortcut on the desktop for convenience and start the program with a shortcut.
When you first start the system asks for a username and password to start the application.
Further in the console you will be asked to enter a password to connect to PAServer, we will need this password when setting up RAD Studio.
8. Search for port and IP-address for future configuration of RAD Studio.
A working PAServer will look like it is shown in the screenshot below, we find the port number in it, then, if necessary, the running PAServer can be minimized.
Find the IP-address through the form “Network”. It doesn't matter if you are using a LAN or WiFi, both are work. For example, I use WiFi for myself.
On this macbook, we leave and proceed to our PC, where RAD Studio XE8 is installed.
9. Creating a MacOS profile in RAD Studio.
Launch RAD Studio XE8 and create a new project “Multi-Device Application”. We translate our view on the “Project Manager”, open the “Target Platforms” list there, find “OS X” in it, right-click on it and select “Properties ...” from the drop-down list.
Create a new profile for our MacBook.
Specify the profile name, this is an arbitrary name, just for our convenience.
Now we specify the IP address of the MacBook, the port and the password that we set when running PAServer on the MacBook.
We check the connection with PAServer by clicking on the “Test Connection” button.
Profile is ready.
10. Configure SDK for OS X.
After setting up the profile, immediately proceed to setting up the SDK.
On this form, check the SDK version and profile.
Next, the installation process.
The SDK is configured and click on the OK button.
11. Setting up work with iOS-simulator.
In the “Project Manager”, open the “Target Platforms” list, find the “iOS Simulator” in it, right-click on it and select “Properties ...” from the drop-down list.
Literally in a few clicks the setting is performed.
The SDK for the iOS simulator is configured and click OK.
12. Checking the settings in the “Project Manager”.
We check in the “Project Manager” so that the name of our profile appears in front of “OS X” and a list of various iOS devices appears in the “iOS Simulator”.
After the first launch on the simulator of the iOS device, a message will appear indicating that the compilation is complete, you need to tick and click OK, so that this message will no longer appear in the future.
13. Running the application.
We launch our application on the MacBook and in the simulator “iOS Simulator”.
That's all!
Remember that when updating xCode, steps 9-10 may have to be repeated.
Remember that it is not necessary to run your application on a MacBook or an iOS simulator each time, you can debug all your logic in the Windows environment, and only then switch and launch your application on a MacBook or an iOS simulator.
No macbook?
- then MacBook will help you in the clouds www.macincloud.com/;
- install OS X on a virtual PC (for example, VirtualBox) and perform the same settings (but this is where the Apple license question arises).
PS I plan to write a post about connecting iOS devices to RAD Studio XE8. Your wishes, suggestions and topics for future posts, please write in a personal or email.
PPS before posting, I discovered that there was a new version of xCode 6.3 :)
Thank you all and good luck!
Source: https://habr.com/ru/post/255721/
All Articles