Create a beautiful date / time / data picker in android
Sooner or later, any developer is confronted with the idea that something in life must be written so that it is not the customer who likes, but himself. Having decided that I was finally ripe for writing an application for Android, which I myself would enjoy with pleasure - I was faced with the fact that the appearance of views in Android was not very ready for the realization of my beautiful ideas. And if ordinary buttons and TextView are easy to rework, here with the TimePicker, things are much worse. The creative part of the brain rebelled and decided that if the application will have a Date / TimePicker, it is such that it is not only convenient but pleasant to use, otherwise it (the same creative part of the brain) will boycott and stop helping.
Well, the challenge is accepted, we will write our Picker with preference and courtesans.
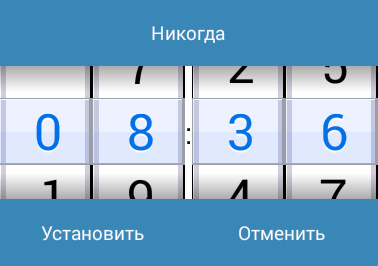
This is the picker we will build.
(For those who just want to use the widget - a link to Git at the end of the article)
')
First of all, I had to answer questions myself - what should this very picker be and what should he be able to do?
Of course, the taste and color of the felt-tip pens are different, but if we compare the style of the competing Pickers, then in my opinion the right one wins:
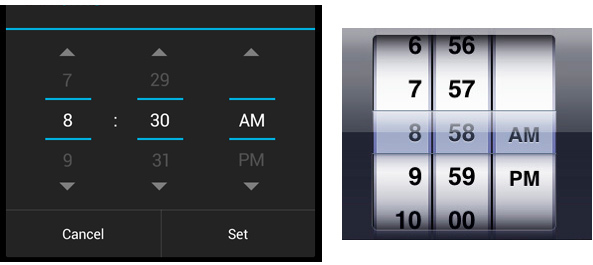
Time picker on Android (left) and iOS (right)
I had to answer for myself - what's more attractive than the right picker?
The answer was not one:
But the mood wanted more, and therefore immediately were added items that should be present in the new Picker.
So, the goals are marked, let's get started.
In general, all the colors of the palette were selected manually before each addition of the element. Colors were compared and corrected. The result was the following palette:
I think the names of the colors speak for themselves, but in any case there will be explanations in the code, so it’s easy to figure it out.
Paste this code into our color.xml.
Picker refers to View Elements, which means we create a DataPicker class:
We will need the following variables:
Define constructors:
In constructors, parameters can be passed, styles, etc. We will not need all these surpluses in this article.
Then we need to override the onSizeChanged method:
This is necessary so that with each change in the size of our canvas all our elements are drawn correctly. Always knowing the size of the canvas, we can accurately fill all its areas.
The next step is to determine the capabilities of our Picker. First, it should get the values that need to be displayed. Create a method for this:
For this method, I needed a Handler. The fact is that the size of the canvas at the time of creation is equal to 0 both in width and in height. In this method, we refer to the data class in which our values and their parameters lie. But just in case, we check if our canvas is set to any size. And if the size is not yet determined, then just postpone this function a little.
A class with values and their parameters looks like this:
The next opportunity that should be is the ability to change the Picker value by scrolling.
Let's redefine the OnTouch method for this:
Actually the method of aligning our values after stopping scrolling:
As we can see, in the past method we used the onSelected function so that our Picker reports that the user has selected a value.
Let's create for this a listener and define events:
When all the basic methods we have identified, we proceed to the most important. We need to draw our Picker on canvas. The onDraw method is responsible for rendering :
It should look like this:

Result:

With shadows already better:
Already something interesting:

So much better:

Perfect:
Finish the onDraw method with catching errors and set the drawing fps:
The convenience of our Picker is that we can combine them for more convenient selection of values.
For example, you can combine 4 components to select a reminder time:
Then our Picker can add attribute processing, custom parameters, work with adapters ... There is an inexhaustible field of activity here and in one article there is no stopping. But if the community is interested in continuing - I will be glad to continue.
Link to Git on ready source.
Well, the challenge is accepted, we will write our Picker with preference and courtesans.
This is the picker we will build.
(For those who just want to use the widget - a link to Git at the end of the article)
')
First of all, I had to answer questions myself - what should this very picker be and what should he be able to do?
Of course, the taste and color of the felt-tip pens are different, but if we compare the style of the competing Pickers, then in my opinion the right one wins:
Time picker on Android (left) and iOS (right)
I had to answer for myself - what's more attractive than the right picker?
The answer was not one:
- Looks nicer
- Intuitive switching
- No extra items
But the mood wanted more, and therefore immediately were added items that should be present in the new Picker.
- The ability to easily change the size without compromising the design
- The ability to indicate not only the time but also ... but in general any information
- Still, it should be more android than apple
So, the goals are marked, let's get started.
Palette
In general, all the colors of the palette were selected manually before each addition of the element. Colors were compared and corrected. The result was the following palette:
Palette
<color name="datepickerBackground">#ffffff</color> <color name="datepickerText">#000000</color> <color name="datepickerSelectedValue">#3770e4</color> <color name="datepickerSelectedValueShadow">#ffffff</color> <color name="datapickerGradientStart">#55000000</color> <color name="datapickerSelectedValueeLineG1">#22ffffff</color> <color name="datapickerSelectedValueeLineG2">#227d98ff</color> <color name="datapickerSelectedValueeLineG3">#336585ff</color> <color name="datapickerSelectedValueeLineG4">#336d8dff</color> <color name="datapicketSelectedValueBorder">#9a9da4</color> <color name="datapicketSelectedBorderTop">#f8fcff</color> <color name="datapicketSelectedBorderBttom">#a1a7bf</color> <color name="datapickerBlackLines">#000000</color> <color name="datapickerGrayLines">#cfcdd8</color> I think the names of the colors speak for themselves, but in any case there will be explanations in the code, so it’s easy to figure it out.
Paste this code into our color.xml.
Create Picker
Picker refers to View Elements, which means we create a DataPicker class:
public class DataPicker extends View { ... } We will need the following variables:
Variables Used
public Context dataPickercontext=null; // Context private OnChangeValueListener mListener=null; // public int nowTopPosition = 0; // private int minTopPosition = 0; // private int upMaxTopPosition = 0; // , private int maxTopPosition = 0; // private int maxValueHeight = 0; // private ArrayList<dpValuesSize> dpvalues = new ArrayList<dpValuesSize>(); // private int canvasW =0; // private int canvasH=0; // private int selectedvalueId=0; // private boolean needAnimation=false; // private int needPosition=0; // public int valpadding = 30; // private int scrollspeed=0; // private boolean scrolltoup=false; // private float dpDownY=0; // private float canvasDownY=0; // private long actdownTime=0; // Define constructors:
public DataPicker(Context context) { super(context); dataPickercontext = context; } public DataPicker(Context context, AttributeSet attrs) { super(context, attrs); dataPickercontext = context; } public DataPicker(Context context, AttributeSet attrs, int defStyle) { super(context, attrs, defStyle); dataPickercontext = context; } In constructors, parameters can be passed, styles, etc. We will not need all these surpluses in this article.
Then we need to override the onSizeChanged method:
@Override protected void onSizeChanged(int w, int h, int oldw, int oldh) { canvasW = w ; canvasH = h ; maxValueHeight = (canvasH - (valpadding*2))/2; nowTopPosition = 0; super.onSizeChanged(w, h, oldw, oldh); } This is necessary so that with each change in the size of our canvas all our elements are drawn correctly. Always knowing the size of the canvas, we can accurately fill all its areas.
The next step is to determine the capabilities of our Picker. First, it should get the values that need to be displayed. Create a method for this:
private Handler dpHandler = new Handler(); public void setValues(final String[] newvalues) { if (canvasW == 0 || canvasH == 0) { dpHandler.postDelayed(new Runnable() { @Override public void run() { if (canvasW == 0 || canvasH == 0) { dpHandler.postDelayed(this, 100); } else { dpvalues.clear(); for (int i = 0; i < newvalues.length; i++) { dpvalues.add(new dpValuesSize(newvalues[i], canvasW, canvasH)); } } } }, 100); } dpvalues.clear(); for (int i = 0; i < newvalues.length; i++) { dpvalues.add(new dpValuesSize(newvalues[i], canvasW, canvasH)); } } For this method, I needed a Handler. The fact is that the size of the canvas at the time of creation is equal to 0 both in width and in height. In this method, we refer to the data class in which our values and their parameters lie. But just in case, we check if our canvas is set to any size. And if the size is not yet determined, then just postpone this function a little.
A class with values and their parameters looks like this:
class dpValuesSize { public int dpWidth = 0; // public int dpHeight = 0; // public String dpValue = ""; // public int dpTextSize = 0; // public int valpadding = 30; // public int valinnerLeftpadding = 20; // /* , . - , View, . . , . - . , */ public dpValuesSize(String val, int canvasW, int canvasH) { try { int maxTextHeight = (canvasH - (valpadding * 2)) / 2; boolean sizeOK = false; dpValue = val; while (!sizeOK) { Rect textBounds = new Rect(); Paint textPaint = new Paint(); dpTextSize++; textPaint.setTextSize(dpTextSize); textPaint.getTextBounds(val, 0, val.length(), textBounds); if (textBounds.width() <= canvasW - (valinnerLeftpadding * 2) && textBounds.height() <= maxTextHeight) { dpWidth = textBounds.width(); dpHeight = textBounds.height(); } else { sizeOK = true; } } } catch (Exception e) { e.printStackTrace(); } } } The next opportunity that should be is the ability to change the Picker value by scrolling.
Let's redefine the OnTouch method for this:
@Override public boolean onTouchEvent(MotionEvent motionEvent) { //. , Y if (motionEvent.getAction() == MotionEvent.ACTION_DOWN) { canvasDownY = motionEvent.getY(); dpDownY = motionEvent.getY() - nowTopPosition; needAnimation = false; actdownTime = motionEvent.getEventTime(); } // , nowTopPosition . , . if (motionEvent.getAction() == MotionEvent.ACTION_MOVE) { if ((int) (motionEvent.getY() - dpDownY) > maxTopPosition) { nowTopPosition = maxTopPosition; return true; } if ((int) (motionEvent.getY() - dpDownY) < upMaxTopPosition) { nowTopPosition = upMaxTopPosition; return true; } nowTopPosition = (int) (motionEvent.getY() - dpDownY); } /* - , , ( roundingValue(). scrollspeed. , - , . */ if (motionEvent.getAction() == MotionEvent.ACTION_UP) { if (canvasDownY > motionEvent.getY()) { scrolltoup = false; } else { scrolltoup = true; } if ((motionEvent.getEventTime() - actdownTime < 200) && (Math.abs(dpDownY - motionEvent.getY()) > 100)) { scrollspeed = (int) (1000 - (motionEvent.getEventTime() - actdownTime)); } else { scrollspeed = 0; roundingValue(); } needAnimation = true; } return true; } Actually the method of aligning our values after stopping scrolling:
private void roundingValue() { // needPosition, . needPosition = (((nowTopPosition - maxTopPosition - (maxValueHeight / 2)) / (maxValueHeight + valpadding))) * (maxValueHeight + valpadding) + maxTopPosition; // , selectedvalueId = Math.abs(((needPosition - valpadding - (maxValueHeight / 2)) / (maxValueHeight + valpadding))); // , . onSelected(selectedvalueId); } As we can see, in the past method we used the onSelected function so that our Picker reports that the user has selected a value.
Let's create for this a listener and define events:
public interface OnChangeValueListener { public void onEvent(int valueId); } public void setOnChangeValueListener(OnChangeValueListener eventListener) { mListener = eventListener; } //, protected void onSelected(int selectedId) { if (mListener != null) { mListener.onEvent(selectedId); } } protected void onSelected(int selectedId) { if (mListener != null) { mListener.onEvent(selectedId); } } // public int getValueid() { try { return selectedvalueId; } catch (Exception e) { } return -1; } When all the basic methods we have identified, we proceed to the most important. We need to draw our Picker on canvas. The onDraw method is responsible for rendering :
@Override protected void onDraw(Canvas canvas) { super.onDraw(canvas); try { // , Picker' if (dpvalues.size() == 0) { return; } // , upMaxTopPosition = -(((dpvalues.size() - 1) * (maxValueHeight + valpadding))); // ( ) canvas.drawColor(Color.argb(0, 255, 255, 255)); //, ( - ) if (needAnimation) { if (scrollspeed > 0) { scrollspeed -= 30; if (scrolltoup) { int currentPos = nowTopPosition + 30; if ((currentPos) > maxTopPosition) { nowTopPosition = maxTopPosition; scrollspeed = 0; roundingValue(); } else { nowTopPosition = currentPos; } } if (!scrolltoup) { int currentPos = nowTopPosition - 30; if ((currentPos) < upMaxTopPosition) { nowTopPosition = upMaxTopPosition; scrollspeed = 0; roundingValue(); } else { nowTopPosition = currentPos; } } if (scrollspeed <= 0) { roundingValue(); } } else { if (nowTopPosition > needPosition) { nowTopPosition -= 20; if (nowTopPosition < needPosition) { nowTopPosition = needPosition; } } if (nowTopPosition < needPosition) { nowTopPosition += 20; if (nowTopPosition > needPosition) { nowTopPosition = needPosition; } } if (nowTopPosition == needPosition) { needAnimation = false; } } } // for (int i = 0; i < dpvalues.size(); i++) { try { Paint paint = new Paint(); paint.setColor(dataPickercontext.getResources().getColor(R.color.datepickerText)); if (selectedvalueId == i) { paint.setColor(dataPickercontext.getResources().getColor(R.color.datepickerSelectedValue)); Paint shadowText = new Paint(); shadowText.setColor(dataPickercontext.getResources().getColor(R.color.datepickerSelectedValueShadow)); shadowText.setTextSize(dpvalues.get(i).dpTextSize); shadowText.setAntiAlias(true); canvas.drawText(dpvalues.get(i).dpValue, (canvasW / 2) - (dpvalues.get(i).dpWidth / 2), ((maxValueHeight + valpadding) * i) + (valpadding + maxValueHeight) + (dpvalues.get(i).dpHeight / 2) + nowTopPosition + 2, shadowText); } paint.setTextSize(dpvalues.get(i).dpTextSize); paint.setAntiAlias(true); canvas.drawText(dpvalues.get(i).dpValue, (canvasW / 2) - (dpvalues.get(i).dpWidth / 2), ((maxValueHeight + valpadding) * i) + (valpadding + maxValueHeight) + (dpvalues.get(i).dpHeight / 2) + nowTopPosition, paint); } catch (Exception e) { } } It should look like this:

// Paint lPBorders = new Paint(); lPBorders.setColor(dataPickercontext.getResources().getColor(R.color.datapickerBlackLines)); canvas.drawLine(0,0,0,canvasH,lPBorders); canvas.drawLine(1,0,1,canvasH,lPBorders); canvas.drawLine(canvasW-1,0,canvasW-1,canvasH,lPBorders); canvas.drawLine(canvasW-2,0,canvasW-2,canvasH,lPBorders); canvas.drawLine(canvasW,0,canvasW,canvasH,lPBorders); lPBorders=new Paint(); lPBorders.setColor(dataPickercontext.getResources().getColor(R.color.datapickerGrayLines)); canvas.drawRect(2,0,7,canvasH,lPBorders); canvas.drawRect(canvasW-7,0,canvasW-2,canvasH,lPBorders); Result:

// Paint framePaint = new Paint(); framePaint.setShader(new LinearGradient(0, 0, 0, getHeight() / 5, dataPickercontext.getResources().getColor(R.color.datapickerGradientStart), Color.TRANSPARENT, Shader.TileMode.CLAMP)); canvas.drawPaint(framePaint); framePaint.setShader(new LinearGradient(0, getHeight(), 0, getHeight() - getHeight() / 5, dataPickercontext.getResources().getColor(R.color.datapickerGradientStart), Color.TRANSPARENT, Shader.TileMode.CLAMP)); canvas.drawPaint(framePaint); With shadows already better:

// Path pathSelect = new Path(); pathSelect.moveTo(0, canvasH / 2 - maxValueHeight / 2 - valpadding / 2); pathSelect.lineTo(canvasW, canvasH / 2 - maxValueHeight / 2 - valpadding / 2); pathSelect.lineTo(canvasW, canvasH / 2); pathSelect.lineTo(0, canvasH / 2); pathSelect.lineTo(0, canvasH / 2 - maxValueHeight / 2); Paint pathSelectPaint = new Paint(); pathSelectPaint.setShader(new LinearGradient(0, 0, 0, maxValueHeight / 2, dataPickercontext.getResources().getColor(R.color.datapickerSelectedValueeLineG1), dataPickercontext.getResources().getColor(R.color.datapickerSelectedValueeLineG2), Shader.TileMode.CLAMP)); canvas.drawPath(pathSelect, pathSelectPaint); pathSelect = new Path(); pathSelect.moveTo(0, canvasH / 2); pathSelect.lineTo(canvasW, canvasH / 2); pathSelect.lineTo(canvasW, canvasH / 2 + maxValueHeight / 2 + valpadding / 2); pathSelect.lineTo(0, canvasH / 2 + maxValueHeight / 2 + valpadding / 2); pathSelect.lineTo(0, canvasH / 2); pathSelectPaint = new Paint(); pathSelectPaint.setShader(new LinearGradient(0, 0, 0, maxValueHeight / 2, dataPickercontext.getResources().getColor(R.color.datapickerSelectedValueeLineG3), dataPickercontext.getResources().getColor(R.color.datapickerSelectedValueeLineG4), Shader.TileMode.CLAMP)); canvas.drawPath(pathSelect, pathSelectPaint); Already something interesting:

// Paint selValLightBorder = new Paint(); Paint selValTopBorder = new Paint(); Paint selValBottomBorder = new Paint(); selValLightBorder.setColor(dataPickercontext.getResources().getColor(R.color.datapicketSelectedValueBorder)); selValTopBorder.setColor(dataPickercontext.getResources().getColor(R.color.datapicketSelectedBorderTop)); selValBottomBorder.setColor(dataPickercontext.getResources().getColor(R.color.datapicketSelectedBorderBttom)); canvas.drawLine(0, canvasH / 2 - maxValueHeight / 2 - valpadding / 2, canvasW, canvasH / 2 - maxValueHeight / 2 - valpadding / 2, selValLightBorder); canvas.drawLine(0, canvasH / 2 - maxValueHeight / 2 - valpadding / 2 + 1, canvasW, canvasH / 2 - maxValueHeight / 2 - valpadding / 2 + 1, selValTopBorder); canvas.drawLine(0, canvasH / 2 + maxValueHeight / 2 + valpadding / 2, canvasW, canvasH / 2 + maxValueHeight / 2 + valpadding / 2, selValLightBorder); canvas.drawLine(0, canvasH / 2 + maxValueHeight / 2 + valpadding / 2 - 1, canvasW, canvasH / 2 + maxValueHeight / 2 + valpadding / 2 - 1, selValBottomBorder); canvas.drawLine(0, canvasH / 2 - maxValueHeight / 2 - valpadding / 2, 0, canvasH / 2 + maxValueHeight / 2 + valpadding / 2, selValLightBorder); canvas.drawLine(1, canvasH / 2 - maxValueHeight / 2 - valpadding / 2, 1, canvasH / 2 + maxValueHeight / 2 + valpadding / 2, selValLightBorder); canvas.drawLine(canvasW - 1, canvasH / 2 - maxValueHeight / 2 - valpadding / 2, canvasW - 1, canvasH / 2 + maxValueHeight / 2 + valpadding / 2, selValLightBorder); canvas.drawLine(canvasW - 2, canvasH / 2 - maxValueHeight / 2 - valpadding / 2, canvasW - 2, canvasH / 2 + maxValueHeight / 2 + valpadding / 2, selValLightBorder); canvas.drawLine(canvasW, canvasH / 2 - maxValueHeight / 2 - valpadding / 2, canvasW, canvasH / 2 + maxValueHeight / 2 + valpadding / 2, selValLightBorder); So much better:
// "" Paint selectedTextPaint = new Paint(); selectedTextPaint.setColor(dataPickercontext.getResources().getColor(R.color.datepickerSelectedValue)); Paint shadowText = new Paint(); shadowText.setColor(dataPickercontext.getResources().getColor(R.color.datepickerSelectedValueShadow)); shadowText.setTextSize(dpvalues.get(selectedvalueId).dpTextSize); shadowText.setAntiAlias(true); canvas.drawText(dpvalues.get(selectedvalueId).dpValue, (canvasW / 2) - (dpvalues.get(selectedvalueId).dpWidth / 2), ((maxValueHeight + valpadding) * selectedvalueId) + (valpadding + maxValueHeight) + (dpvalues.get(selectedvalueId).dpHeight / 2) + nowTopPosition + 2, shadowText); selectedTextPaint.setTextSize(dpvalues.get(selectedvalueId).dpTextSize); selectedTextPaint.setAntiAlias(true); canvas.drawText(dpvalues.get(selectedvalueId).dpValue, (canvasW / 2) - (dpvalues.get(selectedvalueId).dpWidth / 2), ((maxValueHeight + valpadding) * selectedvalueId) + (valpadding + maxValueHeight) + (dpvalues.get(selectedvalueId).dpHeight / 2) + nowTopPosition, selectedTextPaint); Perfect:
Finish the onDraw method with catching errors and set the drawing fps:
}catch(Exception e){e.printStackTrace();} // FPS. this.postInvalidateDelayed( 1000 / 60); } Done!
The convenience of our Picker is that we can combine them for more convenient selection of values.
For example, you can combine 4 components to select a reminder time:
Sample of the finished dish

Then our Picker can add attribute processing, custom parameters, work with adapters ... There is an inexhaustible field of activity here and in one article there is no stopping. But if the community is interested in continuing - I will be glad to continue.
Link to Git on ready source.
Source: https://habr.com/ru/post/255651/
All Articles