We are switching from STM32 to the Russian K1986BE92QI microcontroller. System Timer (SysTick)
Introduction
In the previous article we blinked the LED, but did not quite correctly. The fact is that as a delay, we used an empty cycle, which we have to select for each time interval. This method is also not suitable when we need accurate time intervals. To solve this problem, our microcontroller has three full-timers and one system timer at once. For a start, let's set a small subtask. We need to get a flashing LED at one second intervals. The task is very simple and for this we have enough of the system timer. Because of its lightness, it is ideal for this type of task. Consider it in more detail.
Learning and tuning
Let's see what is written about this timer in the documentation.
The processor has a 24-bit system timer, SysTick, which counts down from the value loaded into it to zero; the reset (return to the beginning) of the value in the LOAD register occurs on the next edge of the clock signal, then the count continues on the subsequent front.
When the processor is stopped for debugging, the timer is not decremented.
Not a lot, but we have enough. It's time to set it up. Take a look at the register map.

Only four registers, but we need only two of them. Consider them in more detail.
')
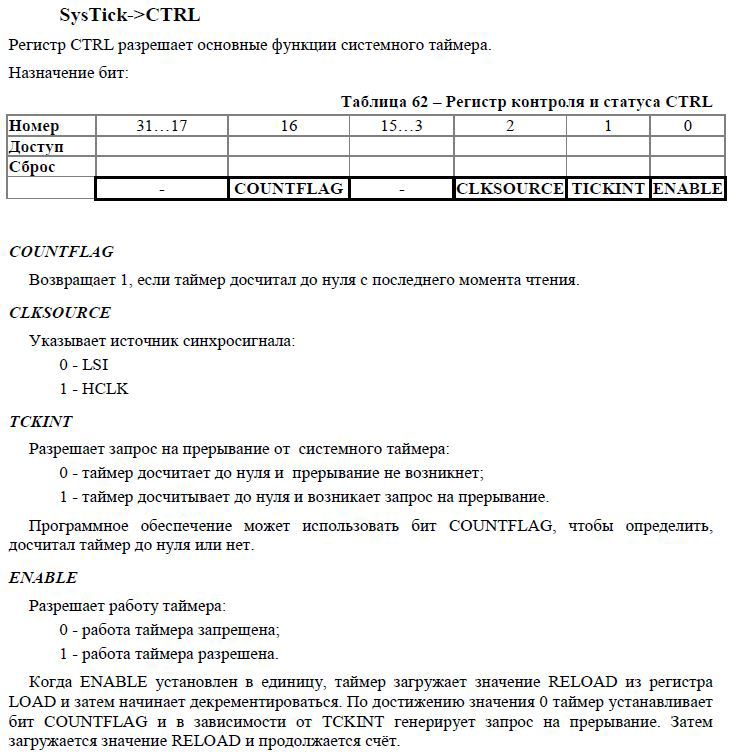
This is the main register setting. As we can see, we need to select the clock source, enable interrupts and turn on the counter. We will clock the timer from HCLK. By default, this source has a clocking frequency of the core, that is, 8 MHz. We will need interrupts to create our own exact delay function. In view of the fact that I could not find the register bits, I decided to register them myself.

We create a separate function for setting the timer and enter our design into it.
void Init_SysTick (void)
{
SysTick-> CTRL | = CLKSOURCE | TCKINT | ENABLE;
}
We look at the following register:

This is where we need to load the delay value. To make our function more universal, we set the timer to interrupt once every one millisecond. We set up our clocking timer from HCLK - this is the clocking frequency of the microcontroller core. By default, it is equal to 8 MHz = 8000000 cycles per second. In one second, one thousand milliseconds => 8000000 (number of ticks per second) / 1000 (number of milliseconds per second) = the number of ticks in one millisecond. But you need to remember to subtract "1", as described in the example above. It turns out the following.
SysTick-> LOAD = (8000000/1000) -1;
I think that this setting will be better placed before turning on the timer.
Total, our function takes the following form.

We write the delay function.
We set up our timer to show interrupts, but never mentioned anywhere what will happen when this interrupt appears. To do this, go to the startup file.
Slightly scrolling down, we can see a long column.
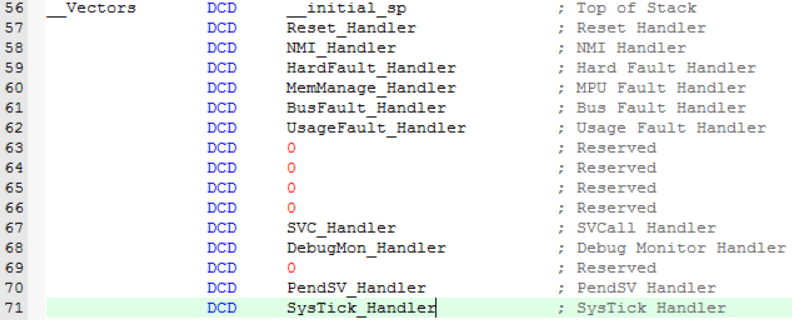
These are called interrupt vectors. When some external / internal urgent event (interrupt) appears, the microcontroller interrupts the execution of the main program, goes to this table and looks where it needs to go further. For example, when an interrupt from our timer appears, it goes to the item named “SysTick_Handler”. If the vector is not registered by us in the program (there is no function with that name) - the controller ignores it and continues the execution of its program. But if the program has a function with this name, then it proceeds to its execution.
Create a function in the main folder named SysTick_Handler. Next, we declare a global variable of 32 bits width. In order for the project to “compress” it does not touch the compiler, we add “volatile” in front of it. If this is not done, then in the future we will observe various errors. In the function itself, we write a condition: if the variable is not yet zero, subtract 1.
Thus, every millisecond the controller will drop the main program and check if the meter is still not empty - take 1 away from it.
Now you need to write the delay function itself, which will use this interrupt.
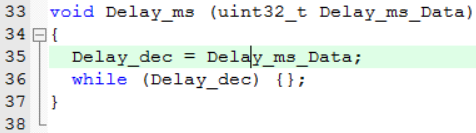
This function takes the delay time (in milliseconds), copies it to a variable, from which the function takes 1 every millisecond from interrupts of the system timer. After the delay is exhausted, the program continues its work. This delay is not the best way to spend CPU time. But in the initial stages it is enough.
Now it's up to you. Replace cycles with our delays.
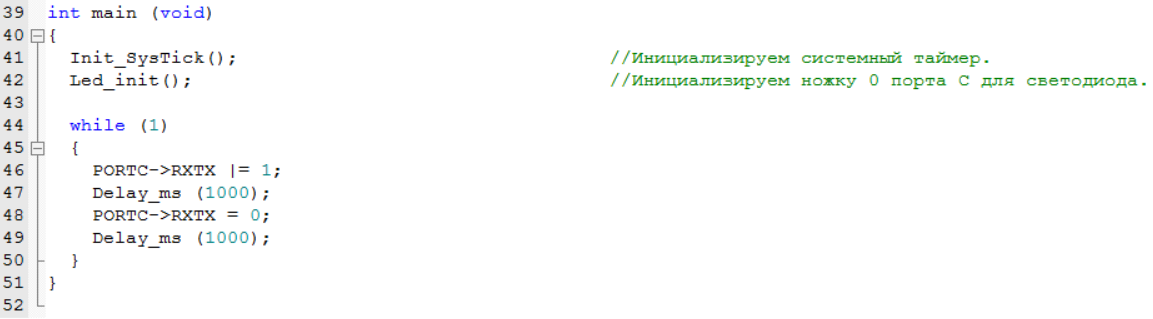
On this with a system timer for now. Source of the project can be found here .
Understanding the system timer, I was based on the knowledge gained from studying STM32 from this video tutorial .
Source: https://habr.com/ru/post/255415/
All Articles