Backup and Restore Virtualized Microsoft Exchange Using Veeam Backup & Replication
After you have transferred Exchange to virtual rails, it's time to start backing up and, if necessary, restoring. Today, I will briefly explain how this can be done using Veeam Backup & Replication 8.0, as well as sharing links to more detailed information sources.

In order to create the correct backup, taking into account the application's work (in our case, it will be about Exchange), in the backup task you need to activate the appropriate setting - application-aware processing. Then, when completing the task, the steps necessary to create a consistent backup will follow. In short, the following will occur:
You can read more about creating consistent backups here or here (in English) or post "Freezing" virtual machines for consistent backups . "
Note: Under certain conditions, Microsoft VSS Persistent Snapshot snapshot technology can be used for Exchange backups, but more about that another time.
')
So, today we are setting up a backup task that will process our Exchange using Microsoft VSS:
Click on OK to save the settings, go back to the wizard step and complete it.
In a disaster recovery situation with Exchange Server, you can use Instant VM Recovery, which allows you to restore a virtual machine to its operational state in just minutes. Veeam vPower technology is used for this - it allows you to run a virtual machine directly from a compressed and deduplicated backup. That is, there is no need to pull backups from the repository, copy it to the production storage system, and so on and so forth - instead, Veeam gives access to the virtual machine files in the repository, mounting the disk on the Veeam backup server (which usually serves as a server for vPower NFS) . The virtual machine itself can then be turned on and started to use, while, for example, the source machine is being repaired - this will allow the end users not to interrupt. The space on the local disk is used as a temporary recording area - all changes are written there while the machine is running from a backup.
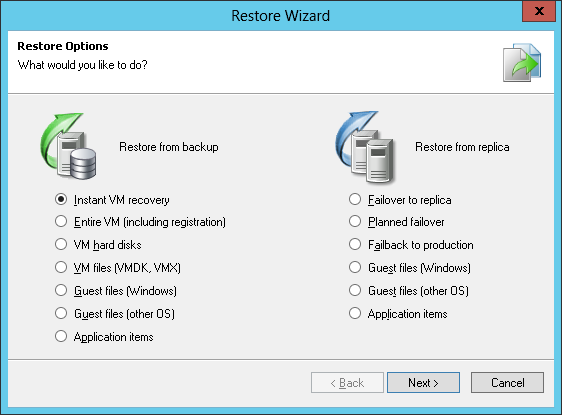
The Restore Wizard is launched by the Restore menu command. Choose what we want to do - namely, Instant VM recovery :
Go through the steps of the recovery wizard:
Thus, upon completion of recovery, the virtual machine will be ready for use.
Note: The recovery wizard UI for different virtualization platforms (VMware and Hyper-V) will differ slightly, but the general description and options are about the same.
After clicking the Next button, Veeam will perform the restore operations with the specified settings using NFS storage (in the case of VMware) or the corresponding driver (in the case of Hyper-V) to start the virtual machine directly from the backup file.
In conclusion, we will migrate the machine back to production storage using Storage vMotion, either Live Migration (from virtualization platform manufacturers) or our own Veeam Quick Migration functionality (only for VMware).
More details about Instant VM Recovery can be found here .
Although Instant VM Recovery is powerful, it is not always convenient to use it. For example, there are cases when you need to restore one lost email message - do not lift the entire server with the entire base for this from the backup! The Veeam Explorer for Microsoft Exchange tool (supports Exchange 2010 SP1 and higher) comes to the rescue in this situation. With it, you can restore only the desired object (letter, calendar or task). In more detail about differences of universal recovery from granular it is possible to read in this post on Habré: "Granular recovery of objects of virtualized applications" .
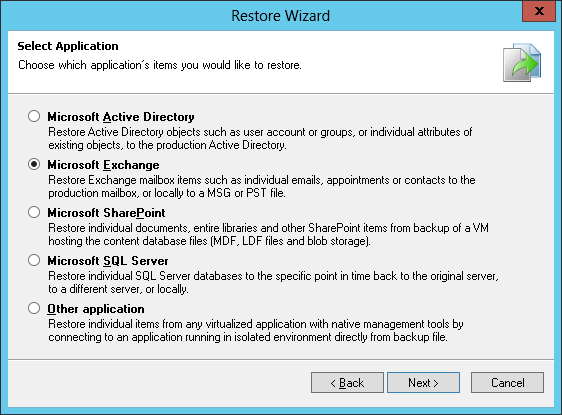
Select the Restore command for the required platform from the Home menu, then select the Application items . Next, we indicate for which particular application we want to restore the object - in our case, this is Microsoft Exchange.
The Microsoft Exchange Item Level Restore wizard starts. In it, we will select our Exchange Server and the point to which we want to recover (Restore Point). If necessary, we specify what it took to recover (Restore Reason). After that, Veeam Explorer for Microsoft Exchange automatically opens, which will bring to your attention the contents of the mailbox datastore (.EDB) for the backed-up Exchange server.
With this tool, you can view the contents of the mailbox datastore, search for the desired letters, tasks or calendar notes.

Having found the desired object, click on it with the right button or use the menu commands to choose exactly how we will restore it (send it by mail, restore it to the server, etc.).
Note that Veeam Explorer for Microsoft Exchange supports the restoration of “hard-deleted” (hard-deleted) objects and archive mailboxes (Online Archive mailboxes) in all editions of Veeam Backup & Replication 8, including the free Free Edition. Recovery on the Exchange server is supported for the commercial version, recovery is available for free by saving to .MSG, exporting to .PST and sending by email as an attached file.
For a more detailed description of the tool, see What's New and in the manual for working with Veeam Explorers (in English), as well as the links below.
Setting up backup jobs
In order to create the correct backup, taking into account the application's work (in our case, it will be about Exchange), in the backup task you need to activate the appropriate setting - application-aware processing. Then, when completing the task, the steps necessary to create a consistent backup will follow. In short, the following will occur:
- Veeam will analyze the guest file system of the virtual machine being processed for the presence of a running application in order to understand what needs to be backed up using VSS (or other methods of freezing the application and the guest OS).
- If you do not use VSS, then before "freezing" Veeam can run a script that you specify.
- Running “freeze”.
- The virtual machine snapshot is created.
- Defrosting is in progress.
- If a script was specified that needs to be executed after defrosting, Veeam will launch it.
- There is a transfer of backup data and commit snapshot.
- Finally, the log truncate is executed (VSS is used.)
You can read more about creating consistent backups here or here (in English) or post "Freezing" virtual machines for consistent backups . "
Note: Under certain conditions, Microsoft VSS Persistent Snapshot snapshot technology can be used for Exchange backups, but more about that another time.
')
So, today we are setting up a backup task that will process our Exchange using Microsoft VSS:
- By running the task wizard (for example, selecting the Edit command for the task) and reaching the Guest Processing step, we check the Enable application-aware processing check box.
- Next, in the Guest OS credentials section, specify the account to access the guest OS.
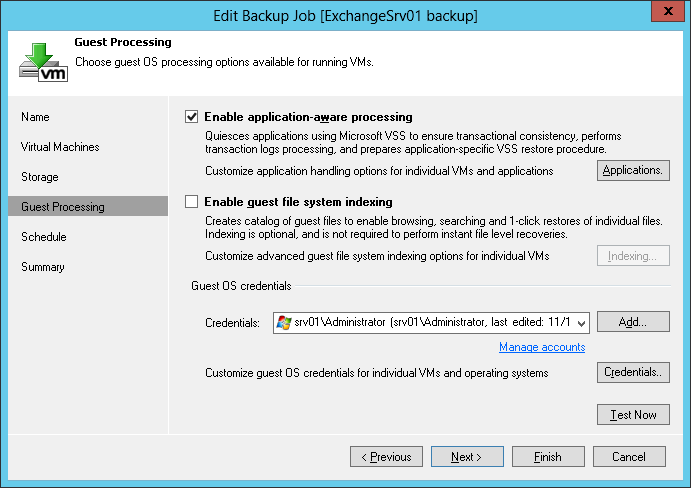
- Click Applications , select our Exchange server in the list and click Edit to specify which options we want to use when processing the application and log.
- First, go to the Applications section on the General tab:
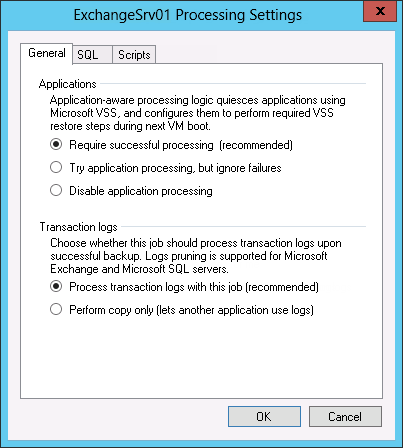
The recommended option for our application is Require successful processing . If you select it, the backup process will take its steps if VSS is successful, otherwise the backup will be stopped. (You can, of course, choose Try application processing, but ignore failures - but in the event of a VSS error, this solution will only create a crash-consistent backup, and this is not exactly what we are striving for.) - Go to the Transaction logs section. Here we have to specify what to do with the logs (transaction logs) if the backup is successfully completed. The logic is as follows:
- If Process transaction logs with this job is selected, the process is guided by the backup made by Veeam: if the backup is successful, the guest file system will be truncated, otherwise it will not (the logs will be saved).
- And if Perform copy only is selected, then during the backup, the VSS_BS_COPY method will be used to create snapshots (COPY ONLY flag); logs will remain intact, if necessary, they can be processed by third-party applications (not Veeam).
Click on OK to save the settings, go back to the wizard step and complete it.
Instant Recovery Instant VM Recovery
In a disaster recovery situation with Exchange Server, you can use Instant VM Recovery, which allows you to restore a virtual machine to its operational state in just minutes. Veeam vPower technology is used for this - it allows you to run a virtual machine directly from a compressed and deduplicated backup. That is, there is no need to pull backups from the repository, copy it to the production storage system, and so on and so forth - instead, Veeam gives access to the virtual machine files in the repository, mounting the disk on the Veeam backup server (which usually serves as a server for vPower NFS) . The virtual machine itself can then be turned on and started to use, while, for example, the source machine is being repaired - this will allow the end users not to interrupt. The space on the local disk is used as a temporary recording area - all changes are written there while the machine is running from a backup.
The Restore Wizard is launched by the Restore menu command. Choose what we want to do - namely, Instant VM recovery :
Go through the steps of the recovery wizard:
- First, choose our virtual machine, which we will recover.
- Then select the point to which we want to recover ( Restore Point ), and the recovery mode ( Restore Mode ).
- If we want to recover to the original location, since the original machine is lost forever - then choose Restore to the original location . Then you will be taken directly to the Restore Reason step, and all the necessary virtual machine settings (host, resource pool, folder) will be exactly taken from the backup.
Important! This option cannot be selected if the original virtual machine is still in the infrastructure. - If you want to restore the virtual machine to another location or with different settings, then select, respectively, Restore (you can change the location, network settings, format of virtual disks, etc.). If this option was chosen, then you will need to go through a series of steps and enter the necessary settings.
- If we want to recover to the original location, since the original machine is lost forever - then choose Restore to the original location . Then you will be taken directly to the Restore Reason step, and all the necessary virtual machine settings (host, resource pool, folder) will be exactly taken from the backup.
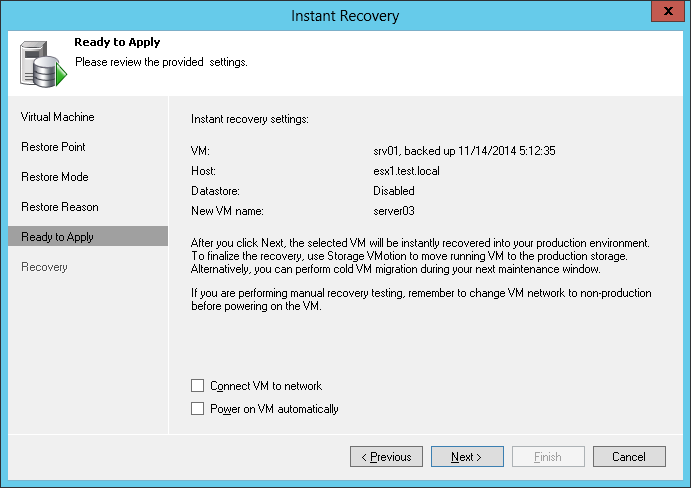
- In the Restore Reason step, we indicate the reason for which we are doing the restoration (it may be necessary in the event of an audit) and go to the Ready to Apply step, where you can select 2 more options: Connect VM to network (connect the virtual machine to the network) and Power on VM automatically ( automatically turn on the virtual machine).
Thus, upon completion of recovery, the virtual machine will be ready for use.
Note: The recovery wizard UI for different virtualization platforms (VMware and Hyper-V) will differ slightly, but the general description and options are about the same.
After clicking the Next button, Veeam will perform the restore operations with the specified settings using NFS storage (in the case of VMware) or the corresponding driver (in the case of Hyper-V) to start the virtual machine directly from the backup file.
In conclusion, we will migrate the machine back to production storage using Storage vMotion, either Live Migration (from virtualization platform manufacturers) or our own Veeam Quick Migration functionality (only for VMware).
More details about Instant VM Recovery can be found here .
Veeam Explorer for Microsoft Exchange: Repairing Individual Objects
Although Instant VM Recovery is powerful, it is not always convenient to use it. For example, there are cases when you need to restore one lost email message - do not lift the entire server with the entire base for this from the backup! The Veeam Explorer for Microsoft Exchange tool (supports Exchange 2010 SP1 and higher) comes to the rescue in this situation. With it, you can restore only the desired object (letter, calendar or task). In more detail about differences of universal recovery from granular it is possible to read in this post on Habré: "Granular recovery of objects of virtualized applications" .
Select the Restore command for the required platform from the Home menu, then select the Application items . Next, we indicate for which particular application we want to restore the object - in our case, this is Microsoft Exchange.
The Microsoft Exchange Item Level Restore wizard starts. In it, we will select our Exchange Server and the point to which we want to recover (Restore Point). If necessary, we specify what it took to recover (Restore Reason). After that, Veeam Explorer for Microsoft Exchange automatically opens, which will bring to your attention the contents of the mailbox datastore (.EDB) for the backed-up Exchange server.
With this tool, you can view the contents of the mailbox datastore, search for the desired letters, tasks or calendar notes.
Having found the desired object, click on it with the right button or use the menu commands to choose exactly how we will restore it (send it by mail, restore it to the server, etc.).
Note that Veeam Explorer for Microsoft Exchange supports the restoration of “hard-deleted” (hard-deleted) objects and archive mailboxes (Online Archive mailboxes) in all editions of Veeam Backup & Replication 8, including the free Free Edition. Recovery on the Exchange server is supported for the commercial version, recovery is available for free by saving to .MSG, exporting to .PST and sending by email as an attached file.
For a more detailed description of the tool, see What's New and in the manual for working with Veeam Explorers (in English), as well as the links below.
What else to read and see
- Article on Habré about a series of tools Veeam Explorers
- Article on Habré about Veeam Quick Migration
- Video on the operation of Veeam Backup & Replication with Exchange DAG (in Russian)
- Video on the restoration of application objects using Veeam Explorers (in Russian)
- An article on the Veeam blog about supporting Exchange DAG (in English)
- Post "Granular restoration of objects virtualized applications"
- Post "" Freezing "of virtual machines to obtain consistent backups"
Source: https://habr.com/ru/post/255409/
All Articles