Making screenshots correctly: practical tips
Device for screen capture on the first computers (Command-Shift-3)
If you have ever done a help or manual for your application, you must have noticed how unexpectedly it takes a lot of time and effort to create screenshots.
After all, it seems that the screenshot is “second of work, Alt + PrintScreen and Ctrl + V!”. Some customers are surprised when they hear that a screenshot in the manual can cost $ 2 or even $ 5.
')
In this article I will tell you how to take screenshots correctly, why it’s not just “two clicks” and what pitfalls are encountered on the way of an inexperienced screenshoter. Treat it as a checklist or a list of practical tips for those who document software. I hope this helps you avoid disappointments and please users with colorful clear pictures.
What you need to screenshot
Need to:
- diagram of the main elements and interface zones with signatures. For example, toolbar, status bar, main menu, context menu. Further, the text does not have to explain: “Click on that button on the second top of the left panel”;
- one main screenshot for each chapter of the manual. Suddenly the user did not read the previous chapters, but used the search;
- screenshot for each action that significantly changes the state of the system, interface or data;
- pop-up (modal) windows.
Not necessary:
- installation wizard, uninstall (only if something quite trivial with a lot of settings);
- login page;
- standard dialog boxes (open, save);
- kilometer drop-down lists (select language or country);
- separate buttons (use text);
- what is already described in detail or is on other screenshots - better give the link;
- panel containing information about version, rights, etc. If a new version is released, it may be necessary to change the numeral or letter on all screenshots;
- pieces of code, configs, etc. Better to insert them as formatted text - and it will look better, and users can copy.
The main principle: the user must know where this page is located (dialogue, menu), and understand the final result of actions. The text should be correctly divided into paragraphs, the headings should reflect the basic actions. And the screenshots are needed to facilitate the search for items and give the user confirmation that he is “on the right track”, that is, on his screen everything looks the same as in the screenshot.
The process of creating screenshots
1. Setting the environment. Choose a uniform style of windows and fonts in your OS. If the interface is “rubber”, determine the width and height of the browser window or the program and do not change it during the shooting.
Layfhak: If you accidentally close the window, its size can be reset, and, most likely, you can not accurately restore them. In order not to “lose” the dimensions, take a screenshot of the window and the entire screen and circle the corners of the window in red, and then set the resulting file as desktop wallpaper.
Maybe someone knows a simpler and more elegant way?
2. Data preparation. Fill the application with examples close to life and solving specific user tasks. You can think of a few cases: simple as “hellowworld”, and more complicated for advanced users.
It is desirable that the names of objects and settings do not change within the same section. For example, in the 1st chapter, user Hippolytus created a note “How to cook fish”. And in the second chapter you need to talk about the customization of notes. Naturally, it is better to talk about how Hippolytus applies a red fill to the already created note. This simple approach will remind the user of previous actions, as well as ensure the completeness of the picture.
Do not forget to fill your system with “real” readable data, make preliminary settings, prepare templates, make backups, etc.
If you make screenshots for documentation in a foreign language, make sure that “Russian” names are not included in the frame (Andrew - ok, Vanja Babushkin - not ok) or inscriptions in Russian.
3. Shooting. It all depends on your tools, but the basic recommendations are:
but. If possible, remove only significant areas of the interface and make the screenshot as compact as possible. So it will fit on A4 paper, and will have a small size.
b. As with the photo, watch the composition, do not cut off parts of the elements along the edges of the screenshot. Try to take screenshots of the same width and height within one example.
c. To save time, take a series of screenshots at once. Just in case, you can make "extra", unplanned screenshots - suddenly come in handy for alterations or editing.
4. Editing. It is not always possible to prepare beautiful and diverse data, avoid typos, or simulate a specific situation (error, failure, large cash balance). In such cases there are at least 2 exits:
a. Edit the code and page styles in the browser ( right click> Inspect element and go), if we are talking about a web application.
b. Change labels, combine blocks from different screenshots in the graphic editor.
It is best to be able to do both, and to combine these approaches depending on the situation.
I want to note that while editing, you can add a frame, cropped edges and shadows to the screen, it is better to do this using styles in your help editor.
5. Preservation. Let the screenshots say unique names, adhering to a specific format, for example, general_settings_privacy. It is better not to use spaces and capital letters, as well as too long names. This approach ensures versatility and efficiency when placing online help on various servers.
It is better to store screenshots in the cloud with support for sharing, tags and versioning. For the convenience of searching, it is better to split the folder with the screens into subfolders corresponding to the structure of the program interface.
6. Paste into text. About this - below, in the " Design ".
7. Check. Postpone the finished section, check it the next day. And better let the text read and screenshots to the tester or designer.
Instruments
Desktop tools
- Snagit (Win, Mac). One of the most popular screen capture software. Consists of 2 modules:
- Capturing Tool. Features: increase of the selection area, automatic detection of interface areas, removal of full-sized screenshots, time delay for pop-up items, video recording;
- Editor. Features: arrows, annotations, effects, frames, sharing.
Of the minuses I can name only that the editor could have more settings and effects; - Shutter (Linux). In short, this is Snagit for Linux, of course, opensource;
- Adobe Photoshop (Win, Mac). I recommend to use for hardcore editing, complex effects. Screenshots of one section can be stored as layers of a psd file, and using macros and scripts you can work wonders with a large number of files;
- GIMP (Win, Mac, Linux). Free replacement Photoshop. Here is a great article about automating the processing of screenshots in the GIMP;
- ImageMagic . (Win, Linux) A set of programs (console utilities) for reading and editing files of a variety of graphic formats. Great for batch processing of screenshots;
- Visio (Win). Why not? It is suitable as an editor for highlighting and annotating, especially if you bought the whole MS Office package;
- Dropbox (Win, Mac, Linux). The desktop client can automatically save all your screenshots on disk and in the cloud and copy the link to the clipboard;
- Joxi (Win, Mac, Linux, Chrome plugin). The same functionality as in Dropbox, plus the ability to add captions and effects on the fly;
- LightShot (Win, Mac, Chrome, Firefox plugin). The same functionality as in Joxi, plus the ability to edit a screenshot in the free online editor Pixlr.
Browser Plugins
HAT program modules
Many HAT (Help Authoring Tools) have built-in modules for taking screenshots:
- Dr.Explain . "Intellectual" removal and annotation of screenshots - the main feature of this program. It defines the window structure and can automatically recognize and sign all interface elements. In the editor itself, there are many styles for arrows, numbers, and so on;
- Help + Manual . More expensive than Dr.Explain, and the module for taking screenshots is worse. But you can use it, especially since the annotations to the screenshots are added to a separate xml file, which can be translated during localization;
- MadCap Flare . Rather expensive editor, the screenshots removal module is not impressive, but all the basic functions are there. The good news is that you can set your own styles for images.
Tools for creating gif animations
To show dynamic actions (for example, text tagging, the appearance of auto-help, menu), screenshots and text is not enough. You can shoot a video tutorial , but it is quite expensive, and weighs more than images. It is better to record a GIF-animation ( example ). These tools will help you:
- GifCam (Win) - for free;
- ScreenFlow (Mac) - paid, also able to shoot and edit video;
- LICEcap (Win, Mac) - for free.
Utilities for image compression
- ImageOptim (Mac) - for free;
- RIOT (Win) - for free.
Registration
Determine the optimal format for your screenshots. In short, then:
- png - interfaces;
- jpg - photo;
- gif - animations ( excellent post about animation ), icons;
- ico - icons.
Each screenshot must have an id, alt, title, number within a section or chapter.
Choose width and height , resolution :
- for printing (width is no more than A4, remember about division into pages and insert page breaks if necessary);
- for the screen (as the screenshot will look on tablets and mobile, consider the features of screenshots made on Retina );
- combined approach - Conditional Output ( Help + Manual , Confluence - Scroll Versions plugin, Flare ). With this approach, you can make several versions of each screenshot.
Remember that the text on the screenshot should be readable without magnification.
Consider the location of the screenshot relative to the text alignment. If the width of the screenshot is small, then you should efficiently use the free space and adjust the text wrap to the left or the right.
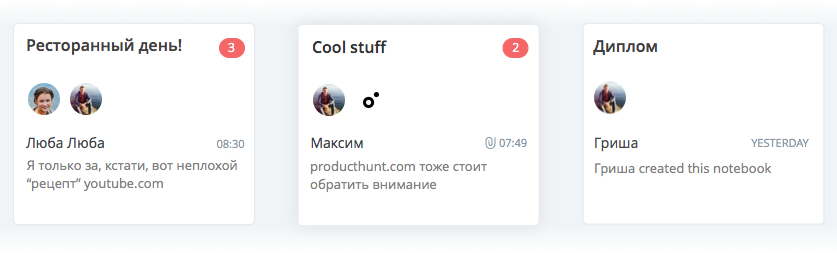
To show the dynamics, you can make a combined screenshot :

If you cut a part of the window, you can show the cut edge with a rough edge or transparency:

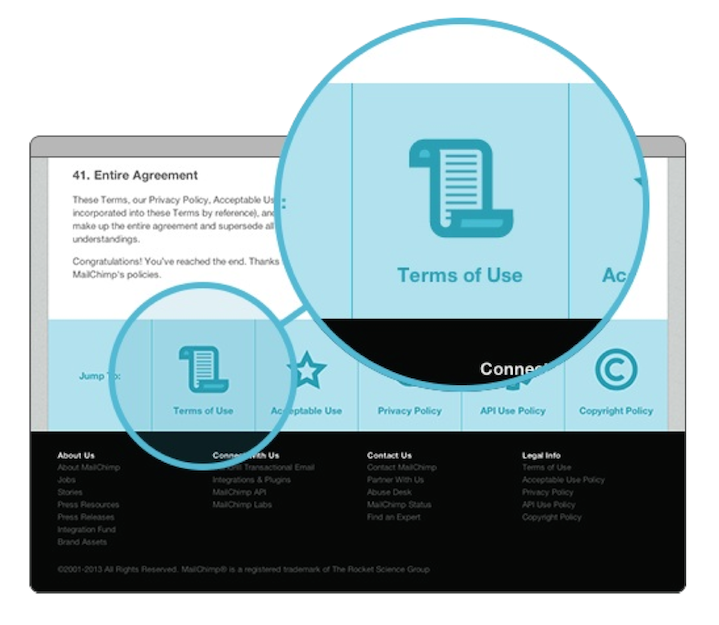
Important elements or small details can be enlarged to emphasize:
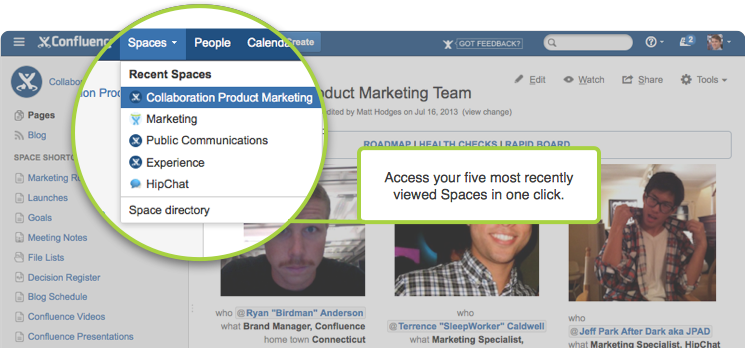
For emphasis, you can also use the selection with the help of color - leave the color of the target element (panel) and discolor the rest:

Add frames, shadows, arrows, captions, blur to taste. The main thing is to keep uniformity and stick to your style-guides:
Use interactive elements (for HTML):
- lightbox as in Confluence , you can with the gallery;
- increase (like goods on ebay);
- slider;
- image map with tooltips ( example 1 , example 2 ).
And some more tips ...
Try not to insert icons and button images into the text, since the line height may change and the layout will look unprofessional. It is better to sign the buttons and icons with the numbers on the big screenshot or insert the icons and buttons into a separate column of the table.
Reuse standard components (icons, panels, dialogs). A good example is the Confluence Inclusions Library .
Post a list of basic illustrations (preferably with links to illustrations) after the content or at the end of the manual.
If the screenshot contains too much data, try replacing it with a prototype, schema, table.
If you make a manual for a mobile application, most likely, you will have a lot of screenshots. Show the navigation between the screenshots . So the user is easier to understand the interaction and transitions, even without reading the text.
Make screenshots for all language versions of software at the same time. Then, when you localize the help, you will not need to ask a translator for additional services, and a technical writer will not need to learn a Yixbar , for example.
I also recommend reading this article with obvious, but useful tips.
Conclusion
Correct screenshots improve any help or manual, make them understandable and intuitive. And to make the right screenshots, you need to be well prepared and spend a lot of units of time, attention and energy. For example, in our practice we encountered difficult products, the screenshots of which cost not ordinary $ 1-2 for a piece, but $ 5 and even $ 10. By the way, if you need help with screenshots or with helpers entirely - we are always in touch ;)
In general, the perfect screenshot (and the manual as a whole) is one that should not be done. With the right approach to UX and UI, you can use the familiar and obvious to the user patterns of navigation and behavior that do not need to be described and explained.
It will be cool if in the comments you share your experience about creating screenshots. Tools, process, dimensions, signatures, styles, storage, automation - any practical advice is interesting!
PS: Thank you for the article to our guru of creating technical documentation Alexander Zinchuk
about the author
Alconost is engaged in the localization of applications, games and websites in 60 languages. Language translators, linguistic testing, cloud platform with API, continuous localization, 24/7 project managers, any formats of string resources.
We also make advertising and training videos - for websites selling, image, advertising, training, teasers, expliners, trailers for Google Play and the App Store.
Read more: https://alconost.com
Source: https://habr.com/ru/post/255373/
All Articles