Add a sidebar to your iOS app.
As a translator, I apologize in advance for any errors in the translation. I would appreciate error messages for their prompt correction.
How can I add a sidebar to my iOS app? This is one of the most frequently asked questions that we receive from our readers. Today we will show how to create a side menu like the one that you can observe, for example, in the application from Facebook.
For those who are not familiar with the concept of a side menu in mobile applications, Ken Yarmost gave a good explanation for this interface element and defined it as:
Since Facebook introduced the sidebar in its mobile application, this interface element has quickly become the standard for implementing application navigation. In one form or another, you can see the side menu in such popular applications as Path, Mailbox, Gmail, Evernote, etc.
')
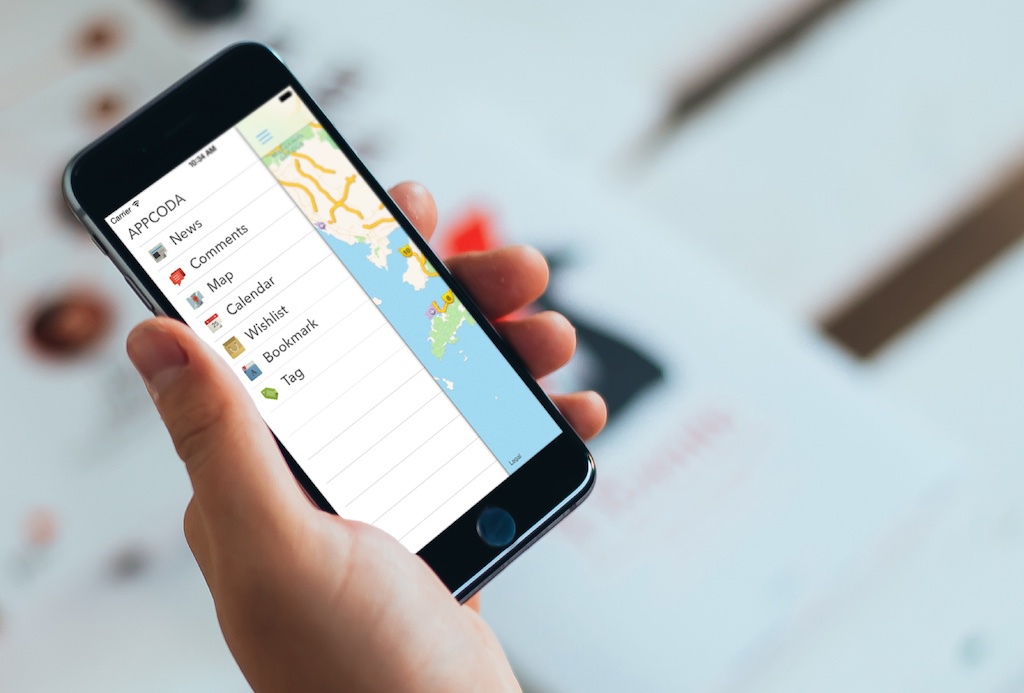
Using the side menu allows you to realize navigation without taking away precious space from the main content on the screen of a mobile device, because in an inactive state such menu is hidden behind a layer of the main content of the application. A menu can be accessed by pressing the menu button on the navigation bar. After the menu has become active, the user can close it using the same menu button on the navigation bar or simply swipe left across the active content area of the application.
With a huge number of solutions on GitHub , we will not build your side menu from scratch. Instead, we will use the wonderful SWRevealViewController library. Developed by John Lluch, this free library provides a quick and easy way to implement sidebar menus.
Well, let's try to develop an example application together.
As usual, we will develop a demo application to show you how to use the SWRevealViewController library. The application is very simple and its main purpose is to guide you through the process of implementing the side menu in your iOS application. Our navigation menu will work as follows:
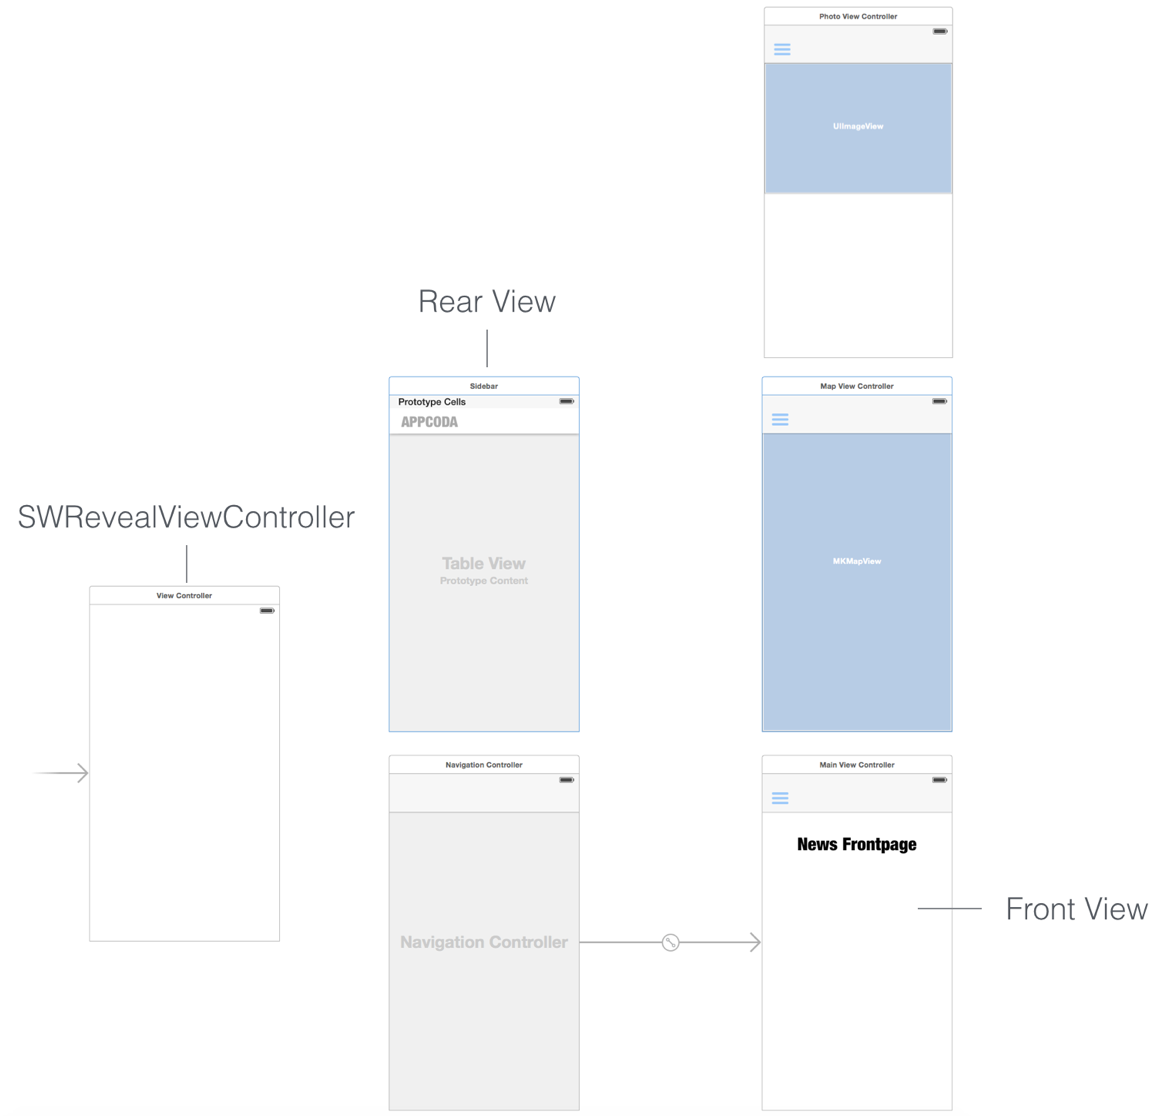
With the introduction of the main idea of the application, we move on. You can create an Xcode project from scratch and design a user interface similar to the one below:
However, to save time, you can download an Xcode project template , which already includes:
As already mentioned, we will use the free SWRevealViewController library to implement the side menu. First you need to download the library from GitHub and extract the files from the downloaded archive.
After unpacking the archive, you need to find the files "SWRevealViewController.h" and "SWRevealViewController.m". Right-click on the SidebarDemo folder in the project navigator window and create a new file group by selecting the “New Group” item in the drop-down menu. Name the group "SWRevealViewController". Import both files into an Xcode project by placing them in the “SWRevealViewController” group.
One of the great features of the SWRevealViewController library is the built-in support for the Storyboard. When implementing the side menu using SWRevealViewController, the developer must associate the SWRevealViewController with the application's main content view controllers (top layer) and side menu layer (underlay) using segues. In our layout, the top layer is the Navigation Controller, associated with the View Controller to display news, and the bottom layer is the View Controller containing the navigation menu. Usually the menu is implemented using UITableViewController.
In our project template for Xcode, we’ve already created view controllers for the top and bottom layers. All you need to do is define the transitions (segues) between the SWRevealViewController and the content view controllers and the menu background.
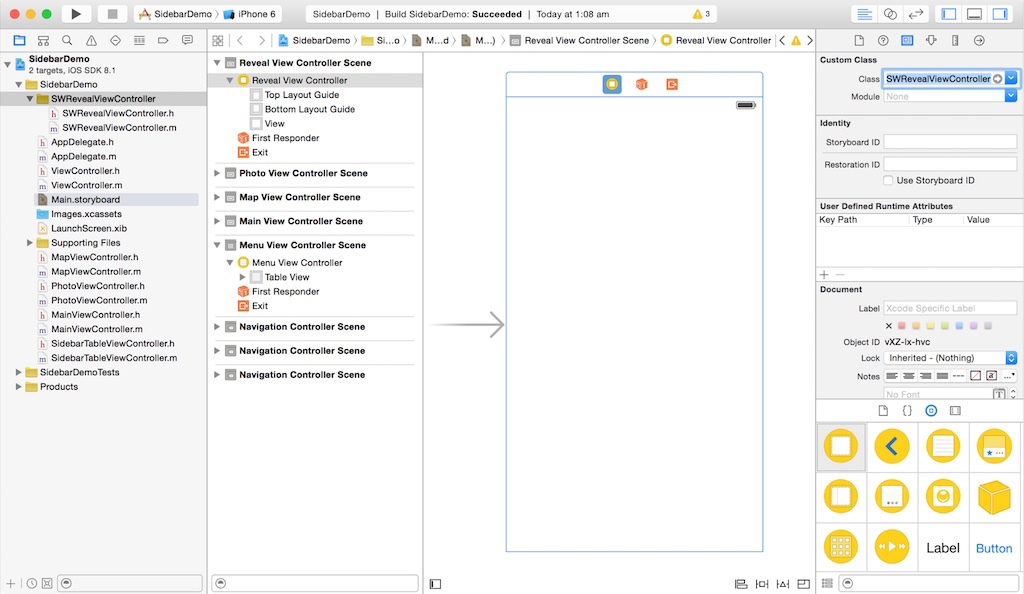
To start, select the start View Controller and change its class to “SWRevealViewController”.
Then, by pressing and holding the control key on the keyboard, click on the SWRevealViewController view controller and drag the mouse cursor to the Menu View Controller. After you release the key, you will see a context menu for selecting the segue selection. In this case, we need to select "reveal view controller set segue". This will define a custom segway ("SWRevealViewControllerSetSegue"). This user transition (segue) informs the SWRevealViewController that the View Controller is the source view controller.
Repeat the same procedure to connect the main view controller to the SWRevialViewController (the main view containing news).

Select the sigway between the SWRevealViewController and the Navigation Controller. Assign the identifier "sw_front" for this transition in the attributes inspector. This is a predefined identifier indicating a transition to the front view controller (news).
For the segway between the SWRevealViewController and the side menu view controller, set the identifier to sw_rear. This identifier tells SWRevealViewController that this controller is a “background” (i.e. sidebar).

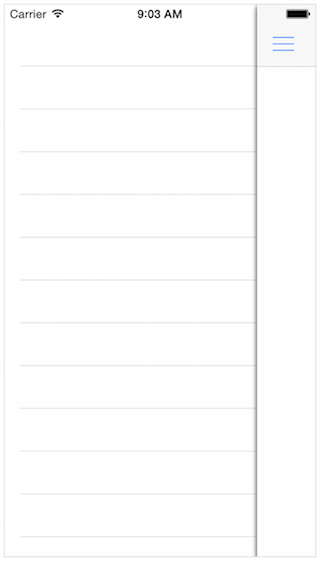
If you compile and run the application, you will see the application that displays the news. And it's all. You will not see the side menu by clicking the menu button on the left side of the navigation pane. And all because we have not yet implemented the action method on pressing this button.
Open MainViewController.m, which is a News Frontpage controller class. Add the following import statement:
Then add the following code to the viewDidLoad method :
SWRevealViewController provides the revealToggle: method to control the sidebar display. As you know, Cocoa uses a target-action mechanism (target-action) for communication between the controller and other objects. We set the View Controller of the navigation panel as the target object for the menu button, and the revealToggle method as the action :. Now, when the user touches the side menu's show button, the revealToggle: method will be called up , which will display the side menu. Finally, we added gesture recognition. Now the user can bring up the menu not only by pressing a button, but also using a swipe on the display area of the main content of the application.
Try compiling and running the application on the iPhone simulator. Click on the "menu" button and the application should show you the side menu that is leaving. Click the button again to close it. You can also open the menu using the swipe to the right.
Before you continue, add the same code snippets to the viewDidLoad method : in the PhotoViewController.m and MapViewController.m files. The application should display the sidebar of the menu when the user presses the menu button in the two view controllers.
In just a few lines of code, you have implemented the sidebar. Wow, isn't it?
However, the menu now does not contain any items. We will add several menu items and show you the implementation of the transition from one item to another. For the sake of simplicity, we will design our menu right on the storyboard.
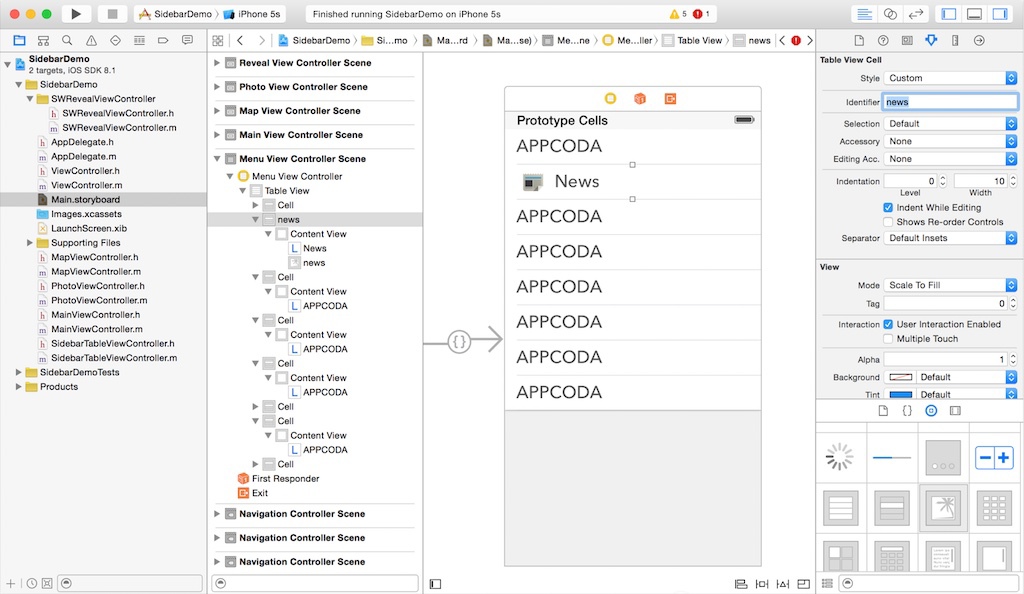
The first cell of the table contains the heading "APPCODA". You can replace this heading with any other, at your discretion. The only thing you have to observe is the identifiers of the cells that we will use in our code afterwards.
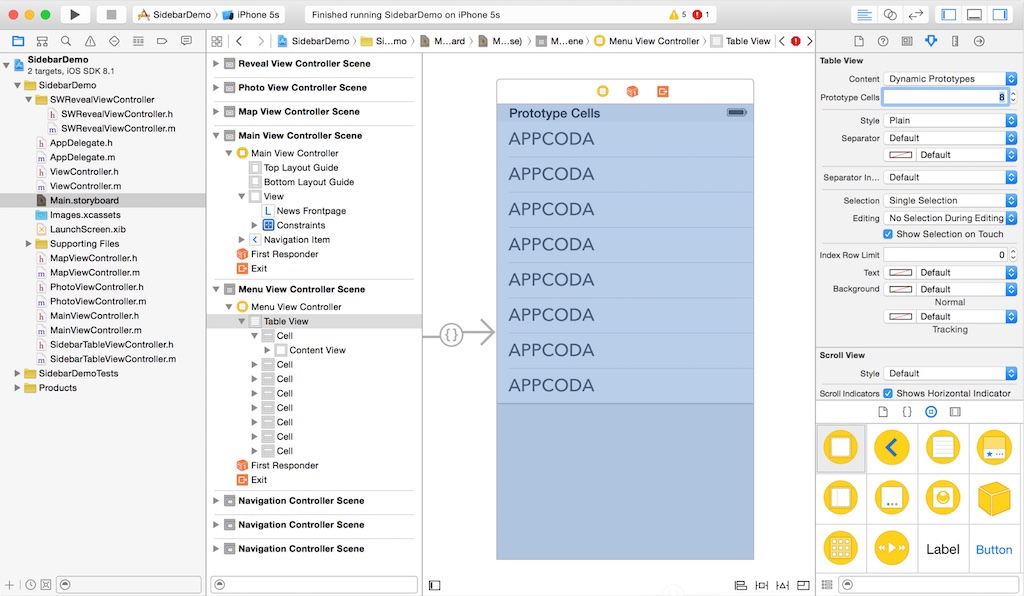
Ok, let's add some menu items. First, select a cell prototype and in the attribute inspector, increase the number of prototypes to 8. As a result, you should get a screen similar to the one below:
Change the label of the second cell from “APPCODA” to “News”. If you want, you can change the text color to dark gray and change the font to “Avenir Next” in the Attributes inspector. Then, move the image view from the object library to the cell. Set the size to 38x38 and set the "news.png" image for this object.
Then, assign a “news” identifier to the cell in the attribute inspector. As a result, you should have a cell similar to the one you see in the image below:
Repeat the same procedure to get the following menu items:
If you did everything right, your navigation bar will look something like this:
After completing the user interface, let's implement the code to display the cells in the navigation table. Open the “SidebarViewController.m” file and add the following import statement to it:
Then, declare the menuItems variable to store the identifiers of the menu items.
The above code is very simple. We initialized the array with the element values of the cell IDs of the menu items. Then adjust the numberOfSectionsInTableView method : so that it returns 1 and the numberOfRowsInSection: method - it should return the correct number of rows in the table:
Finally, change the cellForRowAtIndexPath: method as follows:
This code simply retrieves the table cell identifier from the menuItems array to display it later. Now compile and run the application again. Click on the menu display button and this time you will see a navigation menu bar containing items.

You have already developed an application with a visually attractive side menu. But we missed something. We have not defined a single transition for menu items. When choosing any of the menu items, we do not go to any of the relevant views.
In order not to complicate the demo, we will connect only three view controllers to the menu items. I think this will very well demonstrate to you the principle of work. Here is what we are going to do:
So let's go back to the storyboard. First, select the cell with the identifier "map" (map). Press and hold the control key on the keyboard and click on the cell "map". Drag the mouse cursor to the map view controller and select the “reveal view controller push controller” in the Selection Segue section.
Repeat this procedure for the News cell, but connect it to the main view controller.
For each of the comments, calendar, wishlist, bookmark, and tag menu items, connect them one by one to the navigation controller of the photo view mode controller and assign the identifier “showPhoto” to each of the created transitions. We will use this identifier to distinguish these segways from the two previous ones.
After you complete the configuration of the segway in the storyboard, open “SidebarViewController.m”. First, add the import statement:
Then add the prepareForSegue: method to control the transition:
In the above code, we first get the identifier of the current cell and set it as the title for the navigation bar. For segways with the “showPhoto” identifier, the controller of the photo display mode will display only one photo. In this code, we set the name of the image file that we will display. For example, when the user selects the item “Comments”, we will show “comments_photo.jpg”.
Now compile and test the application again. Open the side menu and select "Map". You will be directed to the map display section. Try to test the transition to other menu items and see what happened.

In this tutorial, we showed you how to use SWRevealViewController to implement a sidebar panel similar to the Facebook application. On GitHub, you can find many other solutions for implementing similar menus, such as GHSidebarNav and ViewDeck . Feel free to explore other libraries and choose the ones that are best for your applications. If you want to learn how to build your sidebar from scratch, Ray Wenderlich offers a great lesson .
How can I add a sidebar to my iOS app? This is one of the most frequently asked questions that we receive from our readers. Today we will show how to create a side menu like the one that you can observe, for example, in the application from Facebook.
For those who are not familiar with the concept of a side menu in mobile applications, Ken Yarmost gave a good explanation for this interface element and defined it as:
The side menu is a panel that “leaves” the bottom, left or right of the main content area of the application, which contains a vertical, independent of the main content of the application scrolling, and serves as the main navigation tool in the application.
Since Facebook introduced the sidebar in its mobile application, this interface element has quickly become the standard for implementing application navigation. In one form or another, you can see the side menu in such popular applications as Path, Mailbox, Gmail, Evernote, etc.
')
Using the side menu allows you to realize navigation without taking away precious space from the main content on the screen of a mobile device, because in an inactive state such menu is hidden behind a layer of the main content of the application. A menu can be accessed by pressing the menu button on the navigation bar. After the menu has become active, the user can close it using the same menu button on the navigation bar or simply swipe left across the active content area of the application.
With a huge number of solutions on GitHub , we will not build your side menu from scratch. Instead, we will use the wonderful SWRevealViewController library. Developed by John Lluch, this free library provides a quick and easy way to implement sidebar menus.
Well, let's try to develop an example application together.
Demo application overview
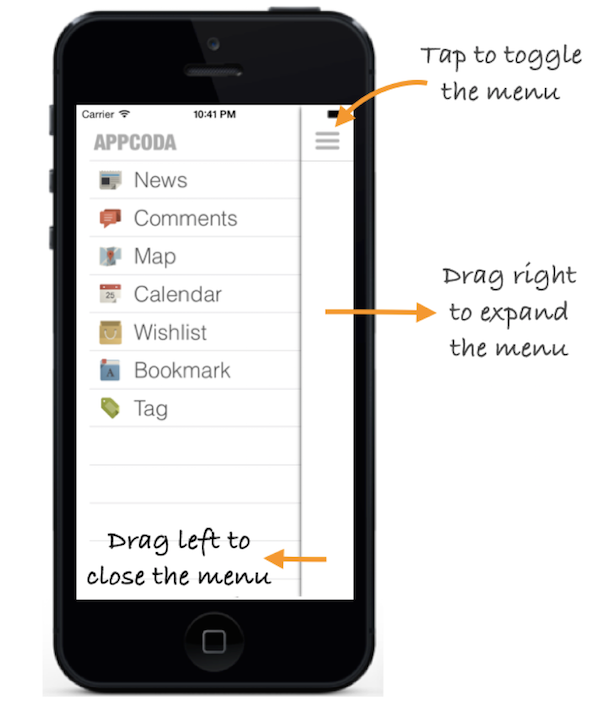
As usual, we will develop a demo application to show you how to use the SWRevealViewController library. The application is very simple and its main purpose is to guide you through the process of implementing the side menu in your iOS application. Our navigation menu will work as follows:
- The menu is invoked by pressing the “menu” button in the upper left corner of the navigation bar;
- Also, the menu can be triggered by swiping right across the active content area;
- The user can close the active side menu by pressing the "menu" button in the upper left corner of the navigation bar;
- Also, the menu can be closed with a swipe left on the active content area.
Create a project in Xcode
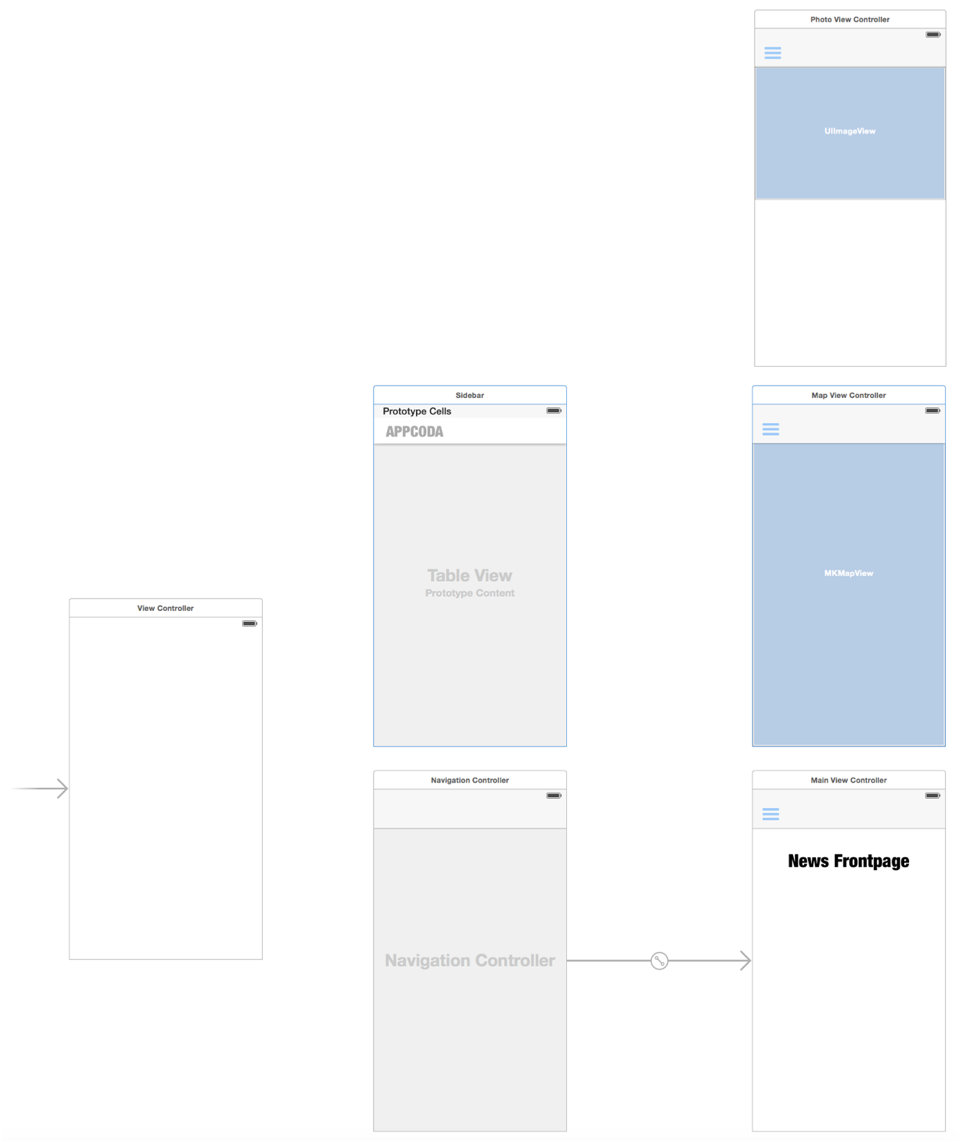
With the introduction of the main idea of the application, we move on. You can create an Xcode project from scratch and design a user interface similar to the one below:
However, to save time, you can download an Xcode project template , which already includes:
- Ready storyboard with all the controllers we need;
- Ready-made view controller classes, including MapViewController and PhotoViewController;
- MapViewController that maps maps;
- PhotoViewController that implements the display of photos and images;
- All the icons and images the app needs (thanks to the free icons from Pixeden )
Import SWRevealViewController Library
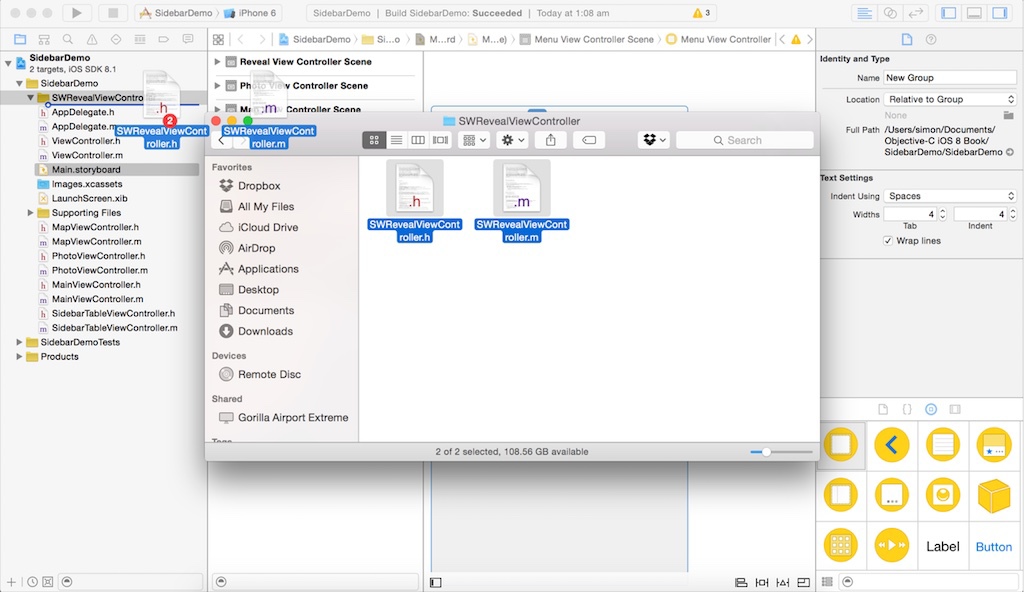
As already mentioned, we will use the free SWRevealViewController library to implement the side menu. First you need to download the library from GitHub and extract the files from the downloaded archive.
After unpacking the archive, you need to find the files "SWRevealViewController.h" and "SWRevealViewController.m". Right-click on the SidebarDemo folder in the project navigator window and create a new file group by selecting the “New Group” item in the drop-down menu. Name the group "SWRevealViewController". Import both files into an Xcode project by placing them in the “SWRevealViewController” group.
Linking controllers to the main content view and slideout menu substrate
One of the great features of the SWRevealViewController library is the built-in support for the Storyboard. When implementing the side menu using SWRevealViewController, the developer must associate the SWRevealViewController with the application's main content view controllers (top layer) and side menu layer (underlay) using segues. In our layout, the top layer is the Navigation Controller, associated with the View Controller to display news, and the bottom layer is the View Controller containing the navigation menu. Usually the menu is implemented using UITableViewController.
In our project template for Xcode, we’ve already created view controllers for the top and bottom layers. All you need to do is define the transitions (segues) between the SWRevealViewController and the content view controllers and the menu background.
To start, select the start View Controller and change its class to “SWRevealViewController”.
Then, by pressing and holding the control key on the keyboard, click on the SWRevealViewController view controller and drag the mouse cursor to the Menu View Controller. After you release the key, you will see a context menu for selecting the segue selection. In this case, we need to select "reveal view controller set segue". This will define a custom segway ("SWRevealViewControllerSetSegue"). This user transition (segue) informs the SWRevealViewController that the View Controller is the source view controller.
Note: If you are using the old version of SWRevealViewController, please note that the use of SWRevealViewControllerSegue is out of date and you must use SWRevealViewControllerSetSegue.
Repeat the same procedure to connect the main view controller to the SWRevialViewController (the main view containing news).
Select the sigway between the SWRevealViewController and the Navigation Controller. Assign the identifier "sw_front" for this transition in the attributes inspector. This is a predefined identifier indicating a transition to the front view controller (news).
For the segway between the SWRevealViewController and the side menu view controller, set the identifier to sw_rear. This identifier tells SWRevealViewController that this controller is a “background” (i.e. sidebar).
If you compile and run the application, you will see the application that displays the news. And it's all. You will not see the side menu by clicking the menu button on the left side of the navigation pane. And all because we have not yet implemented the action method on pressing this button.
Open MainViewController.m, which is a News Frontpage controller class. Add the following import statement:
#import "SWRevealViewController.h" Then add the following code to the viewDidLoad method :
SWRevealViewController *revealViewController = self.revealViewController; if ( revealViewController ) { [self.sidebarButton setTarget: self.revealViewController]; [self.sidebarButton setAction: @selector( revealToggle: )]; [self.view addGestureRecognizer:self.revealViewController.panGestureRecognizer]; } SWRevealViewController provides the revealToggle: method to control the sidebar display. As you know, Cocoa uses a target-action mechanism (target-action) for communication between the controller and other objects. We set the View Controller of the navigation panel as the target object for the menu button, and the revealToggle method as the action :. Now, when the user touches the side menu's show button, the revealToggle: method will be called up , which will display the side menu. Finally, we added gesture recognition. Now the user can bring up the menu not only by pressing a button, but also using a swipe on the display area of the main content of the application.
Try compiling and running the application on the iPhone simulator. Click on the "menu" button and the application should show you the side menu that is leaving. Click the button again to close it. You can also open the menu using the swipe to the right.
Before you continue, add the same code snippets to the viewDidLoad method : in the PhotoViewController.m and MapViewController.m files. The application should display the sidebar of the menu when the user presses the menu button in the two view controllers.
Adding items to the navigation menu
In just a few lines of code, you have implemented the sidebar. Wow, isn't it?
However, the menu now does not contain any items. We will add several menu items and show you the implementation of the transition from one item to another. For the sake of simplicity, we will design our menu right on the storyboard.
The first cell of the table contains the heading "APPCODA". You can replace this heading with any other, at your discretion. The only thing you have to observe is the identifiers of the cells that we will use in our code afterwards.
Ok, let's add some menu items. First, select a cell prototype and in the attribute inspector, increase the number of prototypes to 8. As a result, you should get a screen similar to the one below:
Change the label of the second cell from “APPCODA” to “News”. If you want, you can change the text color to dark gray and change the font to “Avenir Next” in the Attributes inspector. Then, move the image view from the object library to the cell. Set the size to 38x38 and set the "news.png" image for this object.
Then, assign a “news” identifier to the cell in the attribute inspector. As a result, you should have a cell similar to the one you see in the image below:
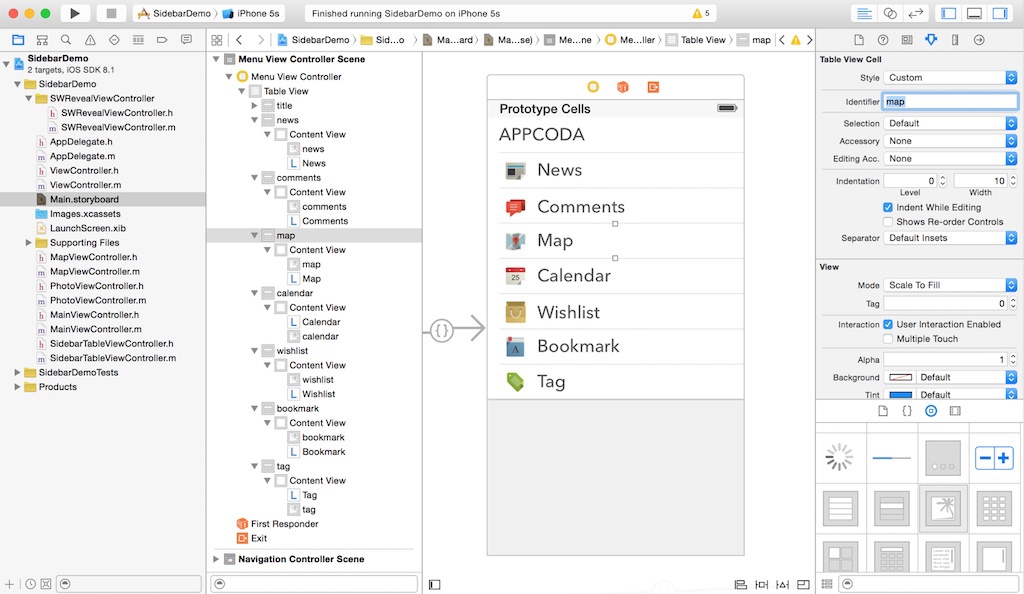
Repeat the same procedure to get the following menu items:
- Comments (image comments.png and cell comments ID)
- Map (map.png image and map cell ID)
- Calendar (image calendar.png and cell ID calendar)
- Wishlist (wishlist.png image and wishlist cell id)
- Bookmark (image bookmark.png and cell identifier bookmark)
- Tag (image tag.png and tag cell id)
If you did everything right, your navigation bar will look something like this:
After completing the user interface, let's implement the code to display the cells in the navigation table. Open the “SidebarViewController.m” file and add the following import statement to it:
#import "SWRevealViewController.h" Then, declare the menuItems variable to store the identifiers of the menu items.
@implementation SidebarViewController { NSArray *menuItems; } The above code is very simple. We initialized the array with the element values of the cell IDs of the menu items. Then adjust the numberOfSectionsInTableView method : so that it returns 1 and the numberOfRowsInSection: method - it should return the correct number of rows in the table:
- (NSInteger)numberOfSectionsInTableView:(UITableView *)tableView { // Return the number of sections. return 1; } - (NSInteger)tableView:(UITableView *)tableView numberOfRowsInSection:(NSInteger)section { // Return the number of rows in the section. return menuItems.count; } Finally, change the cellForRowAtIndexPath: method as follows:
- (UITableViewCell *)tableView:(UITableView *)tableView cellForRowAtIndexPath:(NSIndexPath *)indexPath { NSString *CellIdentifier = [menuItems objectAtIndex:indexPath.row]; UITableViewCell *cell = [tableView dequeueReusableCellWithIdentifier:CellIdentifier forIndexPath:indexPath]; return cell; } This code simply retrieves the table cell identifier from the menuItems array to display it later. Now compile and run the application again. Click on the menu display button and this time you will see a navigation menu bar containing items.
Implementing menu selection
You have already developed an application with a visually attractive side menu. But we missed something. We have not defined a single transition for menu items. When choosing any of the menu items, we do not go to any of the relevant views.
In order not to complicate the demo, we will connect only three view controllers to the menu items. I think this will very well demonstrate to you the principle of work. Here is what we are going to do:
- Connect the cell with the item “News” to the main view controller using the “reveal view controller push controller”
- We connect the cell with the “Map” item to the map view controller using the “reveal view controller push controller”
- All other cells of the menu items will be linked to the photo view controller using the same type of segway. However, for each menu item will be shown its own photo.
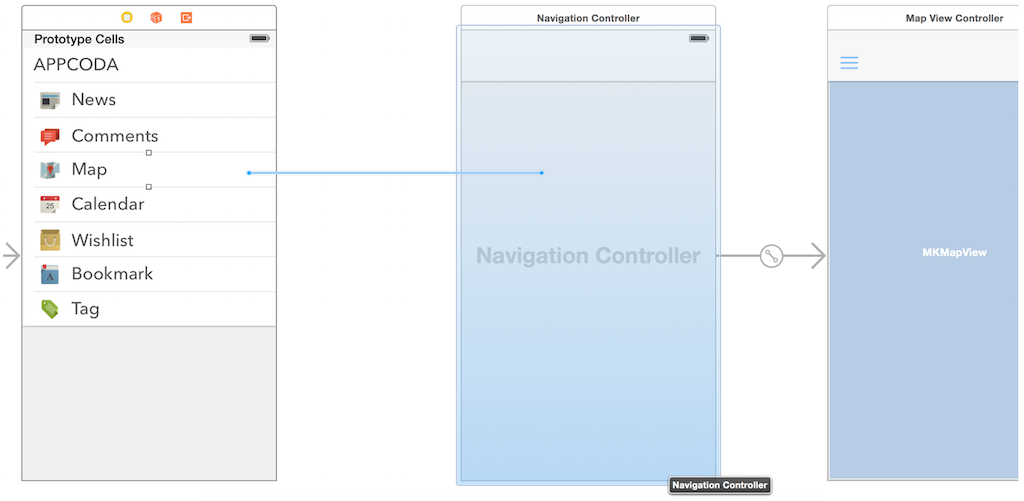
So let's go back to the storyboard. First, select the cell with the identifier "map" (map). Press and hold the control key on the keyboard and click on the cell "map". Drag the mouse cursor to the map view controller and select the “reveal view controller push controller” in the Selection Segue section.
Repeat this procedure for the News cell, but connect it to the main view controller.
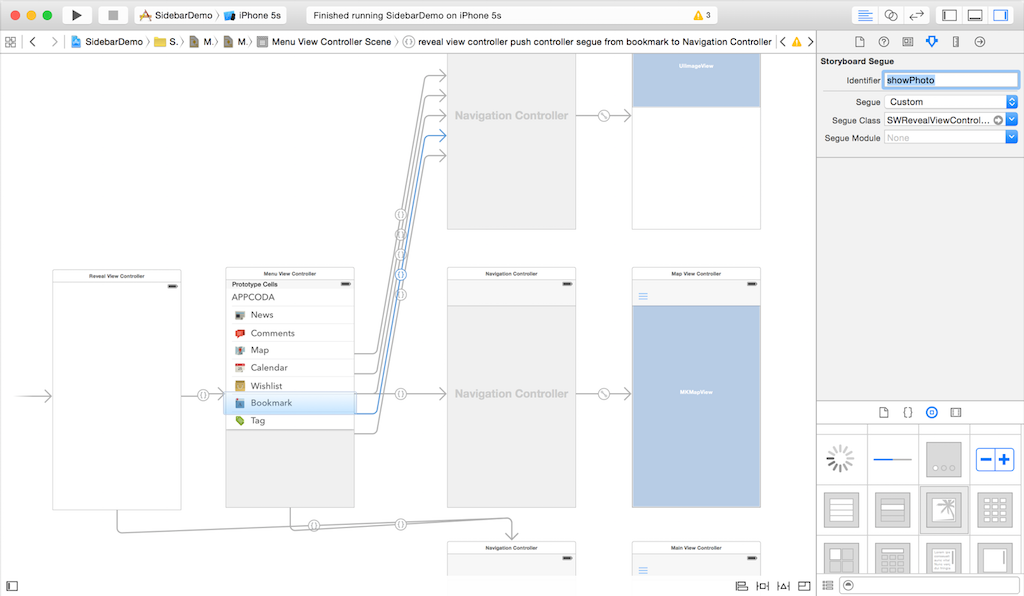
For each of the comments, calendar, wishlist, bookmark, and tag menu items, connect them one by one to the navigation controller of the photo view mode controller and assign the identifier “showPhoto” to each of the created transitions. We will use this identifier to distinguish these segways from the two previous ones.
After you complete the configuration of the segway in the storyboard, open “SidebarViewController.m”. First, add the import statement:
#import "PhotoViewController.h" Then add the prepareForSegue: method to control the transition:
- (void)prepareForSegue:(UIStoryboardSegue *)segue sender:(id)sender { // Set the title of navigation bar by using the menu items NSIndexPath *indexPath = [self.tableView indexPathForSelectedRow]; UINavigationController *destViewController = (UINavigationController*)segue.destinationViewController; destViewController.title = [[menuItems objectAtIndex:indexPath.row] capitalizedString]; // Set the photo if it navigates to the PhotoView if ([segue.identifier isEqualToString:@"showPhoto"]) { UINavigationController *navController = segue.destinationViewController; PhotoViewController *photoController = [navController childViewControllers].firstObject; NSString *photoFilename = [NSString stringWithFormat:@"%@_photo", [menuItems objectAtIndex:indexPath.row</a>; photoController.photoFilename = photoFilename; } } In the above code, we first get the identifier of the current cell and set it as the title for the navigation bar. For segways with the “showPhoto” identifier, the controller of the photo display mode will display only one photo. In this code, we set the name of the image file that we will display. For example, when the user selects the item “Comments”, we will show “comments_photo.jpg”.
Final compilation and testing of the application
Now compile and test the application again. Open the side menu and select "Map". You will be directed to the map display section. Try to test the transition to other menu items and see what happened.
Let's sum up
In this tutorial, we showed you how to use SWRevealViewController to implement a sidebar panel similar to the Facebook application. On GitHub, you can find many other solutions for implementing similar menus, such as GHSidebarNav and ViewDeck . Feel free to explore other libraries and choose the ones that are best for your applications. If you want to learn how to build your sidebar from scratch, Ray Wenderlich offers a great lesson .
Source: https://habr.com/ru/post/255209/
All Articles