Complete energy autonomy or how to survive with solar panels in the outback (part 4. Made in Russia)
Russia has all the infrastructure and its own funds for building a solar power plant in a specific farm. Moreover, all the necessary electronics, and solar panels are made by us on our own, and all this works fine. After experimenting with a nouinheim, branded European China and other equipment, I decided to turn to Russian developers of autonomy equipment and test these devices myself. The first to get to the test is a hybrid inverter MAP HYBRID v.1 24V: 4.5 kW , followed by a high-performance solar MPPT controller.

')
It is not without reason that the inscription “Made in Russia” is large on the main picture. Everything you saw in the photo is really made in Russia: solar panels are manufactured by Telecom-STV , the plant of which is located in Zelenograd, batteries are manufactured by Liotech and manufactured in the Novosibirsk region, and inverters and solar controllers are manufactured in Moscow by MicroART .
In the last part, I decided on an inverter model and made a list of requirements that the device should meet:
1. Work in UPS mode
2. Reserve a separate power phase in the house
3. Pumping energy from solar panels into the home network to reduce consumption from the external network
That is why I chose a hybrid inverter. In principle, any powerful uninterruptible power supply unit would cope with the first two points, but the last point is accessible only to hybrids and I will explain this further using the example of MAP SIN HYBRID.
The logic of the device is as follows:
1. We broadcast the external network through ourselves until it goes beyond the voltage parameters set by the user (above or below the threshold - switch to battery power).
2. If the user connects devices that consume more energy than the external network can provide (set in the controller settings), the inverter starts to add energy from the batteries.
3. If the inverter was connected to the solar controller of the same manufacturer via an I2C bus with a cable, then when the electricity is consumed, the solar controller immediately knows from the inverter how much power is required and gives all the energy, if it is available.
It was the last point that pleased me, since there is a direct interaction between the two devices. Let me explain how this is better than using a third-party controller, using the logic of their work as an example.
Any solar controller:
1. If the battery voltage is sufficient, provide a supporting charge.
Turn on the load
2. If the voltage on the battery subsided a little, but not critical, do not change anything.
3. If the battery voltage sags heavily - we give the maximum energy to charge
Remove the load
4. If the battery voltage is higher than sufficient, reduce the current supply
Solar controller, paired with an inverter:
1. If the battery voltage is sufficient, provide a supporting charge.
Turn on the load
2. If the inverter says that 500 W is on, we give 500 W (or how many solar panels can provide)
Remove the load
3. If the inverter says that the load is removed, reduce the energy supply, continue to maintain the battery charge
By the example of these two processes, it can be seen that the solar controller, which operates independently, will work with delay, which means that energy will be withdrawn from the batteries for some time, introducing them into a cyclic mode and reducing the resource.
In the second case, when the inverter and the solar controller are united by one bus, the solar controller will produce as much energy as the load consumes, if this is possible at the current time. Thus battery life is saved. But I will return to the solar controller and its testing in the following material, and in this I will continue to work with the inverter.
First connection
The first thing you need to connect it. This is done easy, but it is necessary to transfer the system from 12V to 24V (the old system was built on 12V, and the new one on 24V - I wrote about this in the third part) . Since my batteries have already worked for some time and were purchased with a difference of a year, it is necessary to maximize their characteristics. For this you need to perform a series of actions.
1. Charge the batteries with a stabilized voltage of 14.4V for several hours
2. Disconnect from the charger and let them stand for several hours.
3. Check the voltage on each of the batteries so that there is no imbalance (the voltage should be the same or as close as possible, within the measurement error).
4. Connect the batteries in series
5. Check the voltage
6. Connect the inverter
So that it was not so boring, I filmed this whole process on video and provided comments.
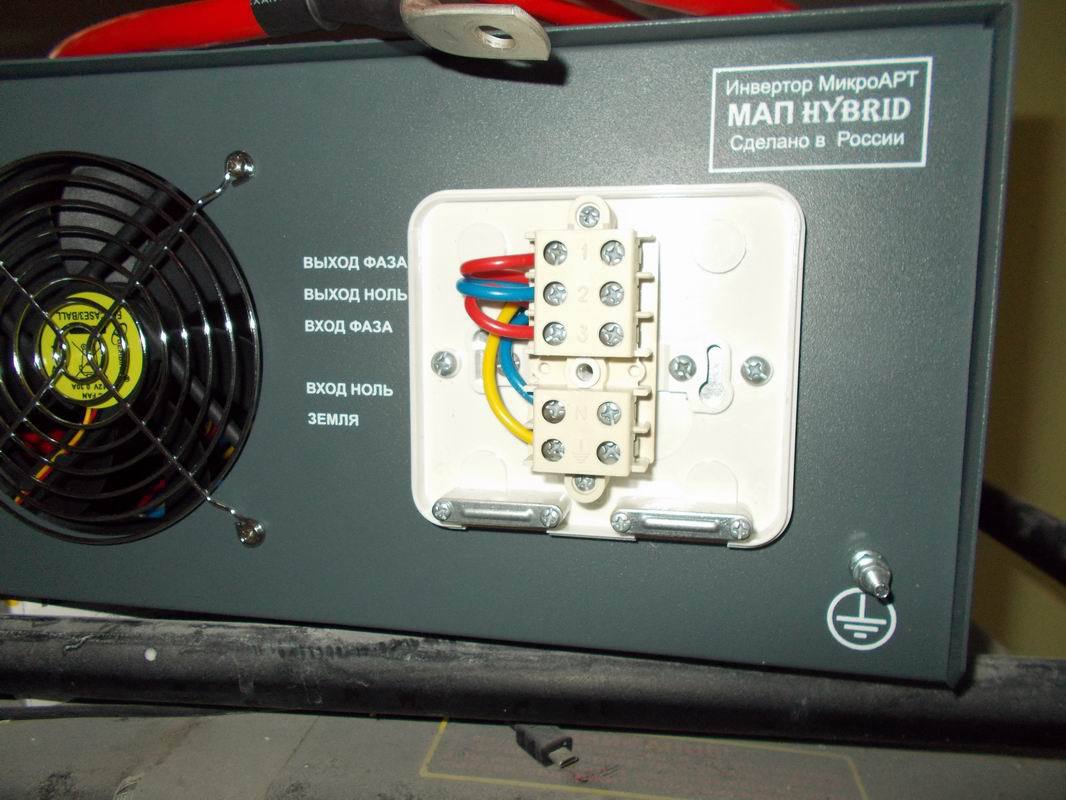
The video captured only connection to the battery. In this case, the device will work only on generation. To work in a hybrid mode, it should be connected to the network and make a power output for the load. To do this, there is a signature pad on the back panel, so that there is no need to climb into the device passport. Convenient and clear:
Service
In one of the previous articles, I wrote how I had to deal with the warranty service of a Chinese device under a German brand. The manufacturer repaired everything and sent it back at his own expense, and I had to pay only for shipping to Germany and wait for 3 months. I also had to face the service of a domestic manufacturer, as interesting glitches occurred when connected to the network (on the display appeared the words “emissions in the network”, “high voltage in the network”). The first call to the support service, which works on weekdays, led me to an intelligent engineer with whom you can communicate in terms without choosing the right words. Then I remembered the technical support of opsocks and Internet providers, when the girls are on the first line, always redirecting to another operator, and I was glad the competent techie on the other side of the line. It was not possible to solve the problem on the spot and they asked me to send the inverter to the service. When the case turned up, I drove into the service myself, gave the device and decided to wait. Diagnostics and correction took about 1.5 hours, and since there were no other clients, I managed to talk with the workers and find out a lot of interesting facts that do not directly relate to my autonomy, so I will write them at the end of the article.
An autopsy revealed ...
Well, what is the test without opening? Having received the corrected inverter on my hands and enlisting the promise of preserving the guarantee upon self-opening of the device, I went home and proceeded.
4.5 kW inverter weighs 23 kg !!! The main evaluator immediately took a strategic position:
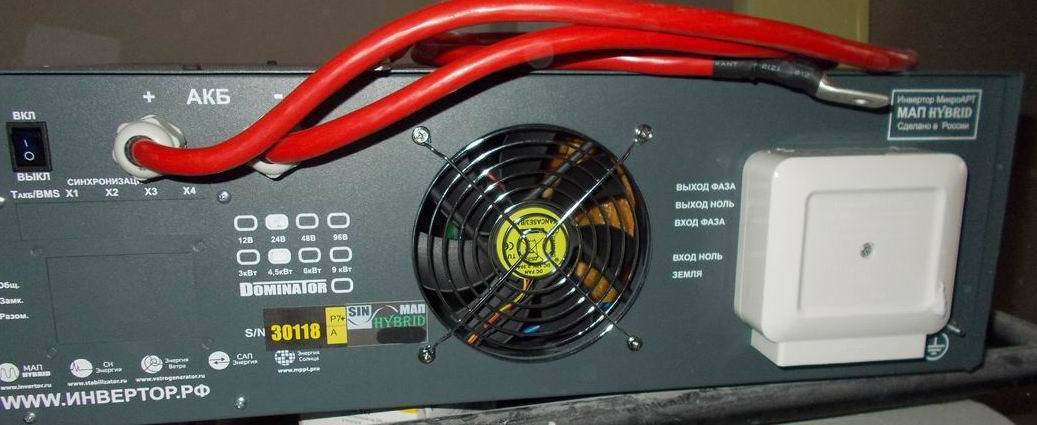
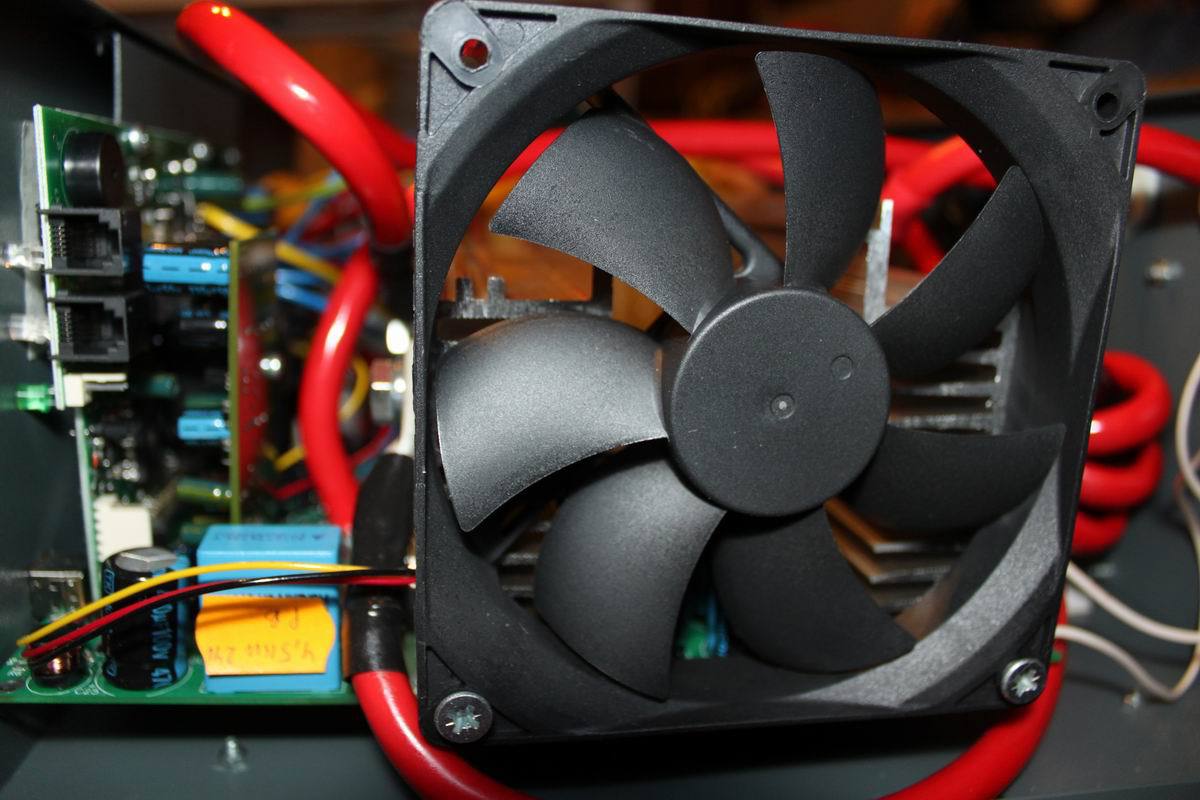
On the back of the device is a main switch, wires, as thick as a finger, for connecting to batteries and a mains plug. Yes, still a healthy cooler that works on a temperature sensor.
Almost a half of the space is occupied by a toroidal transformer, by the way, also of Russian production.
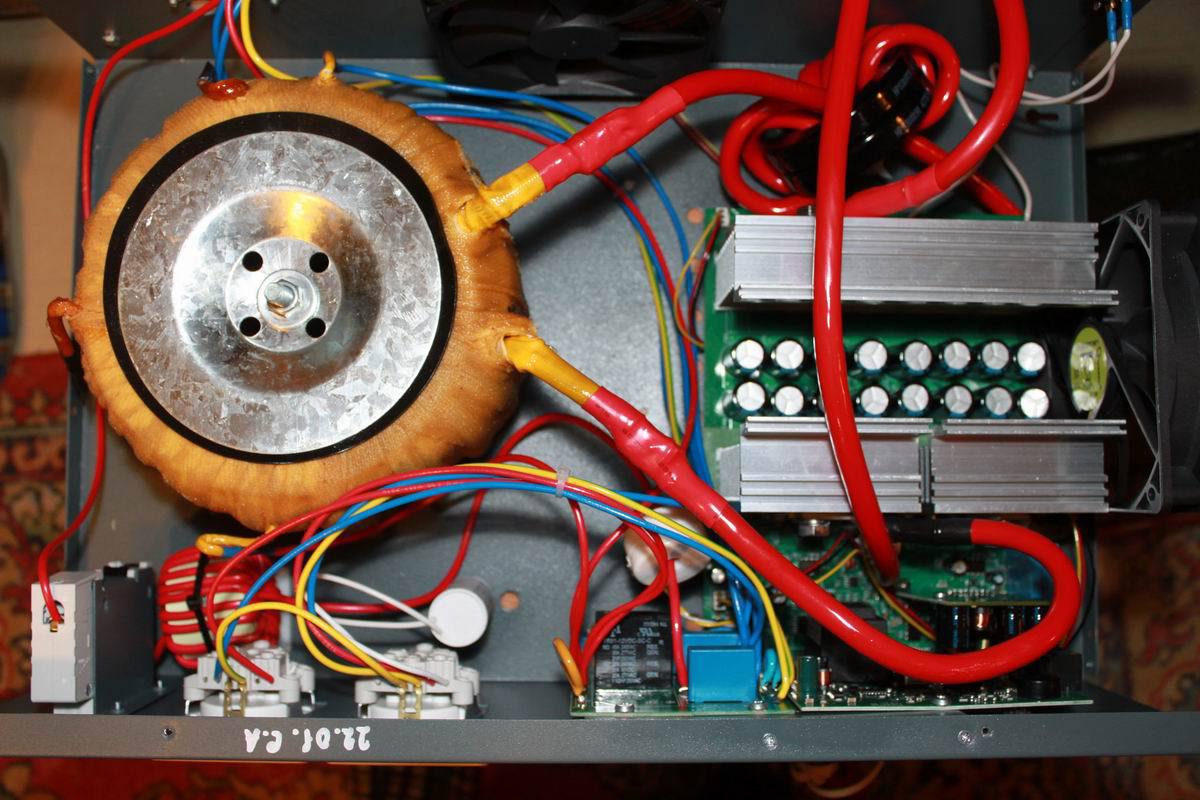
Low frequency technology involves the use of large transformers. That is why the inverters made by this technology easily transfer peak loads, have the possibility of a powerful charge (after all, the charge comes from the network or generator, and they have a low frequency of 50 Hz). But you have to pay for everything - inverters with this technology are larger, heavier and cost more than high-frequency inverters. The diameter of the torus is 17 cm.
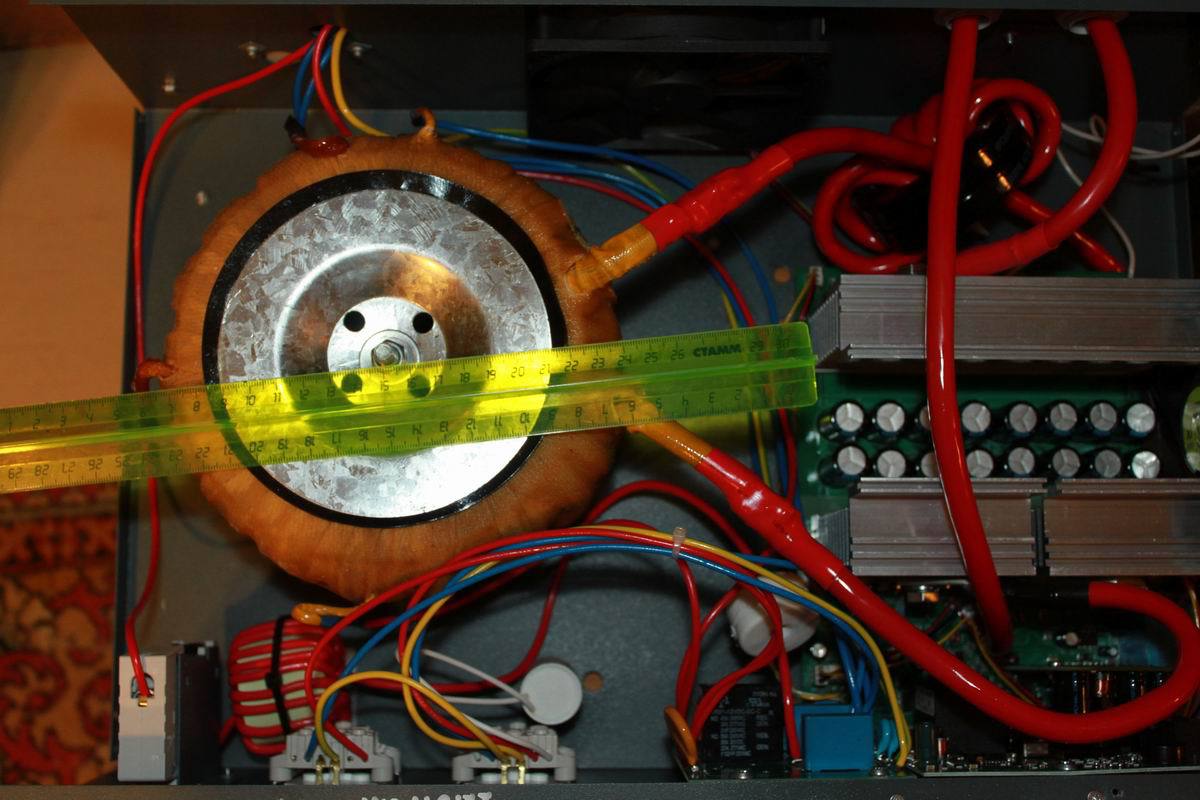
In the previous photo clearly visible radiators power switches and a bunch of capacitors. To keep the temperature under load, all the electronics are blown from the side by the second cooler:
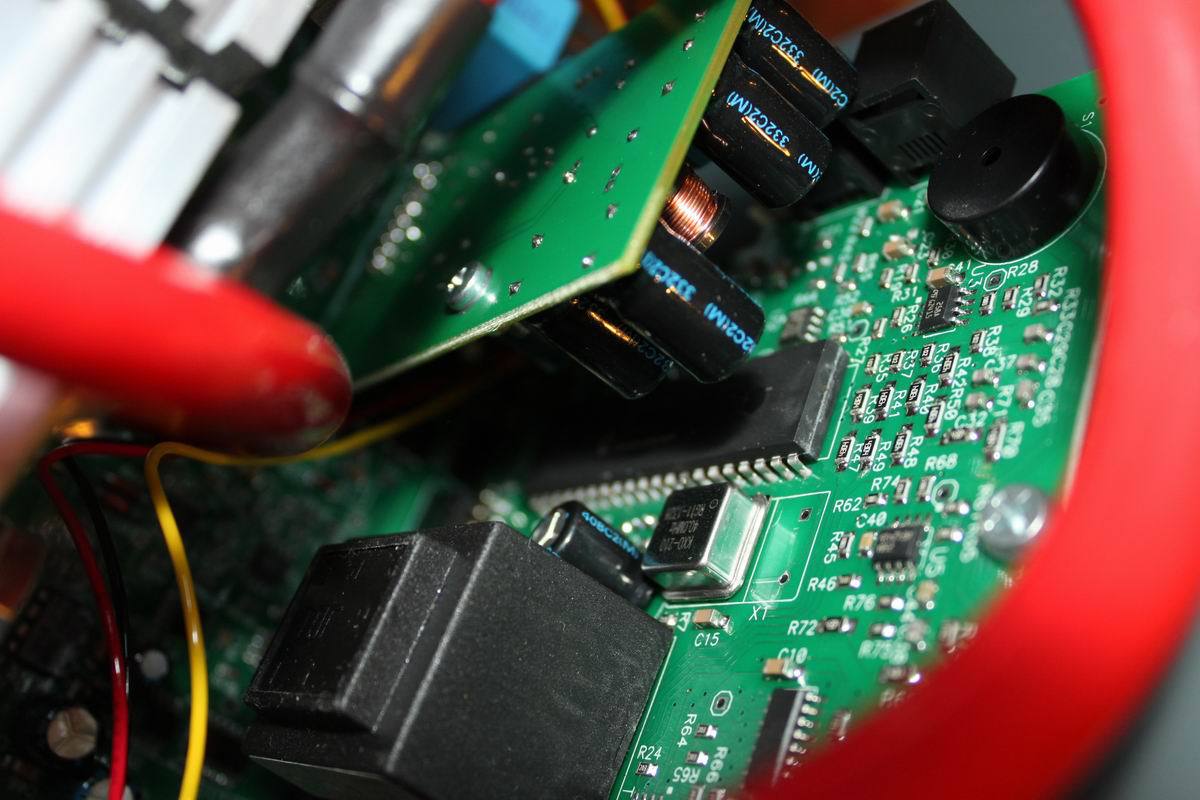
All control electronics are securely fastened and I did not dare remove the boards to see which processor is being used. But you can see the level of soldering smd components. By the way, the production of boards is also made in Russia at the Zelenograd plant.
Growth opportunities
It's nice that the manufacturer periodically releases new firmware and they are available on their website . Often taken into account the wishes of users. From the current advantages, we can note the possibility of reserving not only one phase, as I did, but three at once. True, this will require three inverters at once, but when connected to one bus, the inverters will produce the necessary phase shift for the correct operation of the three-phase equipment. According to the manufacturer , there are already ready sets of redundancy or autonomous provision of 3 phases with a total power of 54 kW (18 kW x3 phase). Let me remind you that the standard home is allocated 15 kW (5 kW x3 phase).
What would you like to see in the future? The ability to synchronize and increase the power of one phase when using two or three inverters of different power. That is, first buy a 4.5 kW inverter, if this is not enough, then buy the same or more and put them on one phase to increase power consumption.
Interesting facts in one line
- MicroART company began with the production of clones of computers ZX Spectrum under the brands ATM Turbo and Pentagon
- Statistics for warranty repair is 1.7% of the number of devices sold
- Hydrometeorological Center of Russia acquired 5000 MAP inverters for its weather stations
- Elabuzhsky reanimobile manufacturer ordered MAP inverters to operate the equipment in the car
- The ships flying the flag of Angola ordered the MAP inverters to operate the equipment on the vessel.
In the next article, I will combine the solar controller and the inverter into one network and check the possibility of paging into the home network from solar panels. I would like to know which format to submit the test is more convenient: photo, video or combine?
Source: https://habr.com/ru/post/255207/
All Articles