Step by Step: Migrating Active Directory Certificate Service from Windows Server 2003 to Windows Server 2012 R2
As you should know, Windows Server 2003 and Windows Server 2003 R2 support ends on July 14, 2015. Knowing this, IT professionals either have already migrated, or this process should be in full swing. This article will describe the steps required to migrate Active Directory Certificate Service from Windows Server 2003 to Windows Server 2012 R2.

The following settings will be used for the demonstration:
')
We come in Windows Server 2003 under the security account from group of local administrators.
Choose Start - Administrative Tools - Certificate Authority

We right-click on the server node. Choose All Tasks , then Back up CA

The “Certification Authority Backup Wizard” will open and click “Next” to continue.

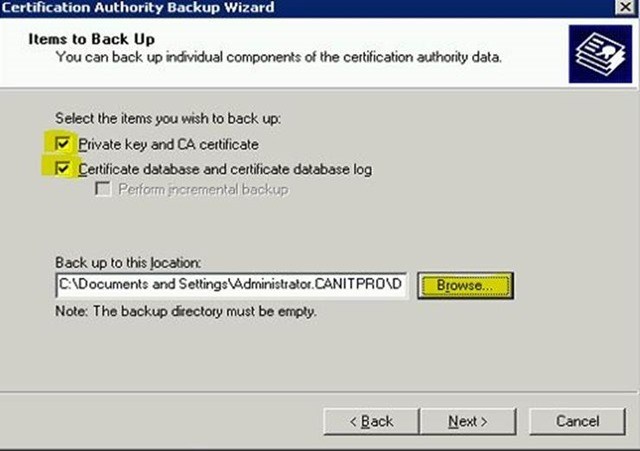
In the next window, select the items that are highlighted to specify the desired settings and click “ Browse ” in order to specify the location of the backup. Click “Next” to continue.
You will then be prompted to enter a password in order to protect the private key and certificate authority certificate file. After entering the password, click “Next” .

In the next window, confirmation will be requested. If everything is in order, click “ Finish ” to complete the process.
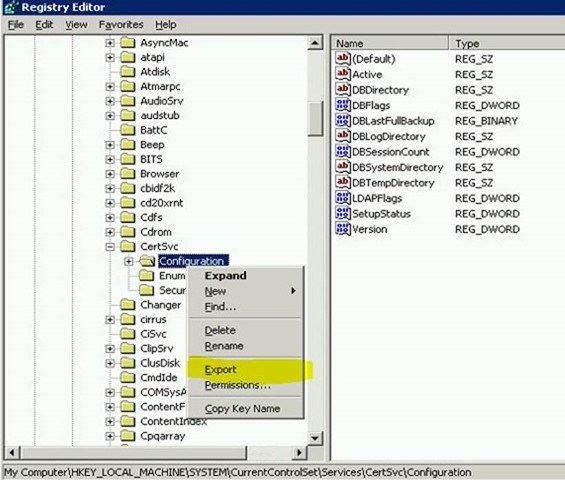
Click Start , then Run . Type regedit and click OK .

Then open HKEY_LOCAL_MACHINE \ SYSTEM \ CurrentControlSet \ Services \ CertSvc
Right-click on the “ Configuration ” key and select “ Export ”
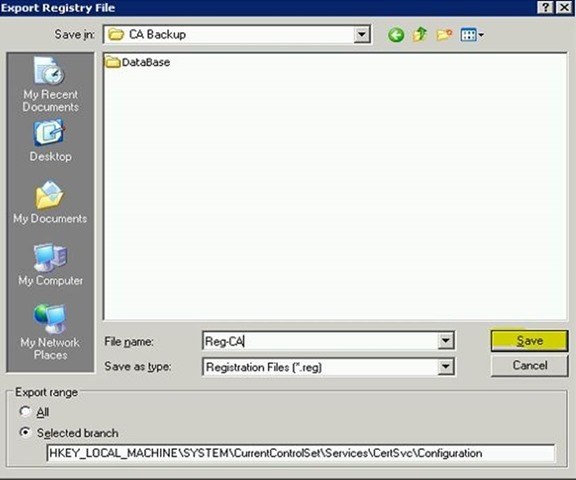
In the next window, specify the path where you want to save the backup file and specify its name. Then click “Save” to complete the reservation.
Now we have backup certification authority files and we can move these files to the new Windows Server 2012 R2 server.

Now that the backup files are ready and before we set up the certificate services on the new Windows Server 2012 R2, we can remove the CA services from Windows Server 2003. To do this, follow these steps.
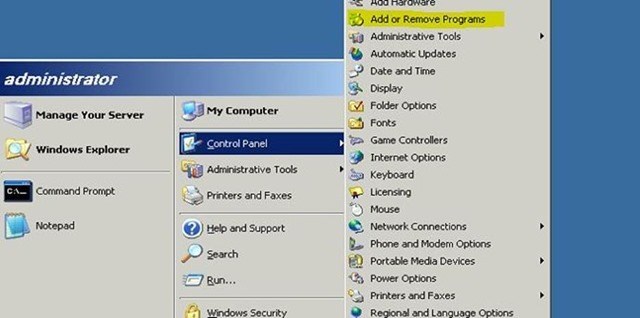
Click Start> Control Panel> Add or Remove Programs
Then select “Add / Remove Windows Components”
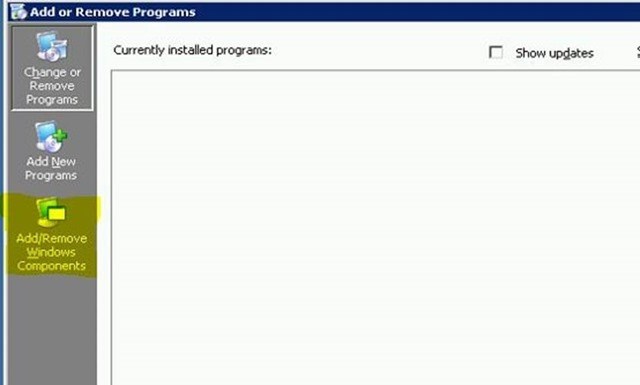
In the next window, uncheck “ Certificate Services ” and click “ Next ” to continue

After completing the process, you will see a confirmation and you can click “ Finish ”

At this stage, we have finished working with certificate authority services on Windows Server 2003, and the next step is to configure and configure certificate authorities on Windows Server 2012 R2.
Log in to Windows Server 2012 R2 as a domain administrator or local administrator.
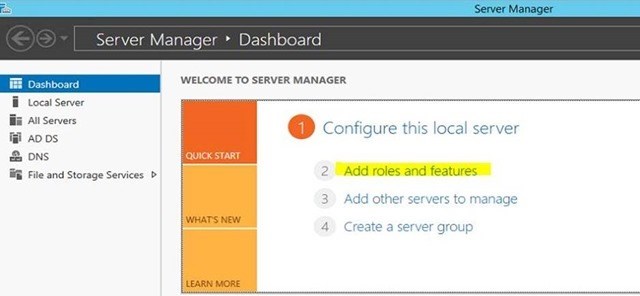
Go to Server Manager> Add roles and features .
“Add roles and features” will start, click “Next” to continue.
In the next window, select “Role-based or Feature-based installation” , click “Next” to continue.
From the list of available servers, select yours and click “ Next ” to continue.
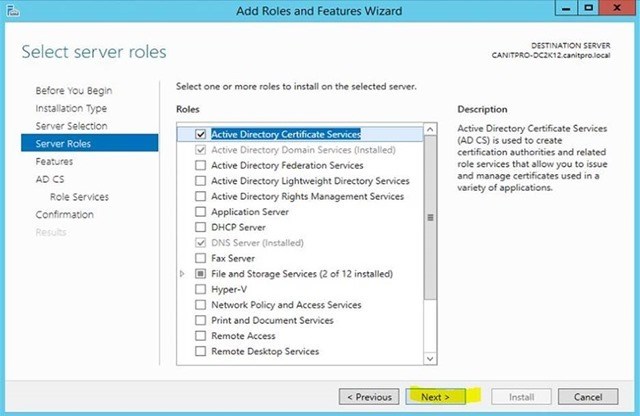
In the next window, select the “Active Directory Certificate Services” role, install all related components and click “ Next ” .
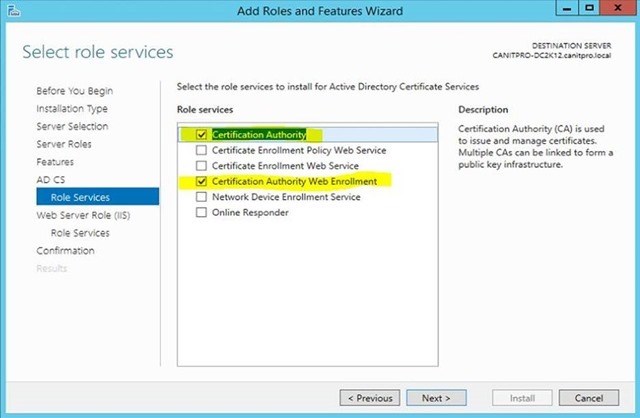
In the next two windows click “ Next ” . After that, you will see options for selecting services to install. We select Certificate Authority and Certification Authority Web Enrollment and click “Next” to continue.
To install the Certification Authority Web Enrollment, you must install IIS . Therefore, in the next two windows, see a brief description of the role, select the components you need and click “ Next ” .
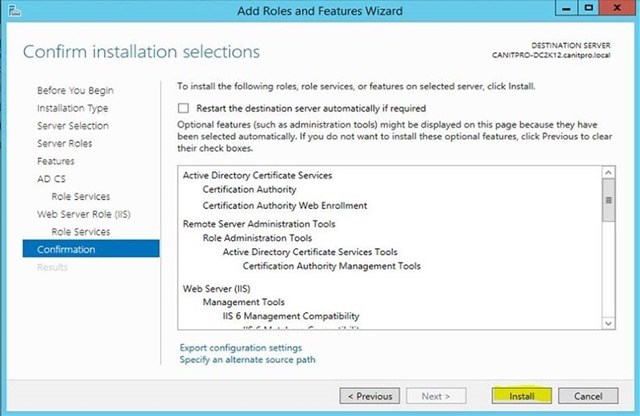
Next you will see a confirmation window. If everything is ok, click “ Install ” to start the installation process.
After the installation is complete, you can close the installation wizard and proceed to the next step.
In this step, we will look at how to set up and restore the backup files we created.
Log on to the server with Enterprise Administrator permissions.
Go to Server Manager> AD CS
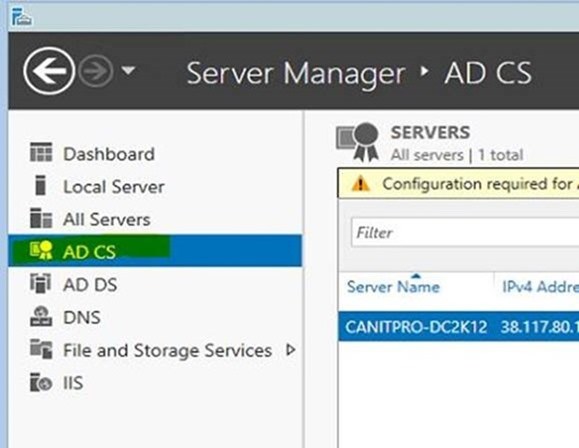
On the right side of the panel you will see a pop-up window, as in the screenshot and click “ More ”

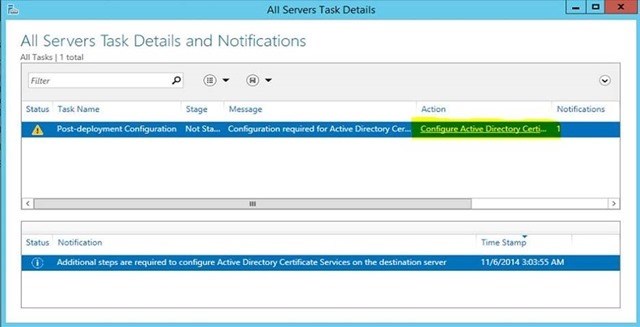
A window will open in which you need to click “ Configure Active Directory Certification Service ...”
The Role Configuration Wizard window opens in which you can change the account. Since we are already logged in with the Enterprise Administrator account, then we will leave what was specified by default and click “ Next ”

The next window will ask how we want to configure the service. Select Certificate Authority and Certification Authority Web Enrollment and click “Next” to continue.

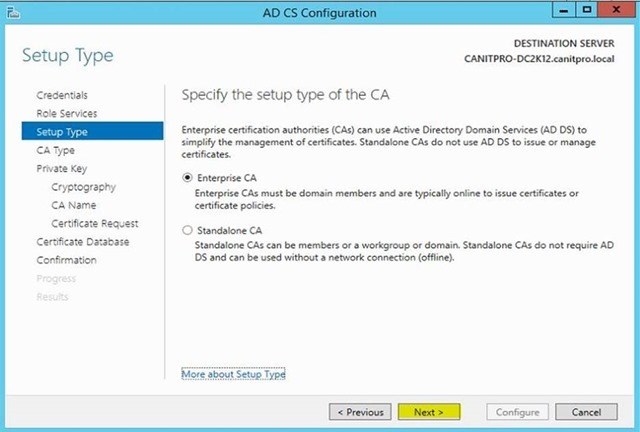
This will be Enterprise CA , so in the next window select Enterprise CA as your installation type and click “ Next ” to continue.
In the next window, select “Root CA” as the CA type and click “ Next ” to continue.

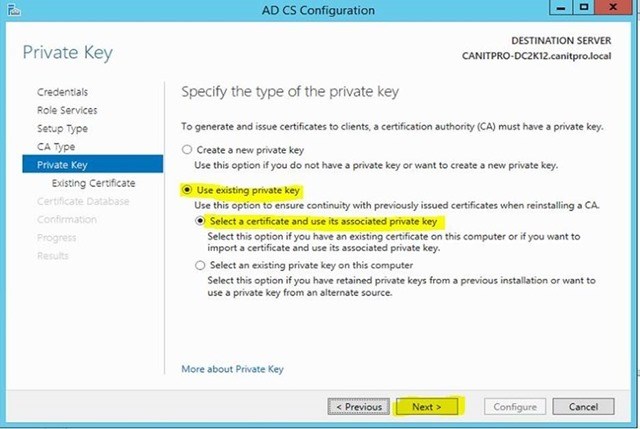
The next setting is very important. If it was a new installation, then we could just create a new private key. But since this is a migration process, we already have a reserved private key. Therefore, here choose the option that is marked on the screenshot and click “ Next ” to continue.
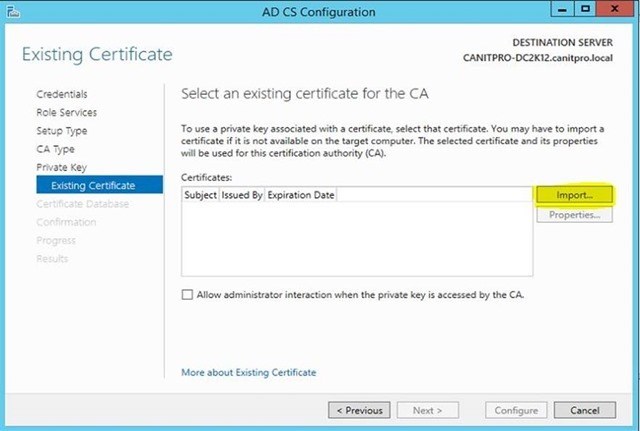
In the next window, click the “ Import ” button.
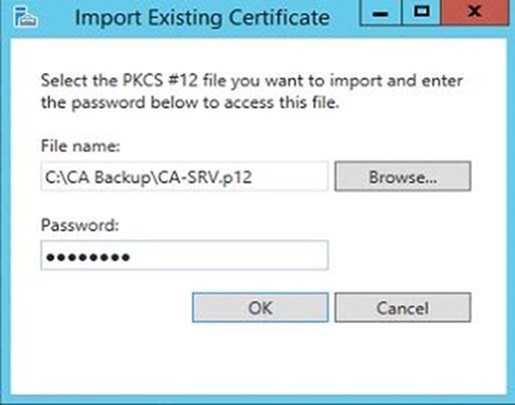
Here we have the opportunity to choose the key that we reserved with Windows Server 2003. Specify the path to this key and enter the password that we used. Then click OK .
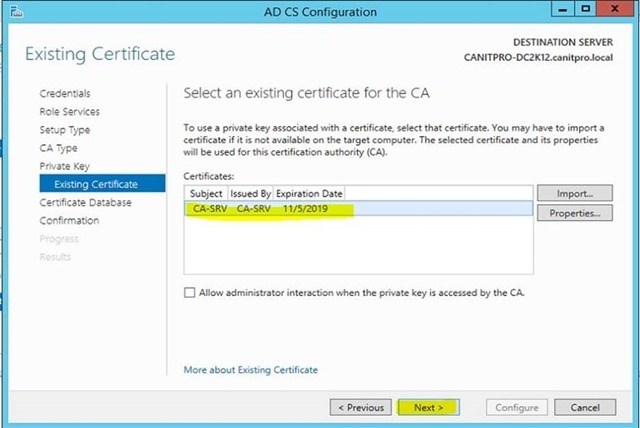
Further, if the import was successful, we will see our certificate. Select it and click “ Next ” to continue.
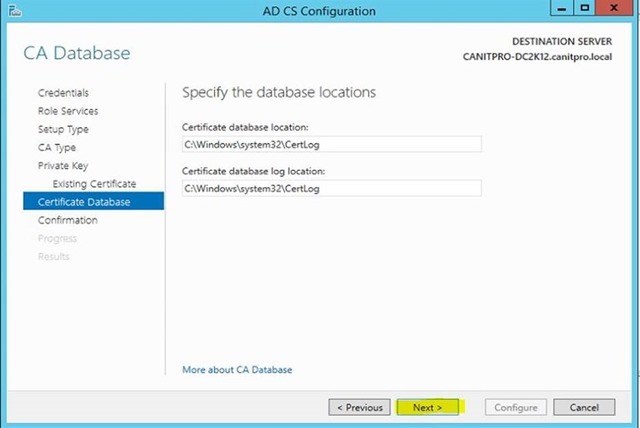
In the next window we can determine the path to the certificate database. I left what was specified by default and click “Next” to continue.
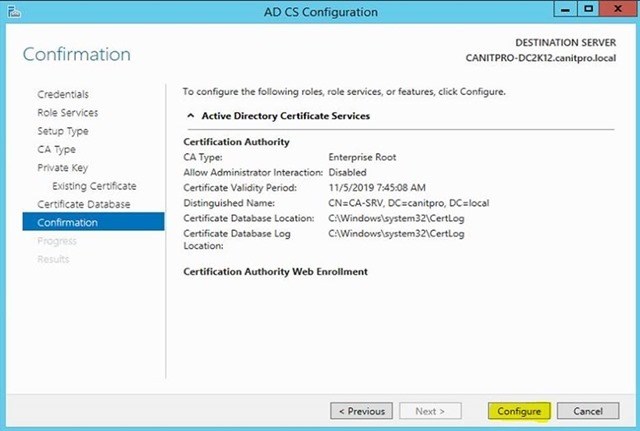
In the next window will be given all the information to configure. If everything is fine, then click “Configuration” to start the process.
After the process is complete, close the configuration wizard.
Now we come to the most important part of the entire migration process, in which we will restore the reserved in Windows Server 2003 CA.
Open Server Manager> Tools> Certification Authority

Right-click the server name and select All Tasks > Restore CA

A warning will appear that the certificate service must be installed to continue. Click OK .

The Certification Authority Restore Wizard will start, click “Next” to continue.
In the next window, specify the path to the folder where the backup is located. Then select the same settings as in the screenshot. Click “ Next ” to continue.

In the next window, you can enter the password that we used to protect the private key during the reservation process. After entering, click “Next” to continue.

In the next window, click “ Finish ” to complete the import process.
Upon successful completion of the process, the system will ask if the certification authority can be started. Start the service.
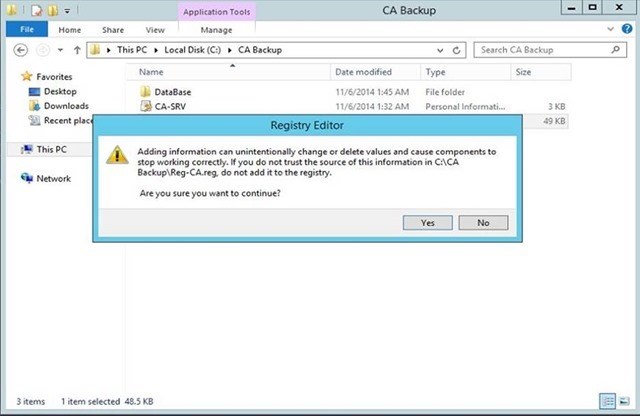
During the backup of the CA, we also backed up the registry key. Now you need to restore it. To do this, open the folder that contains the reserved registry key. Double-click on it.
A warning window will appear. Click “ Yes ” to restore the registry key.
Upon completion, you will receive a confirmation of successful recovery.

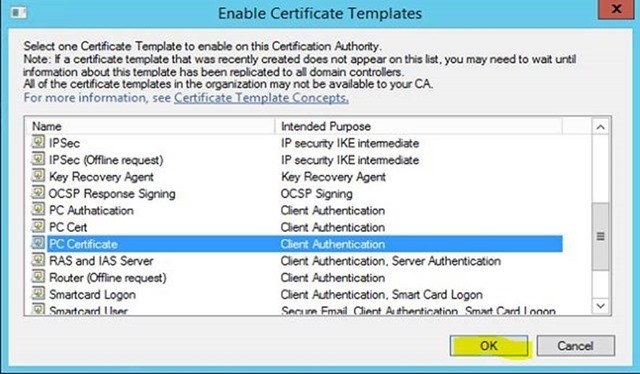
We have completed the migration process, and now we need to re-issue the certificates. I had a template setup in a Windows Server 2003 environment called “ PC Certificate ” , which was used to issue certificates for computers included in the domain. Now let's see how I will reissue the template.
Opens Certification Authority Console
Right click on Certificate Templates Folder> New> Certificate Template to Reissue .

From the list of certificate templates, select the appropriate certificate template and click OK .
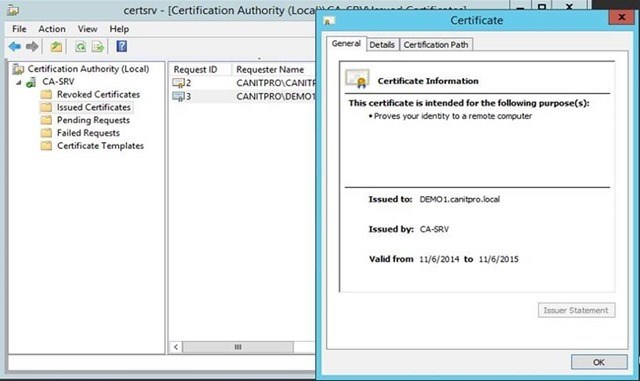
Now that the certificate template is installed on the computer, it needs to be set to automatic. For verification, I installed a computer with Windows 8.1 operating system, called it demo 1 and added canitpro.local to the domain. After its first boot, on the server, I open the certification authority console and expand the “Issued Certificate” section. There I can see the new certificate that is released for the computer.
This completes the migration process.
The following settings will be used for the demonstration:
| Server name | operating system | Server roles |
|---|---|---|
| canitpro-casrv.canitpro.local | Windows Server 2003 R2 Enterprise x86 | AD CS (Enterprise Certificate Authority) |
| CANITPRO-DC2K12.canitpro.local | Windows Server 2012 R2 x64 |
')
Step 1: Backup Configuration and Database of a Windows Server 2003 Certification Authority
We come in Windows Server 2003 under the security account from group of local administrators.
Choose Start - Administrative Tools - Certificate Authority
We right-click on the server node. Choose All Tasks , then Back up CA
The “Certification Authority Backup Wizard” will open and click “Next” to continue.
In the next window, select the items that are highlighted to specify the desired settings and click “ Browse ” in order to specify the location of the backup. Click “Next” to continue.
You will then be prompted to enter a password in order to protect the private key and certificate authority certificate file. After entering the password, click “Next” .
In the next window, confirmation will be requested. If everything is in order, click “ Finish ” to complete the process.
Step 2. Backing Up Registry Authority Registry Settings
Click Start , then Run . Type regedit and click OK .
Then open HKEY_LOCAL_MACHINE \ SYSTEM \ CurrentControlSet \ Services \ CertSvc
Right-click on the “ Configuration ” key and select “ Export ”
In the next window, specify the path where you want to save the backup file and specify its name. Then click “Save” to complete the reservation.
Now we have backup certification authority files and we can move these files to the new Windows Server 2012 R2 server.
Step 3: Remove the Certificate Authority Service from Windows Server 2003
Now that the backup files are ready and before we set up the certificate services on the new Windows Server 2012 R2, we can remove the CA services from Windows Server 2003. To do this, follow these steps.
Click Start> Control Panel> Add or Remove Programs
Then select “Add / Remove Windows Components”
In the next window, uncheck “ Certificate Services ” and click “ Next ” to continue
After completing the process, you will see a confirmation and you can click “ Finish ”
At this stage, we have finished working with certificate authority services on Windows Server 2003, and the next step is to configure and configure certificate authorities on Windows Server 2012 R2.
Step 4. Install Certificate Services on Windows Server 2012 R2
Log in to Windows Server 2012 R2 as a domain administrator or local administrator.
Go to Server Manager> Add roles and features .
“Add roles and features” will start, click “Next” to continue.
In the next window, select “Role-based or Feature-based installation” , click “Next” to continue.
From the list of available servers, select yours and click “ Next ” to continue.
In the next window, select the “Active Directory Certificate Services” role, install all related components and click “ Next ” .
In the next two windows click “ Next ” . After that, you will see options for selecting services to install. We select Certificate Authority and Certification Authority Web Enrollment and click “Next” to continue.
To install the Certification Authority Web Enrollment, you must install IIS . Therefore, in the next two windows, see a brief description of the role, select the components you need and click “ Next ” .
Next you will see a confirmation window. If everything is ok, click “ Install ” to start the installation process.
After the installation is complete, you can close the installation wizard and proceed to the next step.
Step 5. Configure AD CS
In this step, we will look at how to set up and restore the backup files we created.
Log on to the server with Enterprise Administrator permissions.
Go to Server Manager> AD CS
On the right side of the panel you will see a pop-up window, as in the screenshot and click “ More ”
A window will open in which you need to click “ Configure Active Directory Certification Service ...”
The Role Configuration Wizard window opens in which you can change the account. Since we are already logged in with the Enterprise Administrator account, then we will leave what was specified by default and click “ Next ”
The next window will ask how we want to configure the service. Select Certificate Authority and Certification Authority Web Enrollment and click “Next” to continue.
This will be Enterprise CA , so in the next window select Enterprise CA as your installation type and click “ Next ” to continue.
In the next window, select “Root CA” as the CA type and click “ Next ” to continue.
The next setting is very important. If it was a new installation, then we could just create a new private key. But since this is a migration process, we already have a reserved private key. Therefore, here choose the option that is marked on the screenshot and click “ Next ” to continue.
In the next window, click the “ Import ” button.
Here we have the opportunity to choose the key that we reserved with Windows Server 2003. Specify the path to this key and enter the password that we used. Then click OK .
Further, if the import was successful, we will see our certificate. Select it and click “ Next ” to continue.
In the next window we can determine the path to the certificate database. I left what was specified by default and click “Next” to continue.
In the next window will be given all the information to configure. If everything is fine, then click “Configuration” to start the process.
After the process is complete, close the configuration wizard.
Step 6. Restoring the reserved CA
Now we come to the most important part of the entire migration process, in which we will restore the reserved in Windows Server 2003 CA.
Open Server Manager> Tools> Certification Authority
Right-click the server name and select All Tasks > Restore CA
A warning will appear that the certificate service must be installed to continue. Click OK .
The Certification Authority Restore Wizard will start, click “Next” to continue.
In the next window, specify the path to the folder where the backup is located. Then select the same settings as in the screenshot. Click “ Next ” to continue.
In the next window, you can enter the password that we used to protect the private key during the reservation process. After entering, click “Next” to continue.
In the next window, click “ Finish ” to complete the import process.
Upon successful completion of the process, the system will ask if the certification authority can be started. Start the service.
Step 7. Restoring registry information
During the backup of the CA, we also backed up the registry key. Now you need to restore it. To do this, open the folder that contains the reserved registry key. Double-click on it.
A warning window will appear. Click “ Yes ” to restore the registry key.
Upon completion, you will receive a confirmation of successful recovery.
Step 8. Re-issue the certificate template
We have completed the migration process, and now we need to re-issue the certificates. I had a template setup in a Windows Server 2003 environment called “ PC Certificate ” , which was used to issue certificates for computers included in the domain. Now let's see how I will reissue the template.
Opens Certification Authority Console
Right click on Certificate Templates Folder> New> Certificate Template to Reissue .
From the list of certificate templates, select the appropriate certificate template and click OK .
Step 9. Test the CA
Now that the certificate template is installed on the computer, it needs to be set to automatic. For verification, I installed a computer with Windows 8.1 operating system, called it demo 1 and added canitpro.local to the domain. After its first boot, on the server, I open the certification authority console and expand the “Issued Certificate” section. There I can see the new certificate that is released for the computer.
This completes the migration process.
Source: https://habr.com/ru/post/255169/
All Articles