Freemasons choose the sun: a hacking program for Sun Solaris & SPARC in the task NeoQUEST-2015
 Leaving the usual x86 architecture is always interesting, and in the NeoQUEST-2015 “Freemasons choose the sun” task, participants were asked to hack a program that was developed and written for the Sun Solaris 2.6 version of 1995, and even for the SPARC architecture!
The task turned out to be difficult not only for passing - its preparation also took some time. Under the cut:
- Solaris installation tips: how to do this by minimizing labor costs?
- Running Solaris 2.6 under qemu for Windows 8.1
- Detailed analysis of two ways to complete the task
We study the source data to the task
Two binary files were given as input data in the task: a small getlaunchkey.bin and image.img, which occupies 2GB. In addition, the text of the task included the name Ivanov and the IP address 79.175.2.82 .
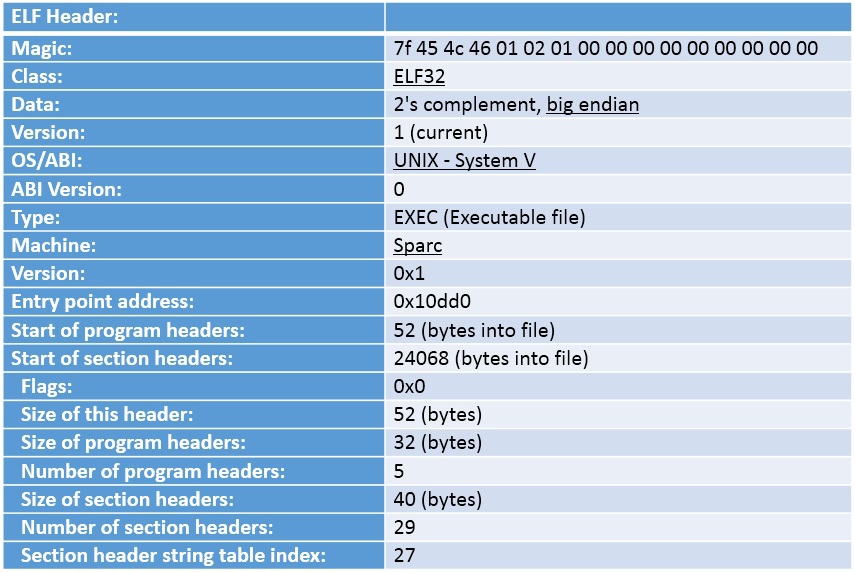
While the two-gigabyte disk is swinging, let's take a look at the small file getlaunchkey.bin. By ELF signature it quickly becomes clear what kind of file it is. The readelf –a getlaunchkey.bin utility tells us a few useful facts.
')
First, from the header it is clear that the program is for System V, and the architecture of the sparc x32 bit is big endian:
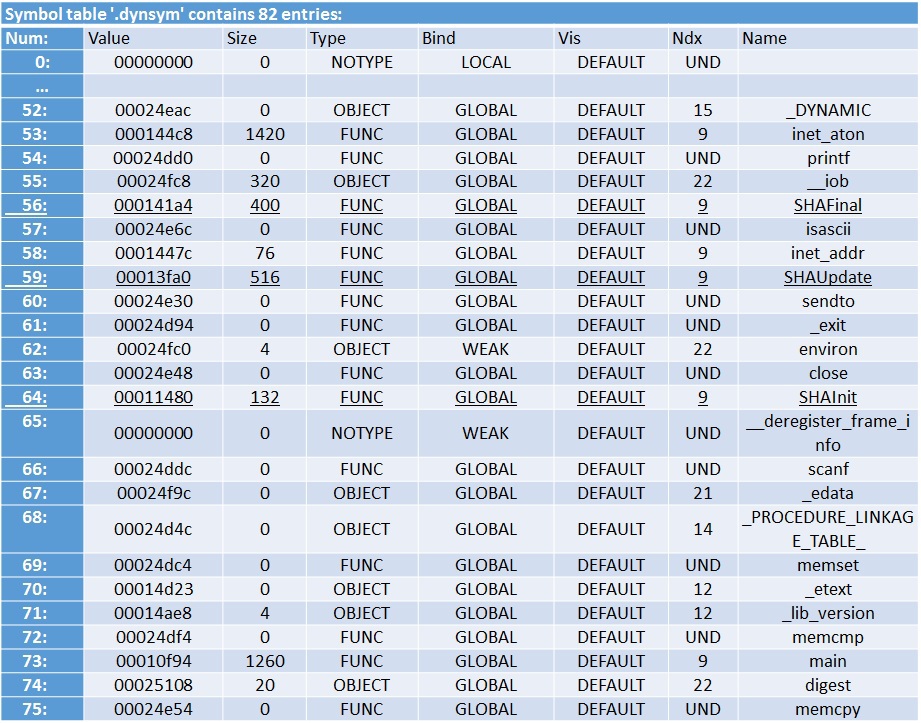
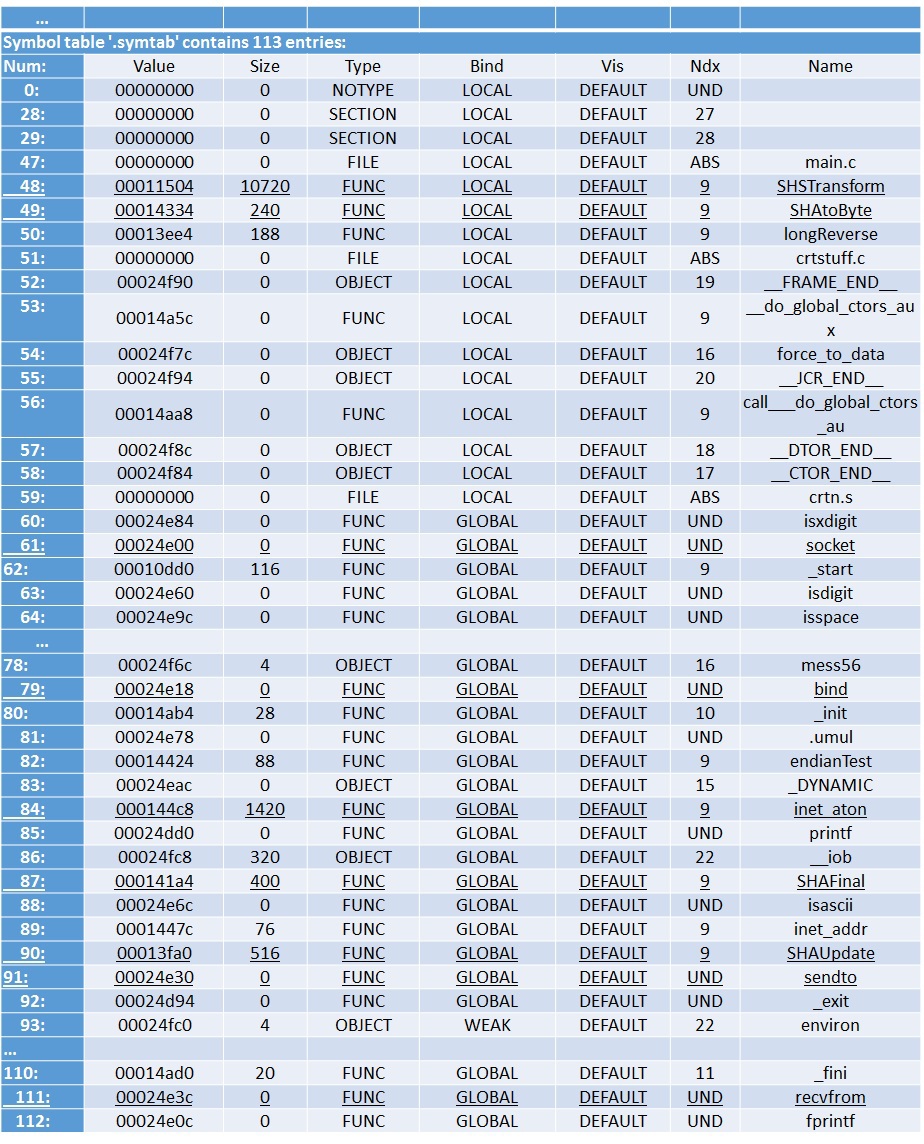
Secondly, from the remaining symbol table in the file, it can be seen that the program uses sockets, and contains the SHA code. The rest is small and simple program:
If you analyze the contents of a binary file, you can easily find in it two IP addresses: 192.168.1.88 and 192.168.1.22, which are present as strings. Given that the program obviously works with sockets, and the executable file is small, you can make two assumptions:
- Both addresses are the addresses of the servers accessed by the application;
- One address is the address of the host computer, and the second is the server address.
In addition, both addresses belong to the local network, which means that they cannot be used in their original form, they must be replaced with some other ones.
The second file, image.img, is clearly similar to a hard disk due to its size. At the beginning of the file there is the QFI signature, which, with fast googling, gives us information that this is the QCOW format used for dynamic hard disk images.
In particular, this format is used in the qemu emulator. If you rummage through the image in a hex editor (or use a utility like strings), you can quickly find strings like “Solaris_2.6”, in addition, there is a string “getlaunchkey”.
From the above, we can conclude that we got the image of the installed Solaris version 2.6, and, apparently, the version of sparc, and the program for this operating system. With the program we have to figure it out. Now there are two ways: try to run the Solaris image in qemu, or try to write an analogue of the getlaunchkey program for Windows.
Run Solaris 2.6 on Windows 8.1
First, let's start Solaris. If you download and install qemu for Windows , then it will include a version that emulates sparc. We try to run the image:
"c:\Program Files (x86)\qemu\qemu-system-sparc.exe" –hda .\image.img And make sure it doesn't work. Now we try to google and find a couple of interesting articles (the first and the second ), which tells you how to run Solaris 2.6 under qemu:
As a result of studying these articles, you can form the following launch line:
"c:\Program Files (x86)\qemu\qemu-system-sparc.exe" -bios .\ss5-1.bin -L .\ –hda .\image.img -m 256 -M SS-5 -nographic -serial mon:telnet:127.0.0.1:4444,server,nowait Let us analyze these options in more detail:
- bios. \ ss5-1.bin - requires qemu to use the specified BIOS image. It turns out that the standard BIOS image for sparc from qemu is not suitable for Solaris 2.6 sparc. The image itself can be downloaded here.
- hda. \ image.img - specify the disk image from which to boot. By the way, you need to remember to remove the Read Only bit from the image file, otherwise qemu will not work (usually in Windows it will not even tell about the error)
- m 256 - set the size of the RAM (256 megabytes for the version of OS 1995 is enough)
- M SS-5 - for qemu we specify the type of the emulated sparc architecture
- nographic is a very important option. In qemu, it turns out, the graphics adapter is emulated with errors, as a result of Solaris 2.6, trying to use graphics, hangs when loading
- serial mon: telnet: 127.0.0.1: 4444, server, nowait - since we turned off the graphics adapter, qemu cannot display anything on the screen, instead it can display a simple COM terminal to the network using the telnet protocol. The option enables the redirection of the COM emulator to the specified device.
If you do not use the last two options, then qemu will launch a graphical window:

But after a long download, it will first hang for a few minutes, and then reboot on a screen like this:

So, we run the command, and we make sure that everything is stuck on the command line - it means that the virtual machine has started. Now, to see the running OS, you need to connect to telnet: 127.0.0.1: 4444 using putty . As a result, in the putty console we will see the following text (just in case, you need to press Enter in the console, otherwise the screen will not update):
Probing Memory Bank #0 32 Megabytes Probing Memory Bank #1 32 Megabytes Probing Memory Bank #2 32 Megabytes Probing Memory Bank #3 32 Megabytes Probing Memory Bank #4 32 Megabytes Probing Memory Bank #5 32 Megabytes Probing Memory Bank #6 32 Megabytes Probing Memory Bank #7 32 Megabytes Incorrect configuration checksum; Setting NVRAM parameters to default values. Setting diag-switch? NVRAM parameter to true Probing CPU FMI,MB86904 Probing /iommu@0,10000000/sbus@0,10001000 at 5,0 espdma esp sd st SUNW,bpp ledma le Probing /iommu@0,10000000/sbus@0,10001000 at 4,0 SUNW,CS4231 power-management Probing /iommu@0,10000000/sbus@0,10001000 at 1,0 Nothing there Probing /iommu@0,10000000/sbus@0,10001000 at 2,0 Nothing there Probing /iommu@0,10000000/sbus@0,10001000 at 3,0 SUNW,tcx Probing /iommu@0,10000000/sbus@0,10001000 at 0,0 Nothing there SPARCstation 5, No Keyboard ROM Rev. 2.15, 256 MB memory installed, Serial #1193046. Ethernet address 52:54:0:12:34:56, Host ID: 80123456. Boot device: /iommu/sbus/ledma@5,8400010/le@5,8c00000 File and args: Internal loopback test -- Wrong packet length; expected 36, observed 64 Can't open boot device Type help for more information ok And now what i can do? From the same articles we learn that we need to type a command for the BIOS:
boot disk0: Now we are waiting for Solaris 2.6 to load. This may take a few minutes ... We look forward to and believe in the operating system of 1995!
As a result, the download will be asked to login and password. By a simple search, we find out that the login is: root, and the password is 123456. Not everything is very securely configured, is it?
zvezda console login: root Password: Last login: Thu Jun 19 11:30:16 on console Sun Microsystems Inc. SunOS 5.6 Generic August 1997 # ls bin devices kernel opt tmp cdrom etc lib platform usr core export lost+found proc var dev home mnt sbin vol # Only the getlaunchkey program is found on Solaris.
We are convinced that the usual commands ls, ps, ... work. If you delve into the system (Solaris), you can find a lot of interesting things, for example:
GCC 3.4.6: # /usr/local/bin/gcc -v Reading specs from /usr/local/lib/gcc/sparc-sun-solaris2.6/3.4.6/specs Configured with: ../configure --with-as=/usr/ccs/bin/as --with-ld=/usr/ccs/bin/ld --enable-shared --enable-languages=c,c++,f77 Thread model: posix gcc version 3.4.6 MC: # /usr/local/bin/mc Left File Command Options Right +<-~---------------------------------v>++<-~---------------------------------v>+ | Name | Size | MTime || Name | Size | MTime | |/.mc | 512|Jun 13 2014||/.mc | 512|Jun 13 2014| |~bin | 9|Jun 13 1998||~bin | 9|Jun 13 1998| |/cdrom | 512|Jun 19 2014||/cdrom | 512|Jun 19 2014| |/dev | 3072|Mar 30 07:43||/dev | 3072|Mar 30 07:43| |/devices | 512|Jun 13 1998||/devices | 512|Jun 13 1998| |/etc | 3072|Mar 30 08:04||/etc | 3072|Mar 30 08:04| |/export | 512|Jun 13 1998||/export | 512|Jun 13 1998| |/home | 512|Jun 19 2014||/home | 512|Jun 19 2014| |/kernel | 512|Jun 13 1998||/kernel | 512|Jun 13 1998| |~lib | 9|Jun 13 1998||~lib | 9|Jun 13 1998| |/lost+found | 8192|Jun 13 1998||/lost+found | 8192|Jun 13 1998| |/mnt | 512|Jun 13 1998||/mnt | 512|Jun 13 1998| |/opt | 512|Jun 13 1998||/opt | 512|Jun 13 1998| |/platform | 512|Jun 13 1998||/platform | 512|Jun 13 1998| |/proc | 65216|Mar 30 08:13||/proc | 65216|Mar 30 08:13| +--------------------------------------++--------------------------------------+ |/.mc ||/.mc | +--------------------------------------++--------------------------------------+ Hint: If you want to see your .* files, say so in the Configuration dialog. # WARNING: processor level 12 onboard interrupt not serviced 1Help 2Menu 3View 4Edit 5Copy 6RenMov 7Mkdir 8Del Looking through the various directories, you can find the file / home / solaris / getlaunchkey. We try to run the program. She asks us to enter a username and password. Simple search does not give anything.
# /home/solaris/getlaunchkey Login: root Password: 123456 Wrong password!# /home/solaris/getlaunchkey Login: ivanov Password: 123456 Wrong password!# Getlaunchkey preview reversal
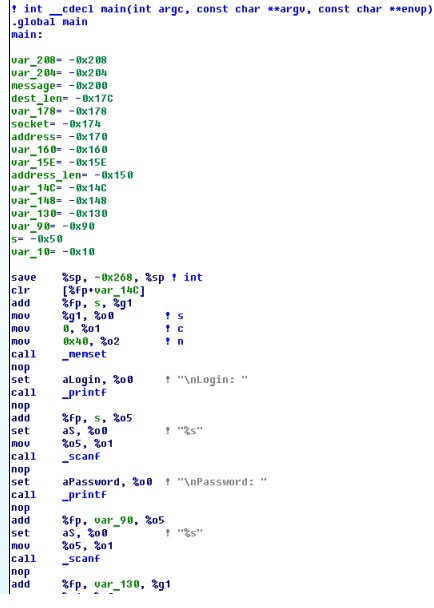
Let's try to hack the program: let's reverse the getlaunchkey program. When parsing this program in IDA, everything looks simple. At the beginning, the program collects the password and username:
It is then considered SHA from the password and compared with the hard-coded value. If the value of the SHA hash is the same, then the program works further, otherwise it terminates:
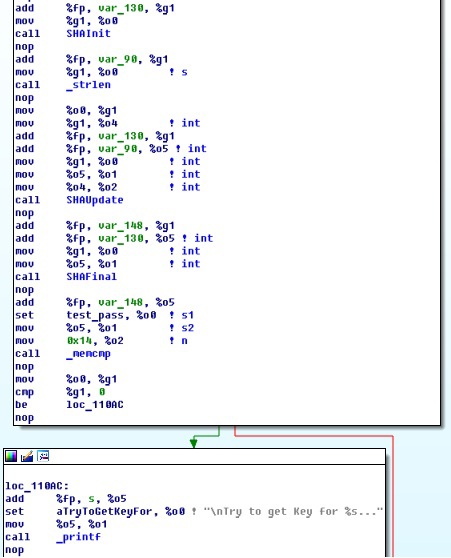
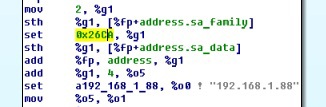
Then comes the typical setup of sockets, which contains the send address (host with Solaris 2.6)

and the address of the recipient (some server):

This uses port 9930:
Further, you will notice that the program performs a series of operations and performs several calls to the server and receives answers, and then prints the answer to the screen.
Now that the approximate algorithm of the program is known, there are two ways to solve it:
- Write a similar C program under Windows / Linux and try to run it.
- Correct the two IP addresses and the decision about the hash of the entered password, then execute the corrected program in Solaris 2.6 and see the result.
Method number 1. Full reverse of the application and writing your program that works similarly
If you act in the first way, you need to analyze the application algorithm in detail and try to write a program that duplicates this functionality. Let's try to do it.
Analysis of the program operation getlaunchkey
In case of successful network initialization, the program performs a series of calculations with a string with the user name:
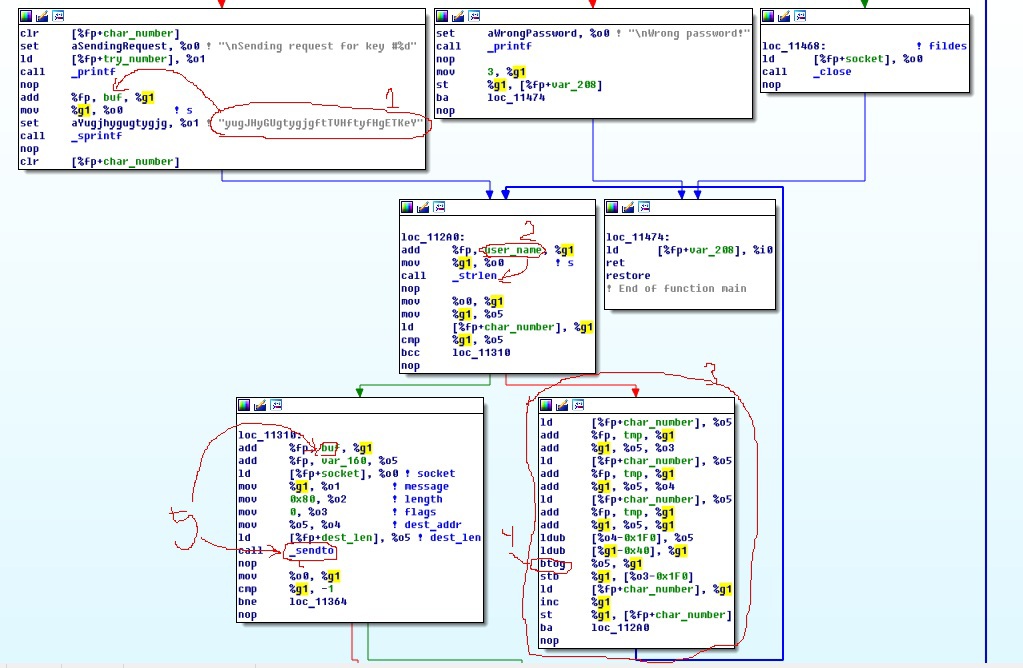
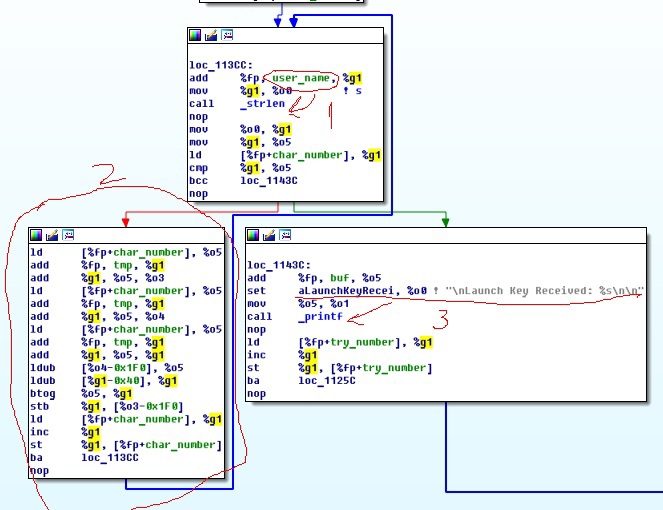
The diagram shows the following:
- first, a kind of “scary” string falls into the local variable buf (1);
- then a cycle is performed according to the length of the username (2) within which some calculations (3) take place;
- as a result of the change, buf is sent to the network at the specified address (5).
Consider the block (3) in more detail.
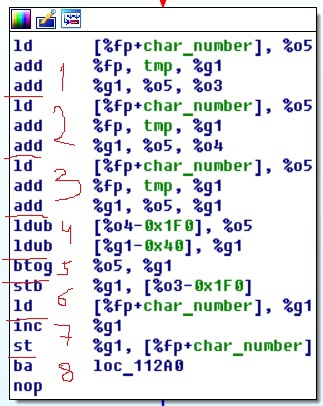
The essence of the calculations in the block is as follows: at the beginning there are three identical blocks with instructions (1, 2, 3) that load data from memory into registers (ld), and two additions (add) that calculate the index in the array relative to char_number . As a result, the same indices are formed in the registers o3, o4 and g1, most likely equal to the current element number in the array relative to fp (Frame Pointer is the pointer of the current stack frame).
The index number is equal to the iteration of the outer loop. Then the registers o5 and g1 are written to the values from the memory at offsets 0x1F0 and 0x40 (4). The indicated offsets correspond to two local arrays. These arrays correspond to the username read and the buffer to which the scary string was copied. Next, the code executes the btog (5) instruction. After this, the result of the operation btog (register g1) is written back to the memory of the array 0x1F0 (instruction stb) (6). Then the value of the variable char_number is increased by 1 (inc) (7). The last part of the block simply goes to the next iteration of the loop (8).
It remains to find out what the instruction btog? Let's use Google and find a list of Sparc instructions (for example, here ). It says the following:
btog reg_or_imm, rd is XOR (rd, reg_or_imm, rd) The essence of the remaining instructions can also be read in the specified source. Thus, the code block (3) corresponds approximately to the following code: buf [char_number] ^ = user_name [char_number].
The rest of the program is waiting for a response from the server:
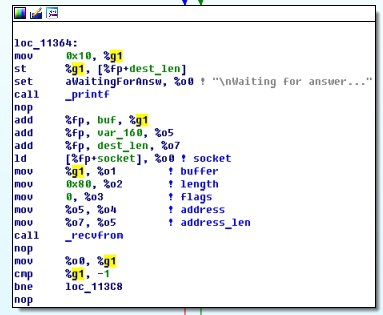
Then, for the received response, it performs again the XOR (2) with the username (1), as a result of which the key (3) is obtained:
So the program repeats several times by the number of attempts. As a result, completes its work.
Program code written following the getlaunchkey reverse
As a result of the work done on the reverse, you get something like this code:
#define SRV_IP "79.175.2.82" #define CLIENT_IP "192.168.1.2" int main() { char login_buf[64]; int i = 0; memset(login_buf, 0, sizeof(login_buf)); printf("\nLogin: "); scanf("%s", login_buf); printf("\nTry to get Key for %s...", login_buf); int len = sizeof(struct sockaddr_in); struct sockaddr_in si_other, si_my; int s, i, slen = sizeof(si_other); char buf[128]; if ((s = socket(AF_INET, SOCK_DGRAM, 0)) == -1) { printf("\nError 1"); exit(2); } memset((char *) &si_other, 0, sizeof(si_other)); si_other.sin_family = AF_INET; si_other.sin_port = htons(9930); if (inet_aton(SRV_IP, &si_other.sin_addr) == 0) { fprintf(stderr, "inet_aton() failed\n"); exit(1); } memset((char *) &si_my, 0, sizeof(si_my)); si_my.sin_family = AF_INET; si_my.sin_port = htons(9930); if (inet_aton(CLIENT_IP, &si_my.sin_addr) == 0) { fprintf(stderr, "inet_aton() failed\n"); exit(1); } if (bind(s, &si_my, len)<0) { printf("bind failed\n"); exit(1); } int j = 0; printf("\nSending request for key #%d", i); sprintf(buf, "yugJHyGUgtygjgftTVHftyfHgETKeY"); for (j = 0; j < strlen(login_buf); j++) { buf[j] ^= (char)login_buf[j]; } if (sendto(s, buf, 128, 0, &si_other, slen)==-1) { printf("\nError 2: sendto"); exit(2); } slen = sizeof(si_other); printf("\nWaiting for answer..."); if (recvfrom(s, buf, 128, 0, &si_other, &slen)==-1) { printf("Error 3: recvfrom"); exit(3); } for (j = 0; j < strlen(login_buf); j++) { buf[j] ^= (char)login_buf[j]; } printf("\nLaunch Key Received: %s\n\n", buf); close(s); } The specified code can now be compiled in Windows or Linux and run. After the launch, the user name (ivanov) is entered, after the data exchange with the server, the program will print the response key.
Such a path takes a lot of time to study the code on the relatively exotic architecture of sparc.
Method number 2. Fixing the program and running it in Solaris 2.6.
Let's try to go through the second path. First, you need to solve two questions: how to upload the corrected file on Solaris 2.6 and how then to ensure the operation of the network so that the program works fine? As a result of a short study, we learn that in addition to all programs, there is an ftp client on Solaris 2.6, with which you can share Windows files with Solaris. Now it's up to you: configure network access for a virtual machine.
Configuring Network Access for a Virtual Machine
To do this, we study another article in the section “Starting QEMU with a TAP interface” and try to configure everything via the vpn bridge. Probably, it can be somehow simpler, but, as indicated further, the network works. The action algorithm for Windows is as follows:
- Download openvpn program. We tested on the version: openvpn-install-2.3.4-I002-x86_64.exe
- Rename the adapter with the “TAP-Windows Adapter V9” type to something short like tap1.
- We create a bridge in “Control Panel \ Network and Internet \ Network Connections” between the network adapter that is connected to the Internet and the new virtual network adapter “TAP-Windows Adapter V9”.
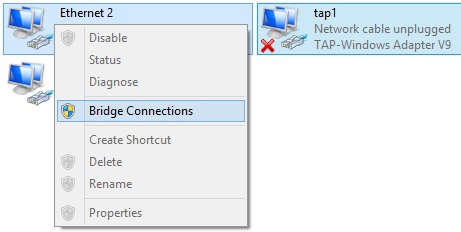
- We supplement the qemu startup line with arguments: -net nic -net tap, ifname = tap1, and start the qemu virtual machine again with the line:

"c:\Program Files (x86)\qemu\qemu-system-sparc.exe" -bios .\ss5-1.bin -L .\ –hda .\image.img -m 256 -M SS-5 -nographic -serial mon:telnet:127.0.0.1:4444,server,nowait -net nic -net tap,ifname=tap1 Now again we load Solaris through putty, login and configure the network. The name of the network interface could be seen at boot time:
Copyright (c) 1983-1997, Sun Microsystems, Inc. configuring network interfaces: le0. Hostname: zvezda <\source> ifconfig le0: <source lang="c"> # ifconfig le0 le0: flags=863<UP,BROADCAST,NOTRAILERS,RUNNING,MULTICAST> mtu 1500 inet 192.168.1.88 netmask ffffff00 broadcast 192.168.1.255 ether 52:54:0:12:34:56 Pay attention to the network configuration: the static IP address is set to 192.168.1.88, which is also present in the program, as it was found out earlier. Therefore, one address in the program corresponds to the local address, and it must be replaced with the new local address, after ARP has been processed. The second address (192.168.1.22) corresponds to the address of the server to which the request is sent, therefore, it must be replaced with the address 79.175.2.82 given to us in the condition.
If necessary, set the correct IP address and gateway address for your local network. For example, you can configure it automatically ( this article will be useful here):
ifconfig le0 auto-dhcp route add default 192.168.1.1 Check the settings again with the ifconfig le0 command:
# ifconfig le0 le0: flags=863<UP,BROADCAST,NOTRAILERS,RUNNING,MULTICAST> mtu 1500 inet 192.168.1.12 netmask ffffff00 broadcast 192.168.1.255 ether 52:54:0:12:34:56 Now check ping 8.8.8.8 and ping 79.175.2.82. If everything is set up normally, we get the following result:
# ping 8.8.8.8 8.8.8.8 is alive # ping 79.175.2.82 79.175.2.82 is alive To provide communication with Windows, it is possible to put on the Windows FTP server. Then, using the ftp client on Solaris 2.6, you can exchange data.
Modification of the getlaunchkey program
Let's get back to the getlaunchkey program. If you do not study in detail the algorithm of the program, then for its normal operation it is required to perform only three modifications of the binary file of the getlaunchkey program:
- change the line with the host address “192.168.1.88” -> “192.168.1.12”
- change the line with the host address “192.168.1.22” -> “79.175.2.82”
- change the result of the solution after checking the password.
The first replacements are trivial, using a hex editor. The last replacement must be done by modifying the code for the sparc instruction. If you pay attention, the transition after checking cmp is carried out by the instruction be (branch equal), which means that this instruction should be replaced with the instruction bne (branch not equal). The opcode of the required instruction can be seen through IDA further along the code:

Thus, you just need to change byte 0x02 to byte 0x12 at offset 0x1084 (0x11084 - 0x10000):

Now it is time to copy the modified getlaunchkey2.bin back to Solaris via ftp and execute it. A Windows host has an IP address of 192.168.1.3. For normal ftp operation, you need to remember to enable the binary type of the transmitted data, otherwise everything is done quite simply:
# ifconfig le0 le0: flags=4863<UP,BROADCAST,NOTRAILERS,RUNNING,MULTICAST,DHCP> mtu 1500 inet 192.168.1.12 netmask ffffff00 broadcast 192.168.1.255 ether 52:54:0:12:34:56 # ftp 192.168.1.3 Connected to 192.168.1.3. 220-FileZilla Server version 0.9.45 beta 220-written by Tim Kosse (tim.kosse@filezilla-project.org) 220 Please visit http://sourceforge.net/projects/filezilla/ Name (192.168.1.2:root): guest 331 Password required for guest Password: 230 Logged on ftp> binary 200 Type set to I ftp> get getlaunchkey2.bin 200 Port command successful 150 Opening data channel for file download from server of "/getlaunchkey2.bin" 226 Successfully transferred "/getlaunchkey2.bin" local: getlaunchkey2.bin remote: getlaunchkey2.bin 25228 bytes received in 0.0039 seconds (6389.19 Kbytes/s) ftp> quit 221 Goodbye # ls -l total 100 -rwxr-xr-x 1 root other 25228 Jun 19 2014 getkey -rw-r--r-- 1 root other 25228 Apr 1 06:25 getlaunchkey2.bin # chmod 777 ./getlaunchkey2.bin # ls -l total 100 -rwxr-xr-x 1 root other 25228 Jun 19 2014 getkey -rwxrwxrwx 1 root other 25228 Apr 1 06:25 getlaunchkey2.bin # ./getlaunchkey2.bin Login: ivanov Password:123 Try to get Key for ivanov... Sending request for key #0 Waiting for answer... Launch Key Received: a24214rf143sdfsf As you can see, the program displayed the key, which was needed for the passage of the task!
Solaris 2.6 Installation Tips
When preparing the job, Solaris 2.6 was completely installed from scratch, gcc was installed on it (it is not included in the standard package), then the program was developed and compiled. How to run Solaris 2.6 and how to set up a network on it was already covered in this article. To complete the picture, a few more tips for installing Solaris:
- About 10 different distributions have been tried, however, it was normally possible to install and run after installation only a distribution kit, whose file is named like this: SOL_2_6_598_SPARC_SMCC_SVR.iso.
- Detailed installation instructions can be found here.
- When installing, it is advisable to manually fix the partition table so that at least 400 Mb is allocated to / usr.
- After installation on the Solaris OS, you can optionally install packages that can be downloaded here.
- To create a virtual disk, you can use the command: qemu-img.exe create -f qcow2 D: \ qemu \ sparc_36.img 36G
- To install the package, you can use the following commands:
gzip -d package_name sudo pkgadd -d unzipped_package_name
Source: https://habr.com/ru/post/255079/
All Articles