Clouds - white-manned horses or secure ownCloud for “small” ones in FreeNAS

ownCloud , according to Wikipedia, is a Free and open web application for data synchronization, file sharing and remote storage of documents in the “cloud”. And, as it seems to me, quite an interesting solution for organizing your own home cloud.
However, ownCloud, which is installed as a plug-in on FreeNAS , and just out of the box, has several disadvantages that I would like to get rid of even when using at home:
- First, it is installed in conjunction with SQLite , which is suitable only if you have a small number of files and users, and absolutely not suitable if you plan to synchronize with the help of the client. In my case, the repository has already spilled over almost 5Tb and the ownCloud installed in this way simply refused to see some of the files. And without synchronization, the return from the cloud is not great. Replace the database with MariaDB .
- Secondly, there is no work on https, but I do not like the idea that someone can intercept my files. Enable https.
- Thirdly, there is absolutely no protection against the banal password selection by the brute force method. Defend against brute force with fail2ban.
- Fourthly, I am too lazy to often look through the logs for hacking, but I really want to quickly find out about such attempts. Set up push notifications about password guessing using the pushover.net service.
I want to immediately make a reservation. I am not an IT specialist, I am only a project manager in one of the Russian system integrators, and this “instruction” was born in attempts to configure all 4 specified points on my home system, FreeNAS, working from Esxi. The instruction is written by a newbie for beginners, so if there are obvious blunders or errors in commands and configs somewhere, then please indicate them in the comments.
All the settings will be done from the console, handles, as close as possible to how this, as I see it, make "adult" IT people.
')
1 Preparing Jail for ownCloud
1.1 Create Jail
I will not describe this step. If you managed to install FreeNAS and it works for you, then you should have no problems with this step. Creating the first jail can take quite a long time.
1.2 Open SSH access to this Jail
It is most convenient to perform further configuration not through a web terminal, but through a full-fledged terminal program. For example, putty . To do this, open SSH access to our Jail and create a new user, from which we will carry out further configuration.
Select the Jail created by us in the FreeNAS web-interface and click the Shell button below.

In the web console Jail enter:
# sysrc sshd_enable="YES" Start the daemon for ssh to work:
# service sshd start Create a user on behalf of which we will then configure our system. The user will have superuser privileges, for which we will include him in the wheel group.
# adduser Adduser settings
Usrname: New user on whose behalf we will perform all manipulations in the terminal. Enter, for example, superstepa .
Full name: The full name of this user. Enter, for example, Dyadya Stepa Policeman .
Uid (Leave empty for default): Well, if asked to leave empty, then do so. Feel free to press Enter .
Login group [superstepa]: We want our user to have all the rights of the local administrator - superuser, and therefore include it in the wheel group.
Login group is wheel. Invite superstepa into other groups? []: Press Enter .
Login class [default]: Click Enter .
Shell (sh csh tcsh git-shell nologin) [sh]: Leave the default sh. Just hit Enter .
Home directory [/ home / superstepa]: And again Enter .
Home directory permissions (Leave empty for default): Enter again.
Use password-based athentications? [yes]: We want this user to authenticate with a password? Of course yes! Hit Enter .
Use an empty password? (yes / no) [no]: We are for security and do not want a new user with superuser rights to have an empty password. So again press Enter .
Use a random password? (yes / no) [no]: I'm just sure that the password we invented is the most reliable. And we want to use it. And therefore Enter .
Enter password: Yeah, and here he is. Enter your password.
Enter password again: Enter it again.
Lock out the account after creation? [no]: No, you do not need to block this account. Just Enter .
OK? (yes / no): Whether we check everything is correct and, if so, then yes .
Add another user? (yes / no): We don’t need other users. No.
2 Installation and preparation for work ownCloud
We join with the help of the terminal program to our Jail.
Enter the name of the user created by us and his password.
At the command prompt $, we write su . Now the command line prompt will change to something like root @ ownCloud: / usr / home / superstepa # , and all our commands will be executed on behalf of the superuser.
To simplify, I will denote the command line prompt with the # symbol, and my comments, which need not be entered, will start with // .
2.1 Install the necessary packages
First we update the current packages:
# pkg upgrade Then we install the packages required for ownCloud operation (we answer yes to all questions that arise):
# pkg install mariadb100-server php56-extensions php56-bz2 php56-curl php56-exif php56-fileinfo php56-gd php56-mbstring php56-mcrypt php56-pdo_mysql php56-openssl php56-zip php56-zlib pecl-APCu pecl-intl In order to enable work on https , we collect with the packages we need, and then install the nginx web server from the ports:
# portsnap fetch extract // , # cd /usr/ports/www/nginx && make config // web- nginx During the build process, we make sure that the following packages are selected:
IPV6
HTTP
HTTP_CACHE
HTTP_DAV
HTTP_FLV
HTTP_GZIP_STATIC
HTTP_PERL
HTTP_REWRITE
HTTP_SSL
HTTP_STATUS
Www
# make install 2.2 Create self-signed keys and certificates
# cd /usr/local/etc/nginx/ Create the server.key root key (des3 encryption algorithm , 1024 bit long):
# openssl genrsa -des3 -out server.key 1024 To do this, the system will ask for the password phrase twice. We invent it and enter it.
Create a root certificate:
# openssl req -new -key server.key -out server.csr You can answer questions as you please. The main thing:
- on the first request Enter pass phrase for server.key enter the correct password from the root key created earlier,
- it is necessary to answer all the questions, otherwise the client ownCloud may later refuse to synchronize files,
- remember the entered data so that in the future you can easily remember that the certificate is yours,
- remember the password entered on the question A challenge password []:.
You can change the validity period of our certificate, for example, up to 10,000 days, by adding the argument -days 10,000 to the command above.
# cp server.key server.key.org // # openssl rsa -in server.key.org -out server.key // # openssl x509 -req -days 3650 -in server.csr -signkey server.key -out server.crt // 2.3 Enable the autorun web server, PHP and database
# sysrc nginx_enable="YES" php_fpm_enable="YES" mysql_enable="YES" 2.4 Install the editor for easy editing configs
Still, we are still “small” and it’s still difficult for us to use the pre-installed vi editor, so we’ll put a simple nano editor (we answer yes to all the questions that arise).
# pkg install nano Attention:
After installing the editor, try running it with the nano command. In some cases that are not clear to me, something is going wrong and instead of starting the following error appears:
In order to fix this, we execute only 2 commands:
Shared object "libiconv.so.2" not found, required "libgmoudle-2.0.so.0
In order to fix this, we execute only 2 commands:
# pkg delete -f gettext # pkg upgrade 2.5 Correcting the nginx web server config
As real administrators, we always make a copy of it before adjusting the config, so that in case of problems, you can always roll back:
# cp /usr/local/etc/nginx/nginx.conf /usr/local/etc/nginx/nginx.old And edit the config file:
# nano /usr/local/etc/nginx/nginx.conf We replace all contents of a config with the following:
worker_processes 2; events { worker_connections 1024; } http { include mime.types; default_type application/octet-stream; log_format main '$remote_addr - $remote_user [$time_local] "$request" ' access_log logs/access.log main; sendfile off; keepalive_timeout 65; gzip off; ssl_certificate /usr/local/etc/nginx/server.crt; // https ssl_certificate_key /usr/local/etc/nginx/server.key; // https server { listen 443 ssl; // https root /usr/local/www; location = /robots.txt { allow all; access_log off; log_not_found off; } location = /favicon.ico { access_log off; log_not_found off; } location ^~ /owncloud { index index.php; try_files $uri $uri/ /owncloud/index.php$is_args$args; client_max_body_size 512M; // location ~ ^/owncloud/(?:\.|data|config|db_structure\.xml|README) { deny all; } location ~ \.php(?:$|/) { fastcgi_split_path_info ^(.+\.php)(/.*)$; fastcgi_pass unix:/var/run/php-fpm.sock; fastcgi_param SCRIPT_FILENAME $document_root$fastcgi_script_name; fastcgi_param PATH_INFO $fastcgi_path_info; include fastcgi_params; fastcgi_param MOD_X_ACCEL_REDIRECT_ENABLED on; } location ~* \.(?:jpg|gif|ico|png|css|js|svg)$ { expires 30d; add_header Cache-Control public; } } } } Exit the editor by pressing Ctrl + X. Do not forget to save changes when exiting.
2.6 Correct php config
# cp /usr/local/etc/php.ini-production /usr/local/etc/php.ini # nano /usr/local/etc/php.ini In the file we find the following lines (we use Ctrl + W to search) and give them the specified values:
always_populate_raw_post_data = -1 // ; date.timezone = Europe/Moscow // cgi.fix_pathinfo=0 upload_max_filesize = 512M // post_max_size = 512M // 2.7 Correct php-fpm.conf:
# cp /usr/local/etc/php-fpm.conf /usr/local/etc/php-fpm.old # nano /usr/local/etc/php-fpm.conf In the file we find the following lines (we use Ctrl + W to search) and give them the specified values:
listen = /var/run/php-fpm.sock listen.owner = www // ; listen.group = www env[PATH] = /usr/local/bin:/usr/bin:/bin 2.8 Adjust /var/db/mysql/my.cnf:
# cp /var/db/mysql/my.cnf /var/db/mysql/my.old # nano /var/db/mysql/my.cnf The file will be empty, so we add the following lines to it:
[server] skip-networking skip-name-resolve innodb_flush_method = O_DIRECT skip-innodb_doublewrite innodb_flush_log_at_trx_commit = 2 innodb_file_per_table expire_logs_days = 1 2.9 Start the nginx web server, PHP, MariaDB and set up the database:
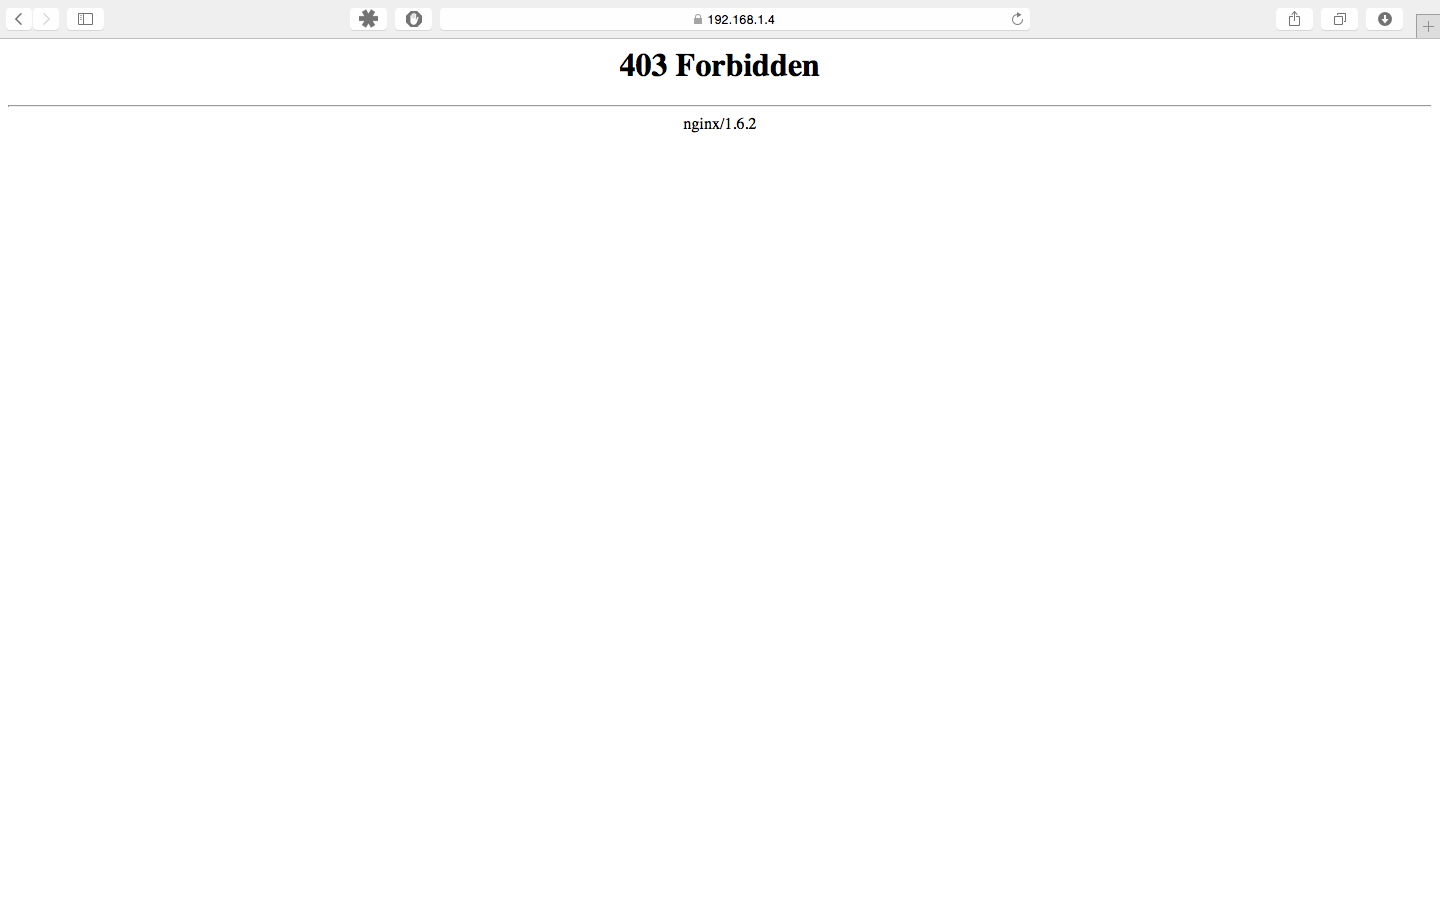
# service nginx start && service php-fpm start && service mysql-server start If everything was done correctly, then everything will start without errors and you can try to go through the browser at https: // <YOUR_JAIL_IP> .
We will be reminded that the certificate is self-signed, but by accepting it we will get to the page with the inscription 403 Forbidden .
Configure the MariaDB database:
# mysql_secure_installation MariaDB settings:
Enter current password for root (enter for none): By default, there is no password, press Enter .
Set root password? [Y / n] : Enter Y.
New password: Enter the new root password.
Re-enter new password: We repeat the password entered earlier.
All other questions are answered with Y , or simply click Enter.
Set root password? [Y / n] : Enter Y.
New password: Enter the new root password.
Re-enter new password: We repeat the password entered earlier.
All other questions are answered with Y , or simply click Enter.
Configure the ownloud database by entering your values, where owncloud is the name of the database, ownclouduserdb is the user name for working with the database, and passwordownclouddb is the password of this user:
# mysql -u root -p CREATE DATABASE owncloud; GRANT ALL PRIVILEGES ON owncloud.* TO 'ownclouduserdb' IDENTIFIED BY 'passwordownclouddb'; FLUSH PRIVILEGES; quit; 2.10 Download and install the current version of OwnCloud
Under the link we look the current actual version of ownCloud . At the time of this writing, it was version 8.0.2 .
Download the archive, where instead of 8.0.2 we indicate the current current version:
# fetch "http://download.owncloud.org/community/owncloud-8.0.2.tar.bz2" Unarchive:
# tar jxf owncloud-*.tar.bz2 -C /usr/local/www Now we delete the unnecessary archive:
# rm owncloud-*.tar.bz2 Assign system owners (user and group) ownCloud:
# chown -R www:www /usr/local/www/owncloud /mnt/files 2.11 Create a task in crone:
# setenv EDITOR nano // nano # crontab -u www -e Register in it:
*/15 * * * * /usr/local/bin/php -f /usr/local/www/owncloud/cron.php If everything was spelled correctly, then we will receive the following system message:
crontab: installing new crontab
Now go to the browser at https: // <YOUR_JAIL_IP> / owncloud and make the latest settings there. Do not forget that we need to change the type of database used, and to do this, click Storage and database and select our database type: MySQL / MariaDB .
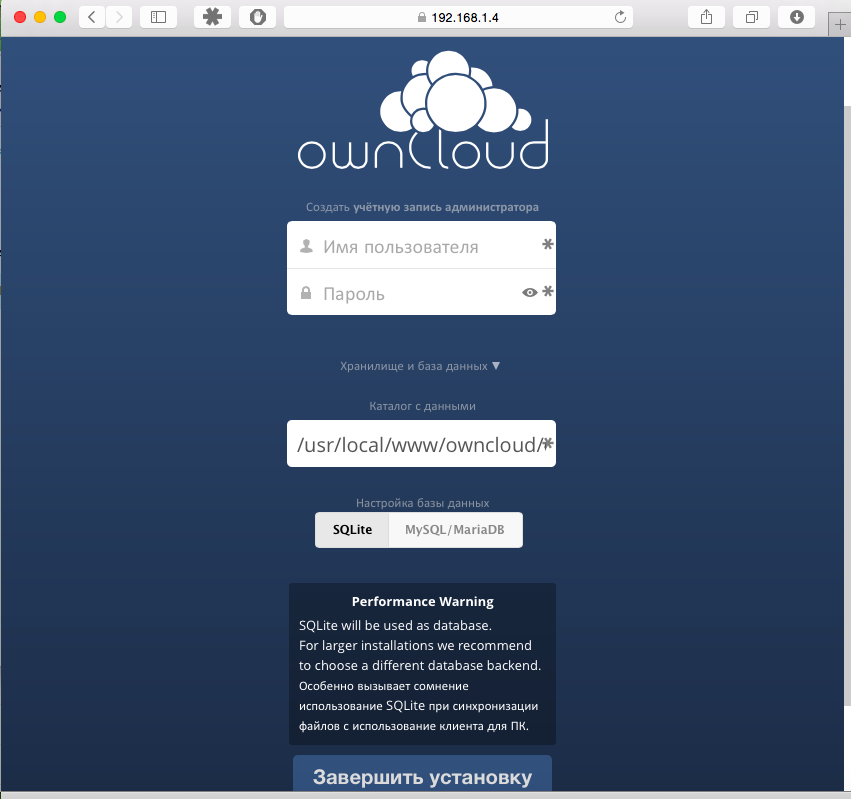
Fill in the fields
Username : The name of our cloud administrator. For example, Stepanadministratovich .
Password : Administrator password.
The data directory : I prefer / mnt / files / . In this directory, I then mount my FreeNAS storage Volumes. If you need to explain how, then write in the comments.
Database User : We created it earlier in step 2.9 of our ownclouduserdb .
Database password : Also assigned earlier in step 2.9 passwordownclouddb .
Database name : All the same step 2.9 owncloud .
Our ownCloud is ready to go.
3 Advanced Settings
3.1 We ask the search robots (Yandex, Google, etc.) not to index our site:
# ln -s /usr/local/www/owncloud/robots.txt /usr/local/www 4 Password protection
4.1 Install fail2ban from ports:
# cd /usr/ports/security/py-fail2ban # make install clean Directory structure fail2ban
Fail2ban is in the following path: / usr / local / etc / fail2ban. The structure of the directories and files there:
folder action.d - contains action files
folder filter.d - filter files
file fail2ban.conf - main configuration file
jail.conf file - specific services protection configuration file
folder action.d - contains action files
folder filter.d - filter files
file fail2ban.conf - main configuration file
jail.conf file - specific services protection configuration file
4.2 Configuring logging in ownCloud:
Create a file in which your ownCloud logs will be written if the login attempt fails:
touch /var/log/owncloud-acces.log The file must be writable by the user www:
# cd /var/log/ # chown www:www owncloud-acces.log Enable logging of unsuccessful logins in ownCloud:
# nano /usr/local/www/owncloud/config/config.php In the file we find or add the following lines before the very last line (use the search Ctrl + W) and give them the specified values:
'logtimezone' => 'Europe/Moscow', // 'logfile' => '/var/log/owncloud-acces.log', 'loglevel' => '2', 'log_authfailip' => true, Check whether logging failed inputs:
Several times we try to log into our ownCloud web-interface with obviously wrong password or username.
Then execute the command in the console:
If everything is done correctly, the following entries will appear in the file:
Then execute the command in the console:
# nano /var/log/owncloud-acces.log If everything is done correctly, the following entries will appear in the file:
{"ReqId": "es09787k250rv52fu0iu44124z494687", "remoteAddr": "192.168.1.1", "app": "core", "message": "Login failed: 'Admin' (Remote IP: '192.168.1.10', X- Forwarded-For: '') "," level ": 2," time ":" 2015-04-04T18: 59: 50 + 03: 00 "}
4.3 Create a filter file for fail2ban:
nano /usr/local/etc/fail2ban/filter.d/owncloud.conf In the file we write the following:
[Definition] failregex={"app":"core","message":"Login failed: user '.*' , wrong password, IP:<HOST>","level":2,"time":".*"} // ownCloud<= 7.0.1 {"app":"core","message":"Login failed: '.*' \(Remote IP: '<HOST>', X-Forwarded-For: '.*'\)","level":2,"time":".*"} // ownCloud=7.0.2-7.0.5 {"reqId":".*","remoteAddr":"<HOST>","app":"core","message":"Login failed: .*","level":2,"time":".*"} // ownCloud>=8 In essence, this is a parser, which, in all the service information that ownCloud writes to its log, must find the ip-address of the one who tried to pick up the password for entry. Those elements that never change in log entries are explicitly indicated here. Those that change are replaced by *. Well, actually the ip-address that we are looking for is replaced by the variable <\ HOST> \.
4.4 Editing the service settings file:
# cp /usr/local/etc/fail2ban/jail.conf /usr/local/etc/fail2ban/jail.old # nano /usr/local/etc/fail2ban/jail.conf Add to the bottom of the jail.conf file:
[owncloud] enabled = true filter = owncloud port = https logpath = /var/log/owncloud-acces.log // ownCloud, 4.2 ignoreip = 192.168.1.59 // ip- maxretry = 2 // bantime = 86400 // findtime = 600 // - action = bsd-ipfw // pushover-notify // , Tab. 4.5 Check whether our filter is working and whether it can find the necessary rows in the ownCloud log with attempts to log in unsuccessfully:
# fail2ban-regex /var/log/owncloud-acces.log /usr/local/etc/fail2ban/filter.d/owncloud.conf If everything is correct, at the bottom of the output there will be a line like
Lines: 2 lines, 0 ignored, 2 matches, 0 missed [processed in 0.0 sec]
4.6 Configuring actions that will be performed in case of failed login attempts:
# cp /usr/local/etc/fail2ban/action.d/bsd-ipfw.conf /usr/local/etc/fail2ban/action.d/bsd-ipfw.local # nano /usr/local/etc/fail2ban/action.d/bsd-ipfw.conf We leave everything in it by default. It already has a rule that when sent to the ban, the ip-address is added to the table (1) of the ipfw firewall:
actionban = ipfw table \ <table \> add \ <ip \>
Add to the ipfw firewall itself a rule that blocks all ip-addresses that are in the table (1), since While there are no rules for the firewall, what to do with addresses from this table of ours (1):
# ipfw add 1 deny all from table\(1\) to me A few examples of working with ipfw:
ipfw list // ipfw delete 13 // 13 ipfw add 14 <> // 14 ipfw table 1 add 192.168.1.5 // ipfw table 1 add 192.168.1.0/24 // ipfw table 1 list // ipfw add deny ip from table(10) to me // 50 ipfw table 1 delete 192.168.1.5 // ipfw table 1 flush // 4.7 Run fail2ban:
Before launching, we will create for fail2ban a file describing the pushover-notify action, which was already mentioned above and which we will talk about later:
#touch /usr/local/etc/fail2ban/action.d/pushover-notify.conf We set fail2ban autostart in /etc/rc.conf:
# sysrc fail2ban_enable="YES" And run it:
# /usr/local/etc/rc.d/fail2ban start If everything is done correctly, then it will start, if not - sort out where the error is. If it is launched, then we check for a ban: we go from a third-party ip-address with the wrong password. It should be banned for the time we specified in the jail.conf file.
A few examples of working with fail2ban that may come in handy during the debugging process:
fail2ban-client status // fail2ban-client status owncloud // , owncloud - fail2ban-client set owncloud unbanip MYIP // ip- , MYIP - ip- Actually, we now have our ownCloud operating on an “adult” https database with password protection.
Almost everything, but let's also add a blocking notification if the password is entered incorrectly as push notifications on our phone.
5 Notification about blocking ip-address
For push notifications, we will use the pushover.net service. I think now you will not be difficult to deal with its API. But if difficulties arise, please write in the comments and I will add an appropriate description of how to work with this service.
5.1 Configure pushover notifications about unsuccessful login attempts and a bath:
# nano /usr/local/etc/fail2ban/action.d/pushover-notify.conf In the file we write the following:
[Definition] actionstart= actionstop= actioncheck= actionban = url -k https://api.pushover.net/1/messages.json -F token=<token> -F user=<user> -F title="ownCloud Alarm" -F message="<ip> is banned after <failures> attemts against <name>" actionunban = url -k https://api.pushover.net/1/messages.json -F token=<token> -F user=<user> -F title="ownCloud Alarm" -F message="<ip> is unbanned" [Init] name = default token = [API Token/key (application key)] user = [User key] where [API Token / key (application key)] and [User key] are the corresponding values from pushover.net .
Restart fail2ban
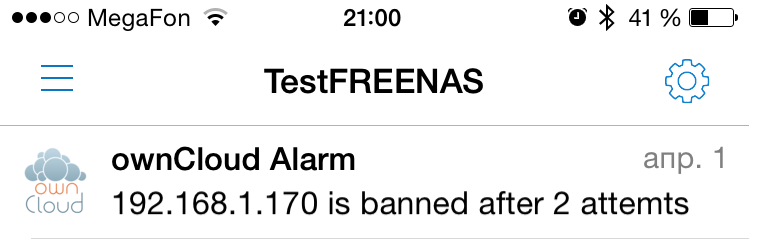
# /usr/local/etc/rc.d/fail2ban restart We check the work of notifications by performing several unsuccessful attempts to log into ownCloud:
That's all. We do not forget to forward ports 80 and 443 on the router to access our ownCloud .
And yes, for more security, you can replace the standard ports with something more exotic.
Source: https://habr.com/ru/post/255019/
All Articles