MPCMeter - indication of the progress of video viewing. Arduino + JavaScript
Instead of introducing
Thanks to my anonymous habradumorosis for a present ( pro mini ). Long hesitated what to do with it. He waved his hand and ordered in addition a Chinese parcel ...
After a month, it’s my time to “flash the LED”;).
Idea
While the parcel was traveling, I thought that this would be done. As a result, it was decided to do something a little more than to flash with a LED.
The idea is the following - to display the progress of viewing the video using some indicator.

Task
- pull out statistics on the film launched;
- process and transfer data to arduino;
- show progress on the indicator.
For impatient immediately result
Implementation
1. MPC
How many can remember, on my PC, I always installed Media PLayer Classic . It turns out MPC is able to give statistics on, let's say, the current session in the form of an html-page with the following content:
HTML
<!DOCTYPE html> <html lang="en"> <head> <meta charset="utf-8"> <title>MPC-HC WebServer - Variables</title> <link rel="stylesheet" href="default.css"> <link rel="icon" href="favicon.ico"> </head> <body> <!--[if lt IE 8]> <div class="browser-warning"><strong>Warning!</strong> You are using an <strong>outdated</strong> browser. Please <a href="http://browsehappy.com/">upgrade your browser</a> to improve your experience.</div> <![endif]--> <p id="filepatharg">D:%5cFILMS%5cIts.Always.Sunny.in.Philadelphia.S10E10.720p.WEB.rus.LostFilm.TV.mp4</p> <p id="filepath">D:\FILMS\Its.Always.Sunny.in.Philadelphia.S10E10.720p.WEB.rus.LostFilm.TV.mp4</p> <p id="filedirarg">D:%5cFILMS</p> <p id="filedir">D:\FILMS</p> <p id="state">1</p> <p id="statestring"></p> <p id="position">1069384</p> <p id="positionstring">00:17:49</p> <p id="duration">1255210</p> <p id="durationstring">00:20:55</p> <p id="volumelevel">75</p> <p id="muted">0</p> <p id="playbackrate">1</p> <p id="reloadtime">0</p> </body> </html> To achieve such functionality from it, you need to put a tick " Listen to the port " in the settings
Settings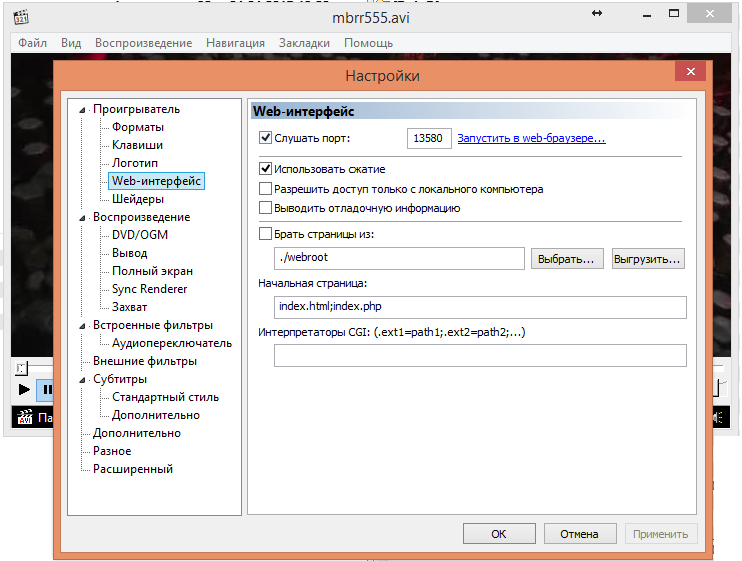
All the most important is contained in the tags
<p id=""></p> It remains only to disassemble them and select the right.
2. NodeJS
We will analyze the page with the help of NodeJS. By the way, the page is available at localhost : 13580 / variables.html (port from settings).
All logic can be divided into 3 blocks:
- MPC web server module;
- data processing module;
- module working with arduino.
Further highlights. The whole project, along with the code, you can look at
Little js
With the help of the native http.get and promises I refer to our page.
Use the parse method of the mpc_obj object to parse the data
At the exit, we have such an object
Preparing data for arduino
Communication with arduino occurs through the exchange of data on the com-port. I chose library to work with com node-serialport
Connect with its help to the com5 port and set the speed
We open the port and send our progress back to arduino every time it asks
main.prototype.get = function(){ var that = this return new Promise(function(done){ http.get(that.mpc_uri, function(res) { res.on('data', function (chunk) { that.mpc_obj.parse(chunk) done(that.mpc_obj.get()); }); }).on('error', function(e) { done(e.message); }); }) } Use the parse method of the mpc_obj object to parse the data
MPC_obj.prototype.parse = function(data){ var obj = {} data.toString().split('\n').forEach(function(line){ // , if (match=/\<p/.test(line)){ var name2 = line.match(/id\=\"(\w+)\"/)[1] if (!obj.hasOwnProperty(name2)) obj[name2]=line.substring(line.indexOf('>')+1,line.lastIndexOf('<')) } }) this.settings=obj; } At the exit, we have such an object
{ filepatharg: 'D:%5cmbrr555.avi', filepath: 'D:\\mbrr555.avi', filedirarg: 'D:%5c', filedir: 'D:\\', state: '1', statestring: '', position: '1023', positionstring: '00:00:01', duration: '114906', durationstring: '00:01:54', volumelevel: '77', muted: '0', playbackrate: '1', reloadtime: '0' } Preparing data for arduino
// MPC_obj.prototype.getProgress = function(){ return (this.settings["position"]/this.settings["duration"]).toFixed(5) } // (PWM) 1,0 -> 255 MPC_obj.prototype.PWM = function(){ return (this.getProgress()*255).toFixed(0) } Communication with arduino occurs through the exchange of data on the com-port. I chose library to work with com
Connect with its help to the com5 port and set the speed
var SerialPort = require('serialport').SerialPort; var serialPort = new SerialPort("COM5", { baudrate: 57600 }, false); We open the port and send our progress back to arduino every time it asks
serialPort.open(function (error) { if ( error ) { console.log('failed to open: '+error); } else { console.log('open'); // arduino serialPort.on('data', function(data) { main.init(function(a){ // serialPort.write(a); }); }); } }); 3. Arduino
Now iron. We have prepared data for arduino, now we will decide on that very indication. To display progress, I chose such a very cheap voltmeter module and tweaked it a bit

A little more detail
It turns out that the lid held onto ... sticky tape and was easily removed

Well, then the size and a pair of new panels

Well, then the size and a pair of new panels
In arduino, we send data about the progress of the film and proportionally change the voltage on one of the legs of the microcontroller. Schematic diagram (the presence of the LED to blink at the end of the session;))

Now let's program our microcontroller.
In the inByte variable, we will read the data received on the com port. We hang on the 3rd pin LED, and on the 9th pin - a voltmeter. We set the exact same speed as before. loop is our endless loop. Every 100ms we send abstract data Serial.print ('A') to the port. We are waiting for the response Serial.available ()> 0. If MPC and a nodeJS application that returns progress are running on the PC, then we’ll lightly highlight the LED on the 3rd analogWrite pin (3, 5) and transmit the analogWrite progress value (9, inByte). The analogWrite function transmits values from 0 to 255, which in our case corresponds to 0V to 5V. Here you need to read about PWM (PWM) - it's all thanks to him.
When we watched half of the movie, at this moment 255/2 = analogWrite (9, 127) will be transmitted to the 9th pin, which corresponds to 2.5V on the voltmeter. As soon as the film is finished - we blink vigorously with a LED;)
int inByte = 0; void setup() { pinMode(9, OUTPUT); pinMode(3, OUTPUT); analogWrite(3, 0); analogWrite(9, 0); Serial.begin(57600); } void loop() { Serial.print('A'); delay(100); if (Serial.available() > 0) { analogWrite(3, 5); inByte = Serial.parseInt(); analogWrite(9, inByte); if (inByte==255) analogWrite(3, 255); } } That's how it all looks live on a breadboard
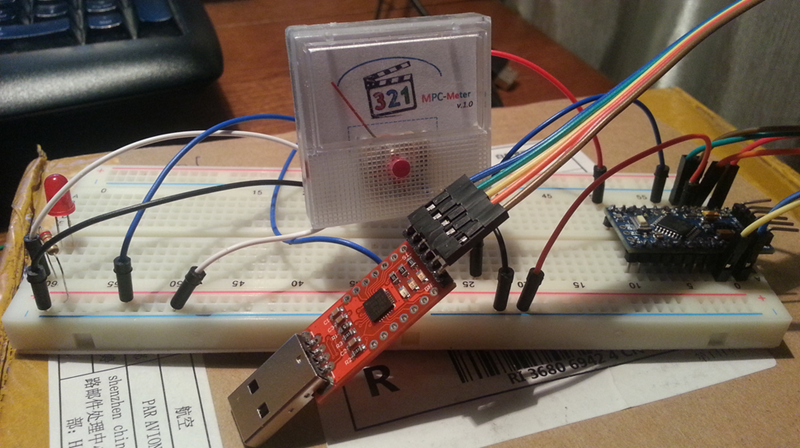
Yes, and on the video;)
By the way, this project used just a present from the very same habromedamorosis.
Ps.
Next is Attiny13, as time will be - I will try to transfer everything to it.
References:
- present from habradedamoroza ;
- Media PLayer Classic ;
- All project on github ;
- module for working with the node-serialport com port ;
- about PWM (PWM) ;
- fresh NodeJS ;
- Arduino IDE .
If somewhere you have written complete nonsense or you are mistaken - prompt, correct;). Thanks for attention.
')
Source: https://habr.com/ru/post/254911/
All Articles