Universal Remote for Arduino
There are many articles on the Internet on how to make your remote to the TV on the Arduino, but I needed a universal remote to control the TV and media player. The main advantage of my universal remote is that the buttons in the application for android phone are dual-targeted, and by the way, look at the video.
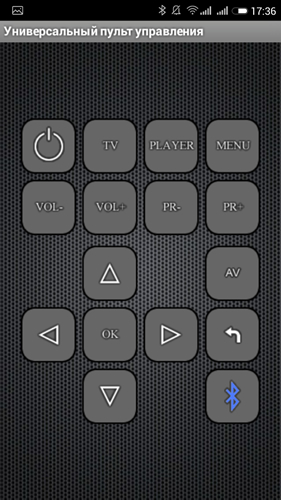
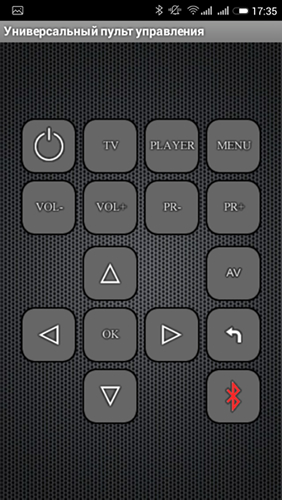
The console is very convenient in that on the screen almost the same buttons are used to control the TV and player. One difference is that the " AV " button in the TV control mode is changed to the " ◻ " (stop) button when switching to the player control mode. The pictures show two modes, on the left is the TV control mode, on the right is the player control mode.

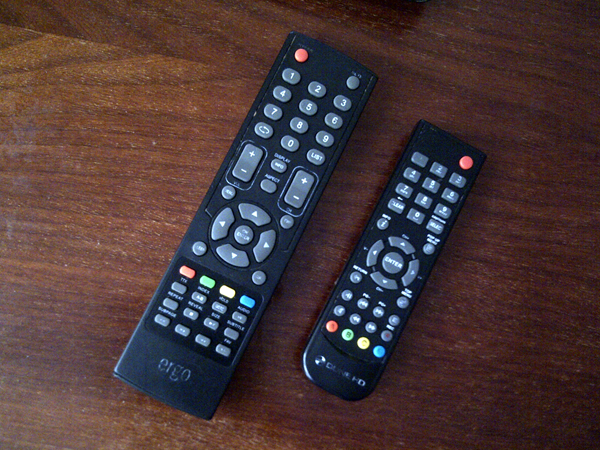
Well, now I'll tell you a little about the creation of such a remote control. For the device I used the remote from the ERGO TV and the remote from the DUNE HD TV101W media player.
')
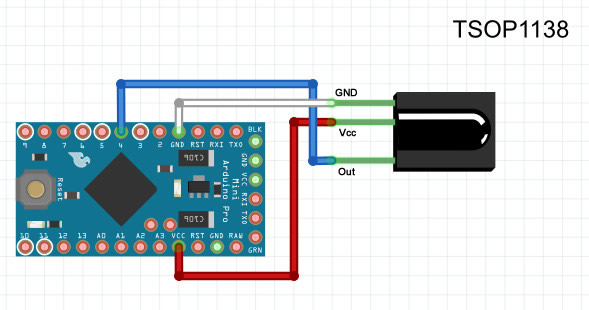
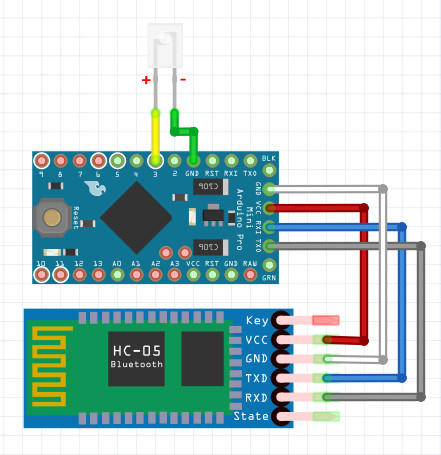
To get data from the remotes, I used the TSOP1138 infrared sensor (analogue of TSOP4838) at an operating frequency of 38 kHz and connected it to the Arduino board according to the scheme:
First we need to read the codes of the buttons on the remotes. I used the IRremote library and the IRrecvDump test sketch.
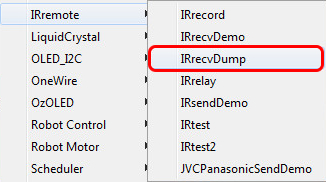
This sketch is required to determine the encoding of the data transfer and to read the code of the buttons on the consoles.
After casting the sketch, open the "port monitor" and, pressing the buttons on the remote, look at the data.

In the picture an example of scanning the power button from the TV remote and the player's remote. Now we create a table for button codes.
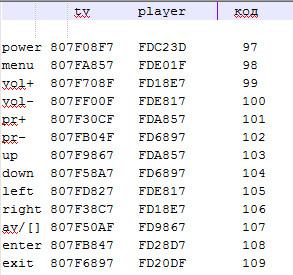
I did as in the photo above. Under the inscription TV codes remote control buttons from the TV; under the inscription Player - codes from the remote media player.
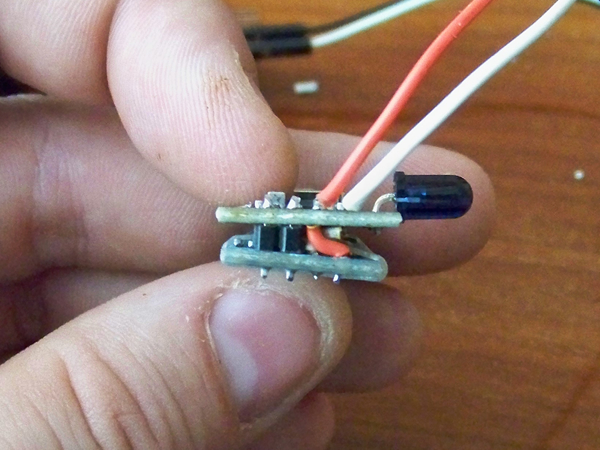
Now turn off our receiver of infrared signals from the Arduino board and connect to it the Bluetooth module HC-05 and the infrared LED as shown in the photo.
After that go directly to the sketch.
In the sketch, you will need to edit the codes of the buttons, namely in the lines:
807F08F7 value change to:
Where 12345678 is the code for your button.
After editing the sketch on your button codes, fill in the sketch to the Arduino board and proceed to installing the application on the phone.
[ Download the app for android devices "Universal Remote Control" ]
Turn on the bluetooth in the phone, look for our device, create a pair, then run the Pult application on the phone.
At startup, we will have a screen with a red bluetooth icon in the lower right corner, which signals that we are not connected to our device.
After that, click on this icon. We should have a window with a list of all available bluetooth devices, where we select our device for connection.

Now we are back on the main screen and can already control the TV:
To switch to the control mode, we will need to click the button labeled "Player" . As I said before, we have a button labeled "AV" will change to the " ◻ " button:
To disconnect from our device, simply hold down the “Power” button for a few seconds.
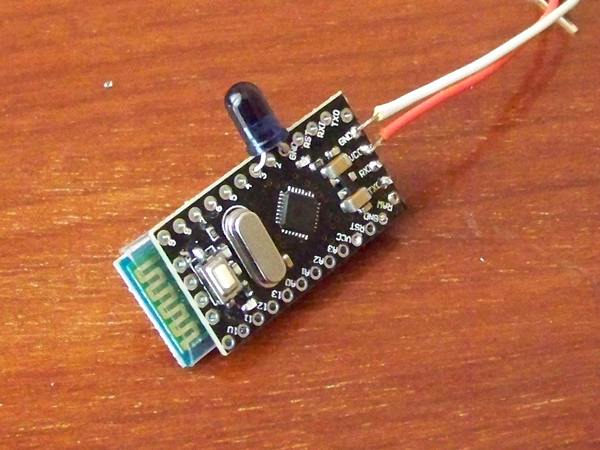
Well, a few photos of my finished device.

It turned out, like, not bad. Waiting for comments on the article.
The console is very convenient in that on the screen almost the same buttons are used to control the TV and player. One difference is that the " AV " button in the TV control mode is changed to the " ◻ " (stop) button when switching to the player control mode. The pictures show two modes, on the left is the TV control mode, on the right is the player control mode.
Well, now I'll tell you a little about the creation of such a remote control. For the device I used the remote from the ERGO TV and the remote from the DUNE HD TV101W media player.
')
To get data from the remotes, I used the TSOP1138 infrared sensor (analogue of TSOP4838) at an operating frequency of 38 kHz and connected it to the Arduino board according to the scheme:
First we need to read the codes of the buttons on the remotes. I used the IRremote library and the IRrecvDump test sketch.
This sketch is required to determine the encoding of the data transfer and to read the code of the buttons on the consoles.
In the sketch in the line int RECV_PIN = 11; indicate our pin number 4
After casting the sketch, open the "port monitor" and, pressing the buttons on the remote, look at the data.
In the picture an example of scanning the power button from the TV remote and the player's remote. Now we create a table for button codes.
I did as in the photo above. Under the inscription TV codes remote control buttons from the TV; under the inscription Player - codes from the remote media player.
Now turn off our receiver of infrared signals from the Arduino board and connect to it the Bluetooth module HC-05 and the infrared LED as shown in the photo.
After that go directly to the sketch.
Sketch
#include <IRremote.h> IRsend irsend; int y = 1; void setup() { Serial.begin(9600); } void loop() { if (Serial.available() > 0) { int x = Serial.read(); if (x == 49) { y = 1; } if (x == 50) { y = 2; } if (y == 1) { // if (x == 97) { irsend.sendNEC(0x807F08F7, 32); delay(40); } if (x == 98) { irsend.sendNEC(0x807FA857, 32); delay(40); } if (x == 99) { irsend.sendNEC(0x807F708F, 32); delay(40); } if (x == 100) { irsend.sendNEC(0x807FF00F, 32); delay(40); } if (x == 101) { irsend.sendNEC(0x807F30CF, 32); delay(40); } if (x == 102) { irsend.sendNEC(0x807FB04F, 32); delay(40); } if (x == 103) { irsend.sendNEC(0x807F9867, 32); delay(40); } if (x == 104) { irsend.sendNEC(0x807F58A7, 32); delay(40); } if (x == 105) { irsend.sendNEC(0x807FD827, 32); delay(40); } if (x == 106) { irsend.sendNEC(0x807F38C7, 32); delay(40); } if (x == 107) { irsend.sendNEC(0x807F48B7, 32); delay(40); } if (x == 108) { irsend.sendNEC(0x807FB847, 32); delay(40); } if (x == 109) { irsend.sendNEC(0x807F6897, 32); delay(40); } } if (y == 2) { // if (x == 97) { irsend.sendNEC(0xFDC23D, 32); delay(40); } if (x == 98) { irsend.sendNEC(0xFDE01F, 32); delay(40); } if (x == 99) { irsend.sendNEC(0xFD18E7, 32); delay(40); } if (x == 100) { irsend.sendNEC(0xFDE817, 32); delay(40); } if (x == 101) { irsend.sendNEC(0xFDA857, 32); delay(40); } if (x == 102) { irsend.sendNEC(0xFD6897, 32); delay(40); } if (x == 103) { irsend.sendNEC(0xFDA857, 32); delay(40); } if (x == 104) { irsend.sendNEC(0xFD6897, 32); delay(40); } if (x == 105) { irsend.sendNEC(0xFDE817, 32); delay(40); } if (x == 106) { irsend.sendNEC(0xFD18E7, 32); delay(40); } if (x == 107) { irsend.sendNEC(0xFD9867, 32); delay(40); } if (x == 108) { irsend.sendNEC(0xFD28D7, 32); delay(40); } if (x == 109) { irsend.sendNEC(0xFD20DF, 32); delay(40); } } } } In the sketch, you will need to edit the codes of the buttons, namely in the lines:
if (x == 97) { irsend.sendNEC(0x807F08F7, 32); delay(40); 807F08F7 value change to:
if (y == 1) { // if (x == 97) { irsend.sendNEC(0x12345678, 32); delay(40); } Where 12345678 is the code for your button.
After editing the sketch on your button codes, fill in the sketch to the Arduino board and proceed to installing the application on the phone.
[ Download the app for android devices "Universal Remote Control" ]
Turn on the bluetooth in the phone, look for our device, create a pair, then run the Pult application on the phone.
At startup, we will have a screen with a red bluetooth icon in the lower right corner, which signals that we are not connected to our device.
After that, click on this icon. We should have a window with a list of all available bluetooth devices, where we select our device for connection.
Now we are back on the main screen and can already control the TV:
To switch to the control mode, we will need to click the button labeled "Player" . As I said before, we have a button labeled "AV" will change to the " ◻ " button:
To disconnect from our device, simply hold down the “Power” button for a few seconds.
List of components used with links to sellers
Arduino Pro Mini ATMEGA328 5V / 16MHz card - 1 pc.
Bluetooth module HC-05 1 pc.
Infrared signal receiver TSOP4838 - 1 pc.
Infrared diode - 1 pc.
Bluetooth module HC-05 1 pc.
Infrared signal receiver TSOP4838 - 1 pc.
Infrared diode - 1 pc.
Well, a few photos of my finished device.
It turned out, like, not bad. Waiting for comments on the article.
Source: https://habr.com/ru/post/254761/
All Articles