Wordpress: Cloud Storage Plugins
In one of the previous publications, we already wrote about the benefits of integrating our cloud storage with CMS. In the comments to this article (it was written a year and a half ago) there were questions about whether specialized Wordpress plugins exist. At that time there were almost no such plug-ins, and those that were were in a very “raw” state. Today the situation has changed: several interesting and useful plug-ins have appeared, which we will describe in more detail below.
Selectel Storage Upload
')
The Selectel Storage Upload plugin is designed to synchronize files placed in the Wordpress Media Library with our cloud storage. Why do you need it? Every media file downloaded via the standard Worpdress interface is automatically copied to the vault. If the media files on the main server are lost for some reason, they can always be restored. Having copies in the repository also simplifies the transfer of the site to another hosting.
In addition, the plugin can be configured so that all the "heavy" content will be placed only in the repository, and not on the main server. This can significantly reduce the load on the server. Since all files placed in the repository will be distributed through the CDN, users will receive them from the geographically closest caching server at maximum speed.
The Selectel Storage Upload plug-in can be installed either through the Wordpress GUI (menu "Plugins" → "Add New") or manually (you can download it here ).
When the installation is completed, Selectel Storage Upload will be added to the list of available plugins.
In order for the plugin to work, it needs to be activated. Immediately we warn you that Selectel Storage Upload most likely will not be able to activate the first time: a message will be issued stating that cURL version 7.16.2+ is required for the normal functioning of the plug-in.
You can fix this error as follows: open the php.ini configuration file (etc / php5 / apache2 / php.ini; in other installations its location may be different) and add the following lines:
 ; cUrl
 extension = / usr / lib / php5 / 200121212 / curl.so
The path to the curl.so file may also differ, and it is better to refine it by searching.
After making the necessary changes, restart the web server:
$ sudo /etc/init.d/apache2 restart
After this, there should be no problems with activation. You can proceed to configure the plugin.
Enter the storage under your account and create a container in which the media files will be stored. We will also create an additional user who will have access only to this container (this should be done for security reasons).
In the Wordpress menu, select “Settings” → “Selectel Upload”. The following page will open:
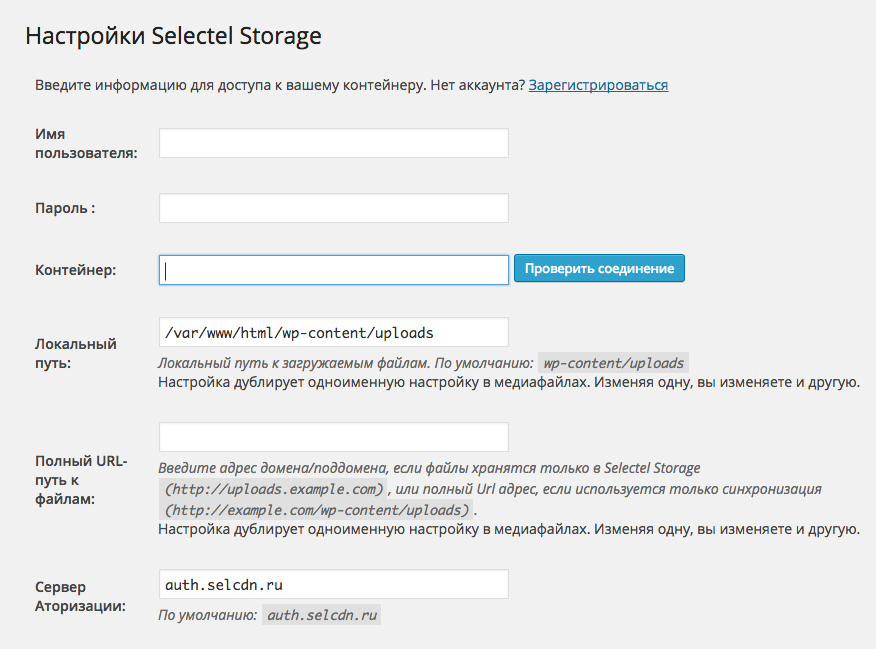
Everything is simple and clear. We specify the access details (name and password of the user created by us), as well as the name of the container for media files. The path to the media files on the local machine, as well as the URL authorization in the repository are set by default.
As mentioned above, you can configure the plugin so that all the downloaded files will immediately be placed in the storage, bypassing the media library, and be only there. To do this, check the box “Store files only in Selectel Storage”.
A domain must be attached to the container where the media files will be stored. In the field “Full URL path to files” you will need to specify the address of this domain (for example, uploads.example.com ).
You can distribute files without attaching a domain. In this case, in the “Full URL path to files” field, you will need to specify an address of the form xxx.selcdn.com/container_name .
W3 Total Cache Plugin: Static Distribution via CDN
To speed up and optimize the work of sites on Wordpress, there are a number of specialized plug-ins, the most famous of which is W3 Total Cache.
We will not describe in detail the procedures for installing and configuring this plug-in in this article: many detailed instructions have been published on the Internet (see, for example, here ). We will talk about how to use the W3 Total Cache and our cloud storage to organize the distribution of statics via CDN.
Install the plugin in accordance with the instructions at the link above. Then check the configuration files. The wp-config.php file must contain the following lines (if not, then they will need to be added manually):
 / ** Enable W3 Total Cache * /
 define ('WP_CACHE', true);  // Added by W3 Total Cache
The .htaccess file should look like this (appropriate changes, if necessary, will have to be made again manually):
 #BEGIN W3TC Browser Cache
 <IfModule mod_deflate.c>
     <IfModule mod_headers.c>
         Header append Vary User-Agent env =! Dont-vary
     </ IfModule>
     <IfModule mod_filter.c>
         AddOutputFilterByType DEFLATE text / css text / x-component application / xj $
     <IfModule mod_mime.c>
         # DEFLATE by extension
         AddOutputFilter DEFLATE js css htm html xml
     </ IfModule>
     </ IfModule>
 </ IfModule>
 # END W3TC Browser Cache
 # BEGIN W3TC CDN
 <FilesMatch "\. (Ttf | ttc | otf | eot | woff | font.css) $">
 <IfModule mod_headers.c>
     Header set Access-Control-Allow-Origin "*"
 </ IfModule>
 # END W3TC CDN
Save the changes and proceed directly to setting up the plugin.
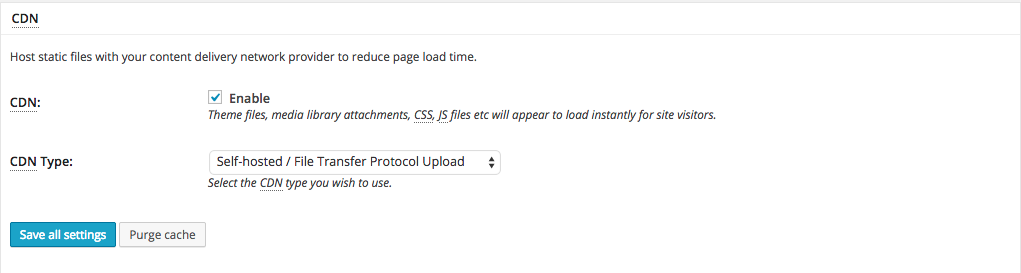
After installing W3 Total Cache, a new item will appear in the main menu - Performance. Choose Performance → General Settings; On the page that opens, find the CDN section. Unfortunately, for the time being, W3 Total Cache cannot be "friends" with any cloud service based on OpenStack Swift, so we will interact with our repository via FTP.
Select the Enabled checkbox and select the Self Hosted / File Transfer Protocole Upload option in the CDN Type list:
Then select the menu item Performance → CDN. The settings page will open. Pay attention to the Configuration field:
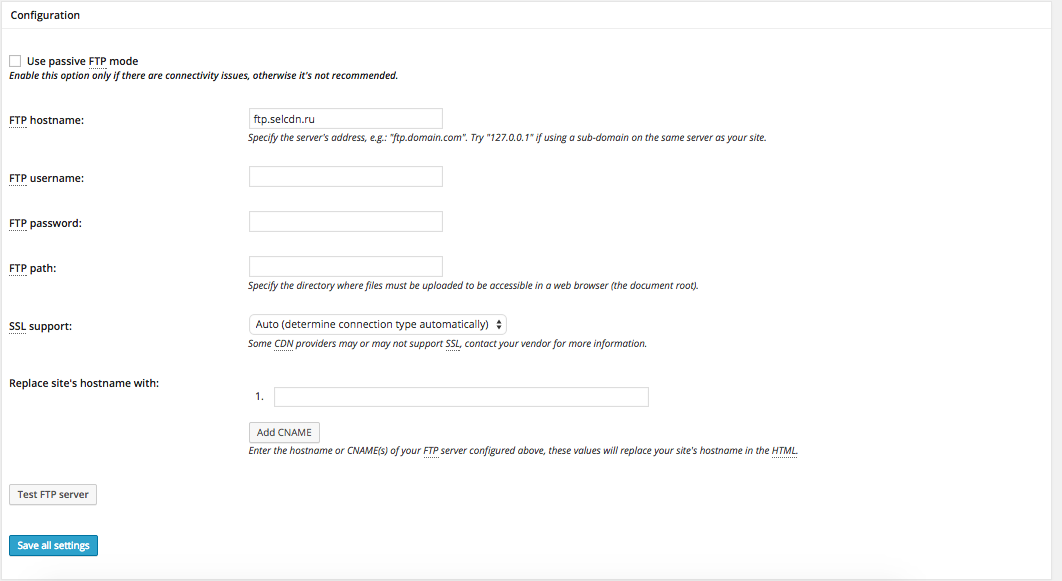
In the FTP hostname field, specify ftp.selcdn.ru, in the FTP Username and FTP Password fields, the username and password (do not forget that it is better to create a separate user with limited access rights to work with FTP). In the FTP path field, specify the name of the container in which the static files of the site will be stored; Before the name you need to put a slash (for example, / mysite).
In the field “Replace your hostname with:” we indicate the canonical name, which will be displayed in the addresses of downloadable files instead of “***. Selcdn.com”.
When loading a site, links to the image will contain CNAME, not the actual domain.
To make the site even faster, you can specify several CNAME records, each of which will be assigned to a specific type of content.
After setting the necessary settings, click on the Save All Settings button.
Inside the specified container, the / wp-content / upload folder will be automatically created, where all static content will be added.
UpdraftPlus Plugin: Backup to the Cloud
UpdraftPlus is a simple and easy-to-use plug-in for creating backup copies of sites on Wordpress, supporting the OpenStack Swift protocol.
Before installing this plugin, you need to perform a number of preparatory actions:
- create a container in the storage where backup copies will be placed;
- create a special user who will have access only to this container;
- on the server, create in the wp-content directory a folder for temporary storage of backup copies that is writable.
Now we will install UpdraftPlus (menu “Plugins” → “Add new”). After activating the plugin in the Wordpress menu item will be added "Updates Plus Backups".
Select this item and go to the "Settings" tab. Find the section "Place your backup copy in the remote storage". In the drop-down list "Choose your remote storage" choose OpenStack Swift.
Next, we specify the details of access to the repository:

In the field “URI for authorization” we specify auth.selcdn.ru . In the “Tenant” field (this is how the term tenant is transmitted in the Russian version of the plug-in) we indicate the account number. Next, we indicate in the appropriate fields the name of the user created by us and his password.
In the "Container" field we indicate the name of the container in which the backup copies will be stored.
Having filled all the fields, click on the button “Check OpenStack settings”. In case of successful verification, a message will be displayed that the plugin has gained access to the container and can create files in it.
Next, go to the section "Advanced / debugging settings" and click on the link "Show expert settings." Find the field “Backup Directory” there and enter in it the name of the folder created earlier for temporary storage of backup copies.
That's all. The plugin is configured to work with the repository. On the "Settings" tab, you can also specify which files should be included in the backup and how often to back up.
Having set all the necessary parameters, click on the “Save Settings” button and go to the “Current Status” tab:
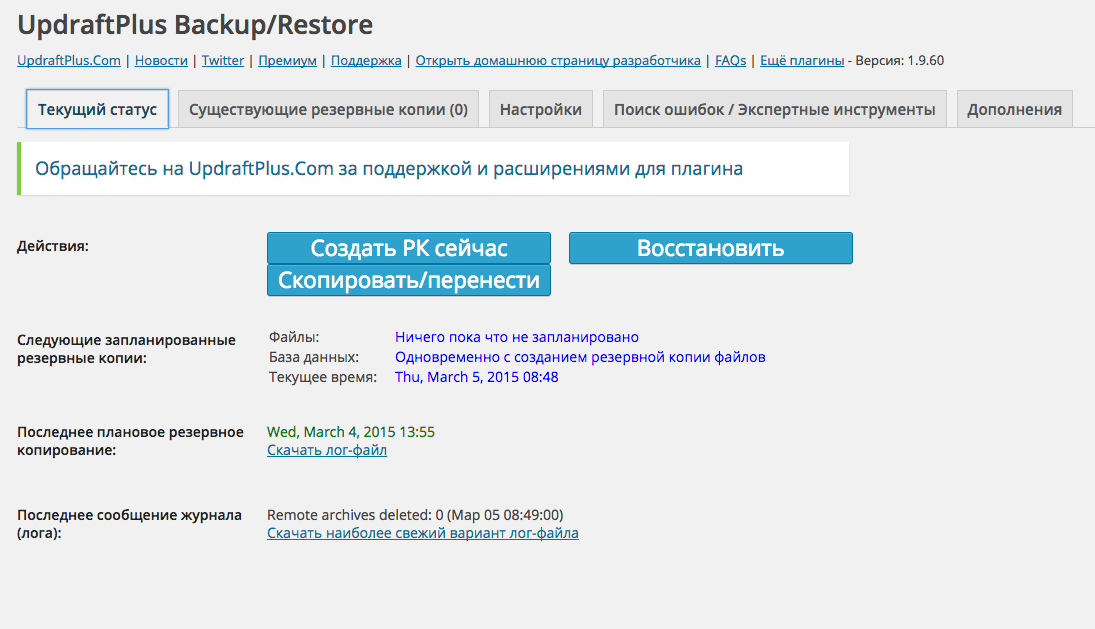
To start the process of backup copying, just click on the button "Create RC now."
The operation of restoring data from a backup is also extremely simple - by clicking on the appropriate button.
Conclusion
While working on this article, we looked at quite a few plugins for Wordpress, but didn’t include the review: most of them are in a very “raw” state and can hardly be recommended for use. And the number of plug-ins that can be configured to work with any cloud storage based on OpenStack Swift is extremely small. So, WordPress plug-in developers still have something to work on.
Many of you have experience developing and administering Wordpress websites. Maybe you know any other interesting plugins that support the OpenStack Swift protocol? We will be very grateful if you tell about them in the comments.
If for any reason you can not leave comments here - welcome to our blog .
Source: https://habr.com/ru/post/254697/
All Articles