A simple gaming TV set-top box on the Arduino
Introduction
In the light of day, and then in a dream, I had the idea of creating my own regulated TV set-top box. Actually, it was here that the rich and saturated world of radio engineering opened up before me. Since I hadn’t dealt with a serious development of electronics before, my choice fell on a simpler version - Arduino and its most common model - Uno .
Work plan
')
1. Deal with the library
2. Solder the video output board
3. Write the code
4. Cut the body
The final external component is not particularly important in the case of such projects.
Step 1. We understand what's what
After several tens of minutes of desperate googling, I came to the conclusion that I could not even create a prefix of the Dandy type. Well, what can I do here, once I took it, I will finish the job.
On the site devoted to projects on Arduino and in general to radio electronics as a whole (not advertising) I found an article about a similar undertaking. It was decided to use the library TVout , as the prefix TV-shnaya. For its installation and work had a little poshamanit.
Necessary library functions
The begin () function initializes the video output (the default screen resolution is 128x96).
Syntax:
TVOut.begin (mode);
TVOut.begin (mode, x, y);
Options:
mode - video signal standard:
_PAL - PAL mode;
_NTSC - NTSC mode.
Return value:
0 - in case of successful connection, 4 - in case of failure (not enough memory for the output buffer).
The delay () function delays the output image.
Syntax:
TVOut.delay (ms);
Options:
ms - delay in ms with an accuracy of: 20 ms for PAL and 16 ms for NTSC.
The delay_frame () function delays the output image.
Syntax:
TVOut.delay_frame (frames);
Options:
frames - the number of frames to delay ...
The feature is useful for minimizing or eliminating on screen flicker caused by screen refresh.
The hres () function returns the horizontal screen resolution.
Syntax:
TVOut.hres ();
Options:
not.
Return value:
unsigned char - horizontal screen resolution.
The vres () function returns the vertical screen resolution.
Syntax:
TVOut.vres ();
Options:
not.
Return value:
unsigned char - vertical screen resolution.
The char_line () function returns the maximum possible number of characters per line when displaying textual information.
Syntax:
TVOut. char_line ();
Options:
not.
Return value:
unsigned char - the number of characters.
The set_pixel () function sets the color of a pixel of a screen at a point with given coordinates.
Syntax:
TVOut.set_pixel (x, y, color);
Options:
x, y - pixel coordinates;
color - pixel color:
0 - black;
1 - white;
2 - invert color.
The get_pixel () function gets the color of a screen pixel from a point with given coordinates.
Syntax:
TVOut.get_pixel (x, y);
Options:
x, y - pixel coordinates.
Return value:
color - pixel color:
0 - black;
1 - white;
2 - invert color.
The fill () function fills the screen with the specified color.
Syntax:
TVOut.fill (color);
Options:
color - fill color:
0 - black;
1 - white;
2 - invert color.
The clear_screen () function clears the screen, filling it with the specified color.
Syntax:
TVOut.clear_screen (color);
Options:
color - fill color:
0 - black;
1 - white;
2 - invert color.
The invert () function inverts the contents of the screen.
Syntax:
TVOut.invert ();
Options:
not.
The shift_direction () function shifts the contents of the screen.
Syntax:
TVOut.shift_direction (distance, direction);
Options:
distance - the distance to shift the screen contents.
direction - the direction of the shift:
UP = 0 - up;
DOWN = 1 - down;
LEFT = 2 - to the left;
RIGHT = 3 - right.
The draw_line () function connects two points on the screen with a line.
Syntax:
TVOut.draw_line (x0, y0, x1, y1, color);
Options:
x0, y0 - the coordinates of the first point;
x1, y1 - coordinates of the second point;
color - fill color:
0 - black;
1 - white;
2 - invert color.
The draw_row () function fills a string with a specified color between two points of the string.
Syntax:
TVOut.draw_row (row, x0, x1, color);
Options:
row - the vertical coordinate of the row;
x1, x2 - horizontal coordinates of line points;
color - fill color:
0 - black;
1 - white;
2 - invert color.
The draw_column () function fills a row with the specified color between two points of the column.
Syntax:
TVOut.draw_column (column, y0, y1, color);
Options:
column - the horizontal coordinate of the column;
y1, y2 - vertical coordinates of the points of the column;
color - fill color:
0 - black;
1 - white;
2 - invert color.
The draw_rect () function draws a rectangle on the screen.
Syntax:
TVOut.draw_rect (x, y, w, h, color);
TVOut.draw_rect (x, y, w, h, color, fillcolor);
Options:
x, y - coordinates of the left upper point;
w, h - width and height of the drawn rectangle;
color - the color of the rectangle borders:
0 - black;
1 - white;
2 - invert color.
fillcolor - the fill color of the rectangle:
0 - black;
1 - white;
2 - invert color.
The draw_circle () function draws a circle on the screen.
Syntax:
TVOut.draw_ circle (x, y, r, color);
TVOut.draw_ circle (x, y, r, color, fillcolor);
Options:
x, y - coordinates of the center of the circle;
r is the radius of the circle;
color - the color of the borders of the circle:
0 - black;
1 - white;
2 - invert color.
fillcolor - the color of the circle filling:
0 - black;
1 - white;
2 - invert color.
The bitmap () function displays a raster image.
Syntax:
TVOut.bitmap (x, y, bmp, w, h);
Options:
x, y - coordinates of the upper left corner of the output point;
bmp - a pointer to the memory array where the image is stored;
w, h - width, height of the displayed image;
Below, we will consider the process of creating the code of displayed bitmap images.
To use text output functions, you need to include files with included or custom fonts in the library. To connect a custom font set, you need to include a header file in the sketch:
#include
The library includes the following font sets:
font4x6;
font6x8;
font8x8;
font8x8ext.
The select_font () function selects a font for displaying textual information.
Syntax:
TVOut.select_font (font);
Options:
font - the font connected in the sketch.
The print_char () function displays a character on the screen.
Syntax:
TVOut.print_char (x, y, char);
Options:
x, y - position on the screen to display the character;
char is a character from the current font.
The set_cursor () function sets the cursor position for displaying textual information on the screen.
Syntax:
TVOut.set_cursor (x, y);
Options:
x, y - coordinates for the cursor.
The print () function displays a string, character, or number.
Syntax:
TVOut.print (x, y, string);
TVOut.print (x, y, char, base);
TVOut.print (x, y, int, base).
Options:
x, y - coordinates of the cursor.
base - output format:
BYTE = 0;
DEC = 10 (default);
HEX = 16.
The println () function displays a string, a character, or a number, and at the end a line feed:
Syntax:
TVOut.println (x, y, string);
TVOut.println (x, y, char, base);
TVOut.println (x, y, int, base).
Options:
x, y - coordinates of the cursor.
base - output format:
BYTE = 0;
DEC = 10 (default);
HEX = 16.
Audio output functions allow you to send a signal of a certain frequency to the TV via the audio output.
The tone () function outputs an audio signal of a specific frequency.
Syntax:
TVOut.tone (frequency, duration);
TVOut.tone (frequency).
Options:
frequency - the frequency of the audio signal;
duration - the duration of the signal.
The noTone () function stops outputting an audio signal.
Syntax:
TVOut.noTone ().
Mode Setup Functions
The begin () function initializes the video output (the default screen resolution is 128x96).
Syntax:
TVOut.begin (mode);
TVOut.begin (mode, x, y);
Options:
mode - video signal standard:
_PAL - PAL mode;
_NTSC - NTSC mode.
Return value:
0 - in case of successful connection, 4 - in case of failure (not enough memory for the output buffer).
Delay functions
The delay () function delays the output image.
Syntax:
TVOut.delay (ms);
Options:
ms - delay in ms with an accuracy of: 20 ms for PAL and 16 ms for NTSC.
The delay_frame () function delays the output image.
Syntax:
TVOut.delay_frame (frames);
Options:
frames - the number of frames to delay ...
The feature is useful for minimizing or eliminating on screen flicker caused by screen refresh.
Functions for receiving parameters
The hres () function returns the horizontal screen resolution.
Syntax:
TVOut.hres ();
Options:
not.
Return value:
unsigned char - horizontal screen resolution.
The vres () function returns the vertical screen resolution.
Syntax:
TVOut.vres ();
Options:
not.
Return value:
unsigned char - vertical screen resolution.
The char_line () function returns the maximum possible number of characters per line when displaying textual information.
Syntax:
TVOut. char_line ();
Options:
not.
Return value:
unsigned char - the number of characters.
Basic graphic functions
The set_pixel () function sets the color of a pixel of a screen at a point with given coordinates.
Syntax:
TVOut.set_pixel (x, y, color);
Options:
x, y - pixel coordinates;
color - pixel color:
0 - black;
1 - white;
2 - invert color.
The get_pixel () function gets the color of a screen pixel from a point with given coordinates.
Syntax:
TVOut.get_pixel (x, y);
Options:
x, y - pixel coordinates.
Return value:
color - pixel color:
0 - black;
1 - white;
2 - invert color.
The fill () function fills the screen with the specified color.
Syntax:
TVOut.fill (color);
Options:
color - fill color:
0 - black;
1 - white;
2 - invert color.
The clear_screen () function clears the screen, filling it with the specified color.
Syntax:
TVOut.clear_screen (color);
Options:
color - fill color:
0 - black;
1 - white;
2 - invert color.
The invert () function inverts the contents of the screen.
Syntax:
TVOut.invert ();
Options:
not.
The shift_direction () function shifts the contents of the screen.
Syntax:
TVOut.shift_direction (distance, direction);
Options:
distance - the distance to shift the screen contents.
direction - the direction of the shift:
UP = 0 - up;
DOWN = 1 - down;
LEFT = 2 - to the left;
RIGHT = 3 - right.
The draw_line () function connects two points on the screen with a line.
Syntax:
TVOut.draw_line (x0, y0, x1, y1, color);
Options:
x0, y0 - the coordinates of the first point;
x1, y1 - coordinates of the second point;
color - fill color:
0 - black;
1 - white;
2 - invert color.
The draw_row () function fills a string with a specified color between two points of the string.
Syntax:
TVOut.draw_row (row, x0, x1, color);
Options:
row - the vertical coordinate of the row;
x1, x2 - horizontal coordinates of line points;
color - fill color:
0 - black;
1 - white;
2 - invert color.
The draw_column () function fills a row with the specified color between two points of the column.
Syntax:
TVOut.draw_column (column, y0, y1, color);
Options:
column - the horizontal coordinate of the column;
y1, y2 - vertical coordinates of the points of the column;
color - fill color:
0 - black;
1 - white;
2 - invert color.
The draw_rect () function draws a rectangle on the screen.
Syntax:
TVOut.draw_rect (x, y, w, h, color);
TVOut.draw_rect (x, y, w, h, color, fillcolor);
Options:
x, y - coordinates of the left upper point;
w, h - width and height of the drawn rectangle;
color - the color of the rectangle borders:
0 - black;
1 - white;
2 - invert color.
fillcolor - the fill color of the rectangle:
0 - black;
1 - white;
2 - invert color.
The draw_circle () function draws a circle on the screen.
Syntax:
TVOut.draw_ circle (x, y, r, color);
TVOut.draw_ circle (x, y, r, color, fillcolor);
Options:
x, y - coordinates of the center of the circle;
r is the radius of the circle;
color - the color of the borders of the circle:
0 - black;
1 - white;
2 - invert color.
fillcolor - the color of the circle filling:
0 - black;
1 - white;
2 - invert color.
The bitmap () function displays a raster image.
Syntax:
TVOut.bitmap (x, y, bmp, w, h);
Options:
x, y - coordinates of the upper left corner of the output point;
bmp - a pointer to the memory array where the image is stored;
w, h - width, height of the displayed image;
Below, we will consider the process of creating the code of displayed bitmap images.
Text output functions
To use text output functions, you need to include files with included or custom fonts in the library. To connect a custom font set, you need to include a header file in the sketch:
#include
The library includes the following font sets:
font4x6;
font6x8;
font8x8;
font8x8ext.
The select_font () function selects a font for displaying textual information.
Syntax:
TVOut.select_font (font);
Options:
font - the font connected in the sketch.
The print_char () function displays a character on the screen.
Syntax:
TVOut.print_char (x, y, char);
Options:
x, y - position on the screen to display the character;
char is a character from the current font.
The set_cursor () function sets the cursor position for displaying textual information on the screen.
Syntax:
TVOut.set_cursor (x, y);
Options:
x, y - coordinates for the cursor.
The print () function displays a string, character, or number.
Syntax:
TVOut.print (x, y, string);
TVOut.print (x, y, char, base);
TVOut.print (x, y, int, base).
Options:
x, y - coordinates of the cursor.
base - output format:
BYTE = 0;
DEC = 10 (default);
HEX = 16.
The println () function displays a string, a character, or a number, and at the end a line feed:
Syntax:
TVOut.println (x, y, string);
TVOut.println (x, y, char, base);
TVOut.println (x, y, int, base).
Options:
x, y - coordinates of the cursor.
base - output format:
BYTE = 0;
DEC = 10 (default);
HEX = 16.
Audio output functions
Audio output functions allow you to send a signal of a certain frequency to the TV via the audio output.
The tone () function outputs an audio signal of a specific frequency.
Syntax:
TVOut.tone (frequency, duration);
TVOut.tone (frequency).
Options:
frequency - the frequency of the audio signal;
duration - the duration of the signal.
The noTone () function stops outputting an audio signal.
Syntax:
TVOut.noTone ().
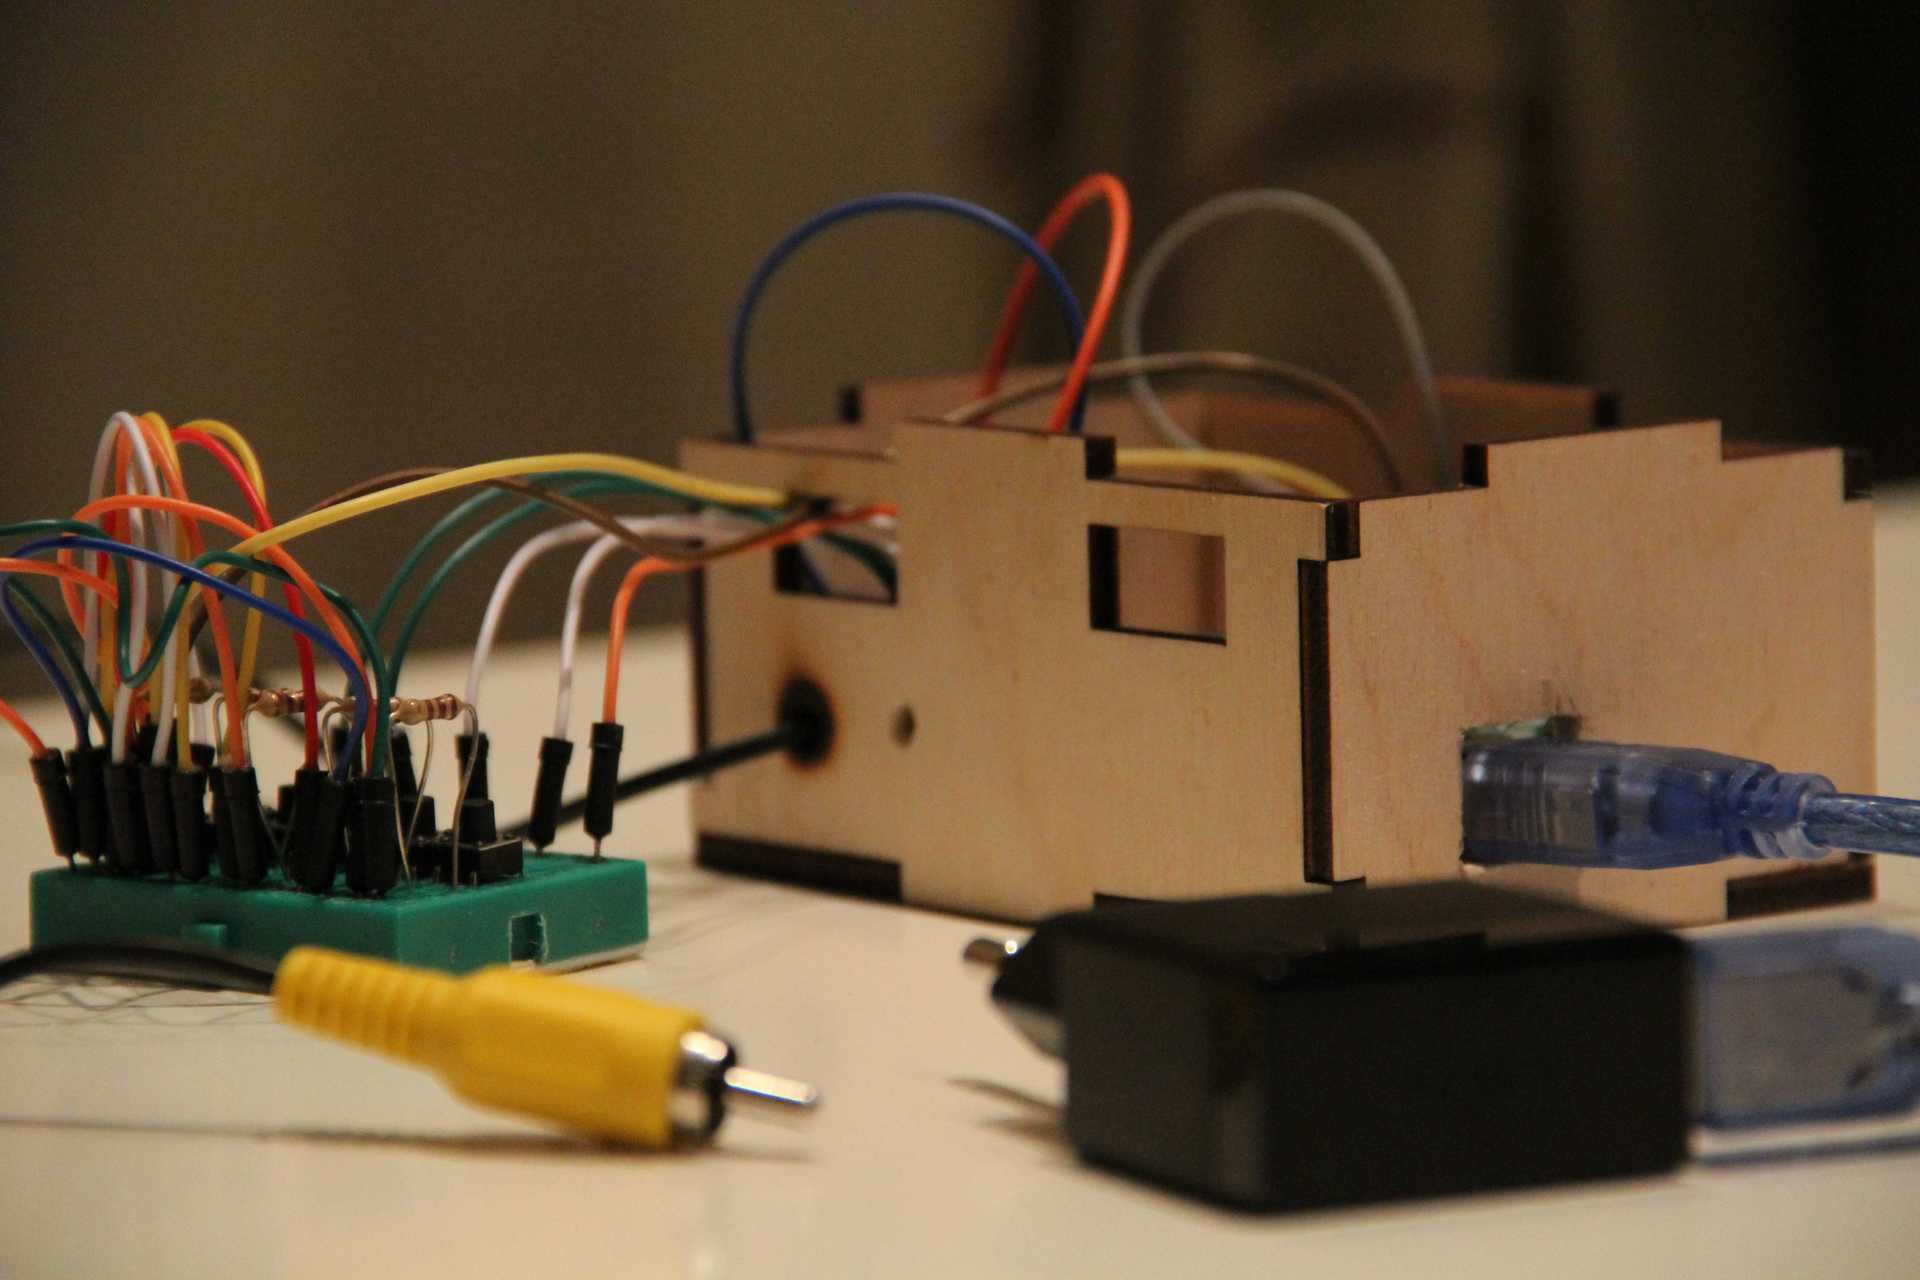
Step 2. Solder the video output
First of all, we need to solder a certain board for outputting the video signal through the composite av output (RCA). Solder as follows:
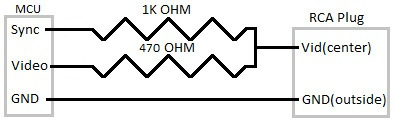
Place two resistors of 470 ohm and 1k ohm parallel to each other and solder the “plus” from the tulip cable to them. Next, we take from the resistor in 470 ohm wire in the seventh pin on the Arduino, because he is responsible for the output video ( video ), and from the resistor in 1k ohm we take the wire in the ninth pin, as he is responsible for synchronization ( sync ). A "minus" from the cable-tulip to the "ground" on the Arduino. Read more here ( English )
Step 3. Write the code (game)
I will not explain that yes how to connect, because the necessary information, as always, can be found on the Internet. I describe what is very difficult to find or not at all.
We start from the welcome screen , where without it. But then an important question comes up: how to call this miracle? I thought about it and invented - Shimo . It sounds good, even technologically, in Chinese, of course, but it does not matter.
Then go back to the game itself. And again the difficult question: what game to do? Since I am not a very diligent and diligent man, as well as a beginner, I decided to write Ping-pong .
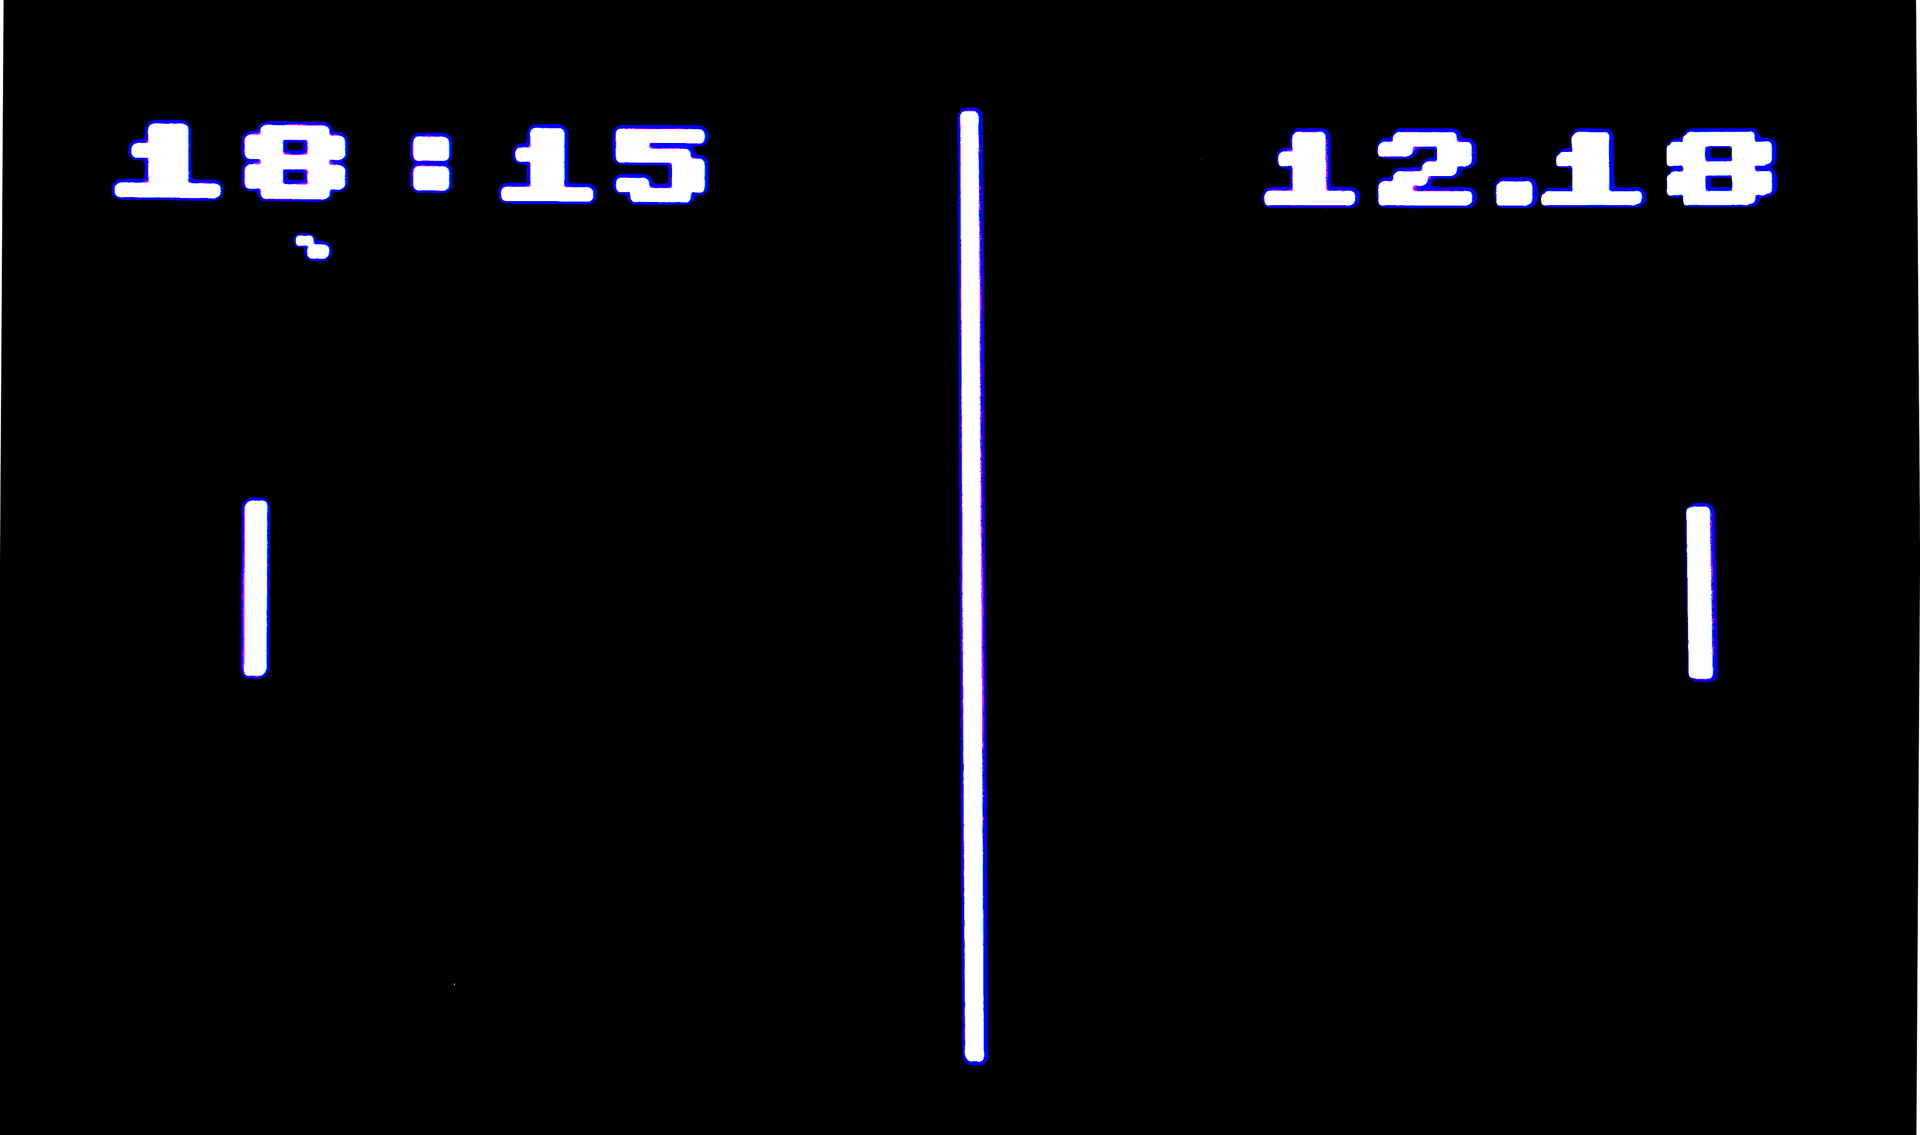
Getting started. Draw a line through the middle of the screen using TV.draw_line (60,0,60,96,1); . The ball appears exactly in the center of the screen. We write the function of its motion void ballmove (int vel, int angle) . Install using TV.set_pixel (x, y, 1); , variables, I called it.
Next, before manipulating the ball, we prescribe an update of the screen, or rather, that the ball does not “inherit” on the screen, so when moving to the next position, you need to paint over the previous black. To do this, we need to register in front of everything else TV.set_pixel (x, y, 0); . After all the changes in the coordinate variables, it is necessary to register the position setting and a small delay - TV.delay (50); . Something like this should happen:
void ballmove(int vel, int angle) { TV.set_pixel(x,y,0); // TV.set_pixel(x,y,1); } Now about the changes of coordinates themselves. Only eight directions (1-8), variable int angle . And there it is already simple, depending on the rotation, subtract or add to the variables any part of the int velocity . I did this:
if(angle == 1) { y -= vel; } if(angle == 3) { x += vel; } if(angle == 5) { y += vel; } if(angle == 7) { x -= vel; } if(angle == 2) { x += round(vel/2); y -= round(vel/2); } if(angle == 4) { x += round(vel/2); y += round(vel/2); } if(angle == 6) { x -= round(vel/2); y += round(vel/2); } if(angle == 8) { x -= round(vel/2); y -= round(vel/2); } Now the movement of the rackets. Here an important clarification - I used only the coordinates for y , since the positions of the rackets in x do not change. Register the following function void racketsmove () . Next, we draw the paddles, the variables int yb1 , int yb2 , TV.draw_line (10, yb1 + 8, 10, yb1-8, 1); and TV.draw_line (110, yb2 + 8, 110, yb2-8, 1); . Updating the screen, that is, "without a trace," is similar to the case with the ball.
Management of rackets is made from buttons. We connect the buttons, pins 2 and 3 - the first racket, 4 and 5 - the second racket. Check the button press and change the coordinates.
This is the function:
void racketsmove() { TV.draw_line(10, yb1+8, 10, yb1-8, 0); TV.draw_line(110, yb2+8, 110, yb2-8, 0); if((yb1 - 8) > 1) { if(digitalRead(2) == HIGH) { yb1 -= 2;} } if((yb1 + 8) < 95) { if(digitalRead(3) == HIGH) {yb1 += 2;} } if((yb2 - 8) > 1) { if(digitalRead(4) == HIGH) {yb2 -= 2; } } if((yb2 + 8) < 95) { if(digitalRead(5) == HIGH) {yb2 += 2;} } TV.draw_line(10, yb1+8, 10, yb1-8, 1); TV.draw_line(110, yb2+8, 110, yb2-8, 1); } Now back to the ball . Now let's write down his collision and pushing away from the walls and rackets. The function is void ballcol () . To do this, simply check its location relative to the objects, and then its angle. Then this angle is changed to another. From the angle is easy to guess.
Angle of reflection equal to the angle of incidenceYou can make some physical exceptions for certain racket zones.
Function:
void ballcol() { if(x == 1 || x == 119 || (x == 10 && y < (yb1 + 3) && y > (yb1 - 3)) || (x == 110 && y < (yb2 + 3) && y > (yb2 - 3))) { if(a==1){a=5;}else if(a==2){a=8;}else if(a==3){a=7;}else if(a==4){a=6;}else if(a==5){a=1;}else if(a==6){a=4;}else if(a==7){a=3;}else if(a==8){a=2;} } if(x == 10 && y < (yb1 - 3) && y > (yb1 - 8)) { a = 2; } if(x == 10 && y > (yb1 + 3) && y < (yb1 + 8)) { a = 4; } if(x == 110 && y < (yb2 - 3) && y > (yb2 - 8)) { a = 8; } if(x == 110 && y > (yb2 + 3) && y < (yb2 + 8)) { a = 6; } if(y == 95 || y == 1) { if(a==1){a=5;}else if(a==2){a=4;}else if(a==3){a=7;}else if(a==4){a=2;}else if(a==5){a=1;}else if(a==6){a=8;}else if(a==7){a=3;}else if(a==8){a=6;} } } The most difficult thing behind, you can successfully breathe.
At the moment we can only make a scoring system, a timer and restart.
Let's start with the timer. There is the seconds variable float ts (it stores absolutely all the time), the variable int tm (the number of minutes we get from ts ). Set the value of tm operation tm = ts / 60; . And display the values on the screen, TV.print (81,1, tm); TV.print (97.1, "."); TV.print (100.1, int (ts- (tm * 60))); .
We continue. The restart function is called void restart () . Here we return the initial values of the variables.
Code:
void restart() { TV.clear_screen(); x = 60; y = 48; yb1 = 48; yb2 = 48; a = 8; ts = 900.0; c1 = 0; c2 = 0; } Final, scoring system, it is too simple. Open Google and drive in the "Rules of the game of table tennis." We are looking for what points are given. We find a part about penalties, and then we successfully find the following: “A point is won if the opponent does not have time to reflect the ball sent to him correctly after the first rebound.” The question is how to count the beats and so on? .. And the beats don't need to be counted, because our ping-pong with two-dimensional graphics.
We calmly find a way out of the situation and, as always, just check the coordinates relative to the side walls. If a collision occurs, then we award the score to the player on the opposite side of the field. The function is void ballscount () . When the timer comes out - we compare the points of the first player (variable int c1 ) and the second player (variable int c2 ), announce the winner, make a delay and cause a restart.
Code:
void ballscount() { if(x == 1) { c2++; } if(x == 119) { c1++; } if(c1 > c2 && ts == 0) { TV.println(10, 45, "Player 1 won!"); delay(10000); restart(); } else if(c1 < c2 && ts == 0) { TV.println(10, 45, "Player 2 won!"); delay(10000); restart(); } else if(c1 == c2 && ts == 0) { TV.println(10, 45, "You are equal"); delay(10000); restart(); } That's all, friends, we have completely written the code of the game. It turned out pretty funny and you can play.
For the lazy, I'll just write all the code.
Complete script
Total 218 lines.
#include <TVout.h> #include <fontALL.h> TVout TV; int x, y, a, c1, c2, yb1, yb2, tm, tsh, s; float ts; boolean paused = false; void setup ( ) { TV.begin(NTSC, 120, 96); TV.clear_screen(); TV.select_font(font6x8); TV.println( 0, 50, "Welcome to Shimo" ); TV.delay (5000); TV.clear_screen(); x = 60; y = 48; yb1 = 48; yb2 = 48; a = 8; ts = 900.0; s = 2; } void loop ( ) { if(!paused) { TV.draw_line(60,0,60,96,1); TV.select_font(font8x8); racketsmove(); ballscount(); TV.print(1,1,c1); TV.print(18,1,":"); TV.print(26,1,c2); tm = ts / 60; ts -= 0.04; if(ts < 0) { ts = 0; } TV.draw_rect(81,1,38,10,0,0); TV.print(81,1,tm); TV.print(97,1,"."); TV.print(100,1,int(ts-(tm*60))); ballcol(); /*if(ts < 600) { s = 4; } if(ts < 300) { s = 6; }*/ ballmove(s, a); TV.delay(50); if(digitalRead(6) == HIGH) { paused = true; delay(1000); } } else { TV.println(40,4,"pause"); if(digitalRead(6) == HIGH) { paused = false; delay(1000); TV.clear_screen(); } } } void ballscount() { if(x == 1) { c2++; } if(x == 119) { c1++; } if(c1 > c2 && ts == 0) { TV.println(10, 45, "Player 1 won!"); delay(10000); restart(); } else if(c1 < c2 && ts == 0) { TV.println(10, 45, "Player 2 won!"); delay(10000); restart(); } else if(c1 == c2 && ts == 0) { TV.println(10, 45, "You are equal"); delay(10000); restart(); } } void ballcol() { if(x == 1 || x == 119 || (x == 10 && y < (yb1 + 3) && y > (yb1 - 3)) || (x == 110 && y < (yb2 + 3) && y > (yb2 - 3))) { if(a==1){a=5;}else if(a==2){a=8;}else if(a==3){a=7;}else if(a==4){a=6;}else if(a==5){a=1;}else if(a==6){a=4;}else if(a==7){a=3;}else if(a==8){a=2;} } if(x == 10 && y < (yb1 - 3) && y > (yb1 - 8)) { a = 2; } if(x == 10 && y > (yb1 + 3) && y < (yb1 + 8)) { a = 4; } if(x == 110 && y < (yb2 - 3) && y > (yb2 - 8)) { a = 8; } if(x == 110 && y > (yb2 + 3) && y < (yb2 + 8)) { a = 6; } if(y == 95 || y == 1) { if(a==1){a=5;}else if(a==2){a=4;}else if(a==3){a=7;}else if(a==4){a=2;}else if(a==5){a=1;}else if(a==6){a=8;}else if(a==7){a=3;}else if(a==8){a=6;} } } void racketsmove() { TV.draw_line(10, yb1+8, 10, yb1-8, 0); TV.draw_line(110, yb2+8, 110, yb2-8, 0); if((yb1 - 8) > 1) { if(digitalRead(2) == HIGH) { yb1 -= 2; } } if((yb1 + 8) < 95) { if(digitalRead(3) == HIGH) { yb1 += 2; } } if((yb2 - 8) > 1) { if(digitalRead(4) == HIGH) { yb2 -= 2; } } if((yb2 + 8) < 95) { if(digitalRead(5) == HIGH) { yb2 += 2; } } TV.draw_line(10, yb1+8, 10, yb1-8, 1); TV.draw_line(110, yb2+8, 110, yb2-8, 1); } void ballmove(int vel, int angle) { TV.set_pixel(x,y,0); if(angle == 1) { y -= vel; } if(angle == 3) { x += vel; } if(angle == 5) { y += vel; } if(angle == 7) { x -= vel; } if(angle == 2) { x += round(vel/2); y -= round(vel/2); } if(angle == 4) { x += round(vel/2); y += round(vel/2); } if(angle == 6) { x -= round(vel/2); y += round(vel/2); } if(angle == 8) { x -= round(vel/2); y -= round(vel/2); } TV.set_pixel(x,y,1); } void restart() { TV.clear_screen(); x = 60; y = 48; yb1 = 48; yb2 = 48; a = 8; ts = 900.0; c1 = 0; c2 = 0; } Step 4. Cut the body
I decided to cut the case on a laser cutter (or a milling machine, I do not know for sure) from 4mm plywood. Drew in InkScape, a little poshamanil and translated into the format of the milling machine.

For gamepads cut small boards and drilled holes in them under the buttons. It turned out not bad, but, unfortunately, I lost the photo.
Conclusion
In the process of work, a simple Arduino video game console was created with a standard Ping Pong game, with two gamepads, in which we can play and even stick.
Additional sources and notes
1. Information about the library
2. Information about connection ports
3. For some requests, the cover image was compressed.
Source: https://habr.com/ru/post/254591/
All Articles