Optimization of ISPmanager for projects on Bitrix or how I crossed ISPmanager and VMBitrix (Bitrix environment)
UPDATE 04/23/2015
')
Perhaps you are already familiar with such a product as "1C-Bitrix: Web Environment" - Linux . This is often an ideal solution for projects based on the CMS Bitrix, but, sometimes, a purely “console” menu does not have the necessary functionality for people working on projects.
For example, another popular product, ISPmanager , allows you to create FTP accounts from a convenient web panel for administrators in just a couple of mouse clicks, while you need Linux administration skills to perform similar actions from the console. But you see, sometimes you just want to manage your server and projects from the tab in the browser, without the help of the ssh console.
However, ISPmanager (in our case, its latest version is number 5) is not ready to work out of the box even with sites on Bitrix, not to mention Bitrix24, corporate portals. Some of the functionality is not available, and projects are quite slow. It takes a long time to learn the recommendations of the documentation on Bitrix, which, unfortunately, is sometimes very late with updating relevant information.
Due to the requirement to work with projects through the " user-friendly " interface of ISPmanager 4/5 and the need to maintain the speed and functionality of the projects, a decision was made about some kind of "crossing" of these two systems.

- Solution successfully tested on ISPmanager 4
- In Apache MPM-ITK mode, the restore.php script gives an error, information on it in the "Important Information" section
What for?
')
Perhaps you are already familiar with such a product as "1C-Bitrix: Web Environment" - Linux . This is often an ideal solution for projects based on the CMS Bitrix, but, sometimes, a purely “console” menu does not have the necessary functionality for people working on projects.
For example, another popular product, ISPmanager , allows you to create FTP accounts from a convenient web panel for administrators in just a couple of mouse clicks, while you need Linux administration skills to perform similar actions from the console. But you see, sometimes you just want to manage your server and projects from the tab in the browser, without the help of the ssh console.
However, ISPmanager (in our case, its latest version is number 5) is not ready to work out of the box even with sites on Bitrix, not to mention Bitrix24, corporate portals. Some of the functionality is not available, and projects are quite slow. It takes a long time to learn the recommendations of the documentation on Bitrix, which, unfortunately, is sometimes very late with updating relevant information.
Due to the requirement to work with projects through the " user-friendly " interface of ISPmanager 4/5 and the need to maintain the speed and functionality of the projects, a decision was made about some kind of "crossing" of these two systems.
And so, before you begin, carefully read the important information.
- The installation script was tested only on clean CentOS 6.6 x64_86, immediately after installing stable ISPmanager 4/5 and including nginx in “Features”.
For advanced users who want to use the proposed solution, who have previously modified any settings in their system, it is strongly not recommended to install the scripts fully automatically - execute commands from them manually - The author does not give any guarantees for the stable or proper operation of the proposed solution. All instructions you perform at your own risk. The current version of scripts and configuration files is under active testing.
- The “compression” module in the system must be DELETED.
- The Apache MPM-ITK bitrix restore.php script crashes with the short_open_tag parameter must be turned on in php.ini
This happens because of the incorrect use of the if condition in this script. The problem exists because in all other php modes it is not modulated, but I have already contacted the developers of 1C-Bitrix and they will have to correct the problem (another question is when they will do it). If someone is interested in the details of the bug - I will answer in the comments
So far, as a temporary fix, we use a distribution kit from the archive attached to the article to restore the site.Fully automatic optimization

For your convenience, the entire solution is decorated in fully automatic scripts and pre-prepared configuration files.
The following scenario is considered:- You have installed clean CentOS 6.6 x86_64
- Install ISPmanager 4/5, following the official instructions
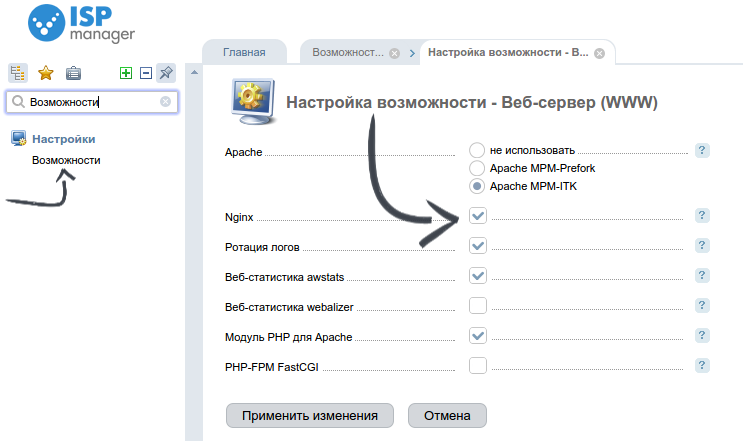
- In the "Features" section of the ISPmanager 4/5 panel, activate Nginx
Then you can proceed to the optimization itself: (all links at the end of the publication)- we launch "bitrix-en_5.1.2_patched_2.sh"
- Copy the script "isp_patch_V0.x.sh" together with the unpacked archive "patch_filesV0.1.zip" to an arbitrary directory on the server
- we launch isp_patch_V0.x.sh
Congratulations, your server with ISPmanager 4/5 is ready to work with projects on Bitrix
It remains only to deploy the site in a fresh domain: (all links at the end of the publication)
- The variant I proposed on how to do this is in a separate but small instruction “ creating a host.pdf ” (in any case, pay attention to connecting the necessary apache and nginx config to the created host)
- For your convenience, I post the distribution kit for installing Bitrix in the " bitrix_install.zip " archive (the installation in this case takes place in the Quick Install / Short install mode)
What happened
Fully working default ISPManager 4/5, who learned how to work with projects on Bitrixes quickly and without loss of functionality.
The assembly is already used in our company - AMC Art , both for its sites and stands, and for the production of client sites.
I will be glad to any of your comments, comments and suggestions!
Consider the proposed solution in more detail.
Stage 1. bitrix-env.sh (or “1C-Bitrix: Web Environment” - Linux)

The classic installation of Bitrix occurs on the Bitrix environment, which is installed via a script
www.1c-bitrix.ru/products/env
We’ll start optimizing our ISPmanager with bitrix-env.sh.
In fact, there is nothing special in the script itself, first there is a standard check of the distribution of the system, then, based on the results of this check, this or that necessary software is installed.
All magic happens when the script adds the “branded” 1C-Bitrix repository and installs the bitrix-env * and bx-nginx package into the system. We will focus our attention on them.
And so, our " bitrix-env_5.1.2_patched_2.sh " is nothing more than a slightly altered script from 1C-Bitrix itself, but the main "trick" in the bitrix-env installation is removed from it, why - I will tell further.Stage 2. bitrix-env.rpm (or Main Configuration Step)

The ecosystem offered by bitrix-env does not suit us, cluttering up potentially conflicting ISPmanager packages / configs and the Bitrix environment does not need anything at all.
Leaving in my opinion only necessary, I transferred everything from the rpm package to the isp_patch.sh script (attention, tested only on centos 6.6 x64).
Further - a little more.Stage 2.1 bx-nginx (or Nginx with Push & Pull support)

This package, which is offered to us by the Bitrix environment, is nothing more than a compiled nginx with the “push and pull” module, which is used in such functionality as, for example, “Business chat”, “Live comments”, “Video calls”, “ Mobile app".
We can just pick up our system, kindly compiled 1C-Bitrix, ready nginx binary to your machine with ISPmanager and save yourself from having to compile it yourself (22 and 23 lines of script)Stage 2.2 bvat.bx (or software parameter autotuner)

An interesting component of the “Bitrix environment” is the bvat.bx script, which is written into the system autoload and performs software tuning tasks that are responsible for the project’s work (mainly the server’s mysql and RAM usage). The tuner itself works quite simply. Based on the current configuration of the system, it exposes this or that prepared “preset” of settings as effective parameters. I would like to note that the configuration provides for changes in the parameters that bvat.bx has set without turning it off completely (although you can do this).
In our script, lines 25-31 are responsible for its installation.
Similar to the reference Bitrix environment, your own parameters for the mysql server can be written in the /etc/mysql/conf.d/z_bx_custom.cnf file (which will be used to bypass bvat.bx). Also, by connecting your configuration files after the bvat configuration files, you can bypass its autotuning for the rest of the software, if this or that parameter set automatically does not suit you.
Since the script's logic is to my liking, it is easy to add its “automation” to its values, and installing it in the system was quite simple, I included it in my configuration.Stage 2.3 php settings

Change a few parameters in php.ini (lines 33-40 in our script)- memory_limit = 512M
- pcre.backtrack_limit = 1000000
- short_open_tag = On
and disable dav modules for phpStage 2.4 mysql settings

42-48 lines of the script copy the previously prepared and configured my.cnf, in which you probably want to change something yourself.Stage 2.5 bitrixenv.ini (or php directives necessary for Bitrix to work)

An integral part of the classic Bitrix environment is the /etc/php.d/bitrixenv.ini file, which contains the necessary settings for the directives listed in it.
with a minimal difference with the original file, I will copy it to my ISPmanager machine, as /etc/httpd/bx/bx_apache.conf (lines 50-52).
It is important to note that we will not intentionally include this file anywhere , in order to prescribe it if necessary only for individual Virtualhosts created from under ISPmanager (in the config-apache section).Step 2.6 Configuring nginx

Nginx settings in my script have an “autotune” share (line 64 and 67)
The rest is taken from the configuration files for nginx from the Bitrix environment.
lines 72-77 are responsible for server level compression
79-82 - for push & pull
Note the bx / conf / bitrix.conf file . It is important to note that we never intentionally include this file in order to preserve it if necessary only to individual hosts created from under ISPmanager (in the nginx config section)
In addition, it has a block “Some security options” with pre-prepared, but commented-out options related to host security.File Link
isp.bitrix_v0.6.zip
Source: https://habr.com/ru/post/254273/
All Articles