Remote control of the Lego Mindstorms robot via JMX and IP Video
The main module of the Lego Mindstorms EV3 designer can work with the leJOS firmware, which allows you to run Java applications. Especially for this, Oracle has released and maintains a separate version of a full-fledged Java SE .
The normal JVM allowed me to use the Java Management Extensions (JMX) protocol embedded in it to implement remote control of the robotic arm. A mnemonic scheme made on the AggreGate platform is used to combine control elements, sensors and images from IP cameras installed on the robot.
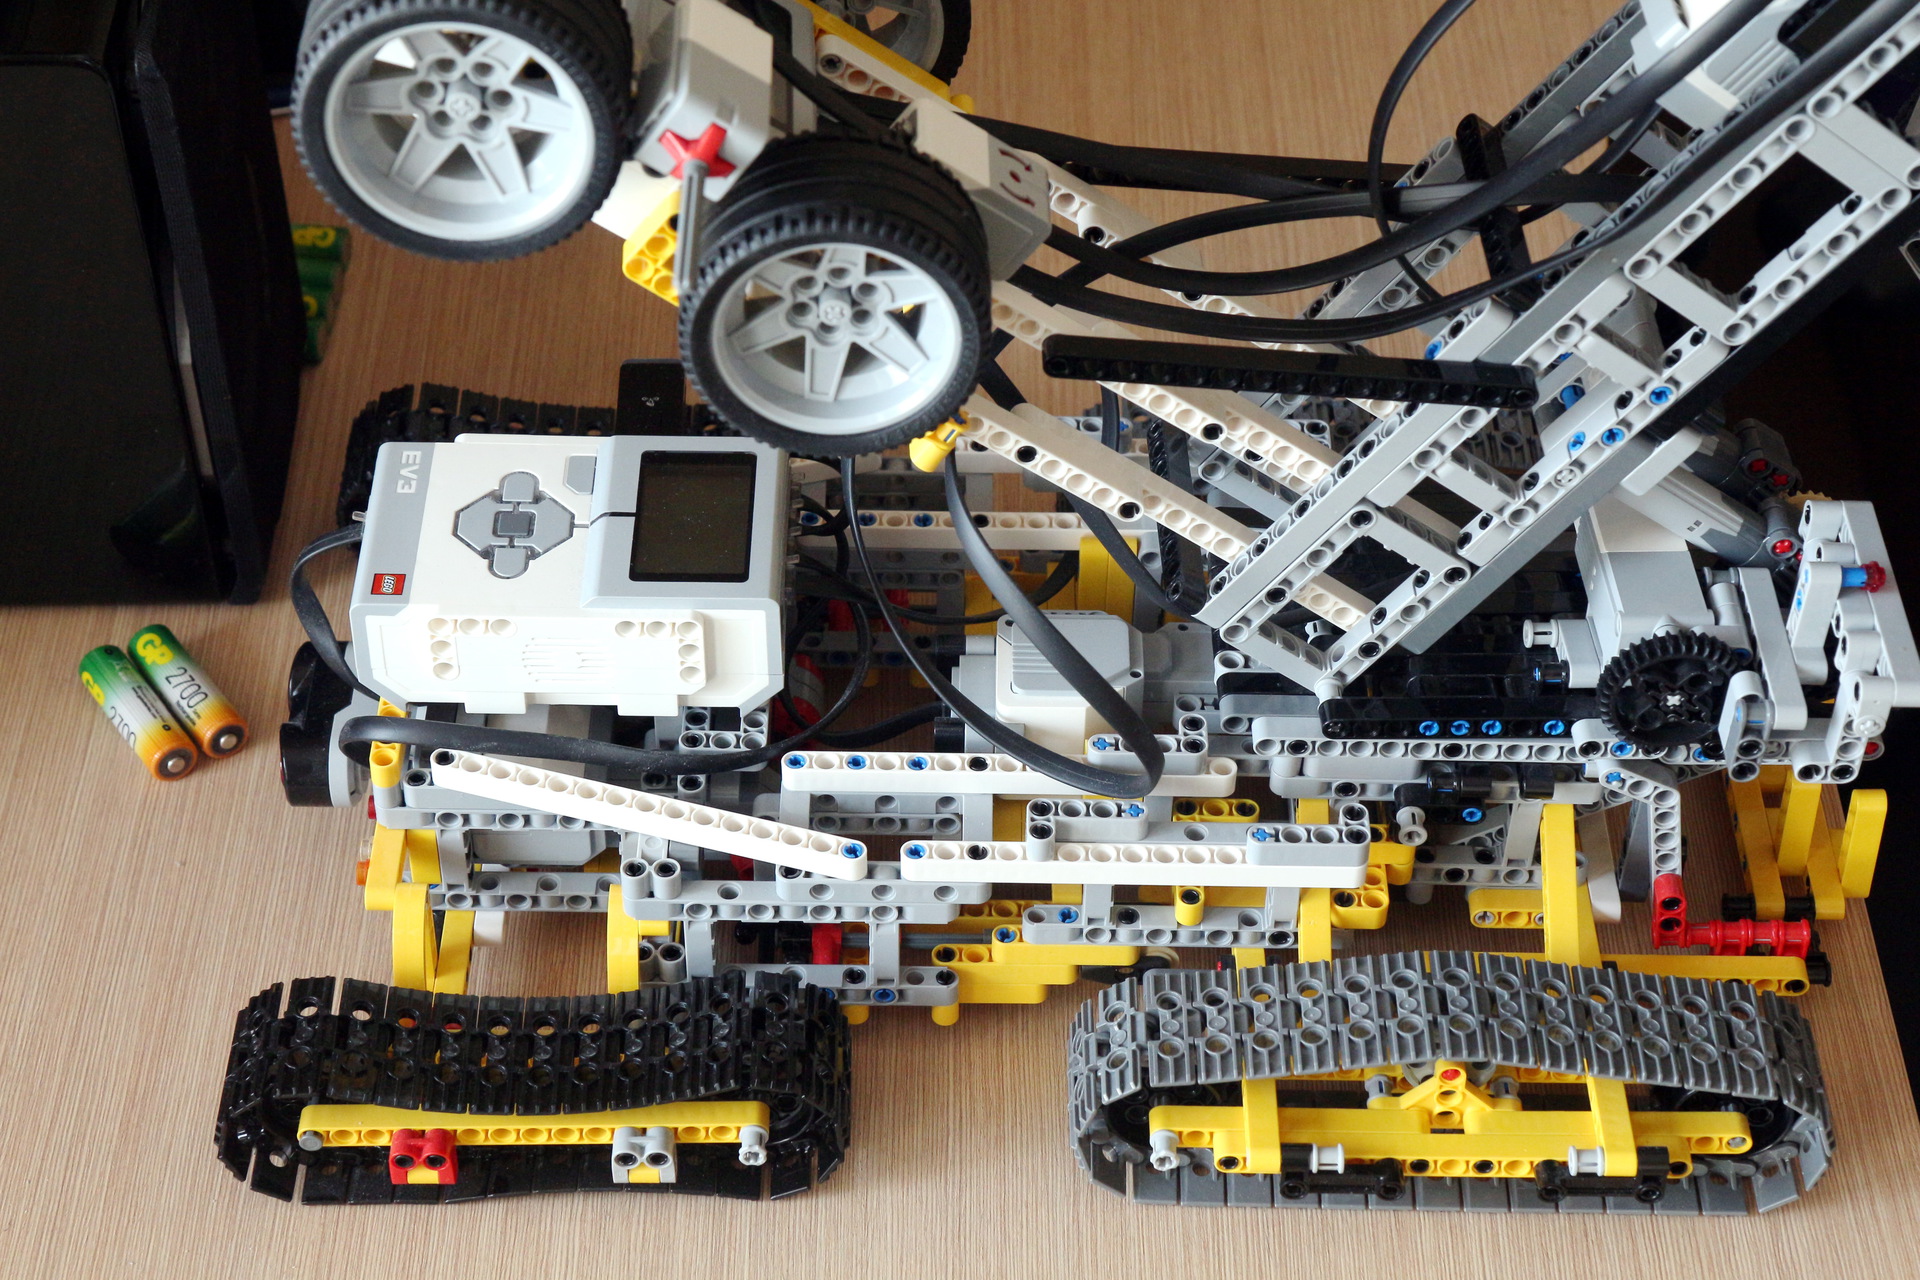
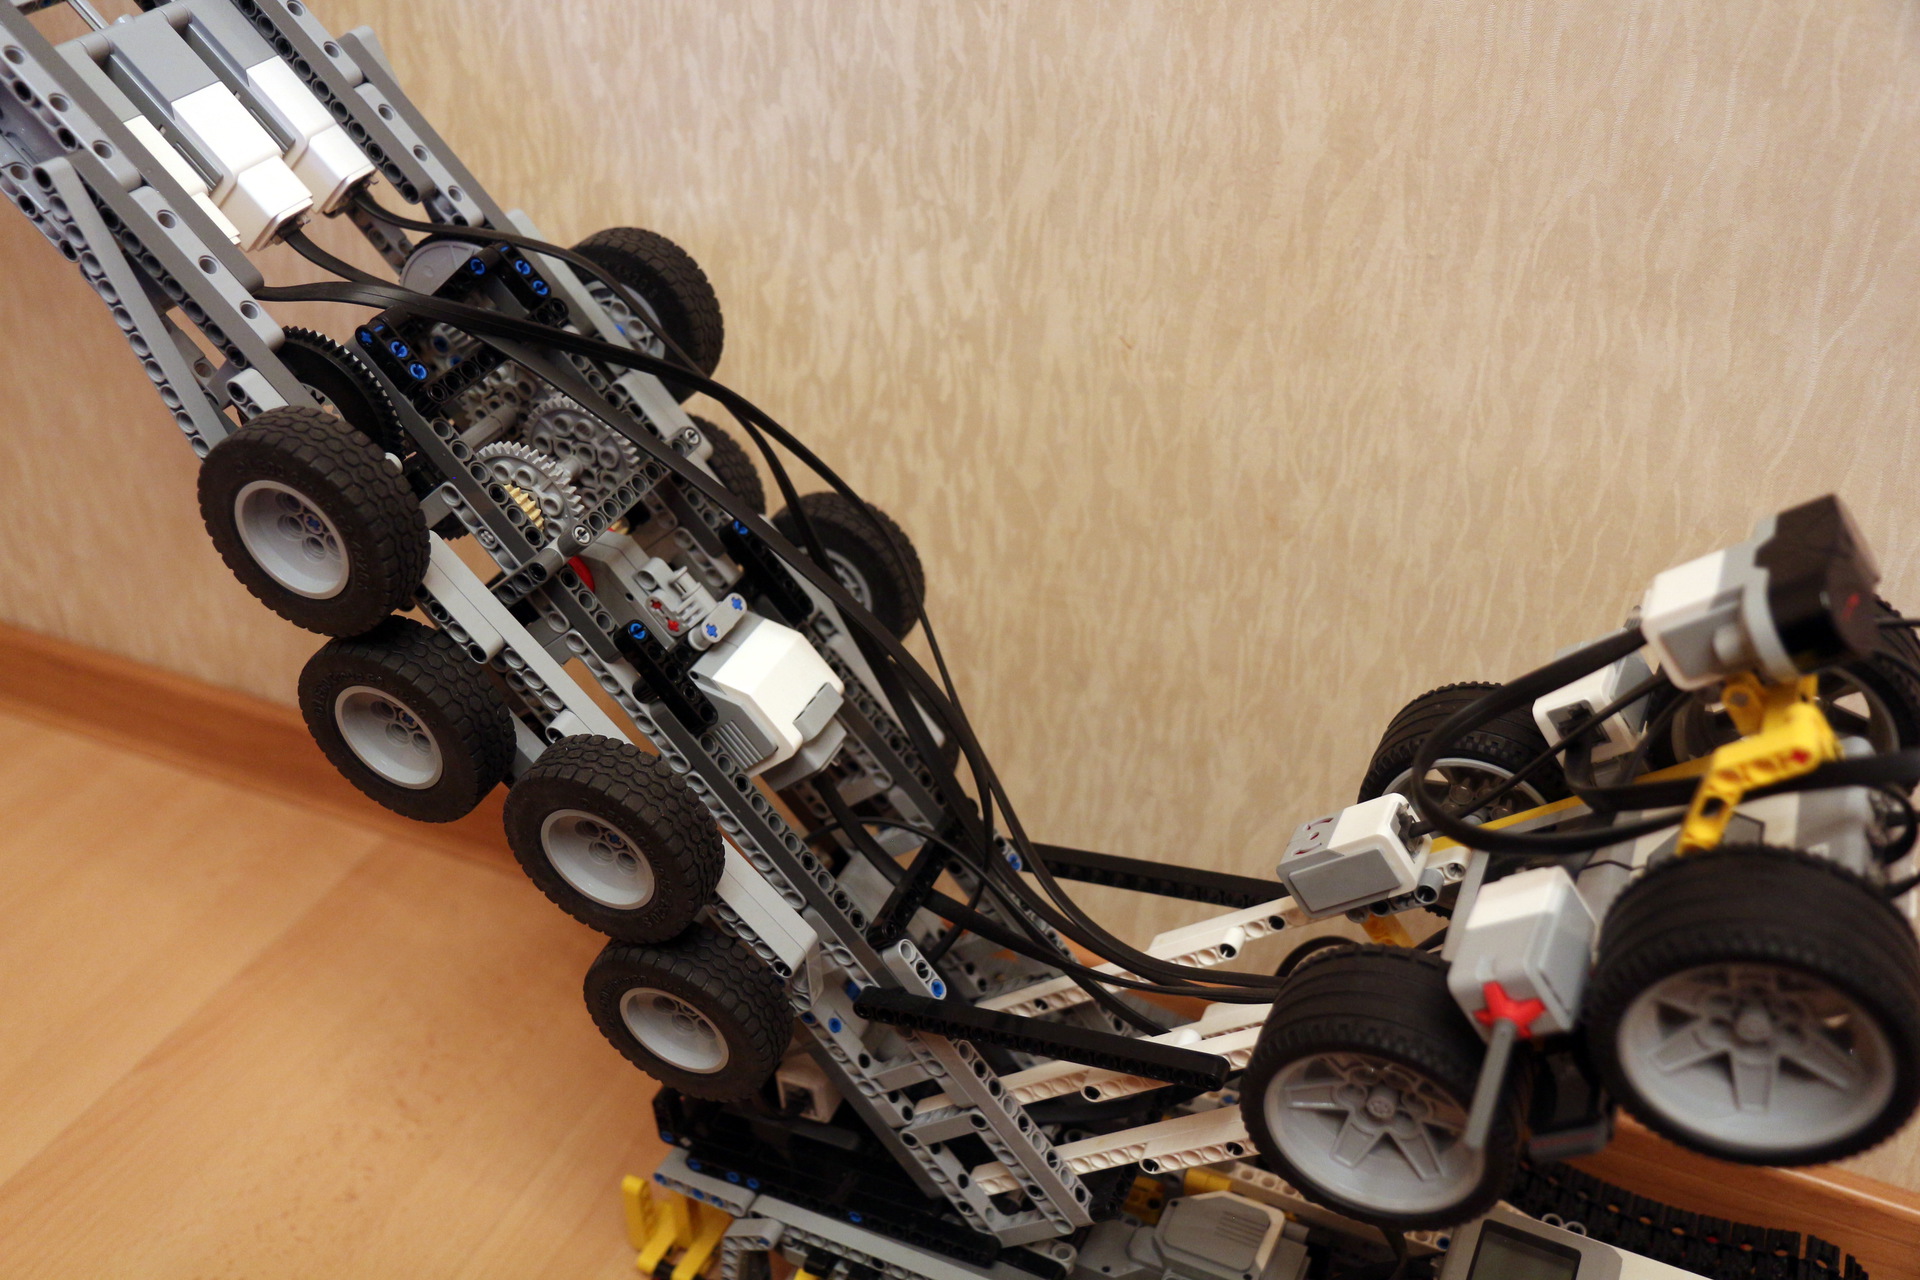
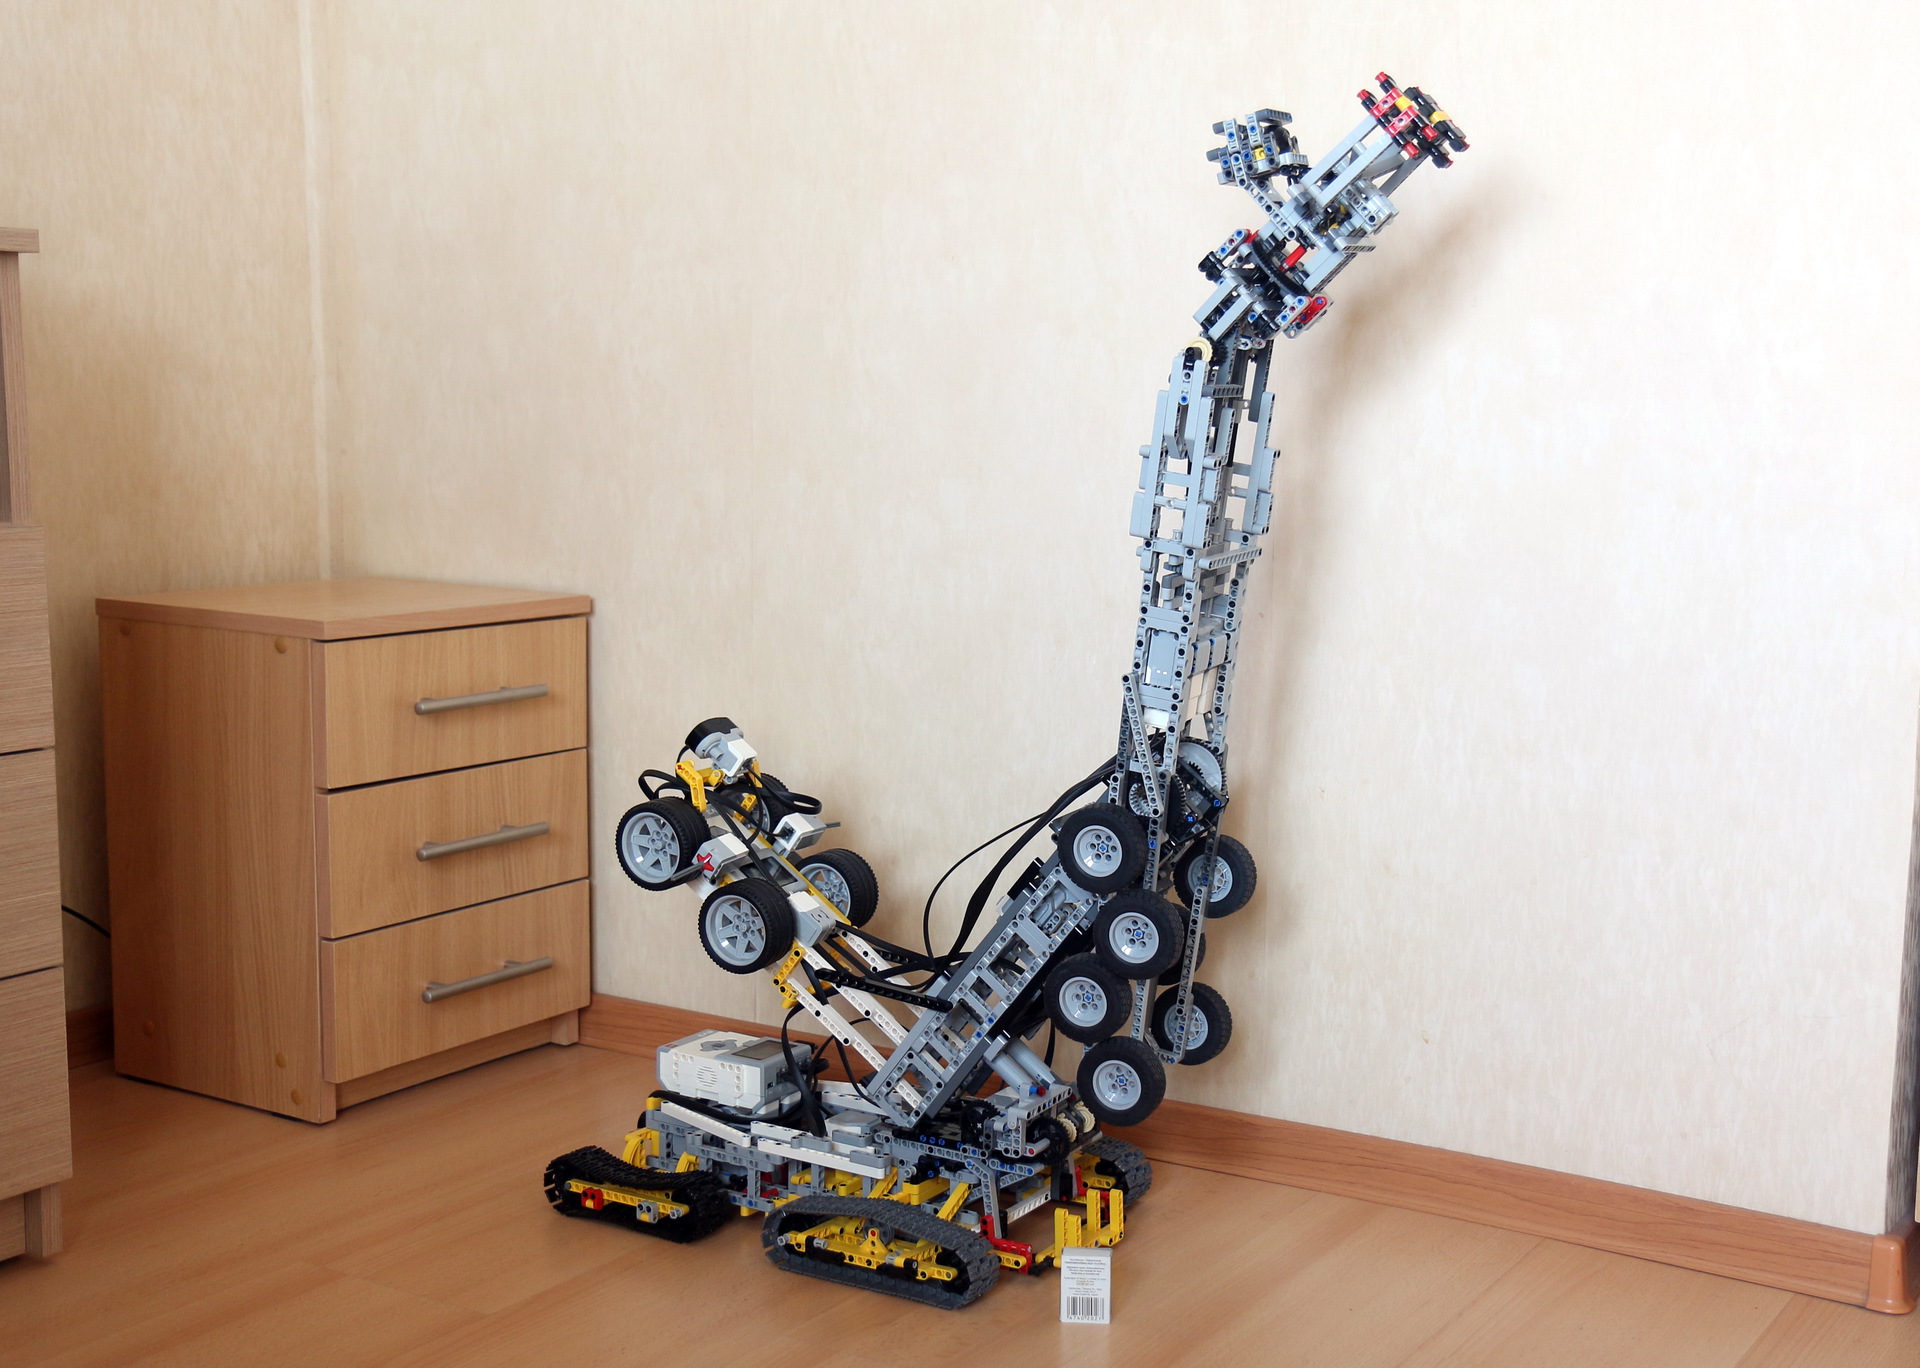
The robot itself consists of two main parts: the chassis and the arm. They are controlled by two fully independent EV3 computers, all of which are coordinated through the management server. There is no direct connection between computers.
')
Both computers are connected to the IP network of the room via NETGEAR WNA1100 adapters. The robot is controlled by eight Mindstorms engines - 4 of them are “big” and 4 “small”. Also installed are infrared and ultrasonic sensors for automatically stopping an obstacle when reversing, two touch sensors for stopping the manipulator's rotation due to an obstacle, and a gyro sensor that facilitates operator orientation by visualizing the position of the shoulder.
There are two engines in the chassis, each of which transmits force to a pair of tracked drives. Another engine rotates the entire arm-manipulator 360 degrees.
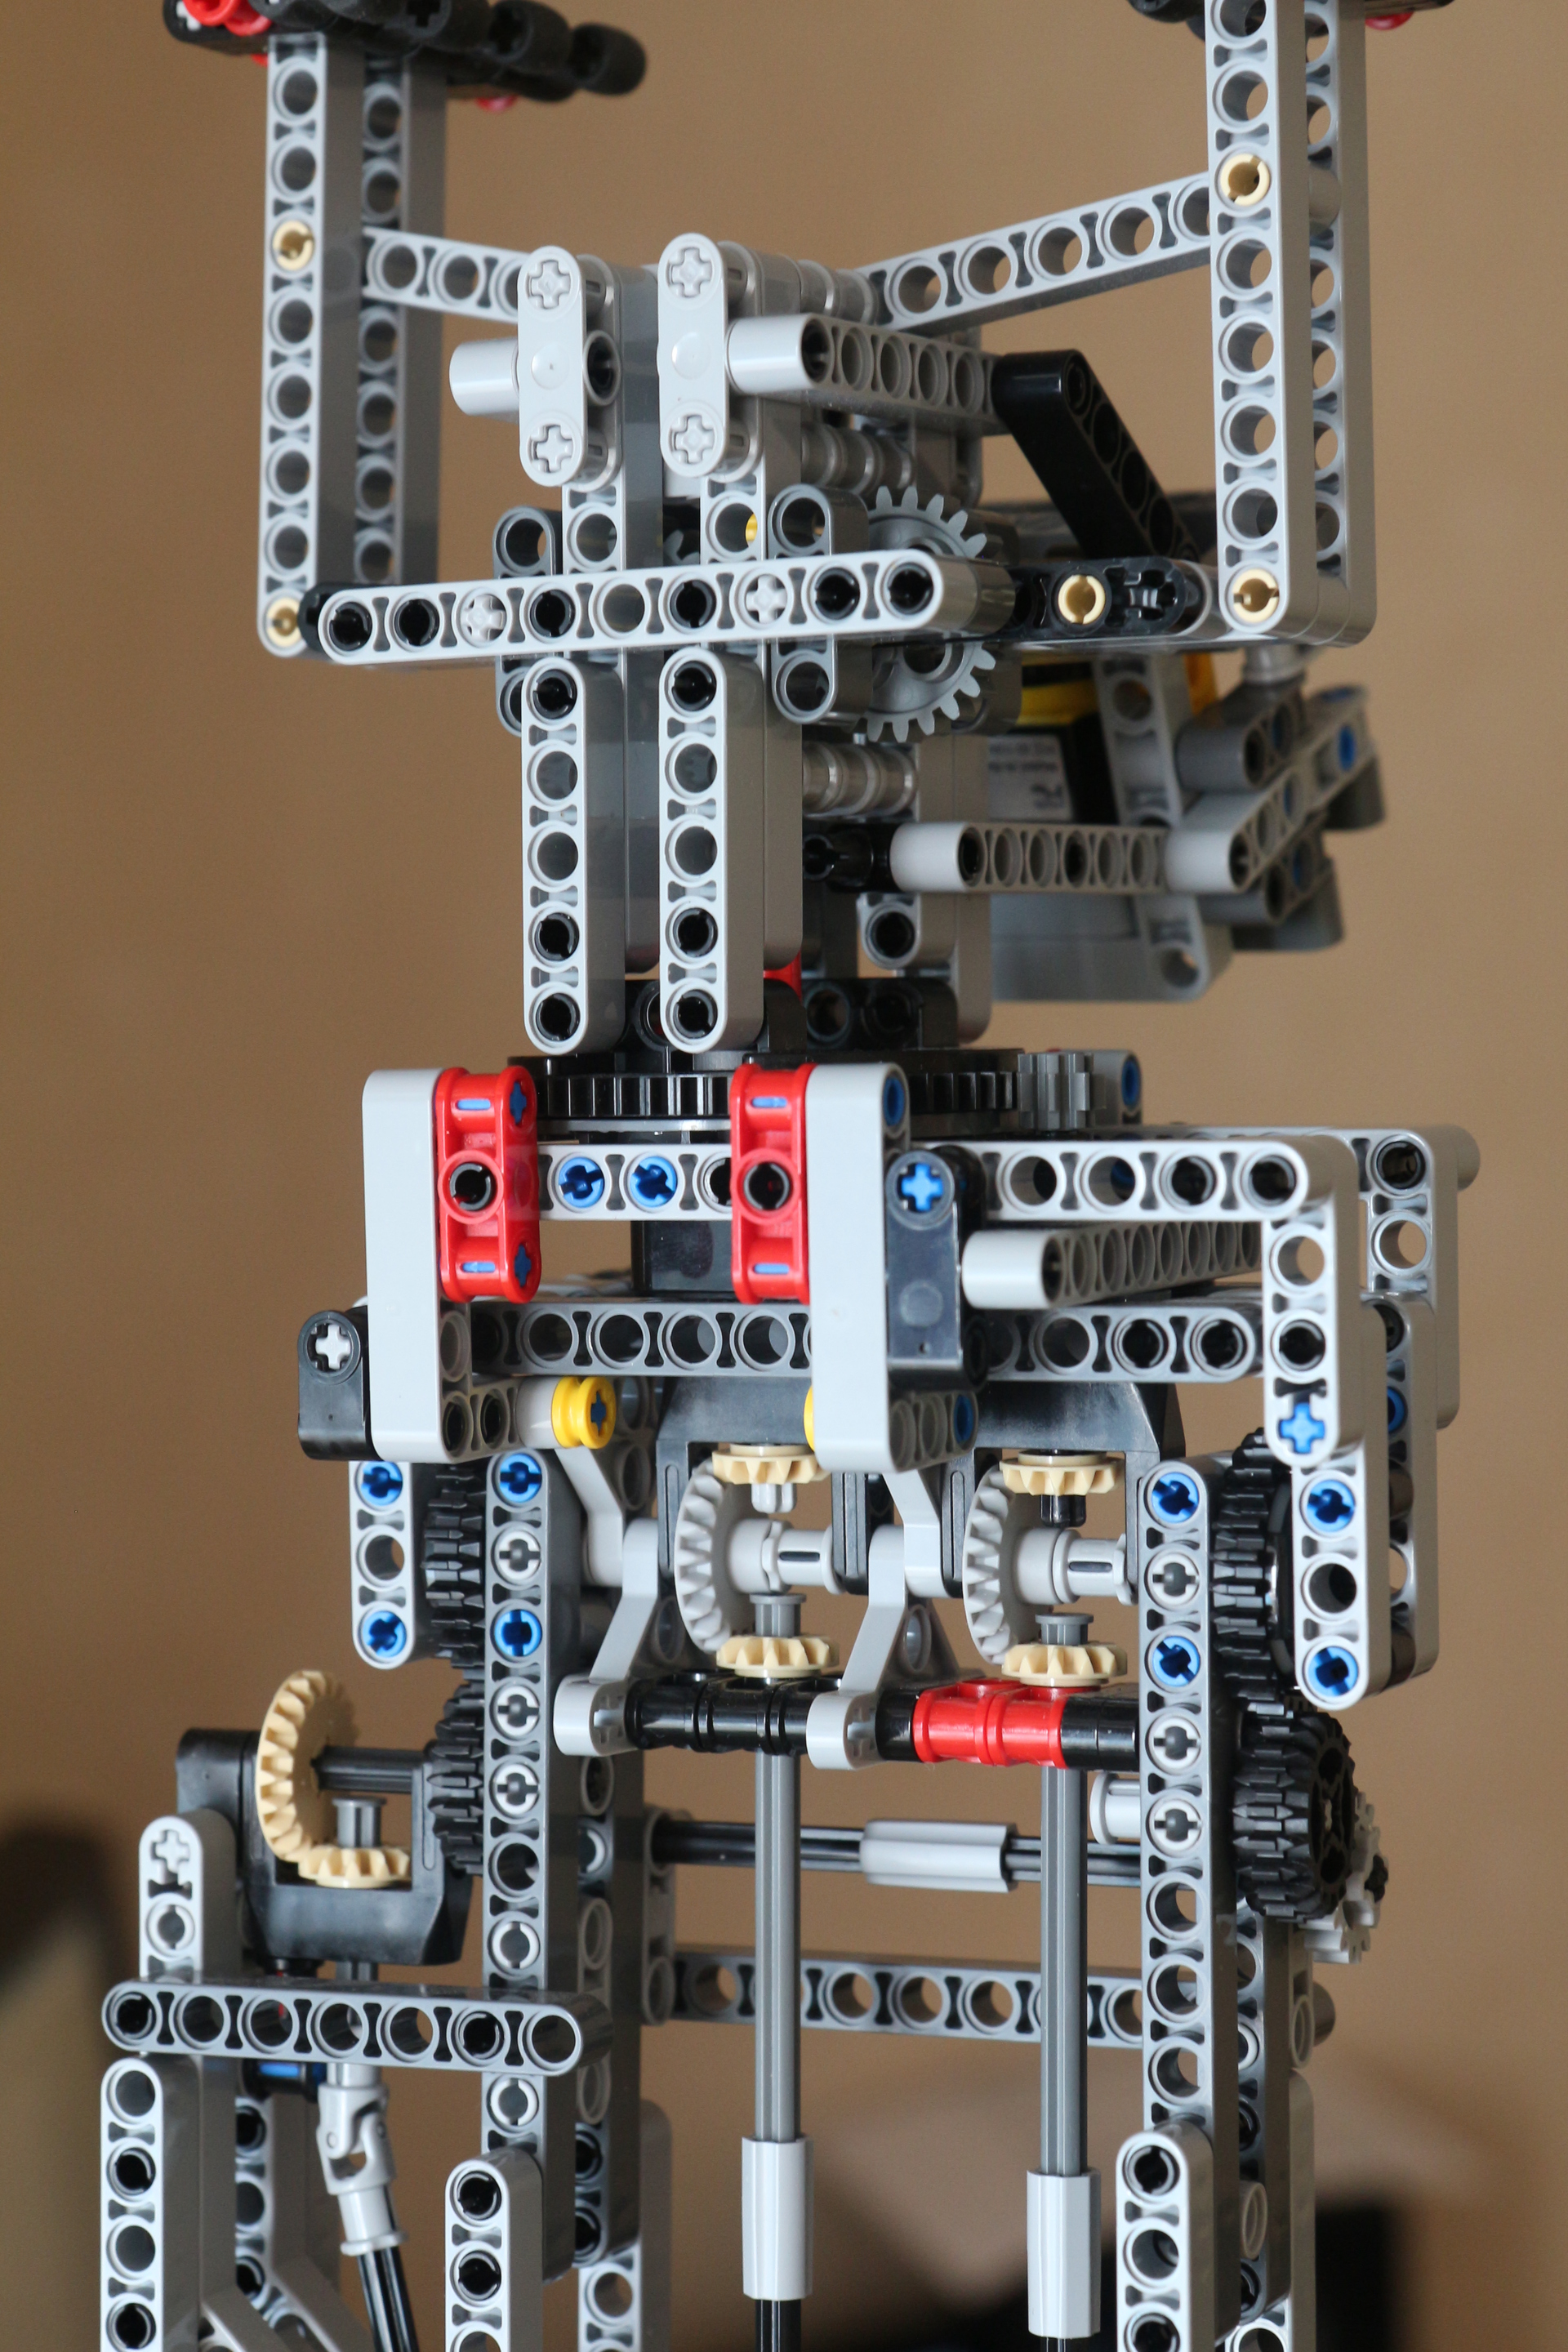
In the manipulator itself, two engines are responsible for raising and lowering the "shoulder" and "forearm." Three more engines are engaged in raising / lowering the brush, turning it 360 degrees and squeezing / unclamping the “fingers”.
The most difficult mechanical knot is “brush”. Because of the need to remove three heavy engines to the “elbow” area, the design was rather tricky.
In general, everything looks like this (a box of matches was hardly found for scale):
Two cameras are installed for transferring pictures:
Software of the robot turned out as simple as possible. The programs of the two computers are very similar, they launch the JMX server, register MBeans corresponding to the engines and sensors, and fall asleep while waiting for JMX operations.
For each type of sensor and motor, an MBean interface and a class that implements it are created, which directly delegates all calls to the class that is part of the leJOS API.
Oddly enough, this programming is over. Not a single line of code was written on the server side and the operator’s workplace.
The robot is directly controlled by the AggreGate IoT platform server. The installed free version of AggreGate Network Manager includes the JMX protocol driver and allows you to connect up to ten JMX hosts. We will need to connect two - one for each EV3 brick.
First of all, you need to create a device JMX account, specifying the URL specified when starting the JMX server in the settings:
After that, select the assets (i.e. MBeans in this case) that will be added to the device profile:
And after a few seconds, we look at and change the current values of all the MBean properties polled:
You can also test various operations by manually calling MBeans, such as forward () and stop ().
Next, configure the polling periods for the sensors. A high polling frequency (100 times per second) is used, since the control server is located in the local network with the robot, and it is the server that makes decisions about stopping the rotation while focusing on an obstacle, etc. The solution is certainly not industrial, but on a well-functioning Wi-Fi network within one apartment it proved to be quite adequate.
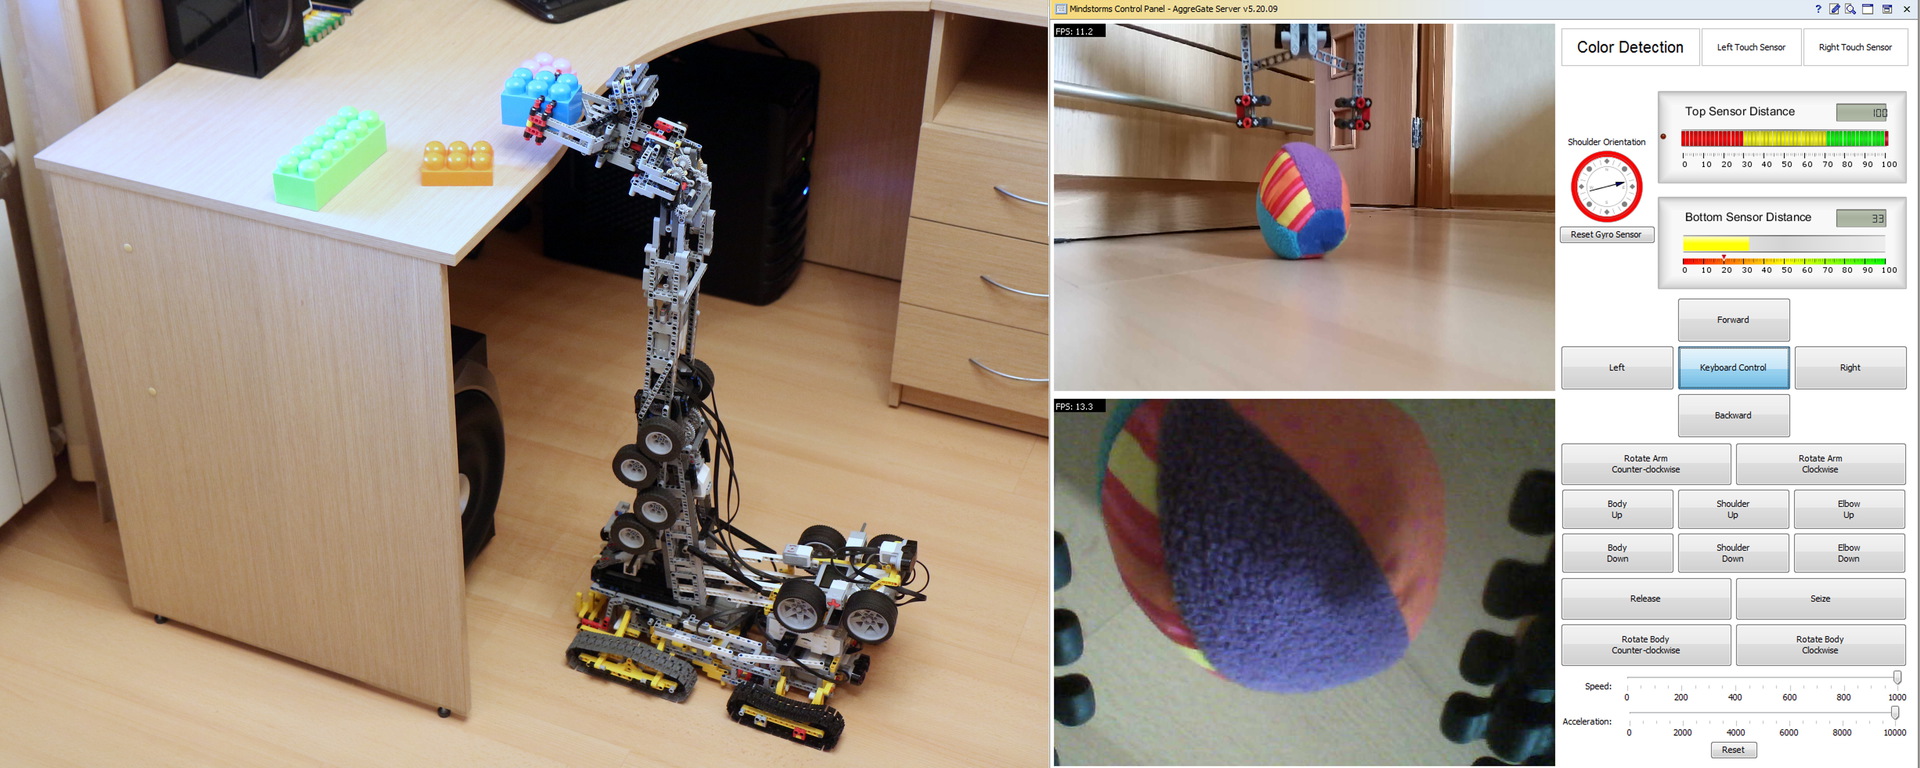
Now we are going to create an operator interface. To do this, first create a new widget and throw in it the necessary components. In the final running version it looks like this:

In fact, the entire interface consists of several panels with buttons, sliders and indicators, grouped into different grid layouts, and two large video players broadcasting pictures from cameras.
Now, as they say ASUTPshniki, it remains to "revive the mnemonic." To do this, the so-called binding binding properties and methods of graphical components of the interface with the properties and methods of server objects are used. Since EV3 computers are already connected to the server, the MBeans of our robot can also be server objects.
The entire operator interface contains about 120 bindings, most of which are of the same type:

Half of the same type of bindings implements control by clicking on the buttons located on the mnemonic scheme. It is beautiful, convenient for testing, but completely unsuitable for real movement of the robot and movement of cargo. The activators of the bindings from this group are mousePressed and mouseReleased events of various buttons.
The second half of the bindings allows you to control the robot from the keyboard by first pressing the Keyboard Control button. These bindings react to keyPressed and keyReleased events, and the condition of each binding states which button code to respond to.
All control bindings call forward () , backward (), and stop () methods of various MBeans. Since event delivery occurs asynchronously, it is important that the calls to the functions forward () / backward () and subsequent calls to stop () are not messed up. For this, bindings calling the methods of one MBean are added to one Queue.
Two separate groups of bindings set the initial speeds and accelerations of the engines (this is now implemented on the server side using the model, therefore these bindings are disabled) and change the speeds / accelerations when moving the Speed and Acceleration sliders.
All other bindings highlight the parts of the mimic when the touch sensors are activated, show the distances to objects on the scales measured by the sensors and perform various service functions.
In addition to the accounts of JMX devices and the widget described above, there is another object on the server involved in controlling the robot. This is a model that stops the engines when one of the touch sensors is triggered. This is also done with the help of bindings, the only difference with the bindings of the widget is that the model bindings are processed on the server and associate some properties of server objects with others.
After setting up the widget and the model, you can launch the widget, activate keyboard controls and have fun:
The normal JVM allowed me to use the Java Management Extensions (JMX) protocol embedded in it to implement remote control of the robotic arm. A mnemonic scheme made on the AggreGate platform is used to combine control elements, sensors and images from IP cameras installed on the robot.
The robot itself consists of two main parts: the chassis and the arm. They are controlled by two fully independent EV3 computers, all of which are coordinated through the management server. There is no direct connection between computers.
')
Both computers are connected to the IP network of the room via NETGEAR WNA1100 adapters. The robot is controlled by eight Mindstorms engines - 4 of them are “big” and 4 “small”. Also installed are infrared and ultrasonic sensors for automatically stopping an obstacle when reversing, two touch sensors for stopping the manipulator's rotation due to an obstacle, and a gyro sensor that facilitates operator orientation by visualizing the position of the shoulder.
There are two engines in the chassis, each of which transmits force to a pair of tracked drives. Another engine rotates the entire arm-manipulator 360 degrees.
In the manipulator itself, two engines are responsible for raising and lowering the "shoulder" and "forearm." Three more engines are engaged in raising / lowering the brush, turning it 360 degrees and squeezing / unclamping the “fingers”.
The most difficult mechanical knot is “brush”. Because of the need to remove three heavy engines to the “elbow” area, the design was rather tricky.
In general, everything looks like this (a box of matches was hardly found for scale):
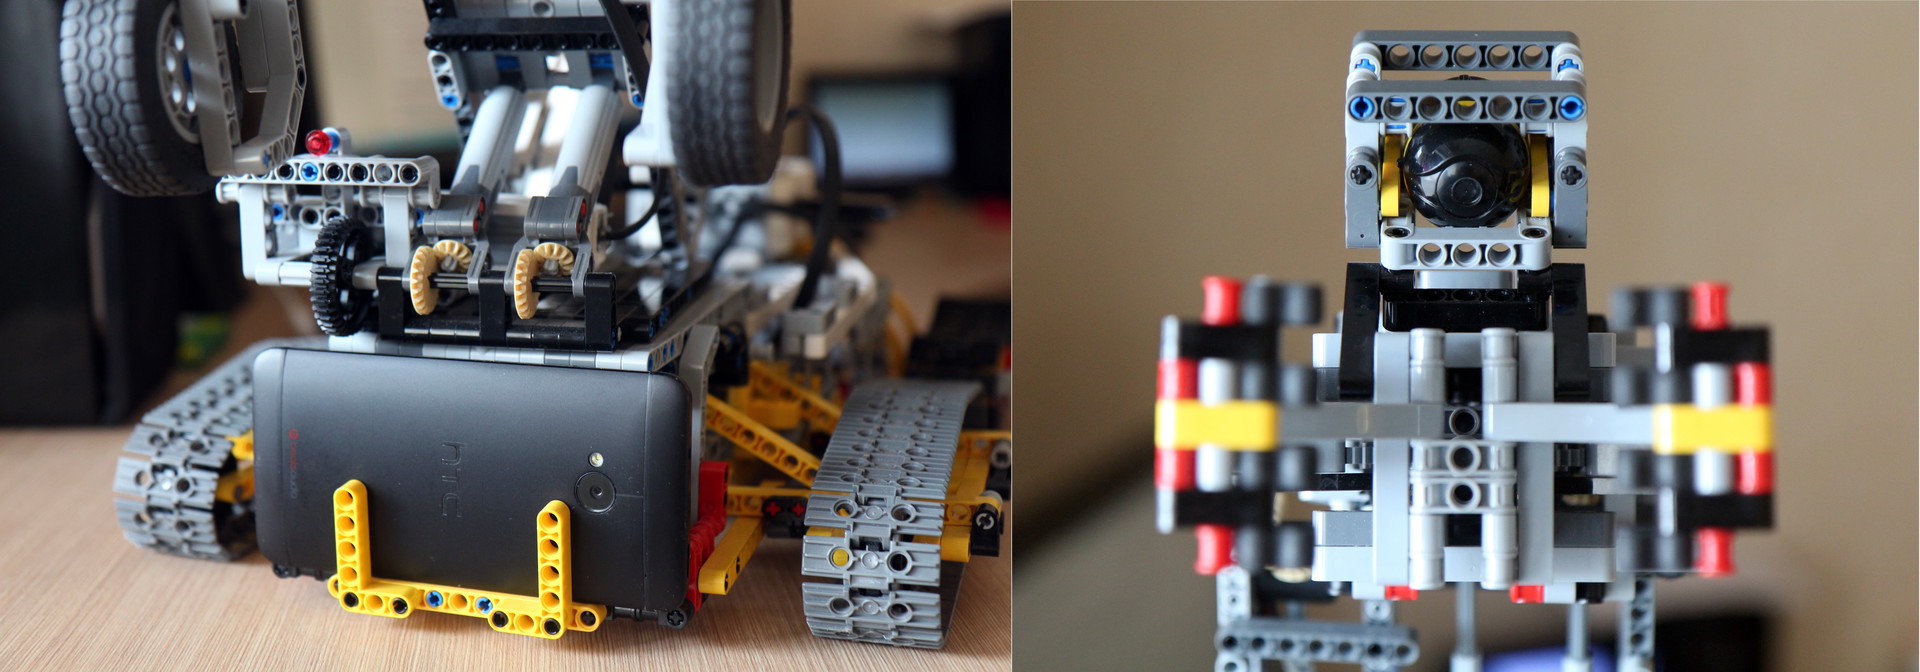
Two cameras are installed for transferring pictures:
- A regular Android smartphone with an IP Webcam application installed for a general overview (in the HTC One image)
- Autonomous Wi-Fi micro-camera AI-Ball , installed directly on the “brush” of the manipulator and helps to catch objects of complex shape
EV3 programming
Software of the robot turned out as simple as possible. The programs of the two computers are very similar, they launch the JMX server, register MBeans corresponding to the engines and sensors, and fall asleep while waiting for JMX operations.
Hand-manipulator software main class code
public class Arm { public static void main(String[] args) { try { EV3Helper.printOnLCD("Starting..."); EV3Helper.startJMXServer("192.168.1.8", 9000); MBeanServer mbs = ManagementFactory.getPlatformMBeanServer(); EV3LargeRegulatedMotor motor = new EV3LargeRegulatedMotor(BrickFinder.getDefault().getPort("A")); LargeMotorMXBean m = new LargeMotorController(motor); ObjectName n = new ObjectName("robot:name=MotorA"); mbs.registerMBean(m, n); // Registering other motors here EV3TouchSensor touchSensor = new EV3TouchSensor(SensorPort.S1); TouchSensorMXBean tos = new TouchSensorController(touchSensor); n = new ObjectName("robot:name=Sensor1"); mbs.registerMBean(tos, n); // Registering other sensors here EV3Helper.printOnLCD("Running"); Sound.beepSequenceUp(); Thread.sleep(Integer.MAX_VALUE); } catch (Throwable e) { e.printStackTrace(); } } } public class EV3Helper { static void startJMXServer(String address, int port) { MBeanServer server = ManagementFactory.getPlatformMBeanServer(); try { java.rmi.registry.LocateRegistry.createRegistry(port); JMXServiceURL url = new JMXServiceURL("service:jmx:rmi:///jndi/rmi://" + address + ":" + String.valueOf(port) + "/server"); Map<String, Object> props = new HashMap<String, Object>(); props.put("com.sun.management.jmxremote.authenticate", "false"); props.put("com.sun.management.jmxremote.ssl", "false"); JMXConnectorServer connectorServer = JMXConnectorServerFactory.newJMXConnectorServer(url, props, server); connectorServer.start(); } catch (Exception e) { e.printStackTrace(); } } static void printOnLCD(String s) { LCD.clear(); LCD.drawString(s, 0, 4); } } For each type of sensor and motor, an MBean interface and a class that implements it are created, which directly delegates all calls to the class that is part of the leJOS API.
Sample interface code
public interface LargeMotorMXBean { public abstract void forward(); public abstract boolean suspendRegulation(); public abstract int getTachoCount(); public abstract float getPosition(); public abstract void flt(); public abstract void flt(boolean immediateReturn); public abstract void stop(boolean immediateReturn); public abstract boolean isMoving(); public abstract void waitComplete(); public abstract void rotateTo(int limitAngle, boolean immediateReturn); public abstract void setAcceleration(int acceleration); public abstract int getAcceleration(); public abstract int getLimitAngle(); public abstract void resetTachoCount(); public abstract void rotate(int angle, boolean immediateReturn); public abstract void rotate(int angle); public abstract void rotateTo(int limitAngle); public abstract boolean isStalled(); public abstract void setStallThreshold(int error, int time); public abstract int getRotationSpeed(); public abstract float getMaxSpeed(); public abstract void backward(); public abstract void stop(); public abstract int getSpeed(); public abstract void setSpeed(int speed); } An example of an MBean implementation code
public class LargeMotorController implements LargeMotorMXBean { final EV3LargeRegulatedMotor motor; public LargeMotorController(EV3LargeRegulatedMotor motor) { this.motor = motor; } @Override public void forward() { motor.forward(); } @Override public boolean suspendRegulation() { return motor.suspendRegulation(); } @Override public int getTachoCount() { return motor.getTachoCount(); } @Override public float getPosition() { return motor.getPosition(); } @Override public void flt() { motor.flt(); } @Override public void flt(boolean immediateReturn) { motor.flt(immediateReturn); } // Similar delegating methods skipped } Oddly enough, this programming is over. Not a single line of code was written on the server side and the operator’s workplace.
Connect to server
The robot is directly controlled by the AggreGate IoT platform server. The installed free version of AggreGate Network Manager includes the JMX protocol driver and allows you to connect up to ten JMX hosts. We will need to connect two - one for each EV3 brick.
First of all, you need to create a device JMX account, specifying the URL specified when starting the JMX server in the settings:
JMX Device Connection Properties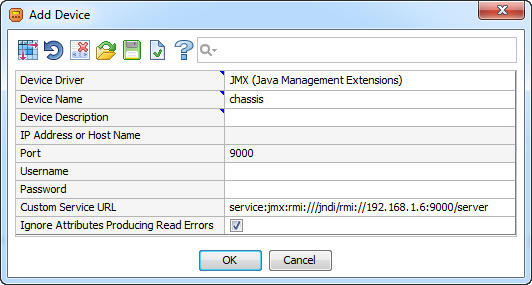
After that, select the assets (i.e. MBeans in this case) that will be added to the device profile:
Selection of MBeans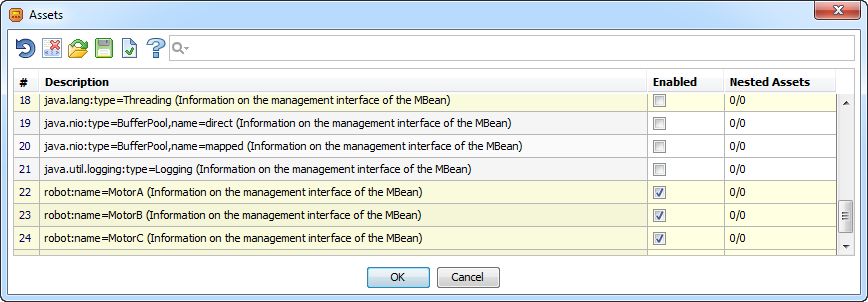
And after a few seconds, we look at and change the current values of all the MBean properties polled:
Device snapshot
You can also test various operations by manually calling MBeans, such as forward () and stop ().
List of operations
Next, configure the polling periods for the sensors. A high polling frequency (100 times per second) is used, since the control server is located in the local network with the robot, and it is the server that makes decisions about stopping the rotation while focusing on an obstacle, etc. The solution is certainly not industrial, but on a well-functioning Wi-Fi network within one apartment it proved to be quite adequate.
Polling periods
Operator Interface
Now we are going to create an operator interface. To do this, first create a new widget and throw in it the necessary components. In the final running version it looks like this:
In fact, the entire interface consists of several panels with buttons, sliders and indicators, grouped into different grid layouts, and two large video players broadcasting pictures from cameras.
Inside view of the interface editor
All form:

View with container panels shown:

View with container panels shown:
Now, as they say ASUTPshniki, it remains to "revive the mnemonic." To do this, the so-called binding binding properties and methods of graphical components of the interface with the properties and methods of server objects are used. Since EV3 computers are already connected to the server, the MBeans of our robot can also be server objects.
The entire operator interface contains about 120 bindings, most of which are of the same type:
Half of the same type of bindings implements control by clicking on the buttons located on the mnemonic scheme. It is beautiful, convenient for testing, but completely unsuitable for real movement of the robot and movement of cargo. The activators of the bindings from this group are mousePressed and mouseReleased events of various buttons.
The second half of the bindings allows you to control the robot from the keyboard by first pressing the Keyboard Control button. These bindings react to keyPressed and keyReleased events, and the condition of each binding states which button code to respond to.
All control bindings call forward () , backward (), and stop () methods of various MBeans. Since event delivery occurs asynchronously, it is important that the calls to the functions forward () / backward () and subsequent calls to stop () are not messed up. For this, bindings calling the methods of one MBean are added to one Queue.
Two separate groups of bindings set the initial speeds and accelerations of the engines (this is now implemented on the server side using the model, therefore these bindings are disabled) and change the speeds / accelerations when moving the Speed and Acceleration sliders.
Binding speed and acceleration engines
All other bindings highlight the parts of the mimic when the touch sensors are activated, show the distances to objects on the scales measured by the sensors and perform various service functions.
Remaining bindings
In addition to the accounts of JMX devices and the widget described above, there is another object on the server involved in controlling the robot. This is a model that stops the engines when one of the touch sensors is triggered. This is also done with the help of bindings, the only difference with the bindings of the widget is that the model bindings are processed on the server and associate some properties of server objects with others.
Control model bindings
After setting up the widget and the model, you can launch the widget, activate keyboard controls and have fun:
Source: https://habr.com/ru/post/254259/
All Articles