DIY control of Dom.ru TV from a tablet using arduino
Let the description of the principle of operation of a unique smart device to simplify interaction in the “man-machine” system looks like an advertisement for diet pills, but in this case it is the best way to explain why, why, and how this device was assembled.

I will not touch on the topic of television in the article, I will tell only about “gadzhetostroenie” and the development of the interface.
This article is partly a continuation of my article Bluetooth TV Remote , so I will refer to some of the technical points described in it.
First, I'll show you how my device works (in the video it is in the lower left corner, next to the receiver Dom.ru):
Outside the device looks like this:

It is disassembled:
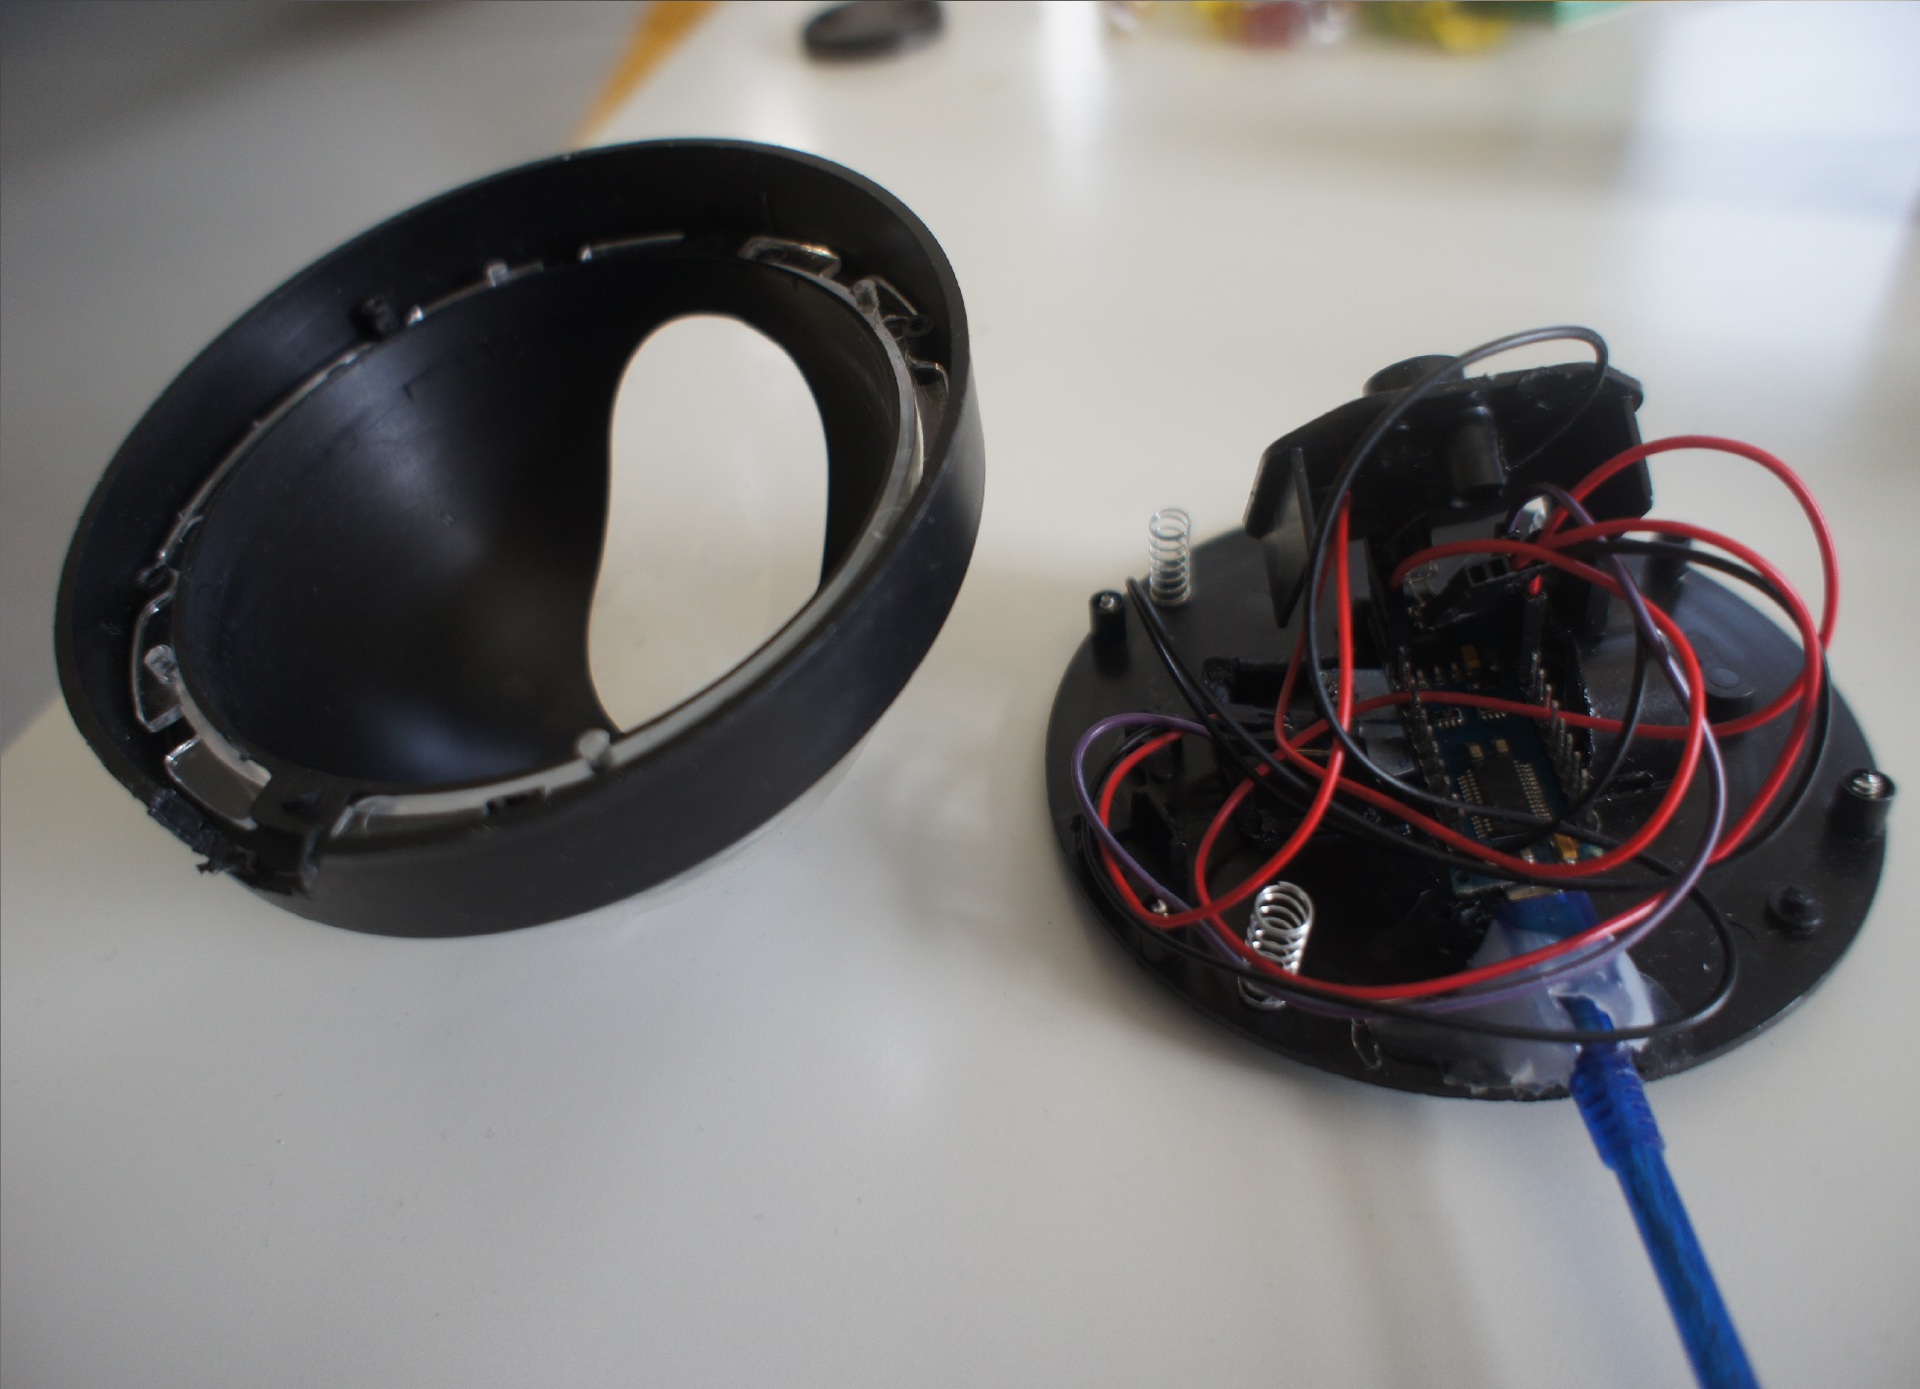
As a case, I used a dummy camera surveillance . Such dummies are sold for 4-5 dollars in Chinese online stores. The design of the device can be viewed in the previous article , and the sketch with the codes of buttons to control the receiver Dom.ru
If someone wants to make a similar device to control the Tricolor TV receiver, then a sketch with the codes of the buttons here:
Video demonstrating the work of the device with TV Tricolor TV here.
How to read the button codes of other receivers is also described in the previous article.
Now a little about the interface.
At first such interface was made:

But he didn’t give significant convenience compared to the standard remote control.
Then I signed some buttons to make it easier to search for the desired channel:
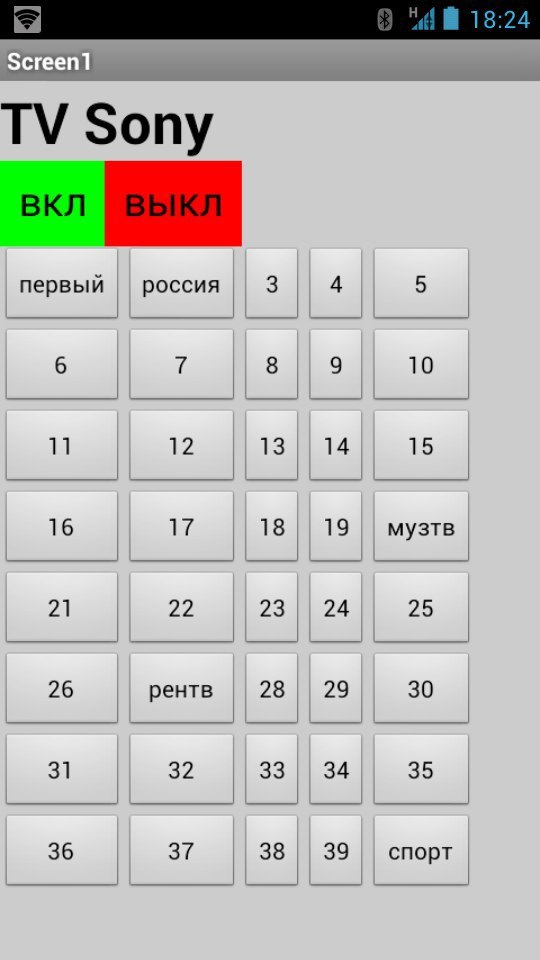
But this option was also not very convenient.
Today the interface looks like this:
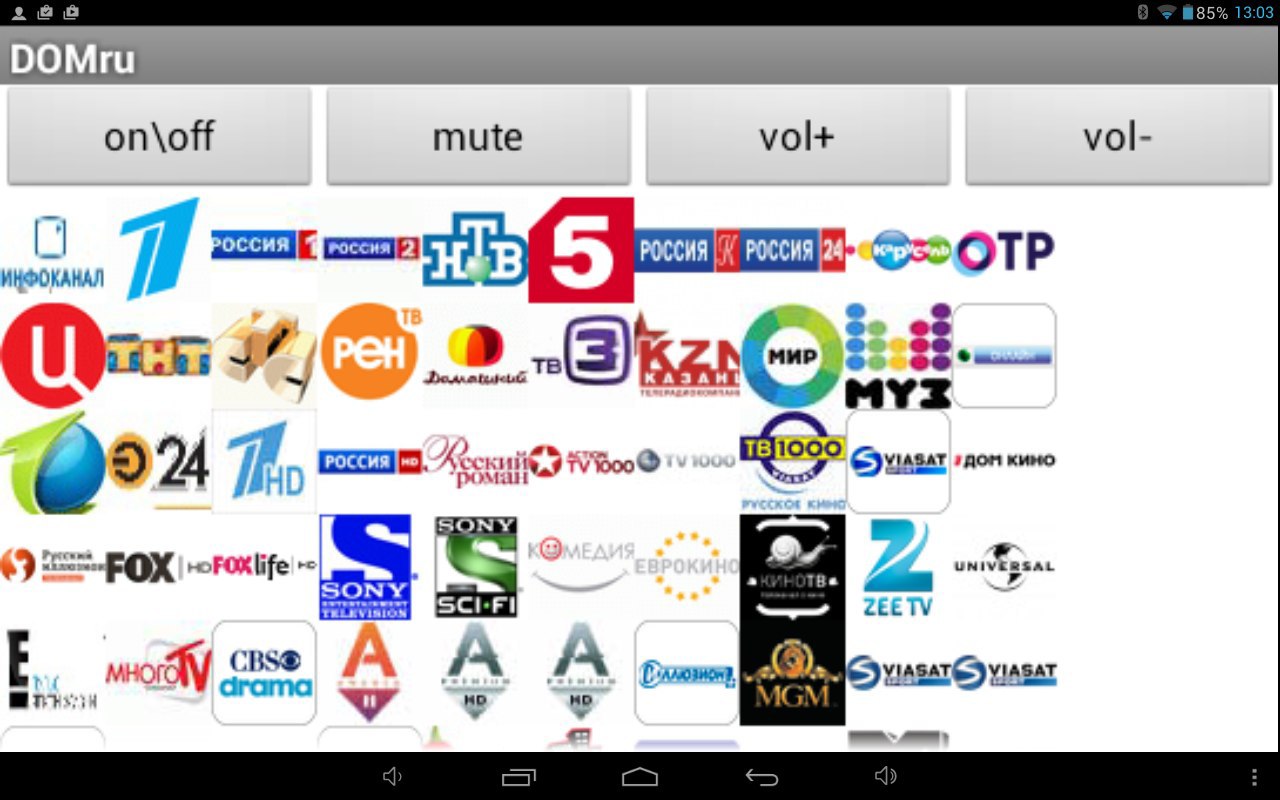
Using this interface turned out to be quite convenient.
In conclusion, I’ll say that I did all the android applications using the App Inventor 2 visual development environment for Android applications.
Who cares how to make such an application “from scratch” can watch my video on this topic (you need to go to youtube to view it).
PS Collection of more than 100 training materials on arduino for beginners and pros here
PPS Online course on arduino to giktaimes here.
I will not touch on the topic of television in the article, I will tell only about “gadzhetostroenie” and the development of the interface.
This article is partly a continuation of my article Bluetooth TV Remote , so I will refer to some of the technical points described in it.
First, I'll show you how my device works (in the video it is in the lower left corner, next to the receiver Dom.ru):
Outside the device looks like this:
It is disassembled:
As a case, I used a dummy camera surveillance . Such dummies are sold for 4-5 dollars in Chinese online stores. The design of the device can be viewed in the previous article , and the sketch with the codes of buttons to control the receiver Dom.ru
here
#include <IRremote.h>
IRsend irsend;
int ledPin = 13;
unsigned long a;
void setup () {
Serial.begin (9600);
Serial.setTimeout (4);
pinMode (ledPin, OUTPUT);
}
void S1 () {irsend.sendNEC (0x8C03F, 32); delay (100);}
void S2 () {irsend.sendNEC (0x820DF, 32); delay (100);}
void S3 () {irsend.sendNEC (0x8A05F, 32); delay (100);}
void S4 () {irsend.sendNEC (0x8609F, 32); delay (100);}
void S5 () {irsend.sendNEC (0x8E01F, 32); delay (100);}
void S6 () {irsend.sendNEC (0x810EF, 32); delay (100);}
void S7 () {irsend.sendNEC (0x8906F, 32); delay (100);}
void S8 () {irsend.sendNEC (0x850AF, 32); delay (100);}
void S9 () {irsend.sendNEC (0x8D02F, 32); delay (100);}
void S0 () {irsend.sendNEC (0x830CF, 32); delay (100);}
void Son () {irsend.sendNEC (0x800FF, 32); delay (100);}
void Smute () {irsend.sendNEC (0x818E7, 32); delay (100);}
void Splus () {irsend.sendNEC (0x8F807, 32); delay (100);}
void Sminus () {irsend.sendNEC (0x802FD, 32); delay (100);}
')
void loop ()
{
if (Serial.available ())
{a = Serial.parseInt ();
if (a == 1) {S1 ();}
if (a == 2) {S2 ();}
if (a == 3) {S3 ();}
if (a == 4) {S4 ();}
if (a == 5) {S5 ();}
if (a == 6) {S6 ();}
if (a == 7) {S7 ();}
if (a == 8) {S8 ();}
if (a == 9) {S9 ();}
if (a == 0) {S0 ();}
if (a == 161) {Son ();}
if (a == 162) {Smute ();}
if (a == 163) {Splus ();}
if (a == 164) {Sminus ();}
}
}
If someone wants to make a similar device to control the Tricolor TV receiver, then a sketch with the codes of the buttons here:
here
#include <IRremote.h>
IRsend irsend;
int ledPin = 13;
unsigned long a;
void setup () {
Serial.begin (9600);
Serial.setTimeout (4);
pinMode (ledPin, OUTPUT);
}
void S1 () {irsend.sendNEC (0x8C03F, 32); delay (200);}
void S2 () {irsend.sendNEC (0x820DF, 32); delay (200);}
void S3 () {irsend.sendNEC (0x8A05F, 32); delay (200);}
void S4 () {irsend.sendNEC (0x8609F, 32); delay (200);}
void S5 () {irsend.sendNEC (0x8E01F, 32); delay (200);}
void S6 () {irsend.sendNEC (0x810EF, 32); delay (200);}
void S7 () {irsend.sendNEC (0x8906F, 32); delay (200);}
void S8 () {irsend.sendNEC (0x850AF, 32); delay (200);}
void S9 () {irsend.sendNEC (0x8D02F, 32); delay (200);}
void S0 () {irsend.sendNEC (0x830CF, 32); delay (200);}
void Son () {irsend.sendNEC (0x800FF, 32); delay (100);}
void Smute () {irsend.sendNEC (0x818E7, 32); delay (100);}
void Splus () {irsend.sendNEC (0x828D7, 32); delay (100);}
void Sminus () {irsend.sendNEC (0x848B7, 32); delay (100);}
void loop ()
{
if (Serial.available ())
{a = Serial.parseInt ();
if (a == 1) {S1 ();}
if (a == 2) {S2 ();}
if (a == 3) {S3 ();}
if (a == 4) {S4 ();}
if (a == 5) {S5 ();}
if (a == 6) {S6 ();}
if (a == 7) {S7 ();}
if (a == 8) {S8 ();}
if (a == 9) {S9 ();}
if (a == 0) {S0 ();}
if (a == 161) {Son ();}
if (a == 162) {Smute ();}
if (a == 163) {Splus ();}
if (a == 164) {Sminus ();}
}
}
Video demonstrating the work of the device with TV Tricolor TV here.
How to read the button codes of other receivers is also described in the previous article.
Now a little about the interface.
At first such interface was made:
But he didn’t give significant convenience compared to the standard remote control.
Then I signed some buttons to make it easier to search for the desired channel:
But this option was also not very convenient.
Today the interface looks like this:
Using this interface turned out to be quite convenient.
In conclusion, I’ll say that I did all the android applications using the App Inventor 2 visual development environment for Android applications.
Who cares how to make such an application “from scratch” can watch my video on this topic (you need to go to youtube to view it).
PS Collection of more than 100 training materials on arduino for beginners and pros here
PPS Online course on arduino to giktaimes here.
Source: https://habr.com/ru/post/254185/
All Articles