The Legend of Temptation: How to use Python to automate iOS

Often, we have to perform with our iPhone monotonous and rather boring manipulations that force us to look with envy at desktops with their limitless customization, scripting and automation actions. Why are there desktops - even for Android users with their omnipresent Tasker, with which you can program a smartphone for anything. In iOS, the existence of such applications is impossible, but we have a small loophole.
In this article I want to talk about Pythonista - the development environment in the Python language (version 2.7.5) for iOS, which allows including writing full-fledged applications with a graphical interface. However, we will use it for several other purposes - to create simple utility scripts that will automate routine operations.

')
Pythonista includes many pre-installed libraries, including those that will help us gain access to iOS functionality. An example is a clipboard that allows you to read and write to the clipboard, contacts for work with the address book, keychain, location, and others.
In addition to the built-in, we also need third-party Python-modules. For Pythonista, there are two analogues of the well-known pip. These are pipista 2.0 and Pypi . To install a package using the first one, you must save the script to the root directory and run the following command:
import pipista pipista.pypi_install('Name_of_library') This library also has the functions pypi_download (), pypi_search () and pypi_versions (), which makes it a complete replacement for pip. The second installer requires clearer queries. For example, you must specify the version of the package - this is convenient if for some reason you do not want to use the latest version.
from Pypi import Installer Installer('Name_of_library', 'Version').install() This installer also has additional features.

How to run a script from the main screen
There are two possibilities for this: * Pythonista Shortcut * and * Launch Center Pro *. In the first case, everything is simple: just go from the device to the site , enter the name of the script and the arguments, click on the Create Shortcut button, then save this page to your desktop using the standard Safari functions.
The second program is much more interesting. To run a script from it, you need to create an event and enter the following line in the * URL * field: “pythonista: // script_name? Action = run & args =”, where script_name is the name of the script taking into account the directory hierarchy, and after args = you need to list the arguments (if they are). Also there is the ability to run on time or with a certain regularity.
There is also an opportunity to pack a script into a full-fledged iOS application. To do this, just download [archive] (goo.gl/jsQK0b) with the Xcode project from the official site and replace the standard script from Hello, world with your own. After that, you can build this project in XCode and run it on the simulator, and if you have an Apple developer account, then on the gadget.

INFO
Pythonista includes all the necessary documentation, so to study it you will not need to connect to the Internet.
The built-in editor of Pythonista is quite developed, has syntax highlighting, autocompletion and additional keys on the keyboard. Moreover, it can also be scripted.
Scripts
Let's write several scripts in order to make life easier for us and our loved ones. Some of them (or all) may seem useless to someone, but they give an idea of what you can do with Pythonista, and can act as a base for your experiments. There are nine scripts in total, and they are very diverse.

Quick Tweet
Let's start with the omnipresent Twitter. It is not very convenient to open the application or go to the site in order to simply send a tweet. Therefore, we will write a script that will tweet what is in the clipboard (do not forget to install the tweepy library).
import tweepy import clipboard # Twitter- consumer_key = "----------" consumer_secret = "----------" access_key="----------" access_secret="----------" # auth = tweepy.OAuthHandler(consumer_key, consumer_secret) auth.set_access_token(access_key, access_secret) api=tweepy.API(auth) # text = clipboard.get() if len(text)<=140 and len(text)>0: api.update_status(text) The script connects to the account using the available keys. They can be obtained on the official website of Twitter . To get all the keys, you need to create an application, then go to the Keys and Access Tokens tab and click the Create my access token button. This way we get the four keys we need. For the script to post messages, you need to give the application such rights on the Permissions tab.
In all other respects, the functionality is extremely simple. The script takes a string from the clipboard, checks if the string matches the tweet format (no more than 140 characters), and posts it.
Quick save to Instapaper
Now about the equally popular service Instapaper, which allows you to save pages for offline reading. The following three-line script adds the page from the clipboard directly to the service client installed on the device.
import webbrowser, clipboard addnew='x-callback-instapaper://x-callback-url/add?url='+clipboard.get() webbrowser.open(addnew) The script uses the so-called x-callback-url - a mini-API of applications that can be called through the built-in browser. On the official site of this feature there is a list of applications that support this feature. The structure of x-callback-url requests is as follows:
x-callback-_://x-callback-url/?= Password generator
Yes, it is the password generator. There are a lot of applications with similar functionality, but we will make our own. Just because we want :).
import random, string,clipboard pass = '' for x in range(random.randrange(8,12)): pass += random.choice(string.ascii_letters + string.digits) clipboard.set(pass) This script will help to create a password with a high resistance to selection (with the inclusion of numbers and letters). The idea of the algorithm is extremely simple: a random (from 8 to 11) number of characters from the above set is added to the empty line. Next, the password is placed on the clipboard.
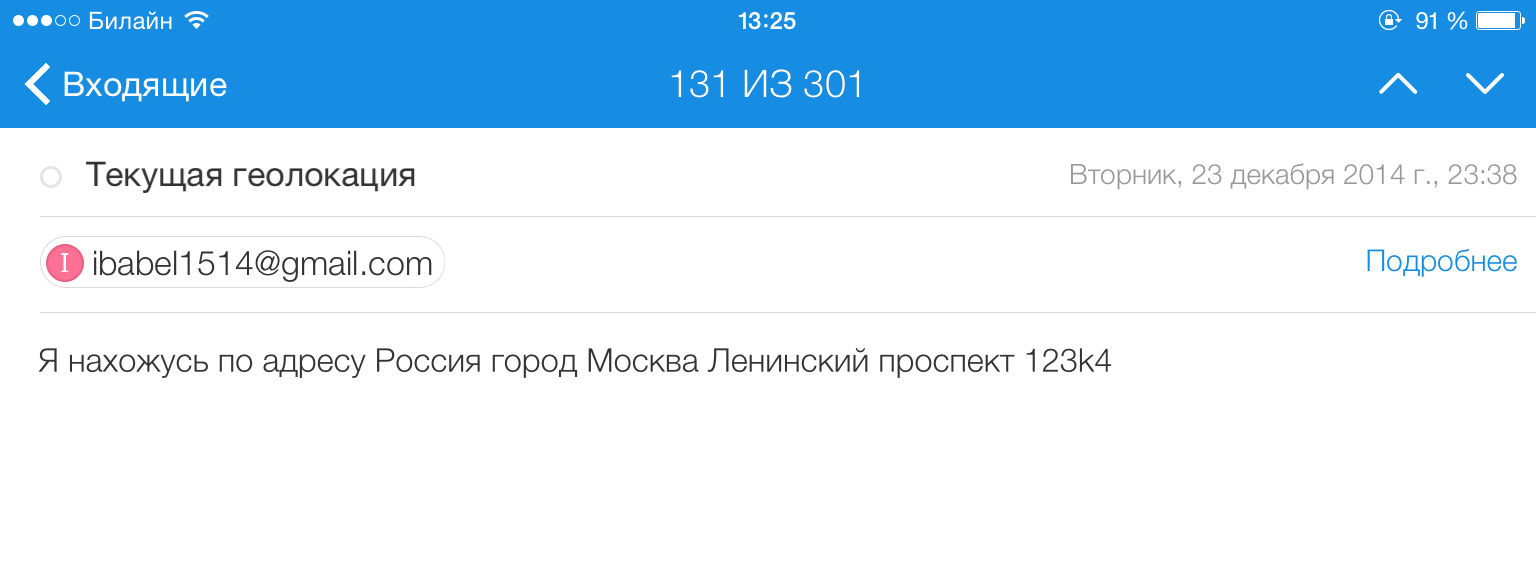
Send your current location by email
Sometimes it is easier to press a button and send your address to the other person, than to explain where you are.
import smtplib, location, time from email.mime.text import MIMEText # SMTP- server = "_" user_passwd = "" port = 22 user_name = "@" send_name='@' # s = smtplib.SMTP(server, port) s.ehlo() s.starttls() s.ehlo() s.login(user_name, user_passwd) # location.start_updates() time.sleep(10) location.stop_updates() loc = location.get_location() addr = location.reverse_geocode(loc)[0] # Text = ' : ' + addr['Country'] + ', ' + addr['City']+', ' + addr['Name'] letter = MIMEText(Text,'html','utf-8') letter['Subject']= ' ' letter['To']=send_name letter=letter.as_string() s.sendmail(user_name,send_name,letter) s.close The script consists of two parts: the first is working with the mail server, the second is getting the current address and sending a letter. Let us dwell on the second in more detail. The fact is that there is no “get current location” function in the location library, but there are two functions that allow you to get a list of frequently visited places. Since the creation of the list lasts only ten seconds (time.sleep (10)), then there will be only one object with the current address. This object is a dictionary. We will get the necessary values by the keys and enter the beautiful phrase into the Text string, which we will send later.
Sending photos to the server via FTP
The clipboard library already known to us allows us to work not only with text, but also with images. This opens up new opportunities for us. How about a script that allows you to save a photo from the clipboard to an FTP server?
import ftplib, clipboard # a=clipboard.get_image() filename='out.jpg' a.save(filename) # con=ftplib.FTP('Host','Login','Password') f=open(filename,'rb') send=con.storbinary(filename,f) con.close() The script can be slightly modified by writing in the first two lines.
import ftplib, photos a=photos.get_image() Then the last captured photo will be sent to the server, not copied. And if you replace the first two lines with these:
import ftplib, photos a=photos.capture_image() then iOS will offer to take a photo.
Work with a remote server via SSH
Many of us have remote servers. Someone is a home media player or file dump, others control servers on Amazon. How to manage them from iPhone or iPad? You can download any FTP client, but this is not an option if you need to regularly perform the same tasks, for example, to do a backup. Stephen Millard wrote [the script] (goo.gl/Tt14cC), allowing you to execute remote commands via SSH. In a simplified form (without checking for the correctness of the data entered and the output of the logs), it looks like this:
import paramiko import console # , strComputer = '' strUser = '' strPwd = '' strCommand = '_' # client = paramiko.SSHClient() client.set_missing_host_key_policy(paramiko.AutoAddPolicy()) client.connect(hostname=strComputer, username=strUser, password=strPwd) # stdin, stdout, stderr = client.exec_command(strCommand) print stdout.read() client.close() To execute a set of commands, it is enough to copy the line “stdin, stdout, stderr = client.exec_command (strCommand)” several times with different commands (or list all the commands with a semicolon. - Ed.).
We shorten links with goo.gl
Often it is necessary to resort to abbreviations. But every time to go to the site, copy, paste - it is somehow boring. Fortunately, there is an API goo.gl.
import googl, clipboard client = googl.Googl("") result = client.shorten(clipboard.get()) clipboard.set(result['id']) The script gets the URL from the clipboard, converts it and puts it back into the buffer. Before running the script, you need to get the API Access Key. To do this, go to the API page , click Add project, and in the list of available services, turn on the URL Shortener API. Next, in the left menu, select the APIs & auth tab, the Credentials submenu, and click the Create new Key button, then the Browser Key. After receiving the key, insert it into the script.
Note that during the execution of the script, the result variable is assigned a dictionary of the form {'kind': 'urlshortener # url', 'id': ShortLink ', u'longUrl': 'LongLink'}. Since we only need a short link, the value on the key 'id' is entered into the clipboard.
Cleaning notebook
Walking through the search engines, we will find only two ways to clear the address book: deleting one contact at a time or synchronizing with an empty contact list on a computer. No, so uninteresting.
import contacts a = contacts.get_all_people() for i in a: contacts.remove_person(i) contacts.save() Just go over the list of contacts. The main thing - do not forget to save the changes (last line).
Import friends from VC in the notebook
Finally, the most complicated and long script is the import of phone numbers from “VKontakte” to a notebook. Like everyone else, VKontakte has an API. For python there are several libraries to work with it. The most famous and easiest to use is the library with the modest name vk.
import vk, datetime, contacts # iOS def convertdate(date): date = date.split('.') if len(date) == 2: return datetime.datetime.combine(datetime.date(1604,int(date[1]),int(date[0])),datetime.time(0, 0)) else: return datetime.datetime.combine(datetime.date(int(date[2]),int(date[1]),int(date[0])),datetime.time(0, 0)) # vkapi = vk.API('ID-', '', '') a = vkapi.friends.get(fields='contacts,bdate') a = a['items'] # for i in a: Temp = contacts.Person() Temp.last_name= i['last_name'] Temp.first_name = i['first_name'] if 'mobile_phone' in i.keys(): try: Temp.phone=[('mobile',i['mobile_phone'])] except: pass if 'home_phone' in i.keys(): try: Temp.phone.append(('home',i['home_phone'])) except: pass Temp.url = [('vk','http://vk.com/id'+str(i['id']))] if 'bdate' in i.keys(): Temp.birthday = convertdate(i['bdate']) contacts.add_person(Temp) # contacts.save() As in the case of Twitter, for the script you need to create an “application” inside VKontakte. To do this, go to the "Applications" tab on the VK website, then to the "Manage" tab, and click the "Create Application" button. On the application page, go to the "Settings" tab and copy the "Application ID". Insert the "Application ID", "Login" and "Password" into the script.
We will understand how this script works. First we get a list of friends. By default, the friends.get () function returns a dictionary consisting of two fields: count and items. We are undoubtedly interested in the second, but since we want to get not only the names and surnames, we will pass the function the parameter fields indicating what we want to know. Next we go through the list of dictionaries, where each dictionary is a user. At each iteration, we create a Temp variable of type Person and in turn add fields to it.
In the process of passing through the contacts, the script solves several problems. The first problem arises when exporting phone numbers, because very often we meet in VC numbers like “who need to - know”, “secret” and the like. That the script could process similar records, without falling, the operator try is used. The second problem arose with the mismatch of the format of the date of birth. In the dictionary obtained from the VC, it is recorded as a string of the format DD.MM.YYYY, and in the birthday field you must enter the data in the datetime.datetime format. To do this, we need the function convertdate at the beginning of the script. In addition, the date of birth may not be specified at all.
Pythonista Embedded Libraries
- canvas - vector graphics library;
- clipboard - work with the clipboard;
- console - functions associated with the input and output of text;
- contacts - access to the notebook;
- editor - work with a text editor Pythonista;
- keychain - access to the Keychain API;
- linguistictagger - linguistic analysis;
- location - geolocation services;
- motion - taking sensor readings;
- notification - work with notifications;
- photos - work with saved photos;
- scene - 2D-graphics and animation;
- sound - library of sounds;
- speech - text-to-speech conversion;
- ui is a native GUI for iOS.
Conclusion
Despite the large number of examples, we have considered not all the features of Pythonista. But its functionality is enough for a lot. For example, the App Store has already laid out several applications created in this program. In addition, soon the creator of Pythonista promises to release an update that supports iPhone 6 and 6+ and two new modules for working with reminders and Bluetooth peripherals.
Www
Official Pythonista Forum: omz-forums.appspot.com/pythonista
Module Documentation: omz-software.com/pythonista/docs/ios
A great article on Pythonista features: www.macstories.net/stories/automating-ios-how-pythonista-changed-my-workflow
Collection of Pythonista scripts: github.com/Pythonista-Tools/Pythonista-Tools

First published in the magazine "Hacker" from 02/2015.
Posted by: Victor Paperno (@ Snusmumrick97)
Subscribe to "Hacker"
Source: https://habr.com/ru/post/254127/
All Articles