Customize your room Service Bus for Windows Server

It is quite often necessary to link together several disparate systems, or to ensure their synchronization. Of course, cases are different and unique, however, writing your own solution is usually quite expensive, both in time and in resources.
Among the major companies, perhaps, you can select cloud solutions from Amazon (SQS) and Microsoft (Service Bus). However, despite the rapid development of the Public Cloud, such solutions are not always applicable, what is called On-Premises. In other words, there is a need for such solutions, but on their own closed areas. In this regard, Microsoft made a sensible step by making the Service Bus available in the Private Cloud, or on at least one machine with installed Windows 7 and higher. In the version of Service Bus 1.0, management via PowerShell was available, and with release 1.1 it was possible to integrate into the Azure Pack console.
')
In this article I will try to describe the process of setting up the Service Bus for Windows Server in as much detail as possible, in pictures. Since it is better to see the whole process once, than several times to read in parts in different sources.
Caution traffic! Under the cut a lot of pictures.
So, Azure Service Bus is a cloud-based universal messaging system.
In order to understand what functionality it has, let's recall a few patterns from the category of Messaging .
One of the best books on this topic, in my subjective opinion, is Enterprise Integration Patterns: Designing, Building, and Deploying Messaging Solutions (translation: Enterprise Application Integration Patterns) aligns the following patterns:
Point-to-Point Channel
A point-to-point channel ensures that each individual message will be consumed by only one recipient. A channel can have many recipients at the same time processing messages, but only one of them can successfully receive a particular message. If several recipients try to consume a message at the same time, the channel itself will ensure that this operation succeeds only one of them. Coordinate the actions of the recipient is not necessary.
If the point-to-point channel has only one recipient, the message will be consumed only once. If the channel is tapped by multiple recipients, they become competing consumers ( Competing Consumers ), and the channel guarantees that the message will be received by only one of them. This scheme of message consumption and processing is perfectly scalable, since the workload per channel can be distributed among several consumers running within several applications on several computers.
If the message is to be received not by one, but by all recipients who listen to the channel, use the “publish-subscribe” channel .

Publish-Subscribe Channel
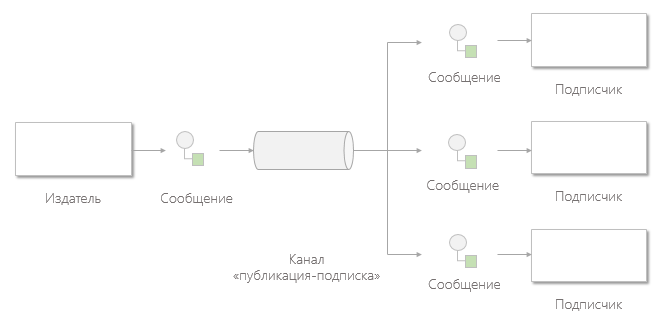
The publish-subscribe channel functions as follows: it has one input channel, which is divided into several output channels, one for each subscriber. When a message is published on a channel, the publish-subscribe channel delivers a copy of the message to each of the output channels. There is only one subscriber at each output of the channel who is allowed to consume the message only once. Due to this, each subscriber will receive a message only once, after which the consumed copies of the message will disappear from the corresponding output channels.
Invalid Message Channel
Messages that have an incorrect format or that do not contain the fields required for this channel cannot be processed correctly, however, formally, they are delivered. In this case, the recipient can move these messages to the invalid message channel for the subsequent diagnosis of the problem.
In the absence of tools to work with invalid messages:

In the case of a channel of invalid messages :

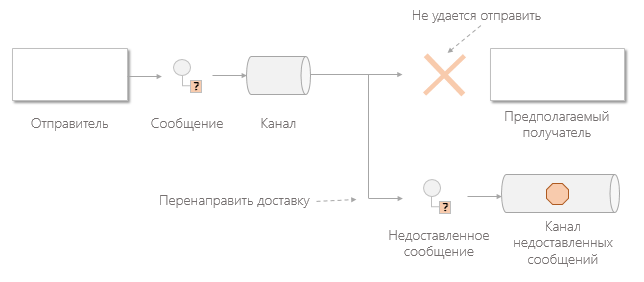
Many messaging systems implement a similar concept called the undelivered message channel . Unlike the invalid message channel , which contains messages that were successfully delivered and received but not processed, the dead message channel is for messages that could not be delivered by the messaging system.
Dead Letter Channel
Once the messaging system determines that it cannot deliver the message, it must decide what to do with it. The message can either be deleted or redirected to the channel of undelivered messages .
Guaranteed Delivery
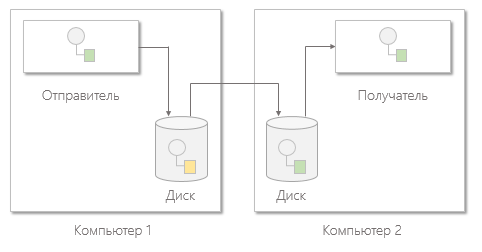
Under the guaranteed delivery they understand the ability to send a message to the recipient in asynchronous mode with a guarantee of either only successful receipt or correct notification of the impossibility of delivery.
Message Bus
The message bus is a combination of a canonical data model, a standard set of commands, and a messaging infrastructure that allows different systems to communicate with each other through a common set of interfaces.

All patterns listed above are implemented in Azure Service Bus:
Now we understand what it is about. The logical question is “can I have the same thing, but

Yes, you can, and absolutely free. In order to start a Service Bus, you only need Windows 7+ and MS SQL Server 2012 Express +.
If you want to manage the Service Bus through the easy-to-use Azure Pack GUI, you'll need Windows Server 2012+.
Service Bus for Windows Server 1.1 can be downloaded through the Microsoft Web Platform Installer .
Download Azure Pack from here (Install Windows Azure Pack: Portal and API Express), or for a direct link .
How it works?
Service Bus in its work uses the database to store the infrastructure data and message containers (messages are evenly distributed between them). The database server and service bus can be located on different machines.
You can use Azure Pack to manage the Service Bus through the web interface. Azure Pack can be on another machine, but for work it also needs a database, where it will store user data, etc.
In my example, I will deploy three virtual machines that will hang on the Internet:
- On the first one I’ll deploy the database where the Service Bus will store the messages.
- On the second service bus.
- On the third Azure Pack and DB for it.
All the same can be deployed on the same machine.
I will create the virtual machines in Microsoft Azure using the updated management portal.
Before you start reading about the Service Bus and Azure Pack settings, I strongly recommend that you familiarize yourself with the terminology on official resources.
Configuring a virtual machine with a database
Configuring a virtual machine with a database
Specify the host name and admin account information.

Set time and automatic updates

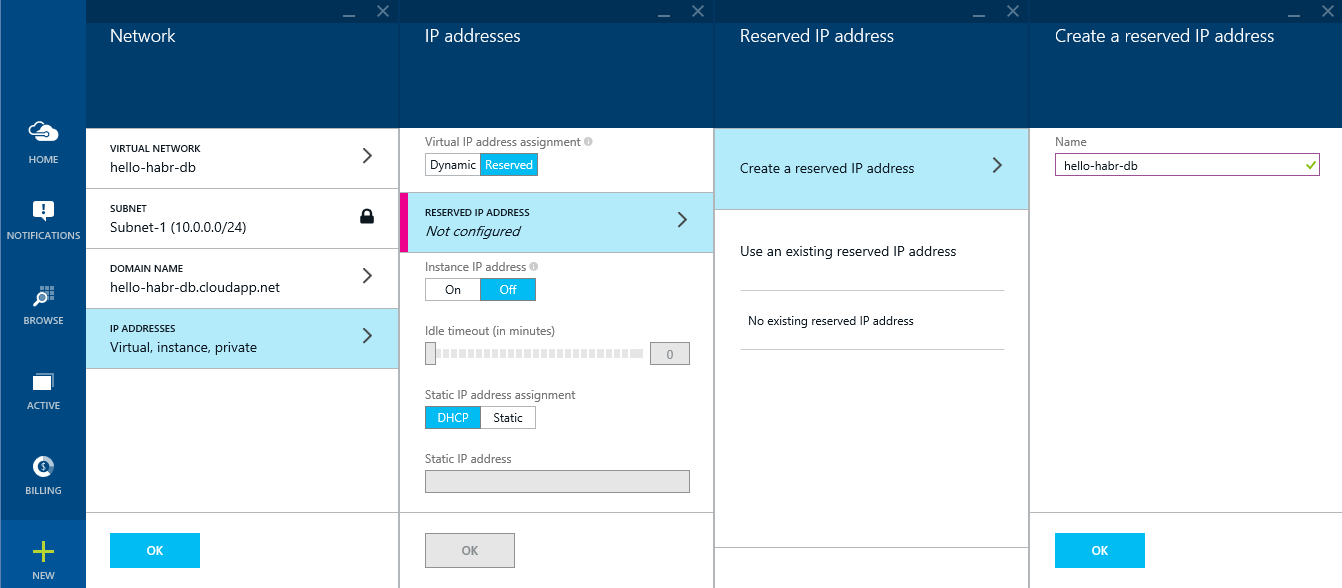
Create a virtual network: hello-habr-db
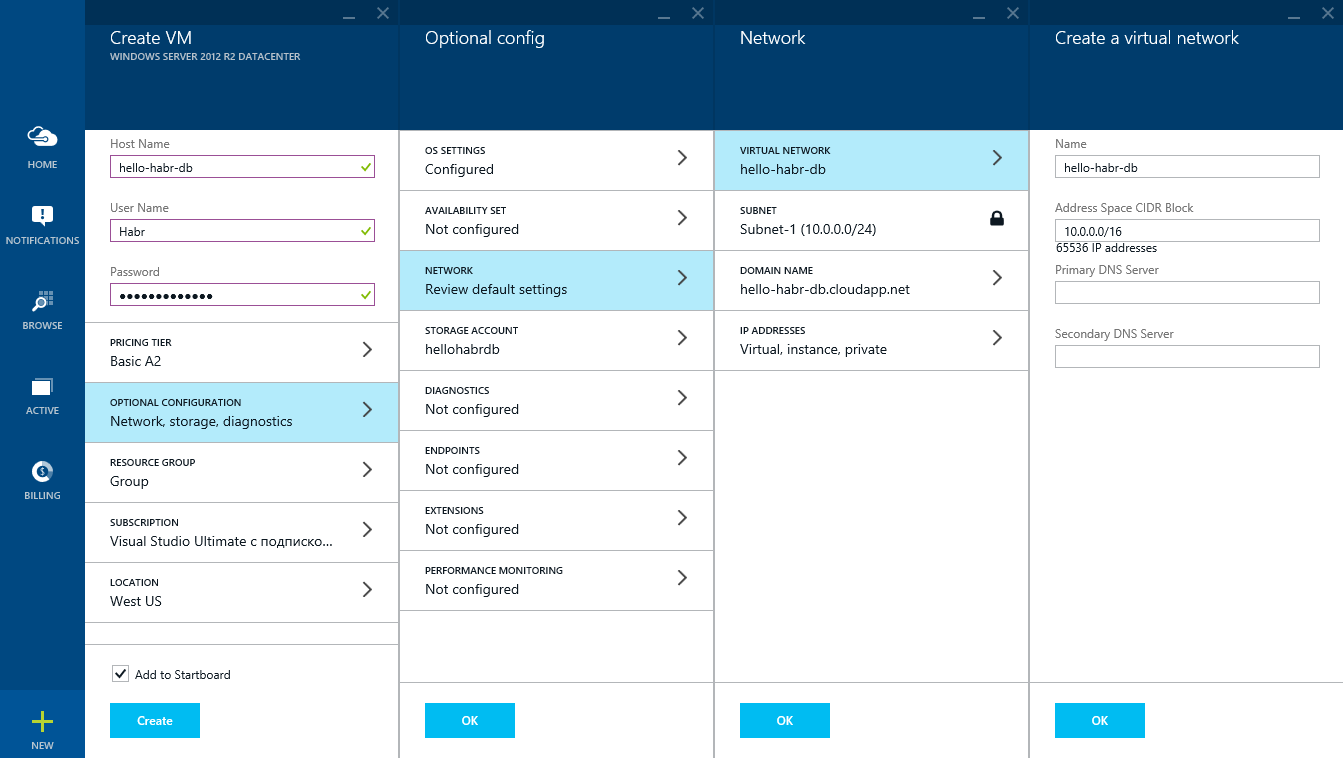
Reserve the external IP address: hello-habr-db
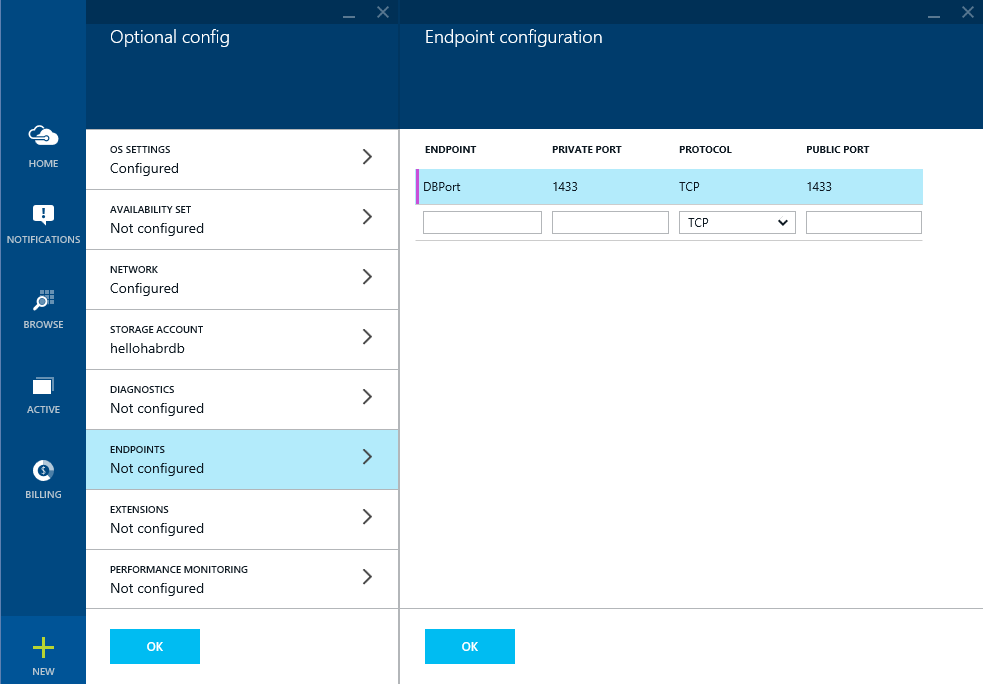
Open the ports for the database to work
We indicate the geographical location closer to Russia

Let's wait for a while, while Azure creates a virtual machine. After which we will receive detailed information about her.

Now you can install the necessary software:
1) Microsoft SQL Server 2014 Express English (!) (Which, by the way, already provides 10 GB)
2) Management Studio 2014
Before you do this, follow these steps:
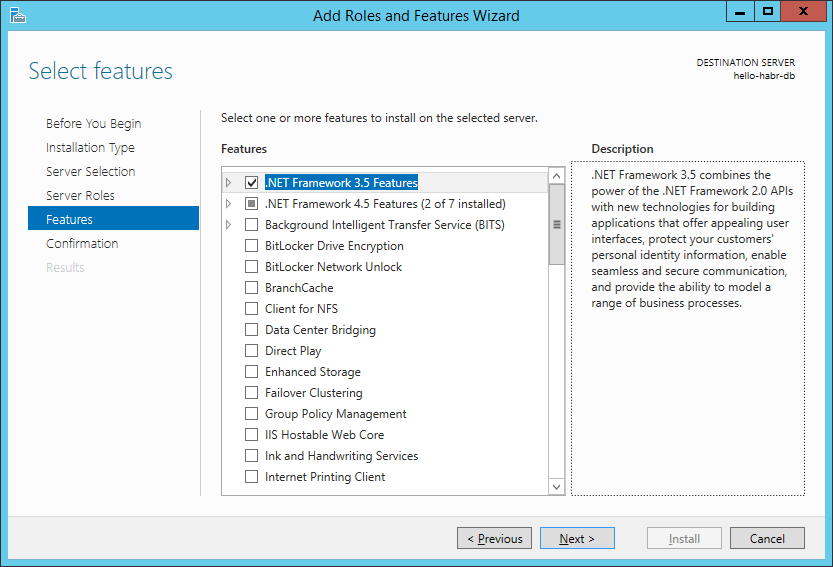
1) Install the .NET Framework 3.5
2) Turn off the firewall (do not repeat it yourself for completeness of the experiment)

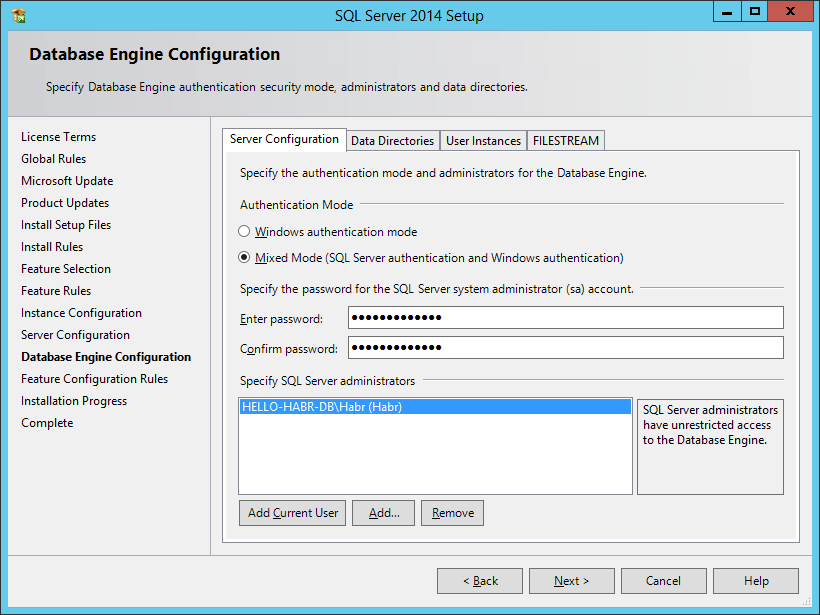
When installing MS SQL Server, you need to select a mixed authentication mode (this is important)
After installation we will configure MS SQL Server to work on externally.
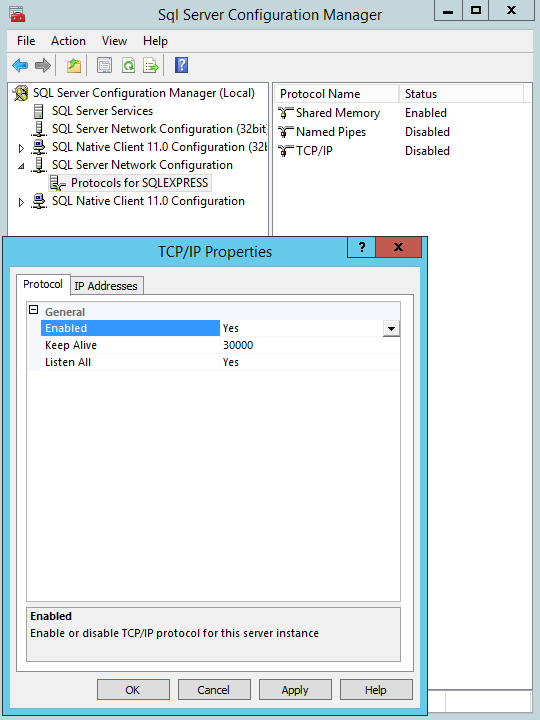
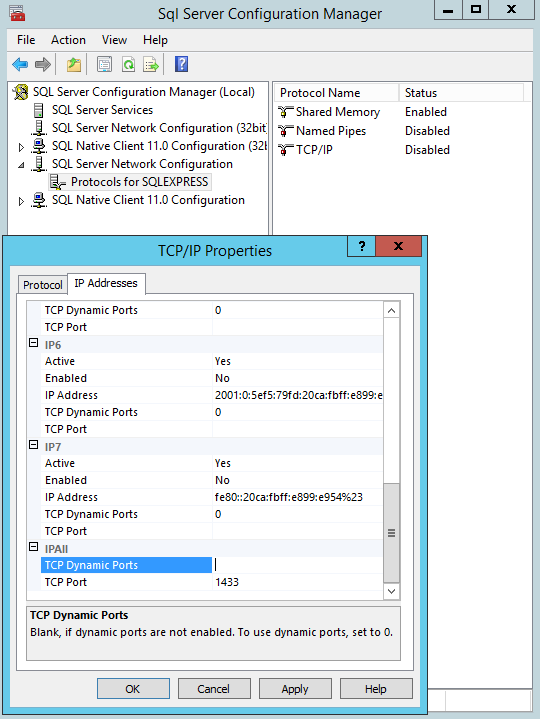
This virtual machine is ready. Do not forget to reload.

Set time and automatic updates

Create a virtual network: hello-habr-db

Reserve the external IP address: hello-habr-db

Open the ports for the database to work

We indicate the geographical location closer to Russia

Let's wait for a while, while Azure creates a virtual machine. After which we will receive detailed information about her.

Now you can install the necessary software:
1) Microsoft SQL Server 2014 Express English (!) (Which, by the way, already provides 10 GB)
2) Management Studio 2014
Before you do this, follow these steps:
1) Install the .NET Framework 3.5

2) Turn off the firewall (

When installing MS SQL Server, you need to select a mixed authentication mode (this is important)

After installation we will configure MS SQL Server to work on externally.


This virtual machine is ready. Do not forget to reload.
Configuring a Virtual Machine with Service Bus for Windows Server
Configuring a Virtual Machine with Service Bus for Windows Server
Specify the host name and admin account information.

Create a virtual network: hello-habr- s b

Reserve an external IP address: hello-habr- s b
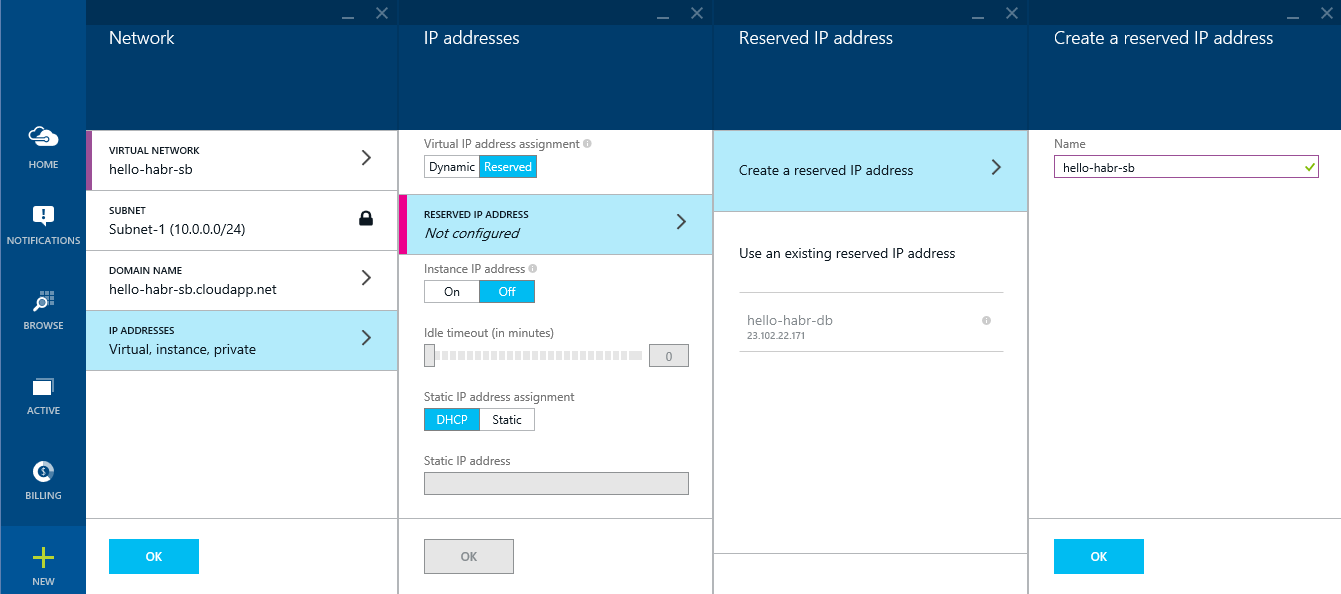
Create another Storage account (although this is not critical): hellohabr s b
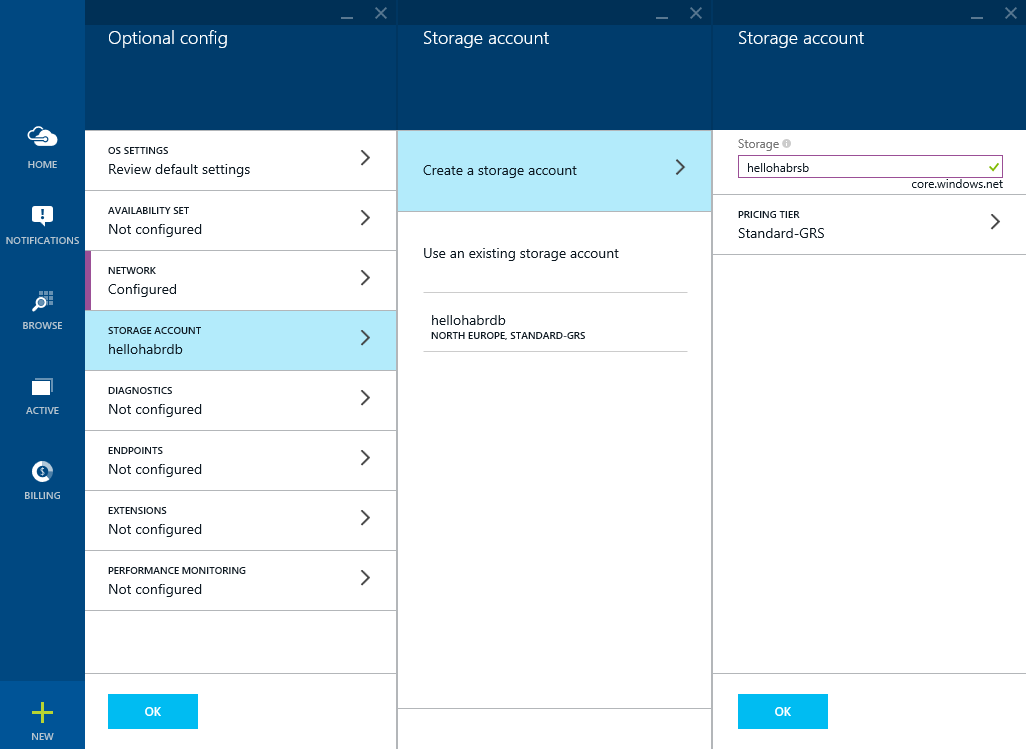
Open an impressive list of ports for the operation of the Service Bus, and to access it Azure Pack

Get a virtual machine

Turn off the firewall (do not repeat this on your own for the sake of completeness)

Let's start the Microsoft web platform installer and through the search we will find the Service Bus 1.1
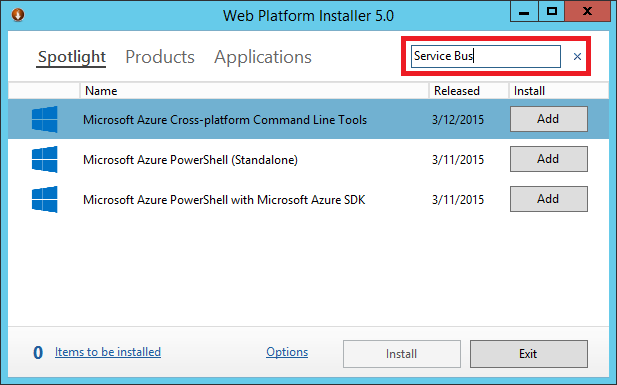
Select two items and click install.

Next, we generate a certificate of access to Service Bus for Windows Server (from a client on another machine on the Internet) using the makecert.exe utility via the command line. In Windows 8.1, it usually lies in the directory:
C: \ Program Files (x86) \ Microsoft SDKs \ Windows \ v7.1A \ Bin
Get the file hello-habr-sb.cloudapp.net.cer . Install it in Certificates - Local Computer (Trusted Root CA) on the server and clients to the Service Bus.
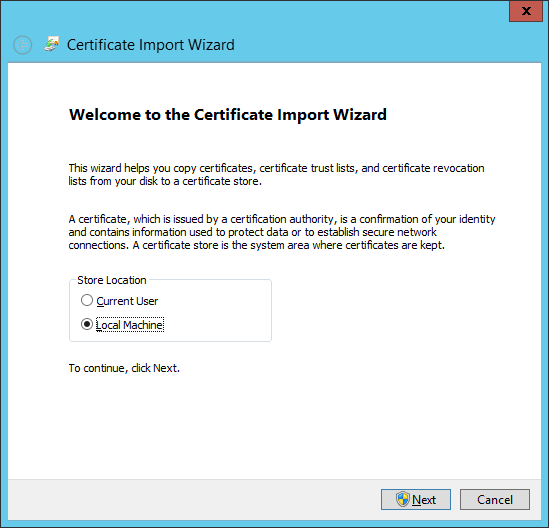
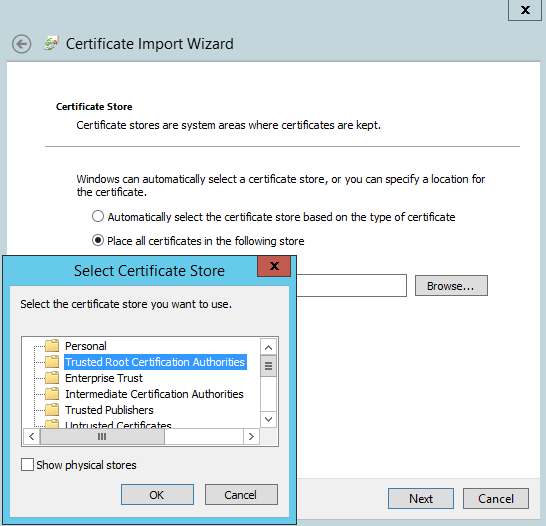
Great, now everything is ready to configure the Service Bus. Run the Service Bus Configuration .
We are interested in Custom Settings

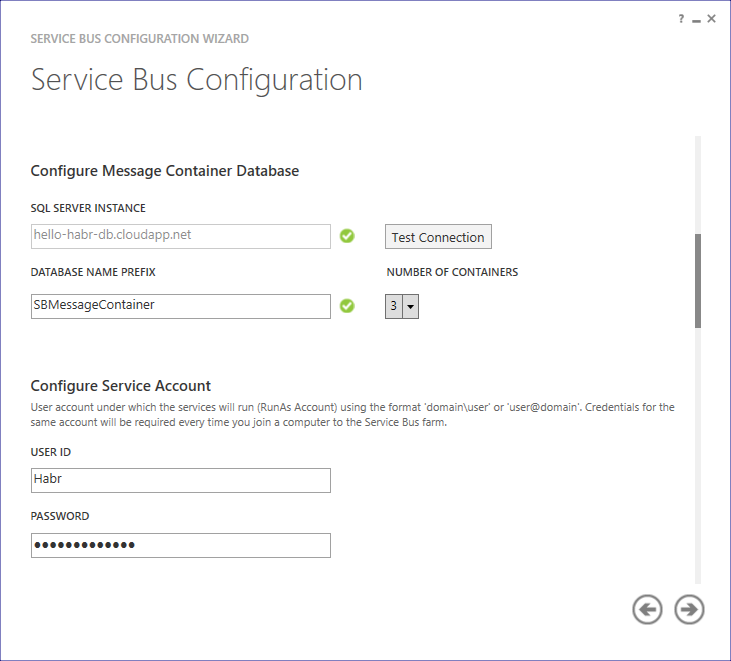
We indicate the DNS name of our virtual machine with the database: hello-habr-db.cloudapp.net . Check the connection.
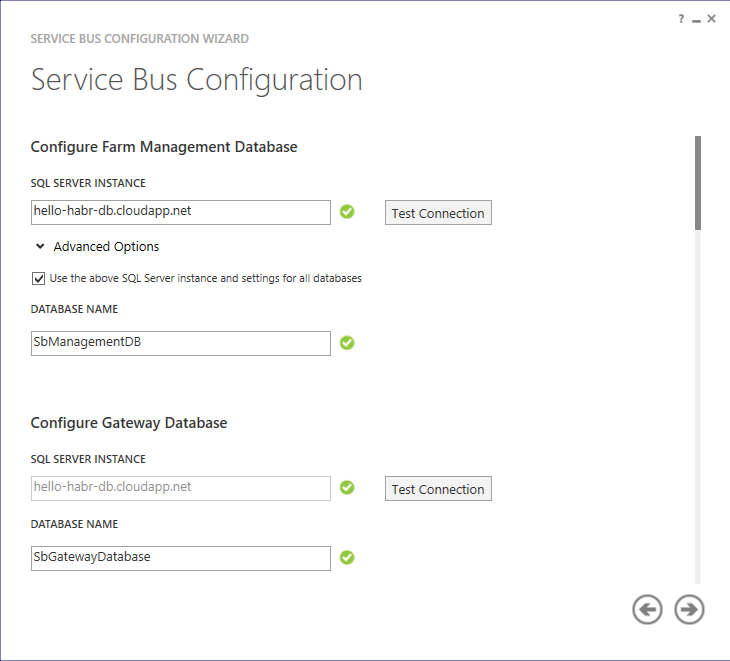
Set the number of containers for processing messages and enter the password
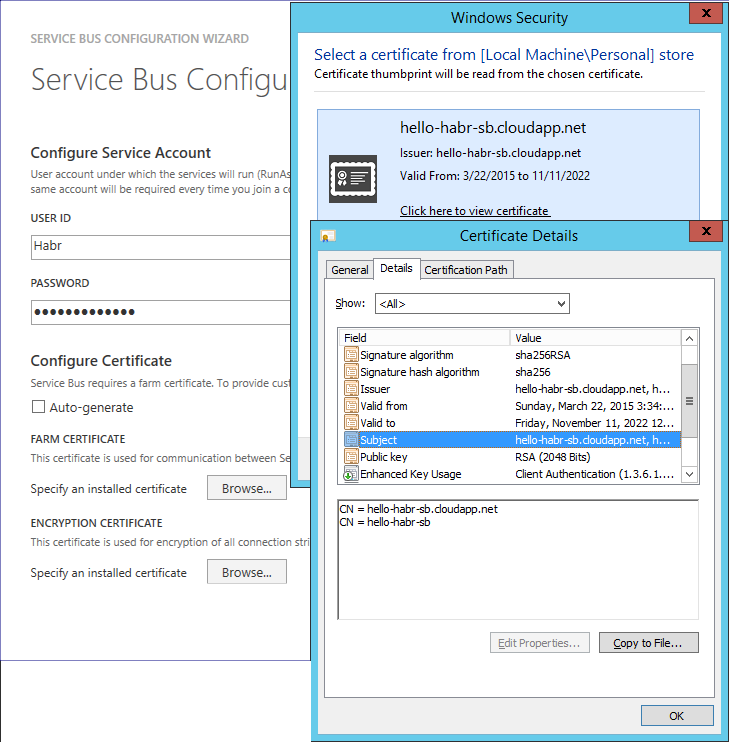
As a certificate, select the previously generated hello-habr-sb.cloudapp.net.cer
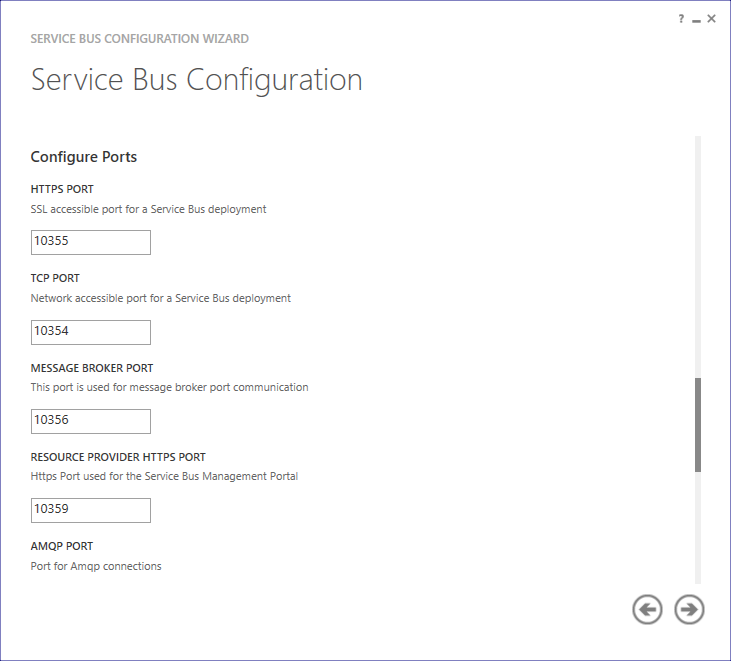
Change ports from 9000 to 10,000
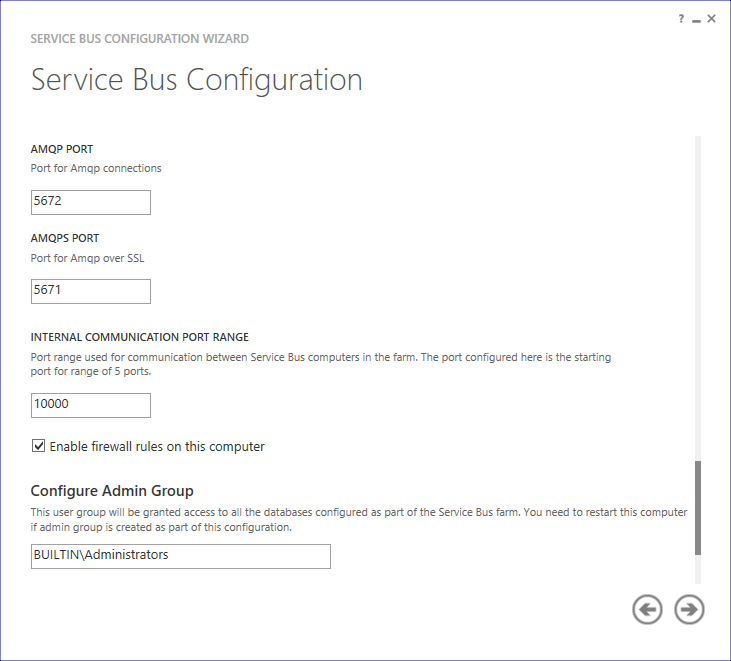
Check the box that we want to manage this farm through the Azure Pack portal. We specify passwords for portals admin- and tenant-

If all actions were done correctly, then we will be told that everything is fine
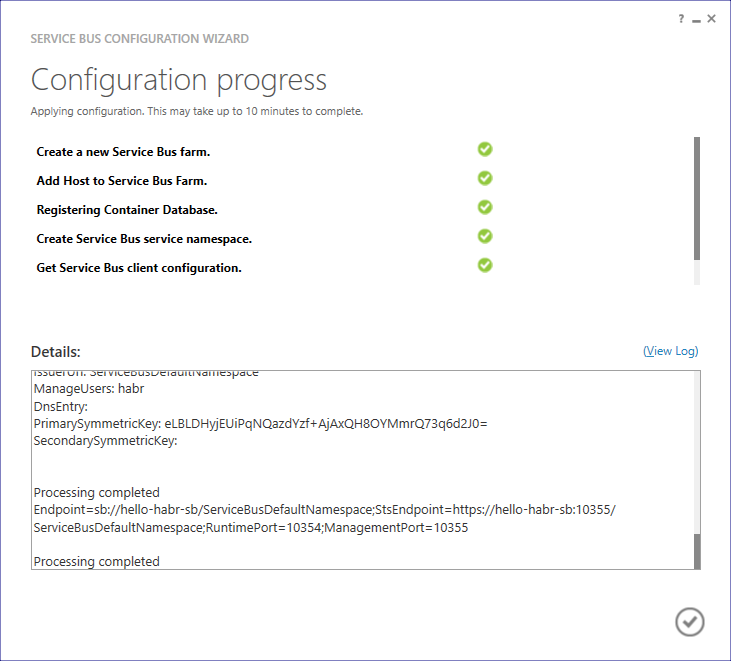
Now we need to change the DNS name of the Service Bus Farm (SBFarm) (this is necessary so that the client can be accessed from another machine on the Internet). This can be done using Service Bus PowerShell (with administrator rights). Run the sequence of commands:
( Start-SBFarm takes a very long time, this is normal)
For the subsequent operability check via the .NET client, assign the SAS key for the previously created ServiceBusDefaultNamespace:
In response, we get:
Last action on this machine: add an entry to the hosts file
(C: \ Windows \ System32 \ drivers \ etc)
Ok, move on to setting up the Azure Pack on a third machine.

Create a virtual network: hello-habr- s b

Reserve an external IP address: hello-habr- s b

Create another Storage account (although this is not critical): hellohabr s b

Open an impressive list of ports for the operation of the Service Bus, and to access it Azure Pack

Get a virtual machine

Turn off the firewall (

Let's start the Microsoft web platform installer and through the search we will find the Service Bus 1.1

Select two items and click install.

Next, we generate a certificate of access to Service Bus for Windows Server (from a client on another machine on the Internet) using the makecert.exe utility via the command line. In Windows 8.1, it usually lies in the directory:
C: \ Program Files (x86) \ Microsoft SDKs \ Windows \ v7.1A \ Bin
makecert.exe -r -pe -n "CN=hello-habr-sb.cloudapp.net, CN=hello-habr-sb" -e 11/11/2022 -eku 1.3.6.1.5.5.7.3.2 -ss My -sr "LocalMachine" -sky Exchange -a sha256 -sy 24 -len 2048 "hello-habr-sb.cloudapp.net.cer" Get the file hello-habr-sb.cloudapp.net.cer . Install it in Certificates - Local Computer (Trusted Root CA) on the server and clients to the Service Bus.


Great, now everything is ready to configure the Service Bus. Run the Service Bus Configuration .
We are interested in Custom Settings

We indicate the DNS name of our virtual machine with the database: hello-habr-db.cloudapp.net . Check the connection.

Set the number of containers for processing messages and enter the password

As a certificate, select the previously generated hello-habr-sb.cloudapp.net.cer

Change ports from 9000 to 10,000


Check the box that we want to manage this farm through the Azure Pack portal. We specify passwords for portals admin- and tenant-

If all actions were done correctly, then we will be told that everything is fine

Now we need to change the DNS name of the Service Bus Farm (SBFarm) (this is necessary so that the client can be accessed from another machine on the Internet). This can be done using Service Bus PowerShell (with administrator rights). Run the sequence of commands:
Get-SBFarm Stop-SBFarm –Verbose Set-SBFarm -FarmDns 'hello-habr-sb.cloudapp.net' Update-SBHost –Verbose Start-SBFarm –Verbose ( Start-SBFarm takes a very long time, this is normal)
For the subsequent operability check via the .NET client, assign the SAS key for the previously created ServiceBusDefaultNamespace:
New-SBAuthorizationRule -NamespaceName ServiceBusDefaultNamespace -Name MainRule -Rights Manage, Send, Listen In response, we get:
KeyName : MainRule PrimaryKey : ylF6GWmH6rlZg1ekQMQrLQnht4kwVFWHAfyB8HkrZvM= SecondaryKey : ZYBpdiCYgZNfwOC37x6DEDLxhv+qan6CJZT0vG3GvTk= Rights : {Manage, Send, Listen} CreatedTime : 3/22/2015 12:53:23 AM ModifiedTime : 3/22/2015 12:53:23 AM ConnectionString : Endpoint=sb://hello-habr-sb.cloudapp.net/ServiceBusDefaultNamespace; StsEndpoint=https://hello-habr-sb.cloudapp.net:10355/ServiceBusDefaultNamespace; RuntimePort=10354; ManagementPort=10355; SharedAccessKeyName=MainRule; SharedAccessKey=ylF6GWmH6rlZg1ekQMQrLQnht4kwVFWHAfyB8HkrZvM= Last action on this machine: add an entry to the hosts file
(C: \ Windows \ System32 \ drivers \ etc)
127.0.0.1 hello-habr-sb.cloudapp.net Ok, move on to setting up the Azure Pack on a third machine.
Configure a virtual machine with an Azure Pack
Configure a virtual machine with an Azure Pack
Specify the host name and admin account information.
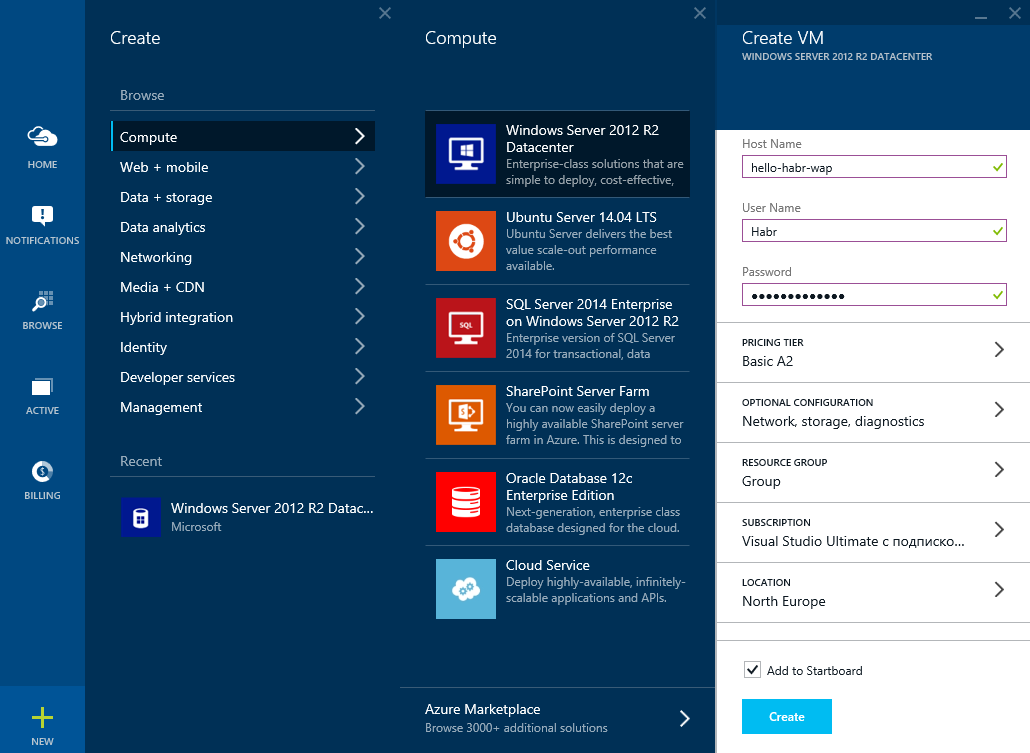
Create a virtual network: hello-habr- wap
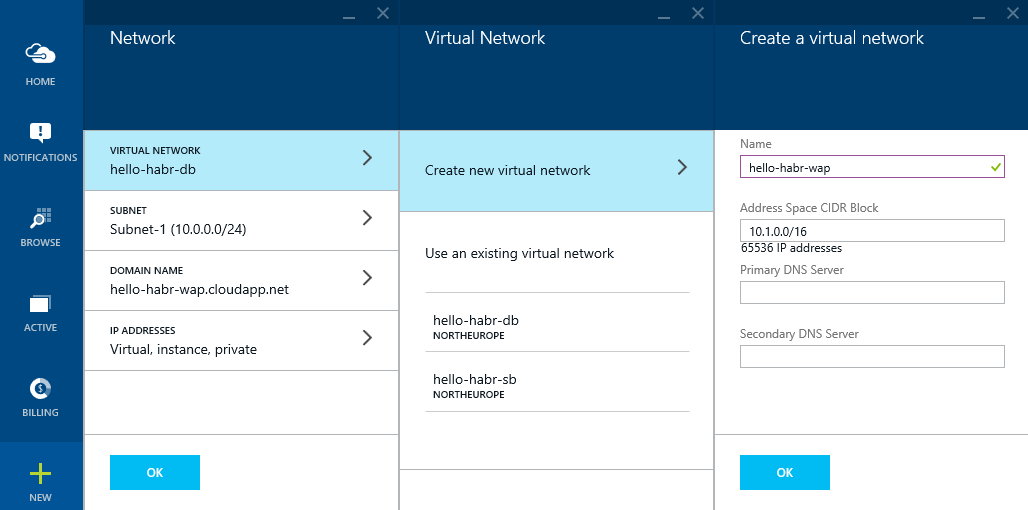
Reserve an external IP address: hello-habr- wap

Let's create another Storage account (although this is not critical): hellohabr wap
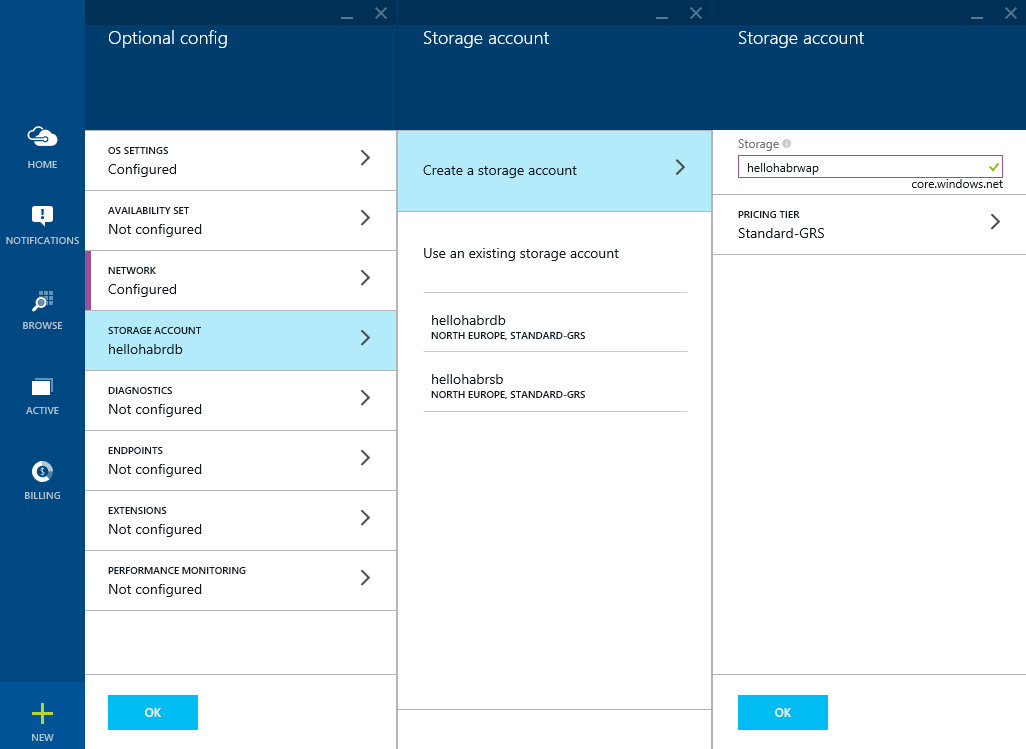
Open the ports to access the Azure Pack management portals

Get a virtual machine
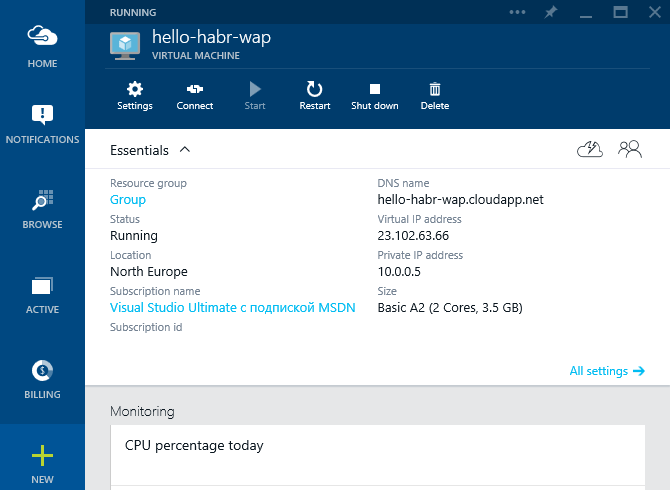
Azure Pack also stores its data in the database, and in order to separate its logic from the logic of the Service Bus, we will raise another database server, but on this machine. For this we need again:
1) Microsoft SQL Server 2014 Express English (!)
2) Management Studio 2014
Before you start the installation, perform the following steps:
1) Install the .NET Framework 3.5

2) Turn off the firewall (do not repeat it yourself for completeness of the experiment)

When installing MS SQL Server, you need to select a mixed authentication mode (this is important)
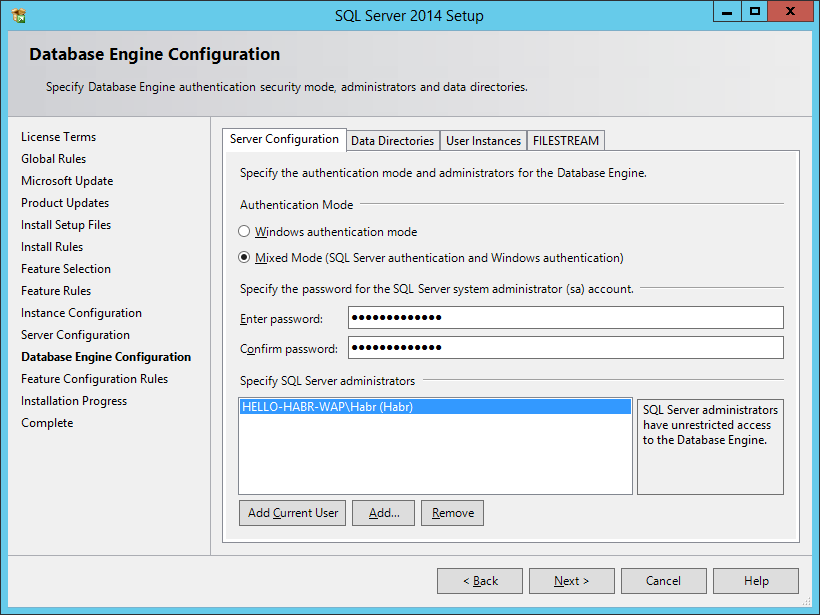
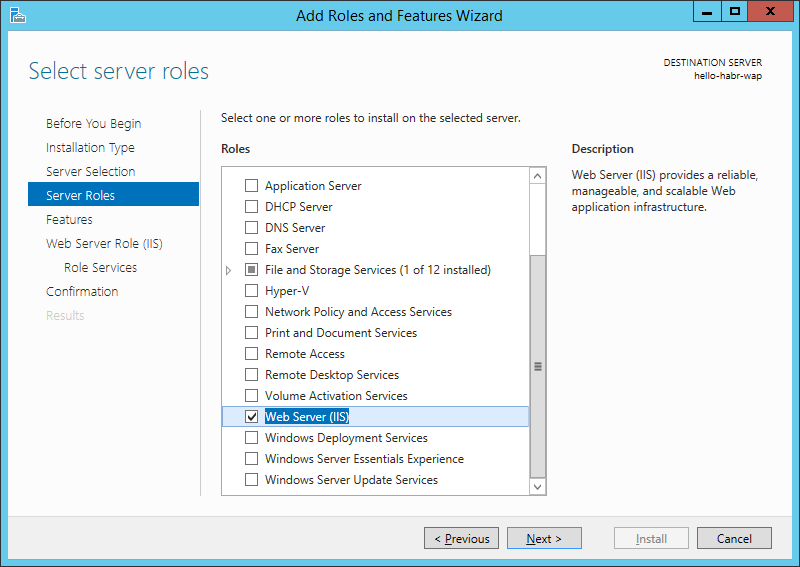
After that, you need to raise IIS for Azure Pack management portals
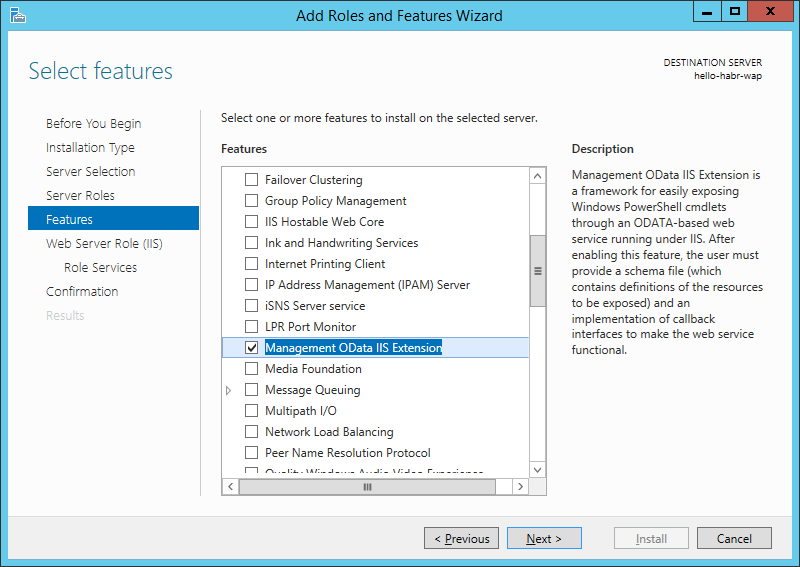
I will also install several components related to IIS management and security.
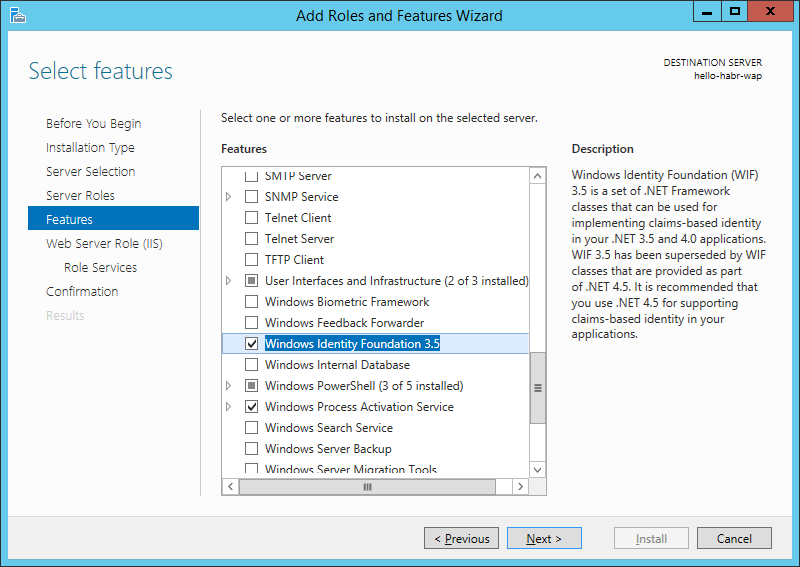

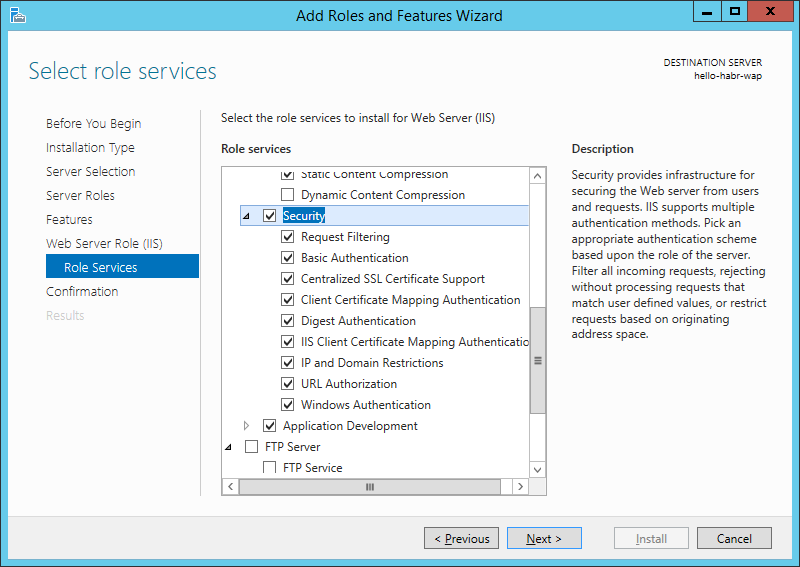

Now we will install Azure Pack with default parameters.
Immediately after installation, the configuration portal will open:
Click continue.
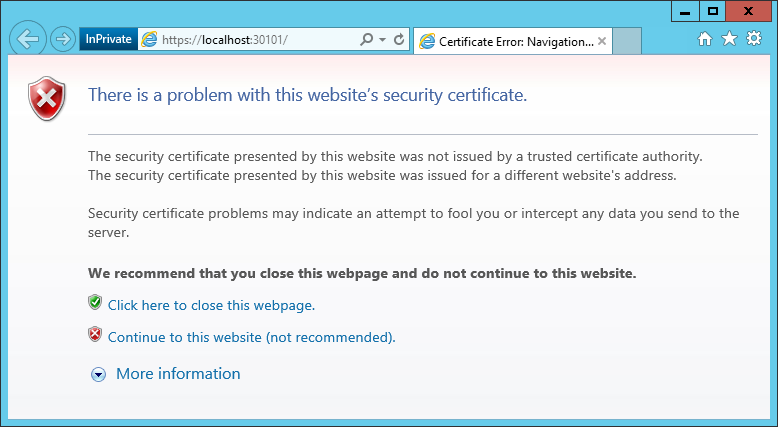
We indicate the database in which the data will be stored Azure Pack
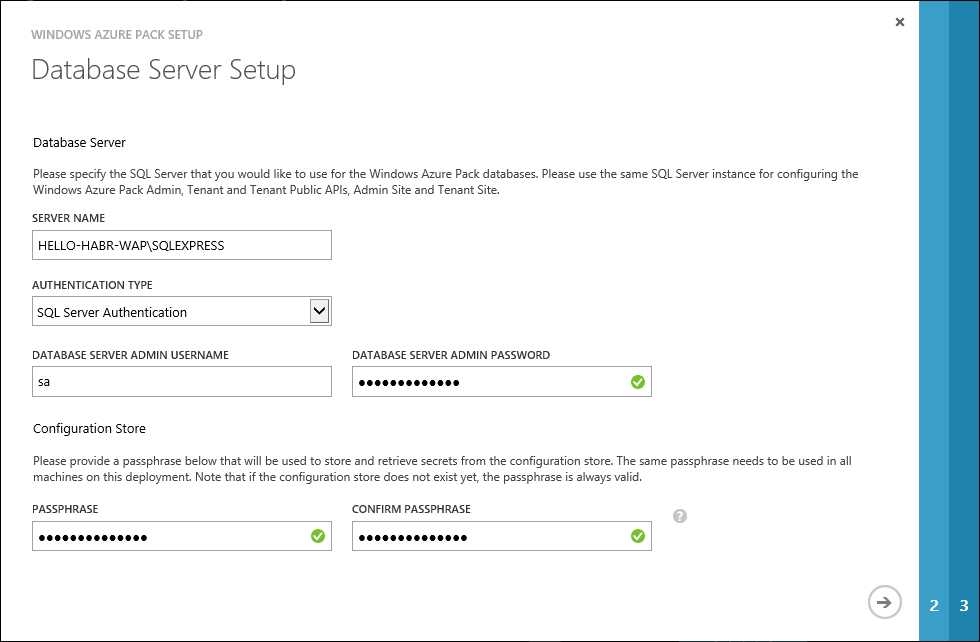
If everything is fine with IIS and DB, we will be informed about the successful implementation
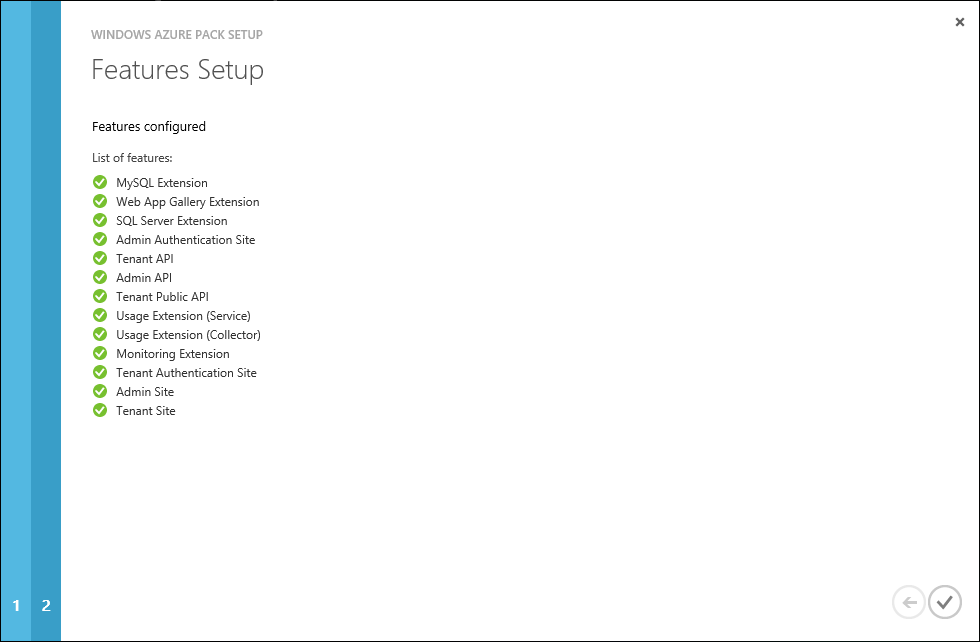
Now we need to generate a certificate of access to the Azure Pack sites (so that only those who have a certificate have access to the sites) using the familiar utilities makecert.exe and pvk2pfx.exe .
C: \ Program Files (x86) \ Microsoft SDKs \ Windows \ v7.1A \ Bin
For server:
For client:
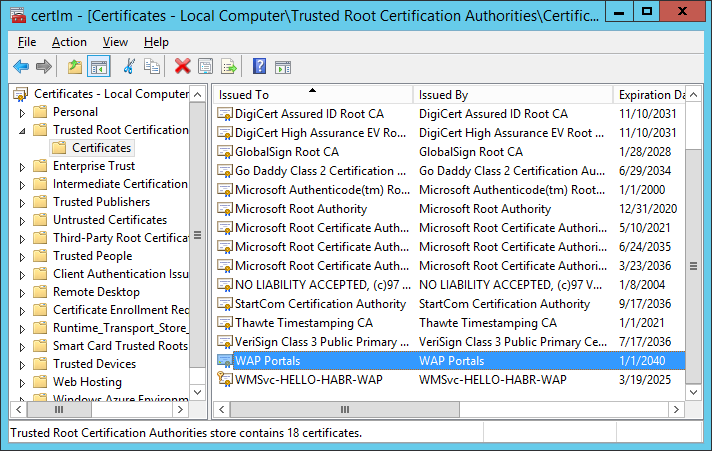
We import WAPPortals.cer into Certificates - Local Computer (Trusted Root CA) on the server.
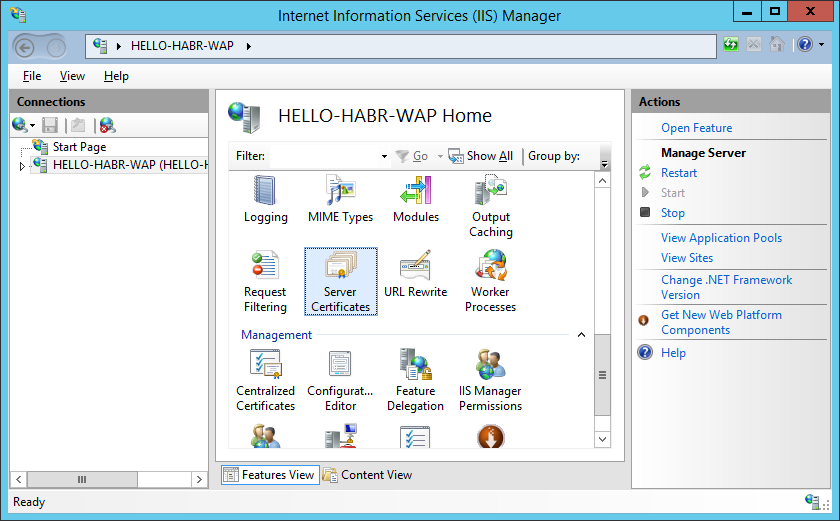
We import WAPLocalServer.pfx to IIS on the server.
In my case - I did not set the password.

Install WAPClient.pfx on the server and on the clients in Certificates - Local Computer and Current User (Personal).
Add an entry to the hosts file
(C: \ Windows \ System32 \ drivers \ etc)
Now we can change the FQDN name for Azure Pack management sites (this is needed to access sites from the Internet) using PowerShell (with administrative rights)
For TenantSite
For adminsite
In the settings of Azure Pack sites in IIS, change the Bindings

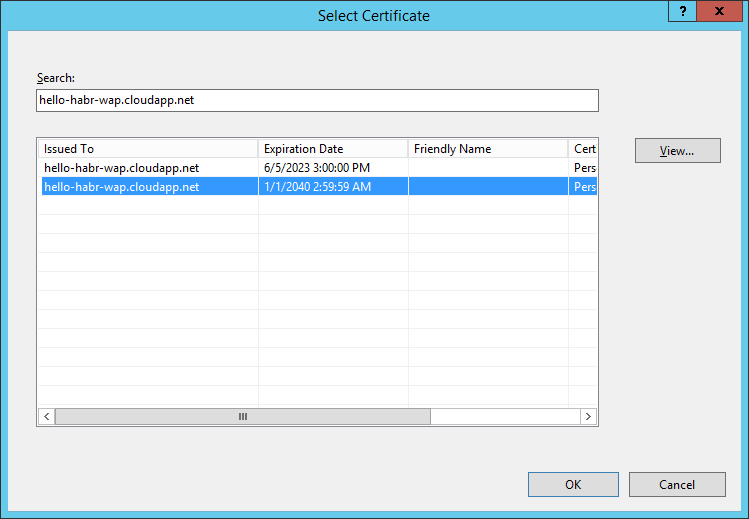
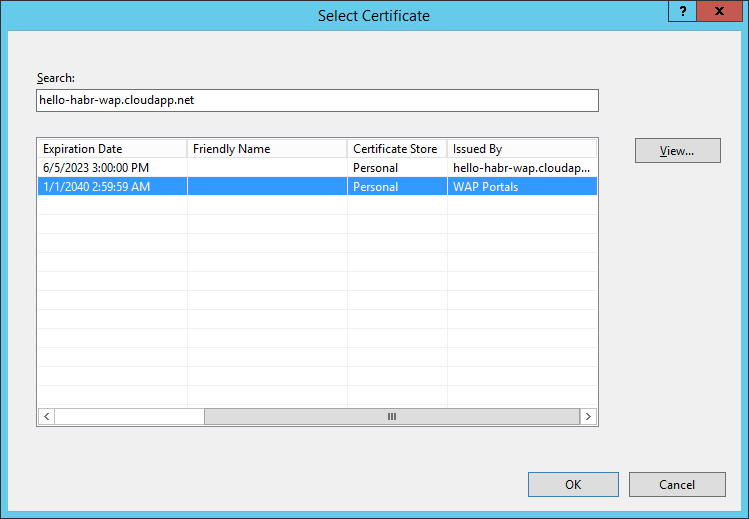
As a certificate, select hello-habr-wap.cloudapp.net - WAP Portals
In the SSL settings for the site - install Require SSL

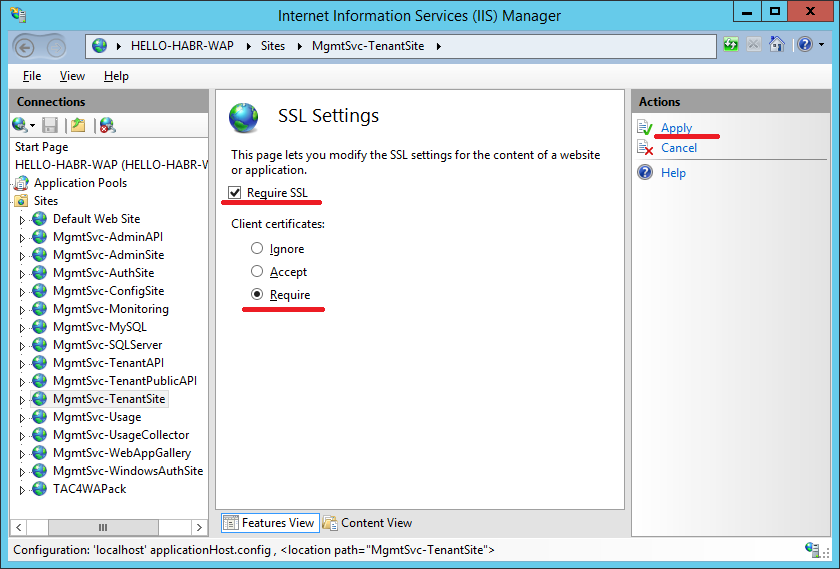
Repeat this procedure for sites:
- TenantSite
- AuthSite
- AdminSite
- WindowsAuthSite
To create user-friendly DNS names, you can use the methods described in the articles: one , two, and three .
Great, we’ve reached the finish line. Now you need to configure access to the Service Bus, which is located on hello-habr-sb.cloudapp.net

Head over to AdminSite:
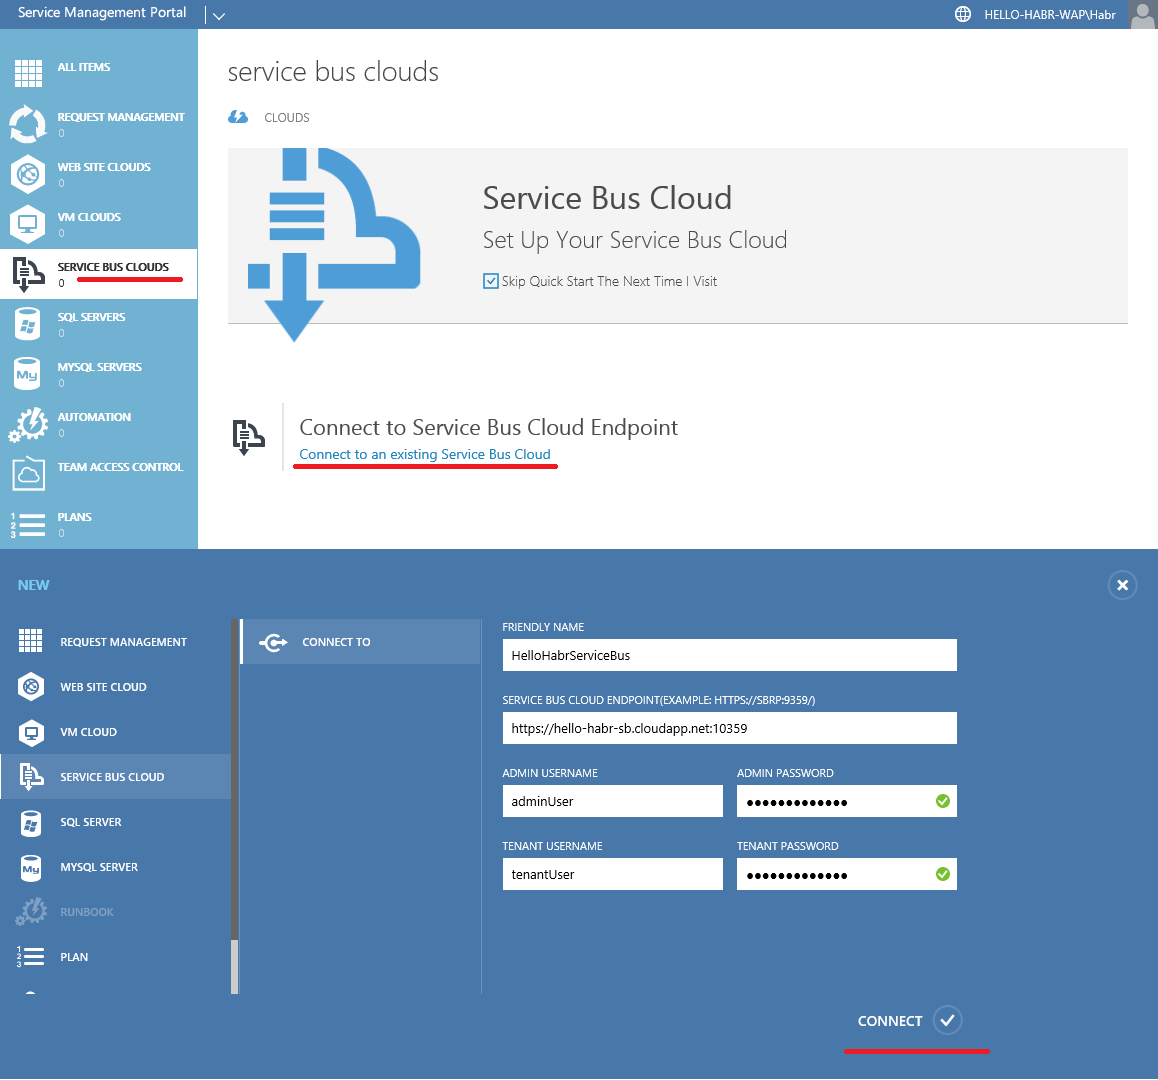
Connect to the virtual machine with Service Bus
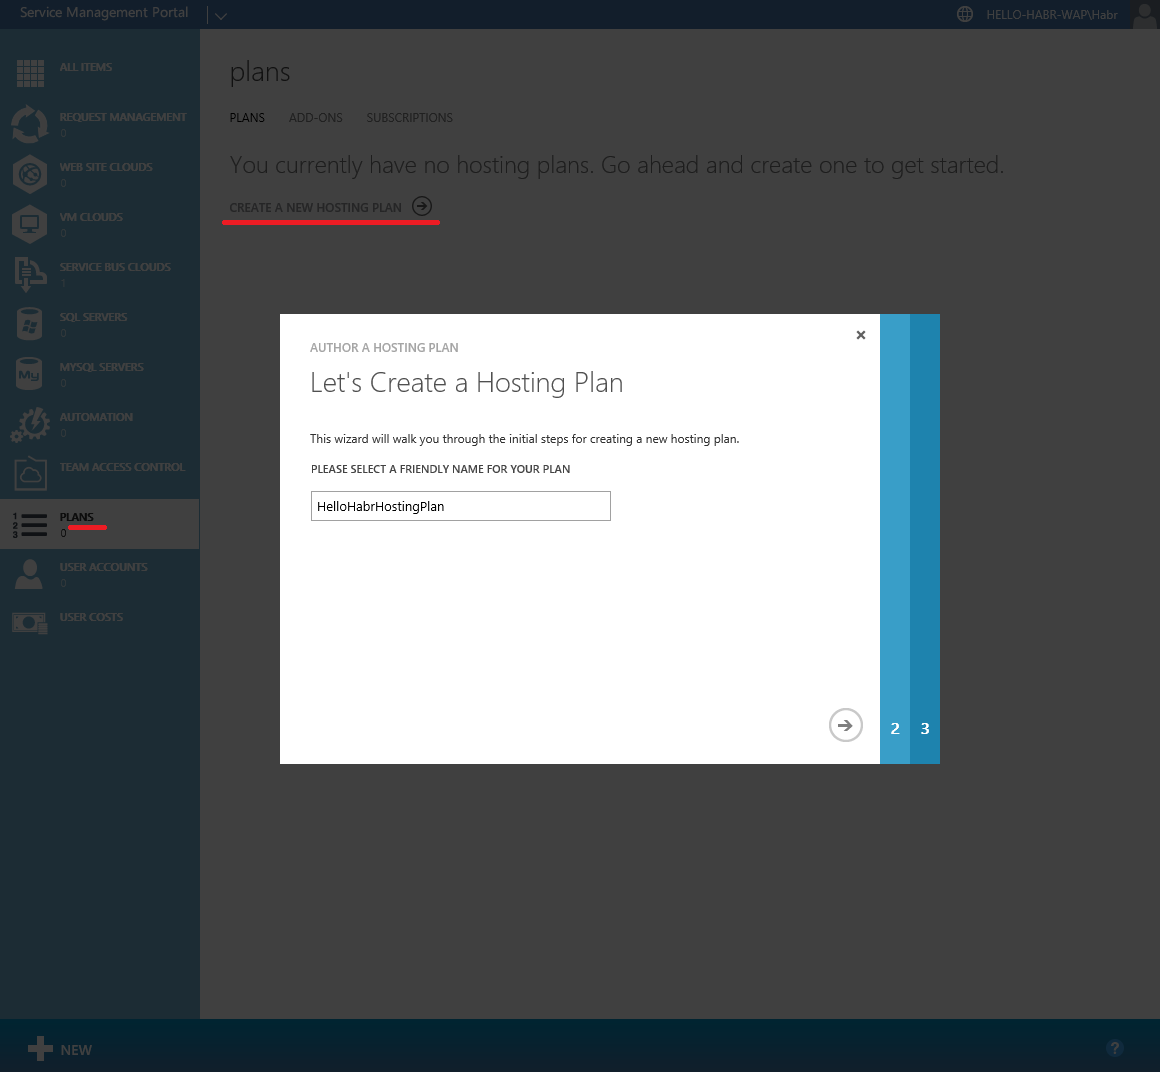
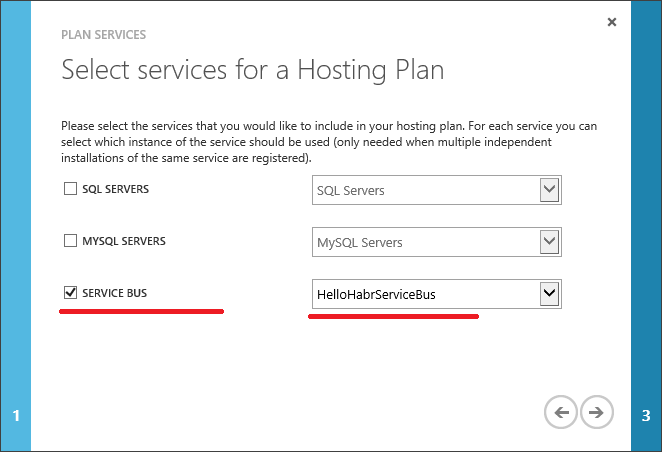
Create a Plan

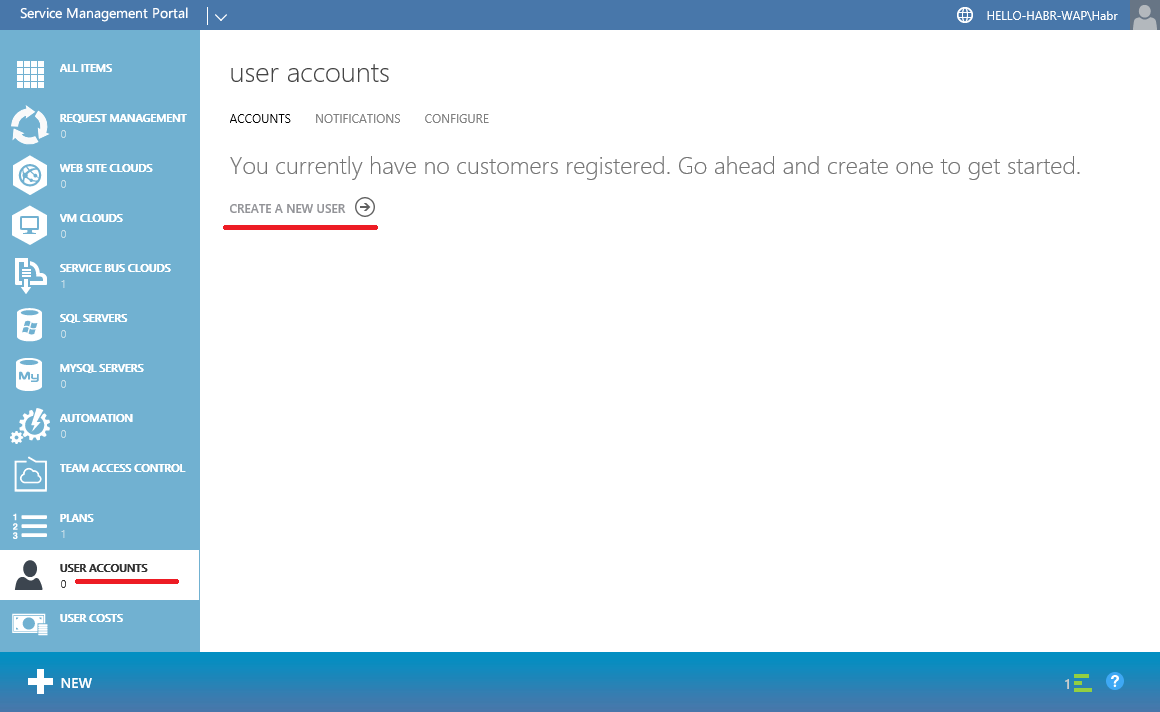
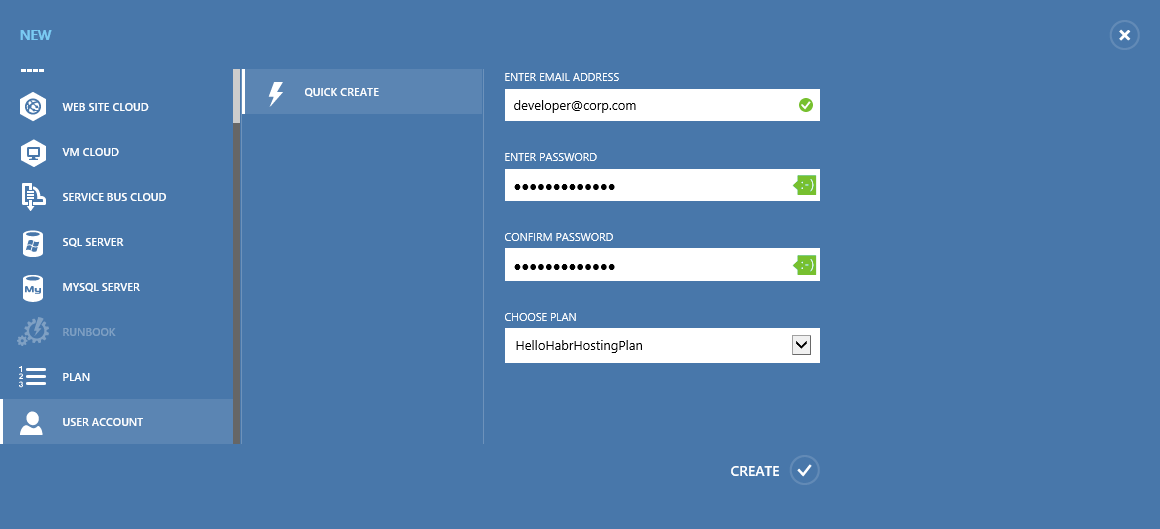
Finally, let's create a user.

Create a virtual network: hello-habr- wap

Reserve an external IP address: hello-habr- wap

Let's create another Storage account (although this is not critical): hellohabr wap

Open the ports to access the Azure Pack management portals

Get a virtual machine

Azure Pack also stores its data in the database, and in order to separate its logic from the logic of the Service Bus, we will raise another database server, but on this machine. For this we need again:
1) Microsoft SQL Server 2014 Express English (!)
2) Management Studio 2014
Before you start the installation, perform the following steps:
1) Install the .NET Framework 3.5

2) Turn off the firewall (

When installing MS SQL Server, you need to select a mixed authentication mode (this is important)

After that, you need to raise IIS for Azure Pack management portals

I will also install several components related to IIS management and security.


Now we will install Azure Pack with default parameters.
Immediately after installation, the configuration portal will open:
https: // localhost: 30101 /
Click continue.

We indicate the database in which the data will be stored Azure Pack

If everything is fine with IIS and DB, we will be informed about the successful implementation

Now we need to generate a certificate of access to the Azure Pack sites (so that only those who have a certificate have access to the sites) using the familiar utilities makecert.exe and pvk2pfx.exe .
C: \ Program Files (x86) \ Microsoft SDKs \ Windows \ v7.1A \ Bin
For server:
makecert -r -pe -n "CN=WAP Portals" -ss CA -a sha1 -sky signature -cy authority -sv WAPPortals.pvk WAPPortals.cer makecert -pe -n "CN=hello-habr-wap.cloudapp.net" -a sha1 -sky exchange -eku 1.3.6.1.5.5.7.3.1 -ic WAPPortals.cer -iv WAPPortals.pvk -sp "Microsoft RSA SChannel Cryptographic Provider" -sy 12 -sv WAPLocalServer.pvk WAPLocalServer.cer pvk2pfx -pvk WAPLocalServer.pvk -spc WAPLocalServer.cer -pfx WAPLocalServer.pfx For client:
makecert -pe -n "CN=WAPMainDeveloper" -a sha1 -sky exchange -eku 1.3.6.1.5.5.7.3.2 -ic WAPPortals.cer -iv WAPPortals.pvk -sv WAPClient.pvk WAPClient.cer pvk2pfx -pvk WAPClient.pvk -spc WAPClient.cer -pfx WAPClient.pfx -po HelloHabr2015 We import WAPPortals.cer into Certificates - Local Computer (Trusted Root CA) on the server.

We import WAPLocalServer.pfx to IIS on the server.

In my case - I did not set the password.

Install WAPClient.pfx on the server and on the clients in Certificates - Local Computer and Current User (Personal).
Add an entry to the hosts file
(C: \ Windows \ System32 \ drivers \ etc)
127.0.0.1 hello-habr-wap.cloudapp.net Now we can change the FQDN name for Azure Pack management sites (this is needed to access sites from the Internet) using PowerShell (with administrative rights)
For TenantSite
Import-Module -Name MgmtSvcConfig Set-MgmtSvcFqdn -Namespace "TenantSite" -FullyQualifiedDomainName "hello-habr-wap.cloudapp.net" -Port 30081 -Server "hello-habr-wap\SQLEXPRESS" Set-MgmtSvcFqdn -Namespace "AuthSite" -FullyQualifiedDomainName "hello-habr-wap.cloudapp.net" -Port 30071 -Server "hello-habr-wap\SQLEXPRESS" Set-MgmtSvcRelyingPartySettings -Target Tenant -MetadataEndpoint "https://hello-habr-wap.cloudapp.net:30071/FederationMetadata/2007-06/FederationMetadata.xml" -ConnectionString "Data Source=hello-habr-wap\SQLEXPRESS;User ID=sa;Password=HelloHabr2015" –DisableCertificateValidation Set-MgmtSvcIdentityProviderSettings -Target Membership -MetadataEndpoint "https://hello-habr-wap.cloudapp.net:30081/FederationMetadata/2007-06/FederationMetadata.xml" -ConnectionString "Data Source=hello-habr-wap\SQLEXPRESS;User ID=sa;Password=HelloHabr2015" –DisableCertificateValidation For adminsite
Import-Module -Name MgmtSvcConfig Set-MgmtSvcFqdn -Namespace "AdminSite" -FullyQualifiedDomainName "hello-habr-wap.cloudapp.net" -Port 30091 -Server "hello-habr-wap\SQLEXPRESS" Set-MgmtSvcFqdn -Namespace "WindowsAuthSite" -FullyQualifiedDomainName "hello-habr-wap.cloudapp.net" -Port 30072 -Server "hello-habr-wap\SQLEXPRESS" Set-MgmtSvcRelyingPartySettings -Target Admin -MetadataEndpoint "https://hello-habr-wap.cloudapp.net:30072/FederationMetadata/2007-06/FederationMetadata.xml" -ConnectionString "Data Source=hello-habr-wap\SQLEXPRESS;User ID=sa;Password=HelloHabr2015" –DisableCertificateValidation Set-MgmtSvcIdentityProviderSettings -Target Windows -MetadataEndpoint "https://hello-habr-wap.cloudapp.net:30091/FederationMetadata/2007-06/FederationMetadata.xml" -ConnectionString "Data Source=hello-habr-wap\SQLEXPRESS;User ID=sa;Password=HelloHabr2015" –DisableCertificateValidation In the settings of Azure Pack sites in IIS, change the Bindings

As a certificate, select hello-habr-wap.cloudapp.net - WAP Portals


In the SSL settings for the site - install Require SSL


Repeat this procedure for sites:
- TenantSite
- AuthSite
- AdminSite
- WindowsAuthSite
To create user-friendly DNS names, you can use the methods described in the articles: one , two, and three .
Great, we’ve reached the finish line. Now you need to configure access to the Service Bus, which is located on hello-habr-sb.cloudapp.net

Head over to AdminSite:
https://hello-habr-wap.cloudapp.net number0091
Connect to the virtual machine with Service Bus

Create a Plan


Finally, let's create a user.


Checking the service bus
Checking the service bus
Let's go to TenantSite and enter the credentials of the created user.

Create Namespace

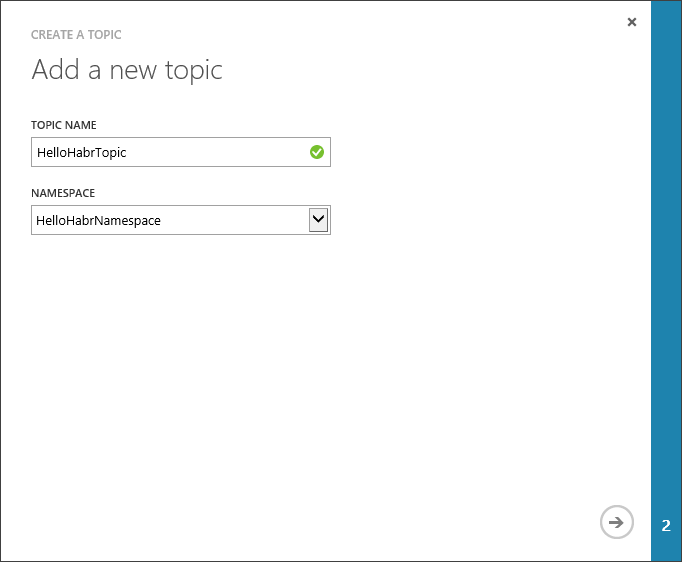
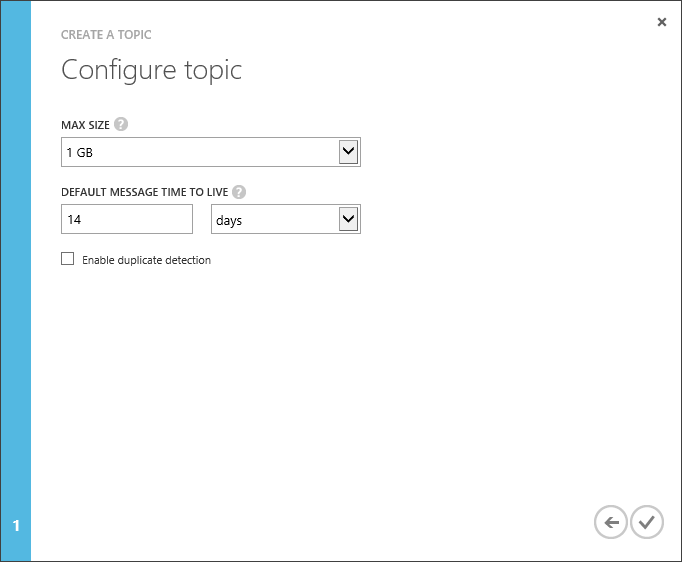
Create Topic


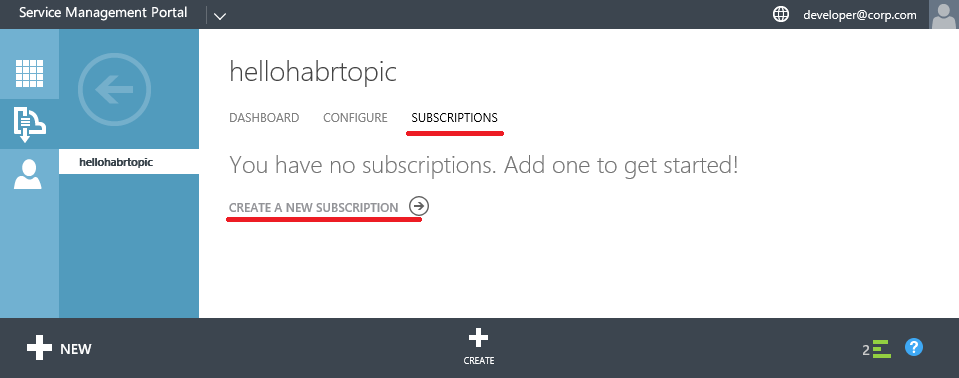
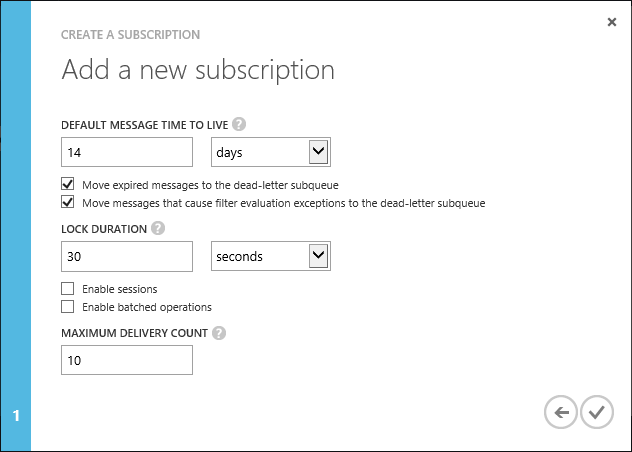
Create Subscription

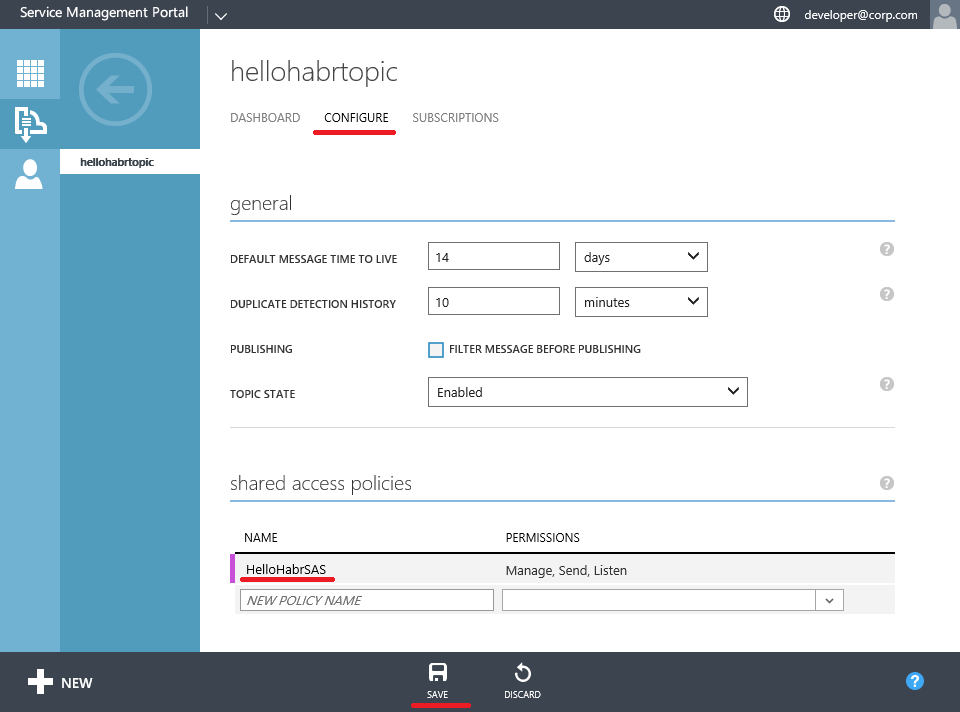
Create Shared Access Policies for Topic
Get access keys
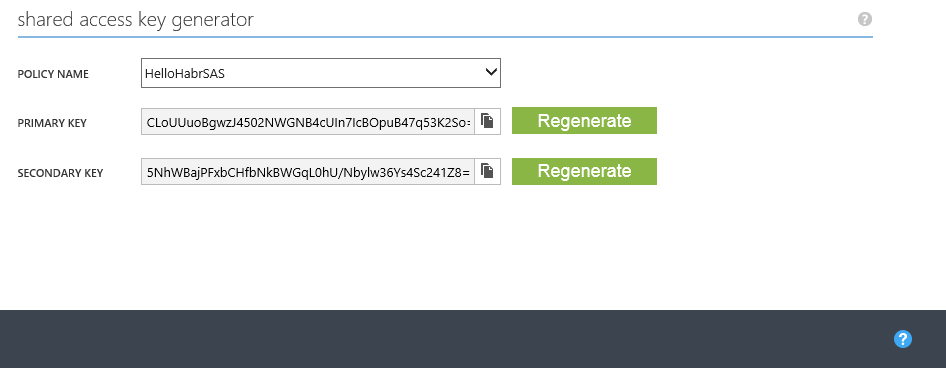
Now everything is ready for verification.
Create a simple console application. I use Visual Studio 2013 for this.
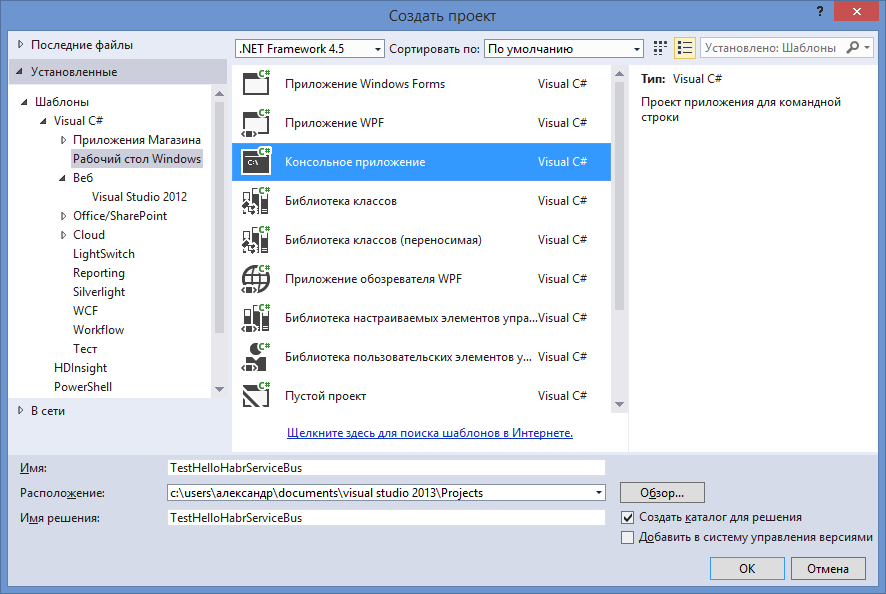
Add the necessary References using the NuGet Package Manager Console
And write a small verification code
Run and verify that messages are being sent and delivered.

https://hello-habr-wap.cloudapp.net lower0081/

Create Namespace

Create Topic


Create Subscription


Create Shared Access Policies for Topic

Get access keys

Now everything is ready for verification.
Create a simple console application. I use Visual Studio 2013 for this.

Add the necessary References using the NuGet Package Manager Console
Install-Package ServiceBus.v1_1 And write a small verification code
using Microsoft.ServiceBus; using System; using System.Collections.Generic; using System.Linq; using System.Text; using System.Threading.Tasks; using Microsoft.ServiceBus.Messaging; namespace TestHelloHabrServiceBus { class Program { static string ServerFQDN; static int HttpPort = 10355; static int TcpPort = 10354; static string ServiceNamespace = "HelloHabrNamespace"; static void Main(string[] args) { ServerFQDN = "hello-habr-sb.cloudapp.net"; ServiceBusConnectionStringBuilder connBuilder = new ServiceBusConnectionStringBuilder(); connBuilder.ManagementPort = HttpPort; connBuilder.RuntimePort = TcpPort; connBuilder.Endpoints.Add(new UriBuilder() { Scheme = "sb", Host = ServerFQDN, Path = ServiceNamespace }.Uri); connBuilder.StsEndpoints.Add(new UriBuilder() { Scheme = "https", Host = ServerFQDN, Port = HttpPort, Path = ServiceNamespace }.Uri); connBuilder.SharedAccessKeyName = "HelloHabrSAS"; connBuilder.SharedAccessKey = "CLoUUuoBgwzJ4502NWGNB4cUIn7IcBOpuB47q53K2So="; NamespaceManager namespaceManager = NamespaceManager.CreateFromConnectionString(connBuilder.ToString()); TopicClient topicClient = TopicClient.CreateFromConnectionString(connBuilder.ToString(), "HelloHabrTopic"); SubscriptionClient subscriptionClient = SubscriptionClient.CreateFromConnectionString( connBuilder.ToString(), "HelloHabrTopic", "HelloHabrSubscription", ReceiveMode.PeekLock); BrokeredMessage message = new BrokeredMessage("My Message"); // try { topicClient.Send(new BrokeredMessage("My Message")); } catch (Exception ex) { Console.WriteLine(ex.Message); } Console.WriteLine(" "); // message = subscriptionClient.Receive(TimeSpan.FromSeconds(10)); if (message != null) { Console.WriteLine("Body: " + message.GetBody<string>()); Console.WriteLine("MessageId: " + message.MessageId); message.Complete(); Console.WriteLine("The end of the message."); } Console.WriteLine("===================================="); Console.WriteLine("Program ends."); Console.ReadLine(); } } } Run and verify that messages are being sent and delivered.

I hope my experience in customizing these solutions will come in handy and will save you some time.
Source: https://habr.com/ru/post/254059/
All Articles