Device and operation of input / output ports of AVR microcontrollers. Part 2
LED connection to I / O port line
After reviewing this material, in which everything is described in great detail and in detail with many examples, you can easily master and program the input / output ports of AVR microcontrollers.
An example will be considered on an ATMega8 microcontroller.
')
We will write the program in Atmel Studio 6.0 .
We will emulate the circuit in Proteus 7 Professional .
The first example in the study of microcontrollers is the connection and control of the LED, this is the simplest and most obvious example. This example has become a classic when learning microcontrollers, like the “Hello World!” Program when learning other programming languages.
The maximum current that each input / output port is able to pass is 40 mA.
The maximum current that each line of the I / O port is capable of passing is 20 mA.
Before connecting the load, including the LED to the lines of the I / O port, you need to know that you can burn the microcontroller by exceeding the permissible load on the line of the I / O port.
To limit the current that flows through the lines of the I / O port of the microcontroller, you need to calculate and connect a resistor.
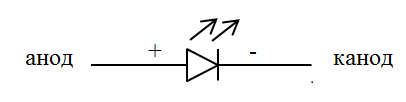
Rice: Lightning LED.
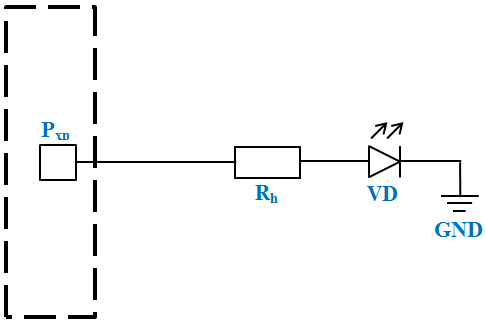
Figure: Connecting the LED anode to the microcontroller.

Figure: Connecting the LED by the cathode to the microcontroller.
The resistance of the current-limiting resistor connected to the lines of the I / O ports when the LED is connected is calculated by the formula:
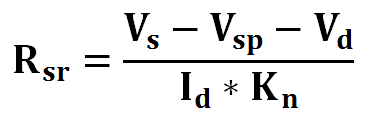
Where:
- Vs - power supply voltage;
- Vsp is the voltage drop on the line of the I / O port;
- Vd - direct voltage drop on the LED;
- Id - direct current on the LED;
- n - reliability coefficient of LED robots;
Example:
- power supply voltage - 5V ;
- direct voltage drop on the LED - 2V (It is taken from the datasheet to the LED) ;
- direct current on the LED - 10mA (It is taken from the datasheet to the LED) ;
- Reliability factor LED robots - 75% (Taken from the datasheet to the LED) ;
- voltage drop on the I / O port line - 0.5 V (Taken from the datasheet to the microcontroller: Vol (output low voltage) - if the current flows in, and Voh (output high voltage) - if the current flows out) ;

Thus, the nominal value of the resistor is R = 166.66 Om , the nearest higher resistance value is selected.
If the forward voltage of the LED is not known, the resistance can be calculated according to Ohm’s law.

Where:
- U is the voltage applied to the circuit;
- I is the rated current of the line input / output port.
Example:
- voltage applied to the circuit section - 4.5V ;
- The rated current of the I / O port line is 20 mA .

After determining the value of the resistor R , it is necessary to calculate the power P , measured in watts, which will be released in the resistor, as heat when current flows in the circuit.

Where:
- U is the voltage applied to the circuit;
- I is the rated current of the line input / output port.
Example:
- voltage applied to the circuit section - 4.5V ;
- direct current on the LED - 20mA .

Having calculated the allocated power at the resistor, we choose the nearest larger value of the resistor power. If the dissipated power of the resistor is insufficient, then it can fail.
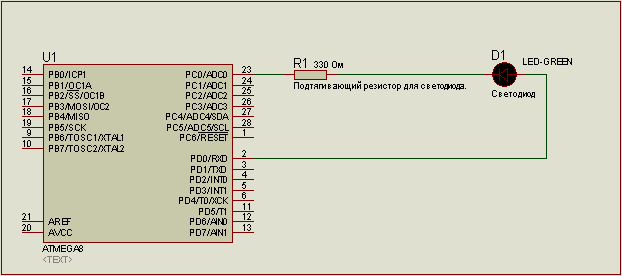
- Connecting a low-power LED anode to the line port I / O:

- connecting a low-power cathode LED to the I / O port line:

- connecting the low-power LED by the anode and cathode to the line of the I / O port:
After reviewing this material, in which everything is described in great detail and in detail with many examples, you can easily master and program the input / output ports of AVR microcontrollers.
- Part 1. Work I / O ports
- Part 2. Connecting the LED to the line I / O port
- Part 3. Connecting the transistor to the I / O port line
- Part 4. Connecting a button to the I / O port line
An example will be considered on an ATMega8 microcontroller.
')
We will write the program in Atmel Studio 6.0 .
We will emulate the circuit in Proteus 7 Professional .
The first example in the study of microcontrollers is the connection and control of the LED, this is the simplest and most obvious example. This example has become a classic when learning microcontrollers, like the “Hello World!” Program when learning other programming languages.
The maximum current that each input / output port is able to pass is 40 mA.
The maximum current that each line of the I / O port is capable of passing is 20 mA.
Before connecting the load, including the LED to the lines of the I / O port, you need to know that you can burn the microcontroller by exceeding the permissible load on the line of the I / O port.
To limit the current that flows through the lines of the I / O port of the microcontroller, you need to calculate and connect a resistor.
Rice: Lightning LED.
Figure: Connecting the LED anode to the microcontroller.
Figure: Connecting the LED by the cathode to the microcontroller.
The resistance of the current-limiting resistor connected to the lines of the I / O ports when the LED is connected is calculated by the formula:
Where:
- Vs - power supply voltage;
- Vsp is the voltage drop on the line of the I / O port;
- Vd - direct voltage drop on the LED;
- Id - direct current on the LED;
- n - reliability coefficient of LED robots;
Example:
- power supply voltage - 5V ;
- direct voltage drop on the LED - 2V (It is taken from the datasheet to the LED) ;
- direct current on the LED - 10mA (It is taken from the datasheet to the LED) ;
- Reliability factor LED robots - 75% (Taken from the datasheet to the LED) ;
- voltage drop on the I / O port line - 0.5 V (Taken from the datasheet to the microcontroller: Vol (output low voltage) - if the current flows in, and Voh (output high voltage) - if the current flows out) ;
Thus, the nominal value of the resistor is R = 166.66 Om , the nearest higher resistance value is selected.
If the forward voltage of the LED is not known, the resistance can be calculated according to Ohm’s law.
Where:
- U is the voltage applied to the circuit;
- I is the rated current of the line input / output port.
Example:
- voltage applied to the circuit section - 4.5V ;
- The rated current of the I / O port line is 20 mA .
After determining the value of the resistor R , it is necessary to calculate the power P , measured in watts, which will be released in the resistor, as heat when current flows in the circuit.
Where:
- U is the voltage applied to the circuit;
- I is the rated current of the line input / output port.
Example:
- voltage applied to the circuit section - 4.5V ;
- direct current on the LED - 20mA .
Having calculated the allocated power at the resistor, we choose the nearest larger value of the resistor power. If the dissipated power of the resistor is insufficient, then it can fail.
- Connecting a low-power LED anode to the line port I / O:
// #include <AVR/io.h> #include <stdint.h> // int main(void) { // / DDRC = 0b11111111; // "" PORTC = 0b11111111; // C .«1» ( Vcc) // while (1) { } } - connecting a low-power cathode LED to the I / O port line:
// #include <AVR/io.h> #include <stdint.h> // int main(void) { // / DDRC = 0b11111111; // "" PORTC = 0b00000000; // C .«0» ( GND) // while (1) { } } - connecting the low-power LED by the anode and cathode to the line of the I / O port:
// #include <AVR/io.h> #include <stdint.h> // int main(void) { // / DDRD = 0b11111111; // D "" PORTD = 0b11111111; // D .«1» ( Vcc) DDRC = 0b11111111; // C "" PORTC = 0b00000000; // C .«0» ( GND) // while (1) { } } Source: https://habr.com/ru/post/253961/
All Articles