DlangUI - Cross-platform GUI for D (Part 1)
I like the language D. I have been following its development for a long time. For D, there are several GUI libraries and binders, but I decided to reinvent my bike.
I want to talk about your project DlangUI . I hope that he will be useful to someone.
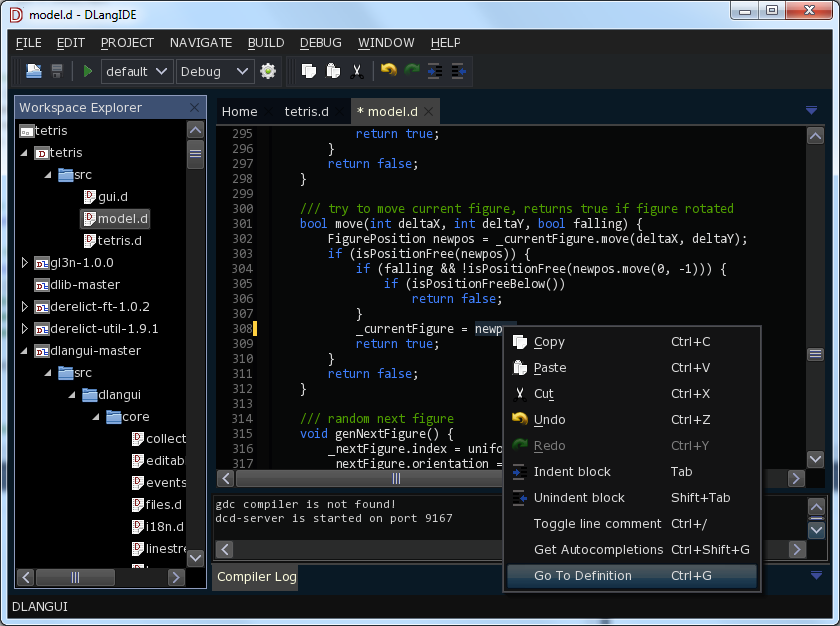
On Cddv screenshot DlangIDE - an application written in DlangUI.
')
For D there are many GUI libraries. A complete list can be found on wiki.dlang.org
If binding to GTK, Qt, wxWidgets, FLTK, and even SWT port from Java to D (DWT). But they pull a lot of dependencies with them, it’s difficult to expand the set of widgets, change their appearance.
Native, written in D, DFL and DGUI - work only under Windows.
Therefore, writing your own bike GUI is not such a stupid idea.
To build and run the application on DlangUI, we need a D compiler (for example, dmd ) and DUB (build tool and dependency manager). Download and install them if they are not already there.
Create a directory for the project, in it create a project file for DUB - dub.json
Also, in the src subdirectory, create a file src / helloworld.d with the following contents:
Now we can run the application. In the command line, in the project directory with dub.json run the command:
Upon successful compilation, the application will start immediately. Window with a single button:

You can also see examples from dlangui (demo of almost all example1 widgets and the tetris game):
Another application - DlangIDE:
Complicate our application. Add some widgets.
We will use simple widgets:
An example of creating a simple text button:
Here “btn1” is the widget identifier, usually used to search for it in the parent widget or to distinguish one widget from another in the general event handler.
“Button 1” d - button text. Note the d suffix is utf32 - dstring. Usually, in DlangUI widget constructors, the text itself can be transferred as text - as utf32 dstring, or the identifier of a string resource as a normal string - to support translation of the interface into several languages.
Widgets can have nested widgets.
Layouts - container widgets for aligning other widgets. Similar to those used in the Android UI:
Creating a VerticalLayout and adding a pair of buttons to it:
Let's correct our example - we will make a form with a complex structure.
Here's what we got:

Consider the signal processing on the example of the onClick signal
Add handlers for clicking on buttons - let them switch the interface theme.
In our example, we are changing the piece of code from RadioButton to VerticalLayout.
Here's what happened:
Explanations:
onClickListener is a signal available in any widget. Here is how it is described:
The handler can be a delegate of the appropriate type.
You can connect an event handler in different ways.
Sample onClick Handler - Regular Delegate
An example of an onClick processor - class method
An example of the onClick processor - a class that defines the interface used in determining the signal
Other useful signals from the Widget class:
These and many other properties can be set both directly and as styles (defined in the file - theme).
You can assign a style using the styleId property. For example, we change the style of the header when selecting the interface theme.
Example: add padding to the main widget and make it a translucent yellow background.
In TableLayout, let's assign a background image “btn_default.png”. Resource Id is the name of the file with no extension. The .9.png extensions denote the nine-patch, a scalable version, as in Android .
Also add padding - indent for nested widgets.
In the TextWidget header for TableLayout, we change the font size and color.
Here is what happened:
The same program running on Ubuntu: only the window frame and fonts differ.
The size of helloworld.exe, built by dmd2 under windows (dub build - build = release) is 1.4Mb, 200K of which are resources.
In the presence of libfreetype-6.dll (700K) and zlib1.dll (84K) - DUB is automatically copied to the bin directory - uses FreeType to render fonts, otherwise win32 API.
Binary file built in Ubuntu x64 using dmd - 4Mb.
Do I need the next part? What else to tell? Write in the comments ...
I want to talk about your project DlangUI . I hope that he will be useful to someone.
On Cddv screenshot DlangIDE - an application written in DlangUI.
')
Features:
- Cross-platform - supported by Windows, Linux, Mac OSX; ease of porting to other platforms
- Written in D - easily expanded
- Using Layouts for Positioning Interface Elements
- Scaling of fonts and icons in the application, depending on the screen resolution
- Unicode support
- Internationalization - support translate UI into multiple languages
- Hardware acceleration using OpenGL (optional)
- Ability to render widgets over the OpenGL scene (for example, for the in-game UI)
- Small size of executable file
- The appearance of the interface is configured using themes (two standard themes - light and dark)
- Embedding resources in an executable file
- Open source, licensed under Boost License 1.0
A couple more screenshots
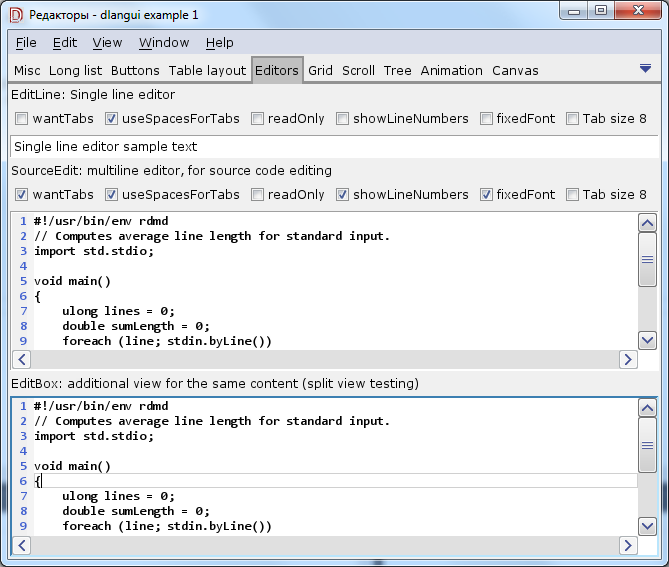
DlangUI demo - example1
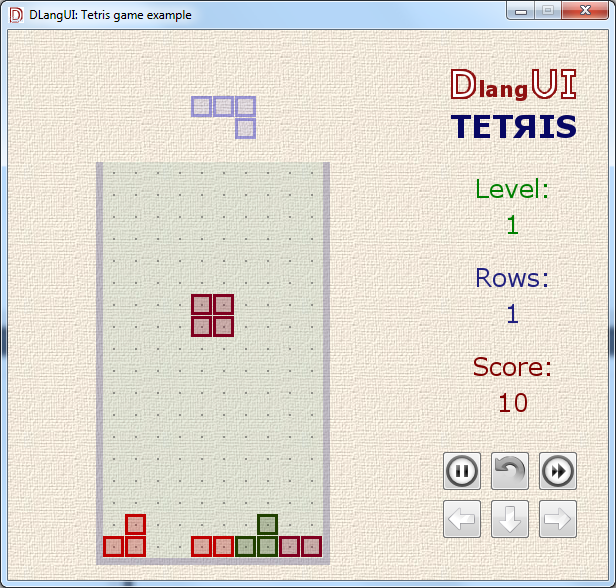
Demo DlangUI - Tetris
Why do we need another GUI library?
For D there are many GUI libraries. A complete list can be found on wiki.dlang.org
If binding to GTK, Qt, wxWidgets, FLTK, and even SWT port from Java to D (DWT). But they pull a lot of dependencies with them, it’s difficult to expand the set of widgets, change their appearance.
Native, written in D, DFL and DGUI - work only under Windows.
Therefore, writing your own bike GUI is not such a stupid idea.
Let's get acquainted with Hello, World
To build and run the application on DlangUI, we need a D compiler (for example, dmd ) and DUB (build tool and dependency manager). Download and install them if they are not already there.
Create a directory for the project, in it create a project file for DUB - dub.json
{ "name": "helloworld", "targetPath": "bin", "targetName": "helloworld", "targetType": "executable", "dependencies": { "dlangui": "~master", } } Also, in the src subdirectory, create a file src / helloworld.d with the following contents:
module app; // dlangui import dlangui; // main WinMain mixin APP_ENTRY_POINT; // DlangUI - main extern (C) int UIAppMain(string[] args) { // Window window = Platform.instance.createWindow("DlangUI example - HelloWorld", null); // window.mainWidget = (new Button()).text("Hello, world!"d).margins(Rect(20,20,20,20)); // window.show(); // return Platform.instance.enterMessageLoop(); } An easier way to create a new DUB project is with dub init
There is a more convenient way to create a new project DUB. Use the command
DUB will create a directory with the specified name, the file dub.json, .gitignore and source / app.d
The initial content of dub.json:
Just add the dlangui dependency here.
Replace the contents of the app.d file with the helloworld code
There is a more convenient way to create a new project DUB. Use the command
dub init helloworld DUB will create a directory with the specified name, the file dub.json, .gitignore and source / app.d
The initial content of dub.json:
{ "name": "helloworld", "description": "A minimal D application.", "copyright": "Copyright © 2015, username", "authors": ["username"], "dependencies": { } } Just add the dlangui dependency here.
"dependencies": { "dlangui": "~master", } Replace the contents of the app.d file with the helloworld code
Now we can run the application. In the command line, in the project directory with dub.json run the command:
dub run Upon successful compilation, the application will start immediately. Window with a single button:
You can also see examples from dlangui (demo of almost all example1 widgets and the tetris game):
dub fetch dlangui dub run dlangui:example1 dub run dlangui:tetris Another application - DlangIDE:
dub fetch dlangide dub run dlangide Widgets & layouts
Complicate our application. Add some widgets.
We will use simple widgets:
- TextWidget - text
- Button - text button
- ImageButton - button with a picture
- ImageTextButton - a button with a picture and text
- CheckBox - clear from the title
- RadioButton - clear from the title
- ImageWidget - image
- EditLine - single line editor
- ComboBox - combo box - to select an item from the dropdown list
An example of creating a simple text button:
auto btn = new Button("btn1", "Button 1"d); Here “btn1” is the widget identifier, usually used to search for it in the parent widget or to distinguish one widget from another in the general event handler.
“Button 1” d - button text. Note the d suffix is utf32 - dstring. Usually, in DlangUI widget constructors, the text itself can be transferred as text - as utf32 dstring, or the identifier of a string resource as a normal string - to support translation of the interface into several languages.
Widgets can have nested widgets.
Layouts - container widgets for aligning other widgets. Similar to those used in the Android UI:
- VerticalLayout - arrange nested widgets vertically
- HorizontalLayout - arrange nested widgets vertically
- TableLayout - arrange nested widgets in several columns, as in the table
Creating a VerticalLayout and adding a pair of buttons to it:
auto vlayout = new VerticalLayout(); // vlayout.addChild(new RadioButton("radio1", "Radio Button 1"d)); vlayout.addChild(new RadioButton("radio2", "Radio Button 2"d)); Let's correct our example - we will make a form with a complex structure.
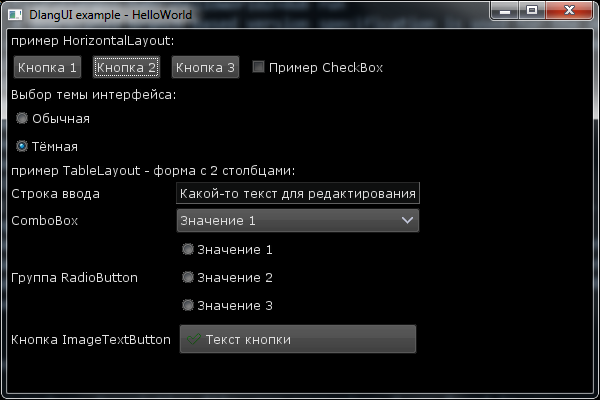
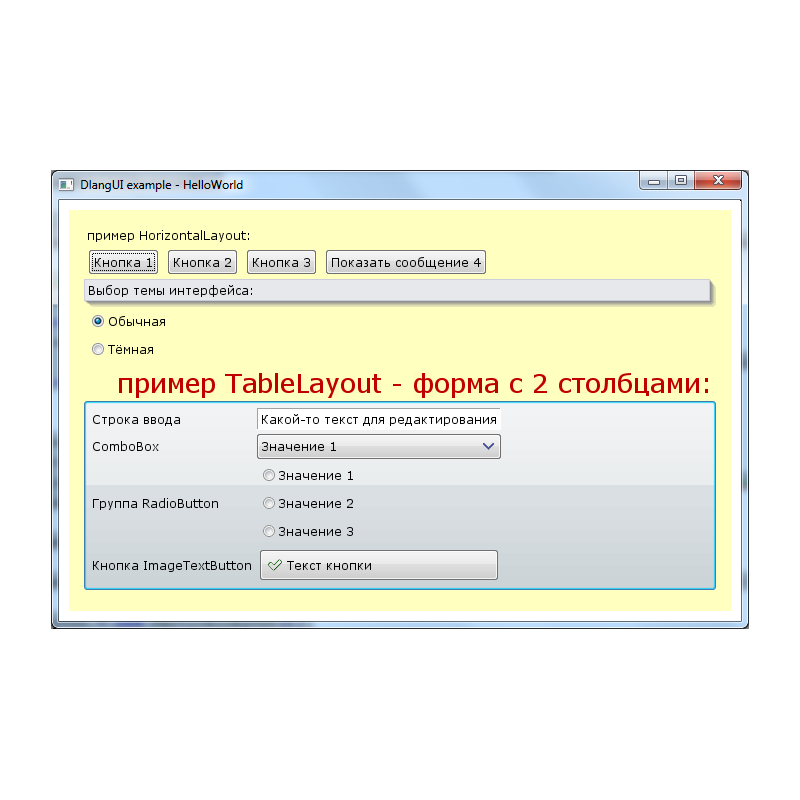
module app; // dlangui import dlangui; // main WinMain mixin APP_ENTRY_POINT; // DlangUI - main extern (C) int UIAppMain(string[] args) { // Window window = Platform.instance.createWindow("DlangUI example - HelloWorld", null); // - , auto mainWidget = new VerticalLayout(); mainWidget.addChild(new TextWidget(null, " HorizontalLayout:"d)); // auto hlayout = new HorizontalLayout(); // hlayout.addChild(new Button("btn1", " 1"d)); hlayout.addChild(new Button("btn2", " 2"d)); hlayout.addChild(new Button("btn3", " 3"d)); hlayout.addChild(new CheckBox("btn4", " CheckBox"d)); mainWidget.addChild(hlayout); mainWidget.addChild(new TextWidget(null, " VerticalLayout:"d)); // auto vlayout = new VerticalLayout(); // vlayout.addChild(new RadioButton("radio1", "Radio Button 1"d)); vlayout.addChild(new RadioButton("radio2", "Radio Button 2"d)); vlayout.addChild(new RadioButton("radio3", "Radio Button 3"d)); mainWidget.addChild(vlayout); mainWidget.addChild(new TextWidget(null, " TableLayout - 2 :"d)); // auto tlayout = new TableLayout(); // / tlayout.colCount = 2; tlayout.addChild(new TextWidget(null, " "d)); tlayout.addChild(new EditLine("edit1", "- "d)); tlayout.addChild(new TextWidget(null, "ComboBox"d)); tlayout.addChild((new ComboBox("combo1", [" 1"d, " 2"d, " 3"d])).selectedItemIndex(0)); tlayout.addChild(new TextWidget(null, " RadioButton"d)); // Layout Layout: auto radiogroup = new VerticalLayout(); radiogroup.addChild(new RadioButton("rb1", " 1"d)); radiogroup.addChild(new RadioButton("rb2", " 2"d)); radiogroup.addChild(new RadioButton("rb3", " 3"d)); tlayout.addChild(radiogroup); tlayout.addChild(new TextWidget(null, " ImageTextButton"d)); tlayout.addChild(new ImageTextButton("btn_ok", "dialog-ok-apply", " "d)); mainWidget.addChild(tlayout); // window.mainWidget = mainWidget; // window.show(); // return Platform.instance.enterMessageLoop(); } Here's what we got:
Processing signals (events) from widgets
Consider the signal processing on the example of the onClick signal
Add handlers for clicking on buttons - let them switch the interface theme.
In our example, we are changing the piece of code from RadioButton to VerticalLayout.
mainWidget.addChild(new TextWidget(null, " :"d)); auto vlayout = new VerticalLayout(); // addChild() , , // . vlayout.addChild(new RadioButton("radio1", ""d)).checked(true).onClickListener = delegate(Widget src) { platform.instance.uiTheme = "theme_default"; return true; }; vlayout.addChild(new RadioButton("radio2", ""d)).onClickListener = delegate(Widget src) { platform.instance.uiTheme = "theme_dark"; return true; }; mainWidget.addChild(vlayout); Here's what happened:
Explanations:
onClickListener is a signal available in any widget. Here is how it is described:
/// interface - slot for onClick interface OnClickHandler { bool onClick(Widget source); } //..... class Widget { //... Signal!OnClickHandler onClickListener; //... } The handler can be a delegate of the appropriate type.
You can connect an event handler in different ways.
Sample onClick Handler - Regular Delegate
auto button1 = new Button("btn1", " 1"d); button1.onClickListener = delegate(Widget src) { window.showMessageBox(UIString(" onClick"d), UIString("\ndelegate"d)); return true; }; An example of an onClick processor - class method
class MyOnClickHandler1 { bool onButtonClick(Widget src) { src.window.showMessageBox(UIString(" onClick"d), UIString(" MyOnClickHandler1.onClick\n id="d ~ to!dstring(src.id))); return true; } } auto memberFunctionHandler = new MyOnClickHandler1(); auto button2 = new Button("btn2", " 2"d); button2.onClickListener = &memberFunctionHandler.onButtonClick; hlayout.addChild(button2); An example of the onClick processor - a class that defines the interface used in determining the signal
// onClick - , class MyOnClickHandler2 : OnClickHandler { override bool onClick(Widget src) { src.window.showMessageBox(UIString(" onClick"d), UIString(" MyOnClickHandler2.onClick\n id="d ~ to!dstring(src.id))); return true; } } auto interfaceHandler = new MyOnClickHandler2(); auto button4 = new Button("btn4", " 4"d); button2.onClickListener = interfaceHandler; // onClick OnClickHandler Other useful signals from the Widget class:
- onCheckChangeListener - the checked state is changed (for example, for CheckBox, RadioButton)
- onFocusChangeListener - changed the focus state of this widget
- onKeyListener - intercepting keyboard events
- onMouseListener - capture mouse events
Commonly used widget properties
- margins - indent from adjacent widgets or container borders (the widget's background is indented with margins)
- padding - indent from the borders of the widget to its internal elements
- backgroundColor - background color (32 bit uint, 0xAARRGGBB)
- backgroundImageId - background image - resource id
- textColor - text color (32 bit uint, 0xAARRGGBB)
- fontSize - font size
These and many other properties can be set both directly and as styles (defined in the file - theme).
You can assign a style using the styleId property. For example, we change the style of the header when selecting the interface theme.
mainWidget.addChild(new TextWidget(null, " :"d)).styleId("POPUP_MENU"); Example: add padding to the main widget and make it a translucent yellow background.
// 10 , 15 mainWidget.margins(Rect(10, 10, 10, 10)).padding(Rect(15, 15, 15, 15)); mainWidget.backgroundColor(0xC0FFFF00); // In TableLayout, let's assign a background image “btn_default.png”. Resource Id is the name of the file with no extension. The .9.png extensions denote the nine-patch, a scalable version, as in Android .
Also add padding - indent for nested widgets.
tlayout.backgroundImageId("btn_default"); // - btn_default.9.png tlayout.padding(Rect(5, 5, 5, 5)); // - 5 In the TextWidget header for TableLayout, we change the font size and color.
tlayout.backgroundImageId("btn_default"); // - btn_default.9.png tlayout.padding(Rect(5, 5, 5, 5)); // - 5 Here is what happened:
The current helloworld.d code is:
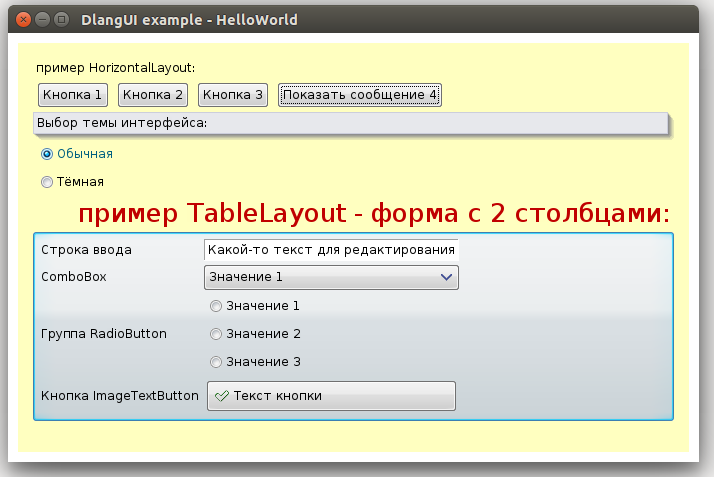
module app; // dlangui import dlangui; // main WinMain mixin APP_ENTRY_POINT; // DlangUI - main extern (C) int UIAppMain(string[] args) { // , - 800x600 Window window = Platform.instance.createWindow("DlangUI example - HelloWorld", null, WindowFlag.Resizable, 600, 400); // - , auto mainWidget = new VerticalLayout(); // 10 , 15 mainWidget.margins(Rect(10, 10, 10, 10)).padding(Rect(15, 15, 15, 15)); mainWidget.backgroundColor(0xC0FFFF00); // mainWidget.addChild(new TextWidget(null, " HorizontalLayout:"d)); // auto hlayout = new HorizontalLayout(); // // onClick - auto button1 = new Button("btn1", " 1"d); button1.onClickListener = delegate(Widget src) { window.showMessageBox(UIString(" onClick"d), UIString("\ndelegate"d)); return true; }; hlayout.addChild(button1); // onClick - class MyOnClickHandler1 { bool onButtonClick(Widget src) { src.window.showMessageBox(UIString(" onClick"d), UIString(" MyOnClickHandler1.onClick\n id="d ~ to!dstring(src.id))); return true; } } auto memberFunctionHandler = new MyOnClickHandler1(); auto button2 = new Button("btn2", " 2"d); button2.onClickListener = &memberFunctionHandler.onButtonClick; hlayout.addChild(button2); // hlayout.addChild(new Button("btn3", " 3"d)).onClickListener = &memberFunctionHandler.onButtonClick; // onClick - , class MyOnClickHandler2 : OnClickHandler { override bool onClick(Widget src) { src.window.showMessageBox(UIString(" onClick"d), UIString(" MyOnClickHandler2.onClick\n id="d ~ to!dstring(src.id))); return true; } } auto interfaceHandler = new MyOnClickHandler2(); auto button4 = new Button("btn4", " 4"d); button2.onClickListener = interfaceHandler; // onClick OnClickHandler hlayout.addChild(button4); mainWidget.addChild(hlayout); mainWidget.addChild(new TextWidget(null, " :"d)).styleId("POPUP_MENU"); auto vlayout = new VerticalLayout(); vlayout.addChild(new RadioButton("radio1", ""d)).checked(true).onClickListener = delegate(Widget src) { platform.instance.uiTheme = "theme_default"; return true; }; vlayout.addChild(new RadioButton("radio2", ""d)).onClickListener = delegate(Widget src) { platform.instance.uiTheme = "theme_dark"; return true; }; mainWidget.addChild(vlayout); // , mainWidget.addChild(new TextWidget(null, " TableLayout - 2 :"d)).textColor(0xC00000).fontSize(26).alignment(Align.Right); auto tlayout = new TableLayout(); // / tlayout.backgroundImageId("btn_default"); // - btn_default.9.png tlayout.padding(Rect(5, 5, 5, 5)); // - 5 tlayout.colCount = 2; tlayout.addChild(new TextWidget(null, " "d)); tlayout.addChild(new EditLine("edit1", "- "d)); tlayout.addChild(new TextWidget(null, "ComboBox"d)); tlayout.addChild((new ComboBox("combo1", [" 1"d, " 2"d, " 3"d])).selectedItemIndex(0)); tlayout.addChild(new TextWidget(null, " RadioButton"d)); // Layout Layout: auto radiogroup = new VerticalLayout(); radiogroup.addChild(new RadioButton("rb1", " 1"d)); radiogroup.addChild(new RadioButton("rb2", " 2"d)); radiogroup.addChild(new RadioButton("rb3", " 3"d)); tlayout.addChild(radiogroup); tlayout.addChild(new TextWidget(null, " ImageTextButton"d)); tlayout.addChild(new ImageTextButton("btn_ok", "dialog-ok-apply", " "d)); mainWidget.addChild(tlayout); // window.mainWidget = mainWidget; // window.show(); // return Platform.instance.enterMessageLoop(); } The same program running on Ubuntu: only the window frame and fonts differ.
The size of helloworld.exe, built by dmd2 under windows (dub build - build = release) is 1.4Mb, 200K of which are resources.
In the presence of libfreetype-6.dll (700K) and zlib1.dll (84K) - DUB is automatically copied to the bin directory - uses FreeType to render fonts, otherwise win32 API.
Binary file built in Ubuntu x64 using dmd - 4Mb.
Other useful widgets
- EditBox - multiline editor
- TreeWidget - tree
- StringGrid - table, similar to Excel
- TabWidget - tabs - to select pages
- AppFrame is the base class of the main widget of the window with menus, toolbars and a status line, for the convenience of writing such applications.
- Scrollbar
- Toolbar
- StatusLine
- ScrollWidget - implements scrolling of the widget attached to it if the dimensions exceed the available space
- DockHost, DockWidget - for applications with dock widgets on the edges of the main window widget (as in the IDE)
Links
- Project page on GitHub
- Online Documentation
- Bugtracker
- Screenshots
- DlangIDE project page on GitHub
- Chat in gitter
To be continued...
Do I need the next part? What else to tell? Write in the comments ...
Source: https://habr.com/ru/post/253923/
All Articles