Manage Azure virtual machines with PowerShell
PowerShell is a very powerful tool, you just need to know how to use it properly. It is also important to note that several PowerShell now provides more functionality than the use of graphical controls: everything that can be done from the graphical interface can be implemented using PowerShell cmdlets. On the contrary, this rule does not work. In the case of Microsoft Azure, using PowerShell, you can do all the same actions as through the management portal, except for creating the subscription itself. Using Azure PowerShell allows you to control and automate the deployment of workloads and their management. In this article we will talk about how you can use Azure PowerShell to manage virtual machines.
You should start by installing the PowerShell module itself for managing Azure. The installation process is extremely simple. You need to download the Microsoft Web Platform Installer , run it and install Microsoft Azure PowerShell from the Microsoft Azure SDK. In addition to the modules, a customized Azure PowerShell console will also be installed.

The next step is to connect to your Azure subscription. You can connect in two ways:
Completely forgot to say. You can use Azure PowerShell to manage your Azure subscription. But using several different PowerShell is not always convenient. You can easily import the Azure PowerShell module into Windows PowerShell. If you want to know how, look under the spoiler.
')
After it is executed, a window will appear in which you will need to specify the email address associated with the account under which you want to log in.

Next you will need to enter your account password. Azure will authenticate you to the system, save the access data and close the window. In PowerShell, you can see the result of the cmdlet:

Azure PowerShell is now successfully connected to your subscription and you can get started.
This cmdlet will open a webpage in the Azure Management Portal, from which you can download your subscription information.

This is where the process of connecting Azure PowerShell to your subscription is complete, and you can proceed to further work.
Before you start working with a virtual machine in Azure, you need to create it. To do this, follow some simple steps.
First you need to set up your Azure subscription and storage account. In order to find out the name of the subscription, use the cmdlet:
Storage Account Name:

Now install:

Now you need to select the ImageFamily or label value for the specific image corresponding to the Azure virtual machine you want to create. Here are some sample images from the Azure Management Portal gallery.

You can see the list of available images using the cmdlet:
Sometimes, the image name is hidden in the Label property, and not in ImageFamily . Therefore, if you did not find the desired image after searching for ImageFamily, try running the following cmdlet:
Once we have decided on the image, you can begin to create a virtual machine. To do this, I recommend using the script, although you can also enter commands line by line in the usual Windows PowerShell.
Now I will explain what happens in this script.
First, we specify the name of the virtual machine image that we got when we ran the Get-AzureVMImage | cmdlet | select ImageFamily –Unique . With the same success it can be replaced with the name Label . Next, we select the latest image that is available in the Microsoft Azure Gallery from this image family.
The next step is to specify the name of the future virtual machine, select its size (you can choose from Small, Medium, Large, ExtraLarge, A5, A6, A7, A8, A9 ), specify the name of the availability group. In conclusion, based on all these properties, we form the virtual machine itself.
Next, we specify the login and password for the local administrator:
When executing the script, a window will appear in which we will have to enter the login and password:
Finally, using the last cmdlet, we create a new virtual machine in a new cloud service:
We specify the desired location and we can choose from Central US, East US, East US 2, South Central US, West US, North Europe, West Europe, East Asia, Southeast Asia .
Also, when you run this cmdlet, you will need to enter a name for the cloud service being created. We are waiting for a few minutes and the Azure virtual machine is ready!

We can see the same virtual machine and portal:

If creating a virtual machine requires a specific sequence of steps, then only one cmdlet is sufficient to delete it:
One of the situations when it is more convenient to use Azure PowerShell to manage a virtual machine than to access the Azure Management Portal is to turn it on and off. This task is solved by two scripts:
running virtual machine
virtual machine shutdown
We reviewed the main examples of virtual machine management using Microsoft Azure. A detailed list of Azure PowerShell cmdlets can be found here .
I hope the information in this article will be useful to you!
Good luck in using PowerShell to customize your systems!
Install Azure PowerShell and connect to subscription
You should start by installing the PowerShell module itself for managing Azure. The installation process is extremely simple. You need to download the Microsoft Web Platform Installer , run it and install Microsoft Azure PowerShell from the Microsoft Azure SDK. In addition to the modules, a customized Azure PowerShell console will also be installed.
The next step is to connect to your Azure subscription. You can connect in two ways:
- Azure Active Directory . This authentication method is recommended because it facilitates the process of controlling access to your Azure subscription. In this method, you use your Microsoft account (or your work account) to login. Azure Active Directory validates the data and returns an access token, which allows you to manage your Azure subscription using PowerShell.
- Certificate of Management. In case you use a management certificate, it is important to remember that access to your subscription using PowerShell will be valid as long as your certificate is valid. However, this method is more complicated in the case of managing the general access to a subscription. In addition, the Azure Resource Manager API does not accept certificate authentication.
Completely forgot to say. You can use Azure PowerShell to manage your Azure subscription. But using several different PowerShell is not always convenient. You can easily import the Azure PowerShell module into Windows PowerShell. If you want to know how, look under the spoiler.
')
How to import an Azure PowerShell module into Windows PowerShell
We start Windows PowerShell with Administrator rights and use only two cmdlets:
Using the first cmdlet, we determine that all downloaded PowerShell scripts must be signed by a trusted publisher before they are launched. Well, the second cmdlet we import the Azure PowerShell module into Windows PowerShell.

Set-ExecutionPolicy RemoteSigned Import-Module “C:\Program Files (x86)\Microsoft SDKs\Azure\PowerShell\ServiceManagement\Azure\Azure.psd1” Using the first cmdlet, we determine that all downloaded PowerShell scripts must be signed by a trusted publisher before they are launched. Well, the second cmdlet we import the Azure PowerShell module into Windows PowerShell.
Azure AD
- Launch Azure PowerShell Console
- Run the cmdlet
Add-AzureAccount After it is executed, a window will appear in which you will need to specify the email address associated with the account under which you want to log in.
Next you will need to enter your account password. Azure will authenticate you to the system, save the access data and close the window. In PowerShell, you can see the result of the cmdlet:
Azure PowerShell is now successfully connected to your subscription and you can get started.
Management certificate
- Access the Azure Management Portal and launch the Azure PowerShell Console
- In the console, enter the cmdlet:
Get-AzurePublishSettingsFile This cmdlet will open a webpage in the Azure Management Portal, from which you can download your subscription information.
- Download and save the file “*. publishsettings ” , which contains a certificate of management.
- Now import the file using the cmdlet
Import-AzurePublishSettingsFile C:\Users\<UserProfile>\Downloads\<SubscriptionName>-credentials.publishsettings This is where the process of connecting Azure PowerShell to your subscription is complete, and you can proceed to further work.
Creating virtual machines
Before you start working with a virtual machine in Azure, you need to create it. To do this, follow some simple steps.
First you need to set up your Azure subscription and storage account. In order to find out the name of the subscription, use the cmdlet:
Get-AzureSubscription Storage Account Name:
Get-AzureStorageAccount Now install:
Select-AzureSubscription –SubscriptionName “Visual Studio Ultimate with MSDN” Set-AzureSubscription –SubscriptionName “Visual Studio Ultimate with MSDN” –CurrentStorageAccountName “portalvhdsbs5v2wvyhthcq” Now you need to select the ImageFamily or label value for the specific image corresponding to the Azure virtual machine you want to create. Here are some sample images from the Azure Management Portal gallery.
You can see the list of available images using the cmdlet:
Get-AzureVMImage | select ImageFamily –Unique Sometimes, the image name is hidden in the Label property, and not in ImageFamily . Therefore, if you did not find the desired image after searching for ImageFamily, try running the following cmdlet:
Get-AzureVMImage | select Label -Unique Once we have decided on the image, you can begin to create a virtual machine. To do this, I recommend using the script, although you can also enter commands line by line in the usual Windows PowerShell.
$family="Windows Server 2012 R2 Datacenter" $image=Get-AzureVMImage | where { $_.ImageFamily -eq $family } | sort PublishedDate -Descending | select -ExpandProperty ImageName -First 1 $vmname="mvademovm" $vmsize="Small" $availset="mvademovm_avs" $vm1=New-AzureVMConfig -Name $vmname -InstanceSize $vmsize -ImageName $image -AvailabilitySetName $availset $cred=Get-Credential -Message "Type the name and password of the local administrator account." $vm1 | Add-AzureProvisioningConfig -Windows -AdminUsername $cred.GetNetworkCredential().Username -Password $cred.GetNetworkCredential().Password New-AzureVM –Location "North Europe" -VMs $vm1 Now I will explain what happens in this script.
First, we specify the name of the virtual machine image that we got when we ran the Get-AzureVMImage | cmdlet | select ImageFamily –Unique . With the same success it can be replaced with the name Label . Next, we select the latest image that is available in the Microsoft Azure Gallery from this image family.
$family="Windows Server 2012 R2 Datacenter" $image=Get-AzureVMImage | where { $_.ImageFamily -eq $family } | sort PublishedDate -Descending | select -ExpandProperty ImageName -First 1 The next step is to specify the name of the future virtual machine, select its size (you can choose from Small, Medium, Large, ExtraLarge, A5, A6, A7, A8, A9 ), specify the name of the availability group. In conclusion, based on all these properties, we form the virtual machine itself.
$vmname="mvademovm" $vmsize="Small" $availset="mvademovm_avs" $vm1=New-AzureVMConfig -Name $vmname -InstanceSize $vmsize -ImageName $image -AvailabilitySetName $availset Next, we specify the login and password for the local administrator:
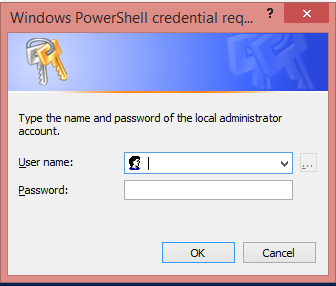
$cred=Get-Credential -Message "Type the name and password of the local administrator account." $vm1 | Add-AzureProvisioningConfig -Windows -AdminUsername $cred.GetNetworkCredential().Username -Password $cred.GetNetworkCredential().Password When executing the script, a window will appear in which we will have to enter the login and password:
Finally, using the last cmdlet, we create a new virtual machine in a new cloud service:
New-AzureVM –Location "North Europe" -VMs $vm1 We specify the desired location and we can choose from Central US, East US, East US 2, South Central US, West US, North Europe, West Europe, East Asia, Southeast Asia .
Also, when you run this cmdlet, you will need to enter a name for the cloud service being created. We are waiting for a few minutes and the Azure virtual machine is ready!
We can see the same virtual machine and portal:
Enable, Disable, Remove
If creating a virtual machine requires a specific sequence of steps, then only one cmdlet is sufficient to delete it:
Remove-AzureVM -ServiceName "mvademovm" -Name "mvademovm" -DeleteVHD One of the situations when it is more convenient to use Azure PowerShell to manage a virtual machine than to access the Azure Management Portal is to turn it on and off. This task is solved by two scripts:
running virtual machine
Start-AzureVM -ServiceName "mvademovm" -Name "mvademovm" virtual machine shutdown
Stop-AzureVM -ServiceName "mvademovm" -Name "mvademovm" -Force We reviewed the main examples of virtual machine management using Microsoft Azure. A detailed list of Azure PowerShell cmdlets can be found here .
I hope the information in this article will be useful to you!
Good luck in using PowerShell to customize your systems!
useful links
- JumpStart: Corporate Mobile Device Management March 26, 2015 Hurry to register!
- Try Azure for free for 30 days!
- Learn Microsoft Virtual Academy courses
- Download a trial version of Windows Server 2012 R2
- Download free or trial Visual Studio
Source: https://habr.com/ru/post/253765/
All Articles