Understanding the download of ArchLinux over the network
In the previous article, we prepared a basic system. Finish the setting in the next article .
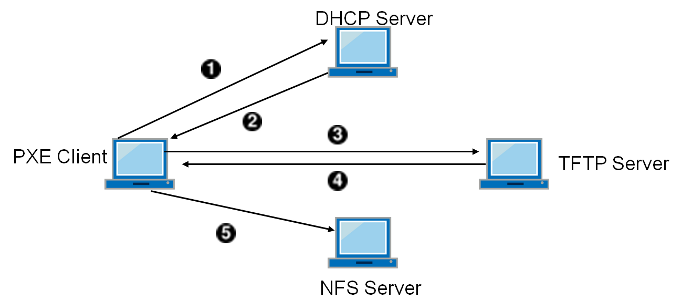
Here we will create a new Arch Linux system capable of booting over the network and automatically launching the Firefox browser, and in between cases we will deal with the necessary functionality of the boot server. Then we configure the server itself and try to boot from it. Everything will happen exactly as in the picture that Google found on the query "PXE":
')
Archlinux compares favorably with the ready-made distributions in that the installation of the new system from the working machine is the same as when using the installation image, and in both cases you get the most current version of the system at the moment. Only small installation scripts will be needed:
Absolutely predictable start:
Install only the base packages, therefore:
Then repeat all the steps until installing the bootloader according to the previous article . Here is the checklist:
In the previous article, we looked at the Linux boot process from the point of view of internal storage. Now we present what is happening through the eyes of a network card. The picture from the title illustrates events well, except that all servers in our case will work on the same computer.
Immediately after turning on the computer, the PXE code (Preboot eXecution Environment, pronounced pixie - thanks to the wiki ), located directly in the network card's ROM, is triggered. His task is to find the loader and transfer control to it.
The network adapter is completely unaware of which network it is currently in, therefore it assigns itself the address 0.0.0.0 and sends a DHCPDISCOVER message.Passport data will be attached to the message, which will definitely be useful to us:
The adapter expects to receive a response from the DHCP server via BOOTP ( Bootstrap Protocol ), where in addition to the required IP address, subnet mask and gateway address, there is information about the TFTP server address and the name of the bootloader file that should be taken from it. The TFTP server, in turn, simply gives anyone who wants it any files that they ask for.
After receiving the answer and applying the network settings, further control of the download is transferred to the resulting file, the size of which can not exceed 32 KB, so two-step download is used. Everything needed to display the boot menu on the screen is downloaded by the same TFTP protocol. The vast majority of network boot tutorials use the pxelinux bootloader, but GRUB does the same thing, and even more: it has different boot loaders for different architectures, including UEFI.
Further, the download is suspended while the boot menu is displayed, and then the selected vmlinuz and initramfs files are downloaded via the same TFTP protocol, to which further download control is transferred. At this stage, there is no longer any difference at all in the boot mechanism over the network or from the internal drive.
Since there is already a GRUB on our server, we will create a folder structure for the network client using this method:
The grub folder and several others will appear in the $ root / boot folder. We will completely “give away” this file structure using a TFTP server. Now we are using 64-bit ArchLinux for the reason that in a 32-bit system there is no folder / grub / x86_64-efi /, which is required for booting UEFI systems. You can take this folder from our 64-bit server and transfer it unchanged to a 32-bit server, then UEFI support will also appear in it.
Create a bootloader configuration file with the following contents:
I took the grub.cfg file from the server and removed from it everything that does not participate in the display of the GRUB boot menu or is somehow related to disks.
Pay attention to the familiar line with the kernel parameters:
As in the previous time, assign the value of the variable "ip". I remind you that it is used in the “net” handler, which we adapted to configure the network card in the boot server. Here again the static IP address and the constant name of the eth0 network card are indicated. The values of $ net_default_ip and $ net_default_server are substituted by GRUB independently based on the data received from the very first DHCP request. $ net_default_ip is the IP address allocated for our machine, and $ net_default_server is the IP address of the boot server.
Most network boot guides (among those found in the Runet), suggest setting a variable like “ip = ::::: eth0: dhcp”, which forces the net handler to send a new DHCPDISCOVER request to get the network settings again.
There is no objective reason to “spam” the DHCP server once again and wait for it to respond, so again we use static and do not forget to specify the DNS servers. We have already solved this problem, so we simply copy the necessary files and add the service to autoload:
We return to the line with the kernel parameters. Still unfamiliar to us, the add_efi_memmap (EFI memory map) command adds an EFI memory map of available RAM . Last time, we intentionally missed it, due to the relatively difficult preliminary layout of the media to support UEFI. Now we do not need to mark up, because the file system on the boot server already exists and will be used unchanged.
The kernel variable, nfsroot, shows where exactly the network should look for the root file system. It performs the same function as the root variable in the boot server. In this case, the address of the NFS server is specified, which in our case coincides with the TFTP server, but this is completely optional.
Handler net is responsible for connecting the root file system using the NFS protocol. Last time we removed this functionality from it, but now we will need it, but in a slightly modified form. The fact is that the net handler out of the box only supports connection via the NFS protocol of version 3. Fortunately, support for version 4 is added very simply.
First, install the package, which includes the net handler we need, as well as the utility package for working with NFS (the nfsv4 module and the mount.nfs4 program):
Fix the net handler from the hooks folder (instead of the command to mount nfsmount, now we will use mount.nfs4):
Using the install handler installer, add the nfsv4 module and the mount.nfsv4 program to iniramfs. First, copy and rename the workpiece:
Now we fix only one build () function, and do not touch the rest:
Add the handler to the initramfs by correcting the line in the mkinitcpio.conf file:
If you don’t touch anything, then usually a fast gzip archiver is used to compress the initramfs file. We are not in such a hurry, as far as we want compression stronger, therefore we will use xz. We remove the comment from this line in the mkinitcpio.conf file:
Xz archiving takes much longer, but the initramfs file is reduced at least a couple of times, which is why it is transmitted much faster by the TFTP server over the network. We copy the preset from our server so that in the course of work only one initramfs file is generated, then we start mkinitcpio:
Finally, edit fstab. Here you can choose the options for mounting the root file system to optimize its work, but we will not touch anything:
The basic installation of the client system is over. But we want to add a graphical environment and automatic launch of Firefox.
To reduce the amount of memory occupied by our system, we abandon the use of the screen manager and focus on the simplest window manager , for example, openbox with automatic user authorization username. The use of "lightweight" components will allow the system to run wonderfully and work even on the most ancient hardware.
Install the modules to support VirtualBox, server X, nice TTF font, openbox and firefox (all other modules will be installed as dependencies):
Enable autoloading of the virtualbox service:
Add an automatic login username without entering a password, for this we change the launch line agetty:
Immediately after the user is authorized, the file ~ / .bash_profile is executed, from his home folder, where we add the automatic launch of the graphic server:
After the launch of the X server, the openbox should start:
Comment out the following lines at the very end of the file (from the twm line to the line we added to start openbox, but not including it):
Copy openbox configuration files
Add firefox to autoload in openbox environment:
Since we were just hosted on behalf of the superuser in the home folder of the user username, we need to return the rights to all the files located in his folder:
Preparing the system for booting over the network is finished, and it is time to move on to setting up the boot server. Now we know that for loading we will need:
Further steps with minor changes repeat this article from the wiki , so there is a minimum of comments on my part.
Download the package:
and bring the contents of the configuration file /etc/dhcpd.conf to the following form:
As you can see, the DHCP server will respond only to those DHCPDISCOVER requests that come from PXE clients, and the rest will simply be ignored.
We start the DHCP server:
Download and install the necessary package:
We need the TFTP server to provide access to the bootloader files that we placed in the $ root / boot folder. To do this, we modify the launch of the service in a proven way:
The first line, “ExecStart =,” cancels the execution of the command specified in the original $ root / usr / lib / systemd / system / tftpd.service file, and instead executes "/usr/bin/in.tftpd -s / srv / nfs / diskless / boot ". Only in the case when the service starts only once (Type = oneshot), can we use several lines of ExecStart = to execute commands one by one. This is not the case, so we cancel one command and execute another.
We start the TFTP server:
Download the package:
Add the folder in which we installed the system to the list of exported:
Do not forget to use the NFS v.4 syntax specifying the path relative to the folder with fsid = root (root relative to all other exported folders, without specifying which nothing will work).
We start the services providing work of the NFS server:
On this boot server is ready to work.
We will follow the boot process from the server using the tcpdump program.
The first line "catches" the DHCPDISCOVER request from the PXE client. In the output filtered by the second line, the names of all files requested by TFTP will be listed. The third line shows two tcp-syn requests sent at the very beginning of the NFS connection (the first connection is made by the net handler, and the second reconnection occurs during the processing of the fstab file).
Create a new virtual machine, for brevity, we will call it "client". In the network settings, we again specify the “Network Bridge” connection type and turn on the machine. Immediately press the F12 key on the keyboard to select the boot device, and then the l key to boot over the network.
Wait until the download is complete. If everything is in order, then on the server we add the used services to the autoload:
All servers DHCP, TFTP and NFS we launched on one boot server. Doing so is optional. For example, Mikrotik routers support Bootp and allow you to use yourself as TFTP - just upload all the necessary files there and check the network settings.
Now the graphical environment will only work in VirtualBox, because we did not install drivers for the "iron" video cards. We will solve the problem of automatically selecting the necessary drivers in the next article . At the same time, we will speed up the loading of the system and make it a “live image”.
Here we will create a new Arch Linux system capable of booting over the network and automatically launching the Firefox browser, and in between cases we will deal with the necessary functionality of the boot server. Then we configure the server itself and try to boot from it. Everything will happen exactly as in the picture that Google found on the query "PXE":
')
Install Linux again
Archlinux compares favorably with the ready-made distributions in that the installation of the new system from the working machine is the same as when using the installation image, and in both cases you get the most current version of the system at the moment. Only small installation scripts will be needed:
pacman -S arch-install-scripts Absolutely predictable start:
export root=/srv/nfs/diskless mkdir -p $root Install only the base packages, therefore:
pacstrap -d -c -i $root base Note:
“We strive to minimize the capacity of the installed system, because the network performance is much lower than the performance of the slowest hard drive!” I had to write in this place, but I know that the volume can be reduced even more if you select specific packages from base package groups. I propose to do it yourself.
Then repeat all the steps until installing the bootloader according to the previous article . Here is the checklist:
- carry out russification (internationalization);
- specify the time zone and configure the autorun service NTP;
- Add username and block his password from being changed.
Compare boot from disk and boot from network
In the previous article, we looked at the Linux boot process from the point of view of internal storage. Now we present what is happening through the eyes of a network card. The picture from the title illustrates events well, except that all servers in our case will work on the same computer.
Immediately after turning on the computer, the PXE code (Preboot eXecution Environment, pronounced pixie - thanks to the wiki ), located directly in the network card's ROM, is triggered. His task is to find the loader and transfer control to it.
Note:
Hereinafter, the possibilities of a network card, which is built into almost any commercially available motherboard, are considered (albeit, among some, equipped with the Socket 775, there were inferior instances). If the corresponding PXE item is not in the list of bootable devices BIOS, then try to enable it in the integrated devices section among the settings of the network card. If nothing helps, then read the instructions from your motherboard, and make sure that it is suitable for further experiments.
The network adapter is completely unaware of which network it is currently in, therefore it assigns itself the address 0.0.0.0 and sends a DHCPDISCOVER message.
- ARCH Option 93 - PXE client architecture (UEFI, BIOS);
- Vendor-Class Option 60 is an identifier that for all PXE clients has the form “PXEClient: Arch: xxxxx: UNDI: yyyzzz”, where the numbers xxxxx are the client architecture, yyyzzz is the major and minor versions of the UNDI (Universal Network Driver Interface) driver.
The adapter expects to receive a response from the DHCP server via BOOTP ( Bootstrap Protocol ), where in addition to the required IP address, subnet mask and gateway address, there is information about the TFTP server address and the name of the bootloader file that should be taken from it. The TFTP server, in turn, simply gives anyone who wants it any files that they ask for.
After receiving the answer and applying the network settings, further control of the download is transferred to the resulting file, the size of which can not exceed 32 KB, so two-step download is used. Everything needed to display the boot menu on the screen is downloaded by the same TFTP protocol. The vast majority of network boot tutorials use the pxelinux bootloader, but GRUB does the same thing, and even more: it has different boot loaders for different architectures, including UEFI.
Further, the download is suspended while the boot menu is displayed, and then the selected vmlinuz and initramfs files are downloaded via the same TFTP protocol, to which further download control is transferred. At this stage, there is no longer any difference at all in the boot mechanism over the network or from the internal drive.
Configuring network boot with GRUB
Since there is already a GRUB on our server, we will create a folder structure for the network client using this method:
grub-mknetdir --net-directory=$root/boot --subdir=grub The grub folder and several others will appear in the $ root / boot folder. We will completely “give away” this file structure using a TFTP server. Now we are using 64-bit ArchLinux for the reason that in a 32-bit system there is no folder / grub / x86_64-efi /, which is required for booting UEFI systems. You can take this folder from our 64-bit server and transfer it unchanged to a 32-bit server, then UEFI support will also appear in it.
Create a bootloader configuration file with the following contents:
cat $ root / boot / grub / grub.cfg
function load_video { if [ x$feature_all_video_module = xy ]; then insmod all_video else insmod efi_gop insmod efi_uga insmod ieee1275_fb insmod vbe insmod vga insmod video_bochs insmod video_cirrus fi } if [ x$feature_default_font_path = xy ] ; then font=unicode else font="fonts/unicode.pf2" fi if loadfont $font ; then set gfxmode=auto load_video insmod gfxterm set locale_dir=locale set lang=ru_RU insmod gettext fi terminal_input console terminal_output gfxterm set timeout=5 set default=0 menuentry " Firefox" { load_video set gfxpayload=keep insmod gzio echo " ..." linux /vmlinuz-linux \ add_efi_memmap \ ip="$net_default_ip":"$net_default_server":192.168.1.1:255.255.255.0::eth0:none \ nfsroot=${net_default_server}:/diskless echo " ..." initrd /initramfs-linux.img } I took the grub.cfg file from the server and removed from it everything that does not participate in the display of the GRUB boot menu or is somehow related to disks.
Pay attention to the familiar line with the kernel parameters:
linux /vmlinuz-linux add_efi_memmap ip="$net_default_ip":"$net_default_server":192.168.1.1:255.255.255.0::eth0:none nfsroot=${net_default_server}:/diskless As in the previous time, assign the value of the variable "ip". I remind you that it is used in the “net” handler, which we adapted to configure the network card in the boot server. Here again the static IP address and the constant name of the eth0 network card are indicated. The values of $ net_default_ip and $ net_default_server are substituted by GRUB independently based on the data received from the very first DHCP request. $ net_default_ip is the IP address allocated for our machine, and $ net_default_server is the IP address of the boot server.
Most network boot guides (among those found in the Runet), suggest setting a variable like “ip = ::::: eth0: dhcp”, which forces the net handler to send a new DHCPDISCOVER request to get the network settings again.
There is no objective reason to “spam” the DHCP server once again and wait for it to respond, so again we use static and do not forget to specify the DNS servers. We have already solved this problem, so we simply copy the necessary files and add the service to autoload:
cp {,$root}/etc/systemd/system/update_dns@.service && cp {,$root}/etc/default/dns@eth0 && arch-chroot $root systemctl enable update_dns@eth0 We return to the line with the kernel parameters. Still unfamiliar to us, the add_efi_memmap (EFI memory map) command adds an EFI memory map of available RAM . Last time, we intentionally missed it, due to the relatively difficult preliminary layout of the media to support UEFI. Now we do not need to mark up, because the file system on the boot server already exists and will be used unchanged.
The kernel variable, nfsroot, shows where exactly the network should look for the root file system. It performs the same function as the root variable in the boot server. In this case, the address of the NFS server is specified, which in our case coincides with the TFTP server, but this is completely optional.
Prepare initramfs
Handler net is responsible for connecting the root file system using the NFS protocol. Last time we removed this functionality from it, but now we will need it, but in a slightly modified form. The fact is that the net handler out of the box only supports connection via the NFS protocol of version 3. Fortunately, support for version 4 is added very simply.
First, install the package, which includes the net handler we need, as well as the utility package for working with NFS (the nfsv4 module and the mount.nfs4 program):
pacman --root $root --dbpath $root/var/lib/pacman -S mkinitcpio-nfs-utils nfs-utils Fix the net handler from the hooks folder (instead of the command to mount nfsmount, now we will use mount.nfs4):
sed s/nfsmount/mount.nfs4/ "$root/usr/lib/initcpio/hooks/net" > "$root/etc/initcpio/hooks/net_nfs4" Using the install handler installer, add the nfsv4 module and the mount.nfsv4 program to iniramfs. First, copy and rename the workpiece:
cp $root/usr/lib/initcpio/install/net $root/etc/initcpio/install/net_nfs4 Now we fix only one build () function, and do not touch the rest:
nano $root/etc/initcpio/install/net_nfs4 build() { add_checked_modules '/drivers/net/' add_module nfsv4? add_binary "/usr/lib/initcpio/ipconfig" "/bin/ipconfig" add_binary "/usr/bin/mount.nfs4" "/bin/mount.nfs4" add_runscript } Add the handler to the initramfs by correcting the line in the mkinitcpio.conf file:
nano $root/etc/mkinitcpio.conf HOOKS="base udev net_nfs4" If you don’t touch anything, then usually a fast gzip archiver is used to compress the initramfs file. We are not in such a hurry, as far as we want compression stronger, therefore we will use xz. We remove the comment from this line in the mkinitcpio.conf file:
COMPRESSION="xz" Xz archiving takes much longer, but the initramfs file is reduced at least a couple of times, which is why it is transmitted much faster by the TFTP server over the network. We copy the preset from our server so that in the course of work only one initramfs file is generated, then we start mkinitcpio:
cp /etc/mkinitcpio.d/habr.preset $root/etc/mkinitcpio.d/habr.preset && arch-chroot $root mkinitcpio -p habr Finally, edit fstab. Here you can choose the options for mounting the root file system to optimize its work, but we will not touch anything:
echo "192.168.1.100:/diskless / nfs defaults 0 0" >> $root/etc/fstab The basic installation of the client system is over. But we want to add a graphical environment and automatic launch of Firefox.
Download Firefox
To reduce the amount of memory occupied by our system, we abandon the use of the screen manager and focus on the simplest window manager , for example, openbox with automatic user authorization username. The use of "lightweight" components will allow the system to run wonderfully and work even on the most ancient hardware.
Install the modules to support VirtualBox, server X, nice TTF font, openbox and firefox (all other modules will be installed as dependencies):
pacman --root $root --dbpath $root/var/lib/pacman -S virtualbox-guest-modules virtualbox-guest-utils xorg-xinit ttf-dejavu openbox firefox Enable autoloading of the virtualbox service:
arch-chroot $root systemctl enable vboxservice Add an automatic login username without entering a password, for this we change the launch line agetty:
mkdir $root/etc/systemd/system/getty@tty1.service.d && \ echo -e "[Service]\nExecStart=\nExecStart=-/usr/bin/agetty --autologin username --noclear %I 38400 linux Type=simple %I" > $root/etc/systemd/system/getty@tty1.service.d/autologin.conf Immediately after the user is authorized, the file ~ / .bash_profile is executed, from his home folder, where we add the automatic launch of the graphic server:
echo '[[ -z $DISPLAY && $XDG_VTNR -eq 1 ]] && exec startx &> /dev/null' >> $root/home/username/.bash_profile After the launch of the X server, the openbox should start:
cp $root/etc/X11/xinit/xinitrc $root/home/username/.xinitrc && echo 'exec openbox-session' >> $root/home/username/.xinitrc Comment out the following lines at the very end of the file (from the twm line to the line we added to start openbox, but not including it):
cat $root/home/username/.xinitrc # twm & # xclock -geometry 50x50-1+1 & # xterm -geometry 80x50+494+51 & # xterm -geometry 80x20+494-0 & # exec xterm -geometry 80x66+0+0 -name login exec openbox-session Copy openbox configuration files
mkdir -p $root/home/username/.config/openbox && cp -R $root/etc/xdg/openbox/* $root/home/username/.config/openbox Add firefox to autoload in openbox environment:
echo -e 'exec firefox habrahabr.ru/post/253573/' >> $root/home/username/.config/openbox/autostart Since we were just hosted on behalf of the superuser in the home folder of the user username, we need to return the rights to all the files located in his folder:
chown -R username $root/home/username Preparing the system for booting over the network is finished, and it is time to move on to setting up the boot server. Now we know that for loading we will need:
- DHCP server with support for BOOTP to configure the network card;
- TFTP server for transferring the bootloader and the vmlinuz and initramfs files, which we have in the $ root / boot / grub folder;
- NFS-server to host the root file system, which lies in our $ root folder.
Configuring the boot server
Further steps with minor changes repeat this article from the wiki , so there is a minimum of comments on my part.
Installing a DHCP server
Download the package:
pacman -S dhcp and bring the contents of the configuration file /etc/dhcpd.conf to the following form:
mv /etc/dhcpd.conf /etc/dhcpd.conf.old nano /etc/dhcpd.conf
# BOOTP allow booting; allow bootp; # , ( , BOOTP , PXE ) authoritative; # ( ) option architecture code 93 = unsigned integer 16; # ( ) subnet 192.168.1.0 netmask 255.255.255.0 { # , class "pxe_client" { match if exists architecture; } pool { # : if option architecture = 7 { filename "/grub/x86_64-efi/core.efi"; } else { filename "/grub/i386-pc/core.0"; } # TFTP , , , , DHCP next-server 192.168.1.100; # , ( ) default-lease-time 600; max-lease-time 7200; option domain-name-servers 192.168.1.1; option routers 192.168.1.1; range 192.168.1.128 192.168.1.192; # , allow members of "pxe_client"; } } As you can see, the DHCP server will respond only to those DHCPDISCOVER requests that come from PXE clients, and the rest will simply be ignored.
We start the DHCP server:
systemctl start dhcpd4 Install TFTP server
Download and install the necessary package:
pacman -S tftp-hpa We need the TFTP server to provide access to the bootloader files that we placed in the $ root / boot folder. To do this, we modify the launch of the service in a proven way:
mkdir -p /etc/systemd/system/tftpd.service.d && echo -e '[Service]\nExecStart=\nExecStart=/usr/bin/in.tftpd -s /srv/nfs/diskless/boot' > /etc/systemd/system/tftpd.service.d/directory.conf The first line, “ExecStart =,” cancels the execution of the command specified in the original $ root / usr / lib / systemd / system / tftpd.service file, and instead executes "/usr/bin/in.tftpd -s / srv / nfs / diskless / boot ". Only in the case when the service starts only once (Type = oneshot), can we use several lines of ExecStart = to execute commands one by one. This is not the case, so we cancel one command and execute another.
We start the TFTP server:
systemctl start tftpd.socket tftpd.service Install NFS server
Download the package:
pacman -S nfs-utils Add the folder in which we installed the system to the list of exported:
echo -e "/srv/nfs 192.168.1.0/24(rw,fsid=root,no_subtree_check,no_root_squash)\n$root 192.168.1.0/24(rw,no_subtree_check,no_root_squash)" >> /etc/exports Do not forget to use the NFS v.4 syntax specifying the path relative to the folder with fsid = root (root relative to all other exported folders, without specifying which nothing will work).
We start the services providing work of the NFS server:
systemctl start rpcbind nfs-server On this boot server is ready to work.
We try to boot from the network
We will follow the boot process from the server using the tcpdump program.
pacman -S tcpdump tcpdump -v '( \ src host 0.0.0.0 and udp[247:4] = 0x63350101) or ( \ dst host HabraBoot and dst port tftp) or ( \ dst host HabraBoot and tcp[tcpflags] == tcp-syn)' The first line "catches" the DHCPDISCOVER request from the PXE client. In the output filtered by the second line, the names of all files requested by TFTP will be listed. The third line shows two tcp-syn requests sent at the very beginning of the NFS connection (the first connection is made by the net handler, and the second reconnection occurs during the processing of the fstab file).
Create a new virtual machine, for brevity, we will call it "client". In the network settings, we again specify the “Network Bridge” connection type and turn on the machine. Immediately press the F12 key on the keyboard to select the boot device, and then the l key to boot over the network.
Wait until the download is complete. If everything is in order, then on the server we add the used services to the autoload:
systemctl enable tftpd.socket tftpd.service dhcpd4 rpcbind nfs-server All servers DHCP, TFTP and NFS we launched on one boot server. Doing so is optional. For example, Mikrotik routers support Bootp and allow you to use yourself as TFTP - just upload all the necessary files there and check the network settings.
Now the graphical environment will only work in VirtualBox, because we did not install drivers for the "iron" video cards. We will solve the problem of automatically selecting the necessary drivers in the next article . At the same time, we will speed up the loading of the system and make it a “live image”.
Source: https://habr.com/ru/post/253573/
All Articles