Transfer of the project to Unity 5. Shaders and light
Prehistory
More recently, Unity 5 was released, in which a whole bunch of new and incomprehensible things, and we have not yet had time to create the documentation.
By virtue of my work as a
Having opened the project in a new version, you will see ... nothing, or almost nothing. Unity 5 does not understand old shaders with alpha and simply fills them with black or white, who wrote.
')
The old Beast has gone down in history and the world will have to be re-cooked.
Below is all the collected information on the issue: translation of the manual and tutorial from offsite Unity3D website, and some notes (on settings) from me.
Dedicated to all transferred to Unity 5.
Standard shader
Useful links:
Why your old and custom shaders don't work ;
The official tutorial on shaders .
Description
The new standard Unity Shader for each platform is collected separately, that is, unused fields do not go to the final shader. Shader optimization is performed on the target platform, when the standard shader builds, 2 important things happen:
- All properties that are not used are cut out from the further build (or maybe they use presets);
- The assembled shader is checked and optimized for the device type (see Build Settings), so you do not need to worry about performance;
The parameters of the standard shader are divided into three sections:
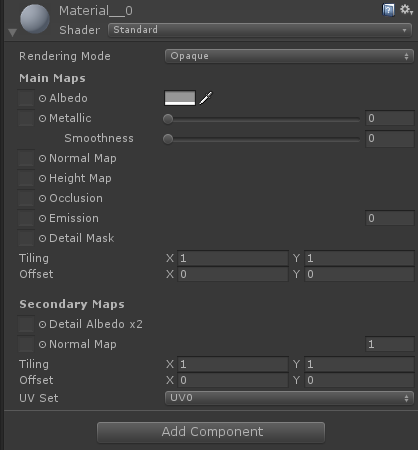
Rendering mode - the rendering mode (transparent, translucent, just a texture or color).
- Opaque - opaque, rendering will be done without alpha; Color is tint the texture.
- CutOut is Alpha testing, the Alpha Cutoff parameter defines the line between two states: “fully transparent” and “opaque”.
- Fade is essentially the same as Transparent , but it allows you to make an object completely transparent.
- Transparent - translucent, for example used for glass, alpha in Albedo is used to adjust transparency.
Main Maps is a property group that describes the main texture and its properties.
- Albedo - the main texture and / or color, alpha (RGB + A) affects the reflection and transparency, in different rendering mode.
- Metallic (with Standart) - determines the degree with which the material reflects the environment, with zero it looks like a matte plastic, and with 1 it looks like a mirror or metallic material. Using white color or texture, we get a material that looks like metal. Optimal use of shades of gray. The R channel in the texture is responsible for the Metallness property, in the A (alpha) channel - Smoothness .
- Specular (with Specular Setup) - determines the color of the reflection and its brightness from the alpha.
- NormalMap is a magical texture for volume: it takes a vector (x, y, z) from a pixel (r, g, b) and adds additional detail when lighting (and other effects, SSR, for example). The effect of volume is obtained.
- HeightMap is the second magic texture, it is the height map, similar to NormalMap , it is needed for Displacement-mapping (with tessellation) or for Parallax Occlusion.
- Occlusion is a property that works with texture (b / w) and obscures the “edges” on the texture, meaning Ambeint-Occlussion. For example, darkening the seams of a brick wall.
- Emission - radiation, the color of the reflection of the object.
- Detail Mask - can be used to apply a mask on the Secondary Maps .
For the Albedo , Metallic and Emission properties, the texture is optional and NOT required.
You can set a color for the Albedo property and Emission , but for Emission, you cannot set the color when scale is zero.
Secondary Maps is a group of properties that describes the second texture applied to the main one.
An example of use is shown on a fabric with a pattern, where Main Maps has color and texture, and Secondary Maps imposes a pattern, such as embroidery, and its texture.
Lighting
I found some GI documentation, but there were no working settings there. Therefore, I translated what I was able to find and tried different settings for baking. All settings are obtained experimentally and reading manuals off. site, blog and forum .
It was useful for me to download the project of the Viking village .
At the moment I am working on a full-fledged 3D project, but for tablets. I have static shadows, light samples and a light source. Light type is Directional , and the settings are Mixed .
First surprise : you have 10GB cache on LocalSettings. You can look at this disgrace in the menu Edit -> Preferece ...
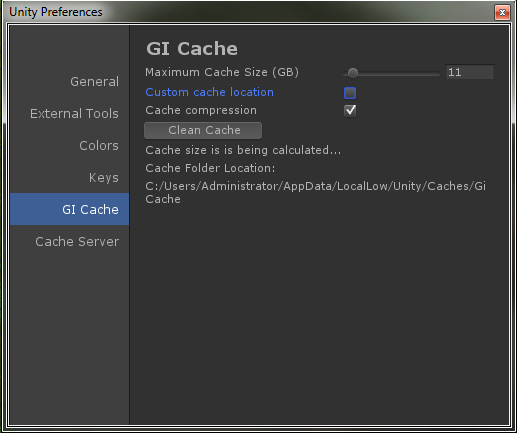
It is not removed by itself, it is necessary to clean it with your hands.
About the first bake:
I have a system on SSD 256GB, so I transferred the cache to regular hard drive. Honestly, I did not notice the difference in the speed of the backup, and there are generated quite a lot of textures. The first scene beak on 100k polikov, with fully default settings, generated 200 cards (light + dir) with a total weight of 1GB (the process went on i7-4770, 32 gigabytes of RAM and 24/7 hours). Naturally, all of this is under the tail.
Description of new features
Unity is now using Enlighten Global Real-Time Lighting (GI) technology.
Uses dynamic GI for direct lighting and shadows. They are calculated in real time using the device's GPU (graphics processor).
Real-time GI must be pre-calculated. In this case, you will not get a Lightmap, as it was in the Beast, most likely you will get LightmapSnapshot . This piece weighs a lot because it contains a cast of your Lightmap. This LightmapSnapshot build will be in a different size. What happens there I do not know.
Description of Lighting Panels
As an example, I use a project with a Viking village, then Window -> Lighting , the Scene tab.
Immediately make a reservation that this scene is baked for literally half an hour, and this is really cool.

Baking occurs in 2 stages, in the first 11 stages, in the second 15. For Baked GI, it klinit on 5/11 Clastering, 7/11 LightTransport, 4/15 Bake AO, 6/15 Bake Visibility and 12/15 BakeInderect.
Scene Tab. Environment lighting
The light should be Baked or Mixed, which will allow you to smoothly switch between baked and real-time calculated GI modes.
Skybox and Sun properties are optional and can remain empty.
SkyBox - property to simulate the sky or the backdrop.
Sun - when using SkyBox , here you can specify the direction of the light or the "sun" (or some large, distant light source illuminating the scene). If this parameter is not used (None), then DirectionalLight will become an infinitely distant light source, like sun.
Ambient Source - ambient light source Ambient Light , which illuminates everything in the scene (the correct definition is somewhat more complicated). It can be 3 types:
- SkyBox - in the Skybox field you need to specify the material with Cubemap ( something like this ). Skybox uses the Skybox colors to determine ambient light from different angles.
- Gradient - allows you to assign colors to Sky Color, Equator Color and Ground Color, looks like this . This property consistently blends the listed colors.
- Color - the color of the ambient light.
Ambient Intensity - Ambient Light brightness, adjustable from 0 to 1.
Ambient GI - the property is available when Precomputed Realtime GI and Baked GI are enabled. Allows you to select the method ( Precomputed Realtime or Baked GI ) that will be used for ambient light.
Reflection Source - the source of reflections. Allows you to specify whether to use the Skybox for reflection effects (the default) or select Cubemap . If Skybox is selected as a source, then an additional option is needed in order to set its resolution for the calculation of reflections.
Reflection Intensity - the degree of exposure to Cubemap or Skybox reflections on the scene.
Reflection Bounces - how many times the reflection of the object will be reflected. It is appropriate to recall the mirror corridor.
Precomputed Realtime GI
Realtime Resolution — sets the number of texels to be used per unit length for objects lit in real-time GI. Usually this value is about ten times lower than the resolution of the baked ones. May be non-integer, for example 0.5.
CPU Usage - determines how much CPU can be loaded in the editor when baking textures in real time.
Baked GI
Baked Resolution — sets the number of texels (for example, “texture pixels”) that will be used per unit length for objects lit by BakedGI . For fast protopipping, it is better to use values in the range 1-4.
Baked Padding - the distance on the texture between baked objects in texels.
Compressed - whether the texture will shrink. Takes less space, but artifacts are possible.
Ambient Occlusion - the relative brightness of surfaces in Ambient occlusion, i.e. blackout on the inside corners. Higher values showed higher contrast between shaded and lighted areas. This applies only to Indirect (indirect) lighting calculated by the GI system.
Final Gather - when the option is turned on, the final light received in the GI calculation will have the same resolution as the baked lightmaps.
General gi
The following parameters affect reflected light in Realtime and Baked GI mode: ambient diffuse, Light Bounces reflected light and Emissive radiation, but not reflection.
Indirect intensity - scales the intensity of Indirect light . In the Scene Window -> Irradiance menu, you can see the Indirect light .
Bounce Boost - how much light is reflected from one surface to another. The reflected light is multiplied by this value, the standard is 1.
Directional Mode - essentially indicates whether it is necessary to save Directional and Specular information to lightmaps during Baked GI mode .
Atlas size - lightmap size when baking Baked GI mode . I usually put 1024px.
In Skined Mesh Renderer, a new property has now been added - Lightmap Parameters , this property is responsible for grouping objects, for example, inside and outside the room, by levels or scenes, how you specify it or automatically.

My low settings for a quick backup.
Precomputed Realtime GI
- Resolution - resolution of the final lightmaps in tixels to world units.
- Cluster Resolution - The ratio of cluster resolution to the resolution of the final lightmap, i.e. the resolution to which the reflected light is calculated.
- Irradiance Budget - the value determines the accuracy with which the incident light data is used to calculate the light of each texel on the lightmap, i.e. recorded pattern (pattern) of incident light. Lower values blur the outlines of the lighted area, a higher value to sharper outlines. It is impossible to get involved in this parameter, as it directly loads the operative and the process at the beike.
- Irradiance Quality - the quality of the transmission of reflected light on lightmap. The value does not affect the final result on the device, but increases the precomputing time in the editor . As I understand it, this property is equivalent to the Final Gather Rays property in Beast , but for reflected rays. More rays - higher quality, but more time and bake.
- Backface Tolerance - this property allows you to neglect the lighting of those tixels that are not sufficiently illuminated (for example, are inside the mesh), and their illumination is calculated by interpolation with nearby texels. Helps to avoid artifacts.
- Modeling Tolerance - the maximum size of the holes in the mesh geometry, which can be neglected when calculating the GI.
- Edge Stitching - if this option is enabled, UV “charts” will be baked with lightmaps to avoid visual artifacts.
- Is Transparent - if this option is enabled, then objects with transparency remain transparent during GI calculation. In this case, backfeys are not taken into account and the light passes through the object. Can be used for emitting invisible surfaces.
- System Tag - a group of objects with lightmaps in one atlas. This is also the granularity on which the calculations depend. Several systems are created automatically if there are enough objects in the scene. Different System Tag can be used for different levels in a location or parts of a level.
Baked GI
- Blur Radius - the radius in tixels from the blur filter, which is used for direct lighting during post-processing. This radius corresponds to the distance at which neighboring tixels will be averaged. Higher levels reduce the likelihood of artifacts and make the edges of the shadow smoother or softer.
- Antialiasing Samples - the degree of smoothing to suppress artifacts.
- Direct Light Quality - the number of rays used to estimate the direct lighting (full analogue of Final Gather Rays in Beast ). More rays give more accurate soft shadows.
Baked ao
- Quality - the number of rays to calculate ambient occlusion (AO)
- Antialiasing Samples - the degree of smoothing to suppress artifacts.
- Baked Tag - as described above System Tag , allows you to group objects into specific sets for baking. Can be used to optimize dynamic level loading.
For Baked Tag and System Tag, the numeric value is not significant, objects use the same lightmap if they have the same tag value.
General GI. Directional Lightmapping
Directional lightmaps store more information about the lighting environment than regular lighting maps. Shaders can use this feature to obtain additional data on the incoming light in order to better calculate the reflected / emitted light. This is due to the use of a larger memory texture and shading time .
You can choose one of 3 modes: Non-directional, Directional and Directional with Specular . All three support realtime and baked lightmaps.
Non-directional: flat diffuse.
The easiest mode using one lightmap. Stores information about how much light emits a surface, suggesting its diffuse . If objects have NormalMap or reflect light, then they will be shown as diffuse , but otherwise shown correctly.
Directional: normal-mapped diffuse
This mode adds a second lightmap, which stores the dominant direction of the incoming light and a multiplier proportional to how much light in the first lightmap enters the dominant direction. The rest is calculated if the light acted evenly (on the sphere). This information allows you to calculate NormalMap , but the material will remain diffuse .
Directional with Specular: full shading
As in the previous one, 2 additional latmaps are used here: light and direction, but here they are divided in half. The left side retains direct light, the right side - indirect. The difference is that the light is stored in the form of incoming intensity (illumination). This information allows you to use shaders similar to BRDF shaders, which are usually reserved for realtime lighting. As a result, it is possible to obtain material with indirect light.
Dual lighting maps ( Dual lightmaps ) - allow the use of reflective surfaces (specular), normal maps (normal mapping).
Directional uses twice as much memory as Non-directional and has a higher shading cost .
Directional with Specular uses twice as much memory as Directional .
I hope for constructive comments, maybe I’m wrong about something. I would be grateful for the advice.
Source: https://habr.com/ru/post/253527/
All Articles