Virtual Reality on Windows Phone using Unity3d
Virtual Reality on Windows Phone using Unity3d
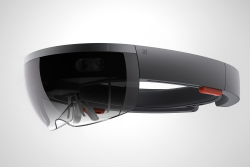 At the last Game Developer Conference there was a lot of news related to virtual reality. This and new devices, such as Microsoft HoloLens, the struggle for recognition between the Oculus Rift and Project Morfeus, the announcement of SteamVR. All this suggests that the topic is very interesting and hot. Although the concept of virtual reality includes a lot of things, technologically it is primarily glasses or a helmet that show a stereoscopic image and react to movement. Many of us would like to experiment in this area, but without a device, for example, the Oculus Rift is difficult. Fortunately, there are technologies that can turn your Windows Phone into a virtual reality helmet.
')
Where to begin
The most important thing is of course the helmet, or, if you like, glasses. They must be made so that they allow you to hold the phone before your eyes. You can use Google Cardboard or make them yourself from cardboard, acrylic and plastic .
After you make glasses, or a helmet, in general, what will keep your phone in front of your eyes, the question arises as to what needs to be done to plunge into that very virtual reality:
- Create stereoscopic image
- Change it depending on the position of the head
- Interact with the virtual world
We create the Unity3d project
Create an empty Unity3d project and create some 3D objects to taste, add lighting. On the other hand, you can use the ready-made free Medieval Home package, import it and open the scene example (Scene / Sample Scene).

Next, configure the export project. To do this, go to the Edit / Project Settings / Player menu and select the Windows Store icon.
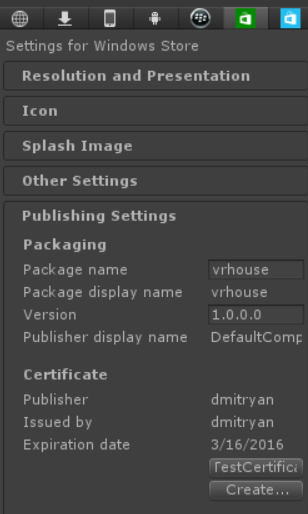
The most important point is the “TestCertificate” button. Click on the Create button and create a new one. Unfortunately, there is a small bug in Unity, due to the fact that the Create dialog does not work in some cases. To work around this problem, launch Visual Studio 2013, create a new Windows Phone 8.1 project, open the folder where this project is located and locate the * .PFX file. Rename it to WSATestCertificate.pfx and copy the current Unity project into the Assets folder.
Next, configure the build. Go to the File / Build Settings menu and select the following values for the Windows Store:

Do not forget to save the current scene in advance ( File / Save Scene ) and click the “ Add Current ” button in this dialog box so that the starting scene appears in the resulting project. After clicking on the Build button, a Visual Studio 2013 project will be created which should be opened in Visual Studio for verification, compiled and run on the device.
Create a stereoscopic image
The first thing to do in the project is to create a stereoscopic image. And this is very easy to do as we have a three-dimensional scene that can be calculated for each eye.
Find the project First Person Controller and duplicate the main camera (right mouse button, Duplicate).
You should have the following:

Further, in the properties for each camera, it is necessary to indicate that the image is rendered only at half of the so-called port ( viewport ) . For the left and right eyes, respectively, at the beginning of the screen, and in its second half:
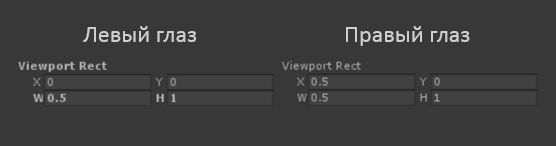
But this is not all, of course, the stereo image is not so received, the pictures that are now displayed by these cameras are the same.
In order for the stereo effect to appear, it is necessary to introduce parallax between these cameras.
Add a new C # script to the project:
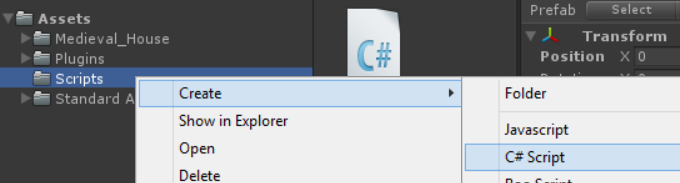
Call it FPSVRBehavior.cs and after it is created, drag it with the mouse to the “First Person Controller”. The created script will be connected to this object.

Now you can proceed to the task of creating parallax between cameras. In the Start () method of the FPSVRBehavior class, we simply set the “left eye” offset from the main “parent” object by a small amount:
var leftEye = GameObject.Find("LeftEye"); leftEye.transform.Translate(Vector3.left * 0.1f); 
The stereo image is ready, create a new build, publish it to your phone and enjoy the stereo image in your virtual glasses! True, the image is static, and in these helmets the position of the head is tracked and depending on it the image on the screen changes.
We consider the position of the head
Windows Phone phones have a gyroscope sensor. It can be used for our purposes. It remains only to learn how to use the data that returns this sensor.
Some digression from the main theme, we are writing a plugin for Unity.
Unity3d is known to be a cross-platform application creation tool. For all its versatility, some narrow points and device-specific APIs are not available. In order for us to get to the values of the gyroscope sensor data, we have to prepare a plugin. Without going into details, a plugin is two DLLs with the same name that are located in the Assets / Plugins and Assets / Plugins / Metro catalogs.

The WindowsPhoneVRController.dll file which is located in the / Assets / Plugins directory is a standard .NET Framework 3.5 build that is designed to work during the Unity Designer.
A similar file located in the / Assets / Plugins / Metro directory is the Windows Store 8.1 Class Library, and it is used by the Unity environment to create the Visual Studio solution so that our project on the target platform will get the functions you need. More details on how to create plugins can be found in my blog.
The source code for both DLLs is the same:
#if NETFX_CORE using System.Threading.Tasks; using Windows.Devices.Sensors; #endif namespace WindowsPhoneVRController { public class Controller { #if NETFX_CORE Gyrometer gyro; #endif public Controller() { #if NETFX_CORE gyro=Gyrometer.GetDefault(); #endif } public static void Vibrate() { Vibrate(8); } public double AngularVelocityX { get { #if NETFX_CORE return gyro.GetCurrentReading().AngularVelocityX; #else return 0; #endif } } public double AngularVelocityY { get { #if NETFX_CORE return gyro.GetCurrentReading().AngularVelocityY; #else return 0; #endif } } public double AngularVelocityZ { get { #if NETFX_CORE return gyro.GetCurrentReading().AngularVelocityZ; #else return 0; #endif } } public static void Vibrate(int _milliseconds) { #if NETFX_CORE var vibrationDevice = Windows.Phone.Devices.Notification.VibrationDevice.GetDefault(); vibrationDevice.Vibrate(TimeSpan.FromMilliseconds(_milliseconds)); #endif } } } Depending on #CONDITION, when compiling for the .NET Framework 3.5, we get a “stub”, and when compiling for the Windows Store, we get the working logic. In the finished example, the link to which is at the bottom, a Visual Studio solution is prepared that compiles both DLLs and decomposes them into the corresponding Assets / Plugins directories .
Consider the sensor values
As it becomes clear from the source code, working with the gyro sensor is very simple. We survey the values of the acceleration of the rotation of the phone and then it remains only to affect the image on the screen with the help of this data.
To do this, again open the FPSVRBehavior.cs file and add the following code in the Update method:
void Update () { float vertical_angle_delta = (float)gyroscopePlugin.AngularVelocityY * 0.05f; float horisontal_angle_delta = (float)gyroscopePlugin.AngularVelocityX * 0.05f; transform.localEulerAngles = new Vector3(transform.localEulerAngles.x+vertical_angle_delta , transform.localEulerAngles.y-horisontal_angle_delta, transform.localEulerAngles.z); } gyroscopePlugin is an instance of our plugin, do not forget to declare a variable in this class and create this object in the Start () method;
As it became clear from the code, we simply query the sensor data, and change the position of the object - in our case, this is the First Person Controller. The magic coefficient 0.05f influences how fast the image will react to the rotation of the phone.
After you build the build and run the application on your phone, the camera will come to life and will now track your head position!
Movement is life
Now we have a practically full-fledged virtual reality application, but in this virtual reality we can only rotate our heads for now. In order to move forward, it is necessary to provide some kind of mechanism. Touching the screen is not possible (the phone is in front of our eyes), connecting additional devices to the phone is difficult, and not convenient. Therefore, we will provide an elegant and easy way for us to walk inside our virtual world.
This method is very simple - if you tilt your head a little (the phone), so that the virtual camera looks at the floor, it moves forward at a certain angle. Naturally, given the collisions in our virtual world, so as not to pass through walls.
Add the following code to the Update method of the FPSVRBehavior class:
var motor = GetComponent<CharacterMotor>(); if (transform.localEulerAngles.x > 30 && transform.localEulerAngles.x < 40) { motor.inputMoveDirection = transform.rotation*(Vector3.forward * 0.1f); WindowsPhoneVRController.Controller.Vibrate(); } The code is self-evident - if we bow our head, then somewhere between 30 and 40% there is a zone that leads to the forward movement. In order to “feel” where this zone is, we help the user by vibrating the phone.
Download the finished project and immerse yourself in virtual reality!
Source: https://habr.com/ru/post/253489/
All Articles