Coub API Tutorial
The other day we released the Coub API . Now you can make applications, watch the tape, like, rekobit, that is, almost everything that can be done on the site can be done through the API. But the most important thing is that now it is possible to create cobs from third-party applications through the API.
In this tutorial, I'll show you how to make the simplest Koba client on Ruby on Rails. The application allows you to log in through Cob and generate such a cob with any text:
')
The working version of this application is at fantozzi.dev2.workisfun.ru , the application code from this tutorial can be viewed on GitHub: github.com/igorgladkoborodov/memegenerator
Cob uses the standard protocol to authorize OAuth 2.0 . It is used in many services that provide an external API (Facebook, for example), it has a lot of documentation and libraries for any platform.
It works like this: the application with its unique key goes to a special page on coub.com, where Kob asks if the user agrees to give the application access. If the user allows, Cob returns the user back to the application, and with the request returns the user's token, which is then used for all user API requests. The same happens, for example, when logging in via Facebook or Twitter.
We will write on RoR and for authorization through OAuth for rails everything has been written for a long time, we will use for this the omniauth-oauth2 heme and the official Cobov omniauth-coub gem .
Create an application with the eloquent title memegenerator and fasten it to Pow (or who uses what):
We check in the browser that we have an empty rail application at memegenerator.dev .
2. Register our new application at coub.com/dev/applications
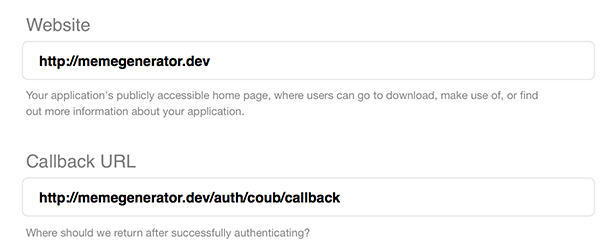
In the Website field we specify the URL of our test application, in the Callback URL field we write
After creating the application, Kob will give us Application ID and Secret, we will need them further:

3. Install the omniauth-coub hem:
Gemfile:
4. Add cob to omniauth providers:
config / initializers / omniauth.rb:
COUB_KEY and COUB_SECRET are the Application ID and Secret from the previous step, you can add them to the ENV variables or, for the test, insert the lines right here, although it’s undesirable to leave keys in the code, you know.
If you have Pow, then you can add variables in the .powenv file in the application root:
.powenv:
In scope, you can specify what rights the application will have. Our application is only needed to create cobs, so we will not ask for anything extra, just authorization and creation of a cob: logged_in, create. A complete list of access modes can be found in the API documentation .
5. We create a user model with the from_omniauth method, which creates or finds in the user base the data that the authorization server transmitted to us on Kobe.
What happens at this point and in the pair of the following points is well explained in one of the episodes of RailsCasts .
app / models / user.rb:
6. Create a session controller. Through it we create and delete a session.
The create method is the place where the user is returned with his token and authorization data. Here we create a user through the from_omniauth method, which we wrote in the last step, and save its token, write it in the cookie so that when you restart the browser, you can return this session.
app / controllers / sessions_controller.rb:
Let the application muzzle stay in the session controller for now, so the index method is here.
7. In order to have access to the current user, add the current_user method to the ApplicationController, which searches for the user in the database if we have a cookie with its token.
app / controllers / application_controller.rb:
8. We display the link to the username on the face or show the current user with the link to the output.
app / views / sessions / index.html.erb:
Along the way / auth / coub, he omnia omniauth-oauth2 will transfer to the login page on coub.com.
9. Register routes:
config / routes.rb:
With authorization everything. Go to memegenerator.dev , check. It should look something like this:
Now we have a user in the database with a token that can make requests through the Coub API.
Having a token you can make requests to the API. These are common HTTP requests, as in a browser. GET requests can also be tested in a browser. Each request, in addition to its own parameters, must contain the access_token parameter with the user's token, which the authorization server previously issued to us.
For example, to like a cob, you need to do something like this:
Some requests can be done without a token, for example, info about Kobe (without a token, only public cobs are available). This is a GET request, this link can be opened simply in the browser:
All these requests are well documented, the full list can be found here: coub.com/dev/docs/Coub+API/Overview
Each time manually making requests and adding a token is inconvenient, therefore we will add the User model to the client method through which we will make requests:
app / models / user.rb:
Gemfile:
We make requests via Faraday, this is an HTTP client on Ruby.
Run the console, test requests for api:
Answers are given in JSON format, so if we want to read what the server returned, we need to parse the answer with the standard JSON library:
We have a Koba ID, let's like it:
We have a video, a frame from the film, we need to put the text on it three times at different times. To work with video through the console, there is the ffmpeg program; in it, through the console, you can do almost anything with video.
On a poppy through Homebrew, it is placed like this:
We put the text through ffmpeg with the drawtext filter:
This line means:
1. ffmpeg -i template.mp4 -vf : take the video file template.mp4. The file for this tutorial can be downloaded here .
2. drawtext = enable : overlay text
3. between (t, 1,2) : from first to second second
4. fontfile = PFDinTextCondPro-XBlack.ttf : use TTF font file
5. text = Blah : write the text Blah
6. fontsize = 40 : font size
7. fontcolor = white : white
8. x = (w-tw) / 2: y = (h * 0.9-th) : text position in the center below (w and h is the size of the video, tw and th is the size of the block with text)
9. output.mp4 : write everything to this file
To write three texts, you just need to write three drawtext separated by a comma:
In the tempo folder, you can fold the file template.mp4 and the font file (you can take any TTF from the font folder) and try to start it in the console, it should generate the correct video.
We have a video, now we need to make a cob out of it.
Cob through the API is pumped in three stages:
1. First, we initialize the download with the POST coubs / init_upload request, in response we get the id of the coba and its permalink.
2. Uploading video with POST coubs /: id / upload_video request. The file is transmitted in the request body, video / mp4 must be transferred to the Content-Type header:
If we want to upload a separate soundtrack to Koba, then this can be done by a separate query coubs /: id / upload_audio. This time we do not need this, so we omit this request.
3. We finalize the creation of a kob with a POST coubs /: id / finalize_upload request, in the parameters we transfer the title, privacy settings, tags, whether the sound is on.
After downloading Koba, it will take some time to process: the video on the Koba servers will be converted into several formats for different platforms, thumbnails and a bunch of all such resource-intensive things will be generated. Conversion progress can be checked GET request coubs /: id / finalize_status. It gives something like this JSON {percent_done: 20, done: false}.
OK. We tested it in the console, now all this needs to be assembled into the application.
Create a Coub model:
2. We make the method generate_video_file, which generates a video from a video template and three texts located in the text1, text2, text3 fields. Template video and font put in the assets. We put the finished video in the tmp folder.
app / models / coub.rb:
3. We make a method that in three stages uploads a video to Kob:
app / models / coub.rb:
4. We register that Cob belongs to the user and at the same time we write the client method for convenient access to the client through the user:
app / models / coub.rb:
5. The url method returns the url to the permalink:
app / models / coub.rb:
Check if everything works:
You can go to this URL and look at the blue screen “Your coub is being processed”.
It remains to do for all this controller:
1. Create a coubs controller. It will consist of two methods: index (this will be a new face, instead of sessions # index) and create. When creating a Koba, we immediately redirect to it.
app / controllers / coubs_controller.rb:
2. Drag index.html.erb from sessions to coubs and fasten the form there:
app / views / coubs / index.html.erb:
Everything, now we come into the browser, and we check that everything works:
In this tutorial, I described only the principle of the API. Of course, for this application, there is a lot more to add: validation, validation of API responses, error handling, drawing interface, tests. A slightly doped version of this script is here http://fantozzi.dev2.workisfun.ru , everything is the same there, but the video is being prepared and uploaded asynchronously via delayed_job.
The sources of this tutorial are in the githaba: https://github.com/igorgladkoborodov/memegenerator/ .
If you have any questions about this tutorial or API, write to igor@coub.com .
In this tutorial, I'll show you how to make the simplest Koba client on Ruby on Rails. The application allows you to log in through Cob and generate such a cob with any text:
')
The working version of this application is at fantozzi.dev2.workisfun.ru , the application code from this tutorial can be viewed on GitHub: github.com/igorgladkoborodov/memegenerator
Oauth
Cob uses the standard protocol to authorize OAuth 2.0 . It is used in many services that provide an external API (Facebook, for example), it has a lot of documentation and libraries for any platform.
It works like this: the application with its unique key goes to a special page on coub.com, where Kob asks if the user agrees to give the application access. If the user allows, Cob returns the user back to the application, and with the request returns the user's token, which is then used for all user API requests. The same happens, for example, when logging in via Facebook or Twitter.
We will write on RoR and for authorization through OAuth for rails everything has been written for a long time, we will use for this the omniauth-oauth2 heme and the official Cobov omniauth-coub gem .
Application Creation and Authorization
Create an application with the eloquent title memegenerator and fasten it to Pow (or who uses what):
$ cd ~/apps/ $ rails new memegenerator $ ln -s ~/apps/memegenerator/ ~/.pow/memegenerator We check in the browser that we have an empty rail application at memegenerator.dev .
2. Register our new application at coub.com/dev/applications
In the Website field we specify the URL of our test application, in the Callback URL field we write
http://memegenerator.dev/auth/coub/callback
After creating the application, Kob will give us Application ID and Secret, we will need them further:
3. Install the omniauth-coub hem:
Gemfile:
gem "omniauth-coub" $ bundle install 4. Add cob to omniauth providers:
config / initializers / omniauth.rb:
Rails.application.config.middleware.use OmniAuth::Builder do provider :coub, ENV["COUB_KEY"], ENV["COUB_SECRET"], scope: "logged_in,create" end COUB_KEY and COUB_SECRET are the Application ID and Secret from the previous step, you can add them to the ENV variables or, for the test, insert the lines right here, although it’s undesirable to leave keys in the code, you know.
If you have Pow, then you can add variables in the .powenv file in the application root:
.powenv:
export COUB_KEY="[Application ID]" export COUB_SECRET="[Secret]" In scope, you can specify what rights the application will have. Our application is only needed to create cobs, so we will not ask for anything extra, just authorization and creation of a cob: logged_in, create. A complete list of access modes can be found in the API documentation .
5. We create a user model with the from_omniauth method, which creates or finds in the user base the data that the authorization server transmitted to us on Kobe.
What happens at this point and in the pair of the following points is well explained in one of the episodes of RailsCasts .
$ rails g model user provider:string uid:string auth_token:string name:string $ rake db:migrate app / models / user.rb:
class User < ActiveRecord::Base def self.from_omniauth(auth) where(provider: auth.provider, uid: auth.uid).first_or_initialize.tap do |user| user.auth_token = auth.credentials.token user.name = auth.extra.raw_info.name user.save! end end end 6. Create a session controller. Through it we create and delete a session.
The create method is the place where the user is returned with his token and authorization data. Here we create a user through the from_omniauth method, which we wrote in the last step, and save its token, write it in the cookie so that when you restart the browser, you can return this session.
$ rails g controller sessions app / controllers / sessions_controller.rb:
class SessionsController < ApplicationController def create user = User.from_omniauth(env["omniauth.auth"]) cookies.permanent[:auth_token] = user.auth_token redirect_to root_url end def destroy cookies.delete(:auth_token) redirect_to root_url end def index end end Let the application muzzle stay in the session controller for now, so the index method is here.
7. In order to have access to the current user, add the current_user method to the ApplicationController, which searches for the user in the database if we have a cookie with its token.
app / controllers / application_controller.rb:
helper_method :current_user def current_user @current_user ||= User.find_by_auth_token(cookies[:auth_token]) if cookies[:auth_token] end 8. We display the link to the username on the face or show the current user with the link to the output.
app / views / sessions / index.html.erb:
<% if current_user %> <%= current_user.name %> <%= link_to "Log out", logout_path, method: :delete %> <% else %> <%= link_to "Auth with Coub", "/auth/coub" %> <% end %> Along the way / auth / coub, he omnia omniauth-oauth2 will transfer to the login page on coub.com.
9. Register routes:
config / routes.rb:
Rails.application.routes.draw do root "sessions#index" get "/auth/:provider/callback" => "sessions#create" delete "logout" => "sessions#destroy" end With authorization everything. Go to memegenerator.dev , check. It should look something like this:
Now we have a user in the database with a token that can make requests through the Coub API.
API Requests
Having a token you can make requests to the API. These are common HTTP requests, as in a browser. GET requests can also be tested in a browser. Each request, in addition to its own parameters, must contain the access_token parameter with the user's token, which the authorization server previously issued to us.
For example, to like a cob, you need to do something like this:
POST http://coub.com/api/v2/likes?id=[coub_id]&channel_id=[channel_id]&access_token=[users_token] Some requests can be done without a token, for example, info about Kobe (without a token, only public cobs are available). This is a GET request, this link can be opened simply in the browser:
GET http://coub.com/api/v2/coubs/4yp6r All these requests are well documented, the full list can be found here: coub.com/dev/docs/Coub+API/Overview
Customer
Each time manually making requests and adding a token is inconvenient, therefore we will add the User model to the client method through which we will make requests:
app / models / user.rb:
def client @client ||= Faraday.new(:url => "http://coub.com/api/v2/", :params => {:access_token => auth_token}) end Gemfile:
gem "faraday" $ bundle install We make requests via Faraday, this is an HTTP client on Ruby.
Run the console, test requests for api:
$ rails c > user = User.first > user.client.get "coubs/4yp6r" Answers are given in JSON format, so if we want to read what the server returned, we need to parse the answer with the standard JSON library:
> coub_info = JSON.parse(user.client.get("coubs/4yp6r").body) > coub_info["id"] => 9090841 We have a Koba ID, let's like it:
> user.client.post "likes?id=#{coub_info["id"]}" Generate video
We have a video, a frame from the film, we need to put the text on it three times at different times. To work with video through the console, there is the ffmpeg program; in it, through the console, you can do almost anything with video.
On a poppy through Homebrew, it is placed like this:
$ brew install ffmpeg --with-freetype We put the text through ffmpeg with the drawtext filter:
$ ffmpeg -i template.mp4 -vf "drawtext=enable='between(t,1,2)':text=Blah:fontfile=PFDinTextCondPro-XBlack.ttf:fontsize=40:fontcolor=white:x=(w-tw)/2:y=(h*0.9-th)" output.mp4 This line means:
1. ffmpeg -i template.mp4 -vf : take the video file template.mp4. The file for this tutorial can be downloaded here .
2. drawtext = enable : overlay text
3. between (t, 1,2) : from first to second second
4. fontfile = PFDinTextCondPro-XBlack.ttf : use TTF font file
5. text = Blah : write the text Blah
6. fontsize = 40 : font size
7. fontcolor = white : white
8. x = (w-tw) / 2: y = (h * 0.9-th) : text position in the center below (w and h is the size of the video, tw and th is the size of the block with text)
9. output.mp4 : write everything to this file
To write three texts, you just need to write three drawtext separated by a comma:
$ ffmpeg -i template.mp4 -vf "drawtext=enable='between(t,1,2)':text=Text1:fontfile=PFDinTextCondPro-XBlack.ttf:fontsize=40:fontcolor=white:x=(w-tw)/2:y=(h*0.9-th), drawtext=enable='between(t,3,5)':text=Text2:fontfile=PFDinTextCondPro-XBlack.ttf:fontsize=40:fontcolor=white:x=(w-tw)/2:y=(h*0.9-th), drawtext=enable='between(t,6.3,8)':text=Text3:fontfile=PFDinTextCondPro-XBlack.ttf:fontsize=40:fontcolor=white:x=(w-tw)/2:y=(h*0.9-th)" output.mp4 In the tempo folder, you can fold the file template.mp4 and the font file (you can take any TTF from the font folder) and try to start it in the console, it should generate the correct video.
Uploading video
We have a video, now we need to make a cob out of it.
Cob through the API is pumped in three stages:
1. First, we initialize the download with the POST coubs / init_upload request, in response we get the id of the coba and its permalink.
$ rails c > user = User.first > init_response = JSON.parse(user.client.post("coubs/init_upload").body) > coub_id = init_response["id"] > permalink = init_response["permalink"] 2. Uploading video with POST coubs /: id / upload_video request. The file is transmitted in the request body, video / mp4 must be transferred to the Content-Type header:
> user.client.post do |r| r.url "coubs/#{coub_id}/upload_video" r.headers["Content-Type"] = "video/mp4" r.body = File.open("tmp/output.mp4", "r").read end If we want to upload a separate soundtrack to Koba, then this can be done by a separate query coubs /: id / upload_audio. This time we do not need this, so we omit this request.
3. We finalize the creation of a kob with a POST coubs /: id / finalize_upload request, in the parameters we transfer the title, privacy settings, tags, whether the sound is on.
> user.client.post "coubs/#{coub_id}/finalize_upload", title: "Test coub", original_visibility_type: "private", tags: "tag1, tag2, tag3", sound_enabled: true After downloading Koba, it will take some time to process: the video on the Koba servers will be converted into several formats for different platforms, thumbnails and a bunch of all such resource-intensive things will be generated. Conversion progress can be checked GET request coubs /: id / finalize_status. It gives something like this JSON {percent_done: 20, done: false}.
> user.client.get "coubs/#{coub_id}/finalize_status" OK. We tested it in the console, now all this needs to be assembled into the application.
Coub Model
Create a Coub model:
$ rails g model coub user:belongs_to title:string visibility_type:string tags:string permalink:string coub_id:string text1:string text2:string text3:string $ rake db:migrate 2. We make the method generate_video_file, which generates a video from a video template and three texts located in the text1, text2, text3 fields. Template video and font put in the assets. We put the finished video in the tmp folder.
app / models / coub.rb:
def escape_ffmpeg_text(text) text.to_s.gsub("'", "\\\\\\\\\\\\\\\\\\\\\\\\'").gsub(":", "\\\\\\\\\\\\\\\\:").mb_chars.upcase # Crazy ffmpeg escaping end def ffmpeg_drawtext(text, from, to) font_file = File.join(Rails.root, "app", "assets", "fonts", "PFDinTextCondPro-XBlack.ttf") "drawtext=enable='between(t,#{from},#{to})':text=#{escape_ffmpeg_text(text)}:fontfile=#{font_file}:fontsize=40:fontcolor=white:x=(w-tw)/2:y=(h*0.9-th)" end def generate_video_file self.video_file = File.join(Rails.root, "tmp", "output-#{Time.now.to_i}.mp4") template_file = File.join(Rails.root, "app", "assets", "videos", "template.mp4") `ffmpeg -i #{template_file} -vf \"#{ffmpeg_drawtext(text1, 1, 2)}, #{ffmpeg_drawtext(text2, 3, 5)}, #{ffmpeg_drawtext(text3, 6.3, 8)}\" #{video_file}` return video_file end 3. We make a method that in three stages uploads a video to Kob:
app / models / coub.rb:
def upload_video self.title ||= text2 self.visibility_type ||= "private" self.tags ||= "" init_response = JSON.parse(client.post("coubs/init_upload").body) self.coub_id = init_response["id"] self.permalink = init_response["permalink"] save client.post do |r| r.url "coubs/#{coub_id}/upload_video" r.headers["Content-Type"] = "video/mp4" r.body = File.open(video_file, "r").read end client.post "coubs/#{coub_id}/finalize_upload", title: title, original_visibility_type: visibility_type, tags: tags, sound_enabled: true end def generate_and_upload_video generate_video_file upload_video end 4. We register that Cob belongs to the user and at the same time we write the client method for convenient access to the client through the user:
app / models / coub.rb:
belongs_to :user def client @client ||= user.client end 5. The url method returns the url to the permalink:
app / models / coub.rb:
def url "http://coub.com/view/#{permalink}" end Check if everything works:
$ rails c > coub = Coub.new > coub.user = User.first > coub.text1 = 'Text 1' > coub.text2 = 'Text 2' > coub.text3 = 'Text 3' > coub.tags = 'tag1, tag2, tag3' > coub.visibility_type = 'unlisted' > coub.generate_and_upload_video > coub.url => "http://coub.com/view/5dbyc" You can go to this URL and look at the blue screen “Your coub is being processed”.
It remains to do for all this controller:
1. Create a coubs controller. It will consist of two methods: index (this will be a new face, instead of sessions # index) and create. When creating a Koba, we immediately redirect to it.
$ rails g controller coubs app / controllers / coubs_controller.rb:
class CoubsController < ApplicationController def index end def create @coub = Coub.create(coub_params.merge(:user => current_user)) @coub.generate_and_upload_video redirect_to @coub.url end private def coub_params params.require(:coub).permit(:text1, :text2, :text3, :visibility_type, :tags) end end 2. Drag index.html.erb from sessions to coubs and fasten the form there:
app / views / coubs / index.html.erb:
<% if current_user %> <p>You're logged in as <%= current_user.name %>. <%= link_to "Log out", logout_path, method: :delete %></p> <%= form_for Coub.new, url: {action: "create"} do |f| %> <%= f.text_field :text1, placeholder: "To me", maxlength: 30, size: 50 %><br /> <%= f.text_field :text2, placeholder: "Your Coub API", maxlength: 30, size: 50 %><br /> <%= f.text_field :text3, placeholder: "Is a piece of shit", maxlength: 30, size: 50 %><br /> <%= f.select :visibility_type, options_for_select(["public", "friends", "unlisted", "private"]) %><br /> <%= f.text_field :tags, placeholder: "first tag, second tag" %><br /> <%= f.submit "Create Coub" %> <% end %> <% else %> <p>Please <a href="/auth/coub">log in via Coub</a>.</p> <% end %> Everything, now we come into the browser, and we check that everything works:
In this tutorial, I described only the principle of the API. Of course, for this application, there is a lot more to add: validation, validation of API responses, error handling, drawing interface, tests. A slightly doped version of this script is here http://fantozzi.dev2.workisfun.ru , everything is the same there, but the video is being prepared and uploaded asynchronously via delayed_job.
The sources of this tutorial are in the githaba: https://github.com/igorgladkoborodov/memegenerator/ .
If you have any questions about this tutorial or API, write to igor@coub.com .
Source: https://habr.com/ru/post/252803/
All Articles