How to create instances in Google Cloud, set up access and hook Bucket to it. Howto
Good to all who read!
I post this how-hot in order to, firstly, not to forget how to do it, and secondly, to help someone create instances in the Google cloud.
Solved problems:
The question: “Why is cloud.google?” We leave on the customer’s conscience. The moped was not mine, I just understood with a new VPS control system. And the following is offered there (I state in a thesis):
')
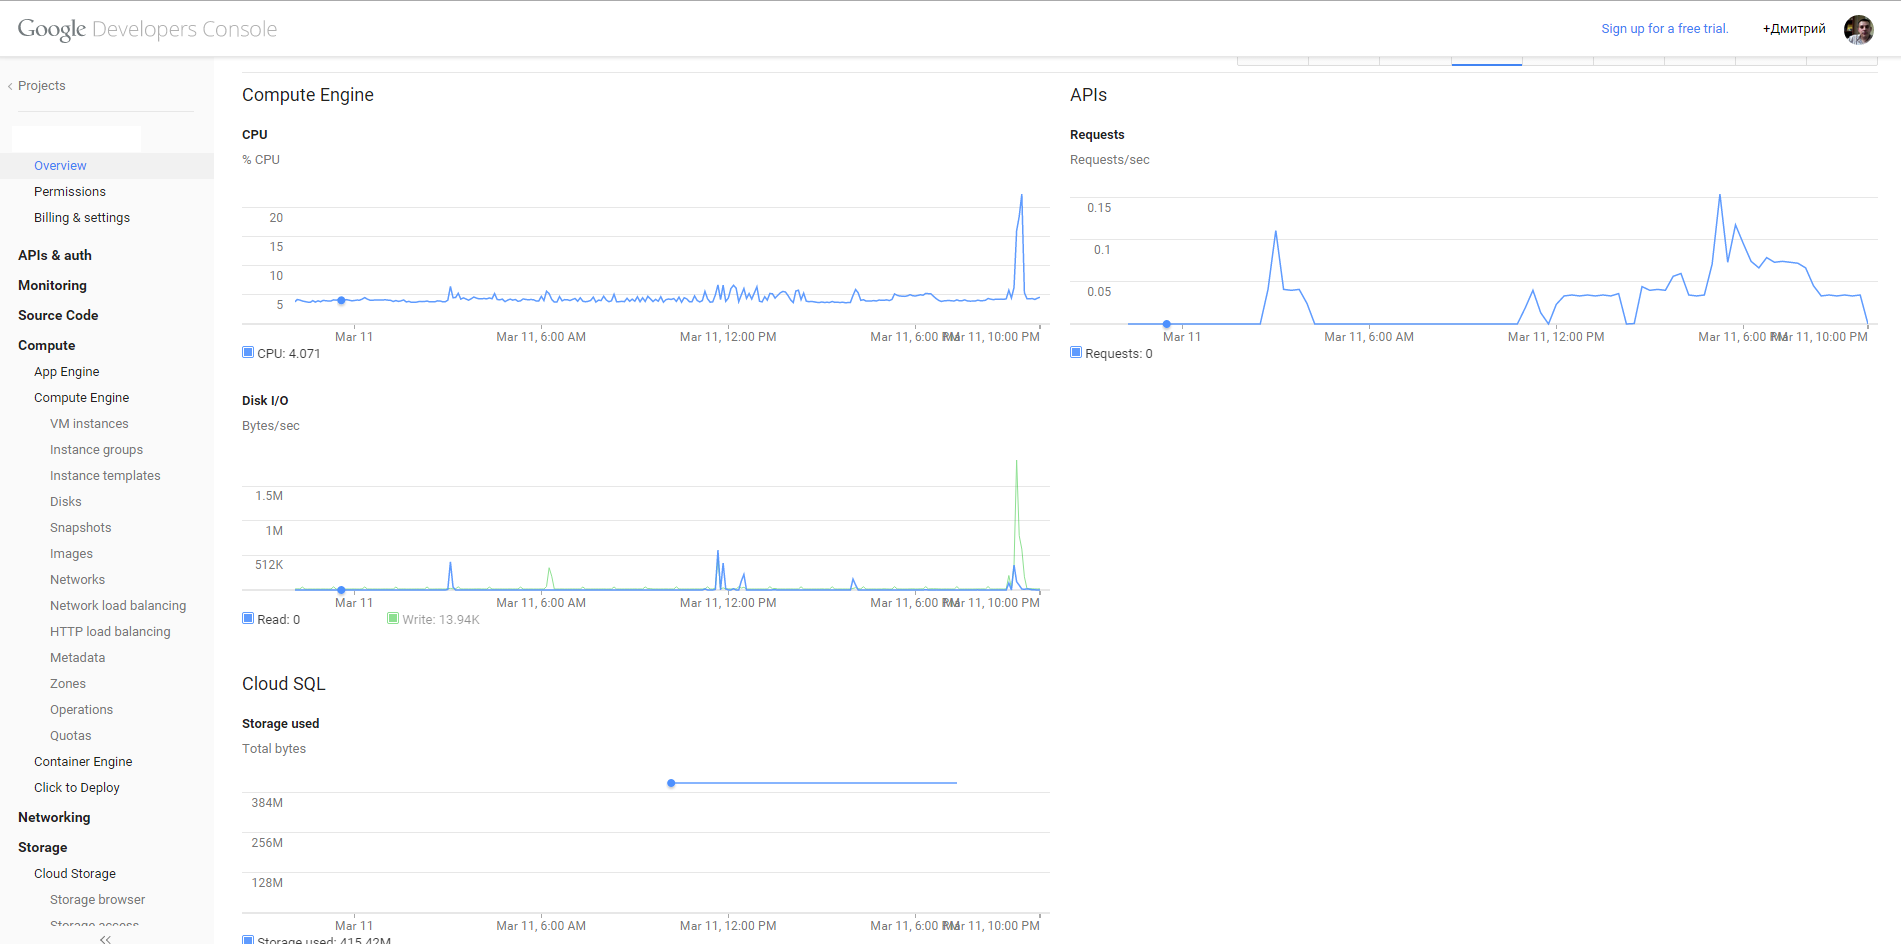
I used the section Compute Engine, Storage, Networking, Storage.
There is an end to the hautushek who has opened at least one spoiler - well done.
A big request. Relying on the previous experience of writing articles on Habrahabre, I ask you to take a reasonable basis. Otherwise, the risk never to understand what my shortcomings are: in the style of presentation, in specifics, in the perception and presentation of information by me. For each comment I will send positive rays.
UPD <12.03.2015>: It turned out that in the Google Cloud instance, sending over port 25 (and connection to another server on port 25) is closed. Totally. Instead, it is proposed to use a relay mail server with sending on port 587.
I post this how-hot in order to, firstly, not to forget how to do it, and secondly, to help someone create instances in the Google cloud.
Solved problems:
- Three instances in different regions of Europe
- shared drive for two instances
- http load balancer
- MySQL cloud base
- from the third instance upload files to google bucket
The question: “Why is cloud.google?” We leave on the customer’s conscience. The moped was not mine, I just understood with a new VPS control system. And the following is offered there (I state in a thesis):
- App Engine - Service for applications and collaboration with the code. Who is interested in documentation
- Compute Engine - actually VPS, drives to them, firewall (s), balasiers (about them further, still at a loss why there are two), managing snapshots and quotas
- Networking - Cloud DNS from Google and VPN
- Storage - cloud storage, data storage and cloud SQL (MySQL)
- BigData - something super-simple and totally unclear to me
')
I used the section Compute Engine, Storage, Networking, Storage.
1. Creating an instance.
I begin to deploy any virtual machine by designing a disk for it. Below is a screen:

The screenshots open areas in which you can create a disc. We are interested in Europe. I draw your attention, it is indicated that the data center "a" in Europe will be closed. An inquisitive reader can search for the location of the centers b, c, and d; in fact, I’m a little concerned about the physical location.
In my account, you can create a “Standard Persistent Disk” with a maximum size of up to 240 Gb. The primitive read / write speed test of the disk is below:
The source type for the disk (Source Type): Image, Snapshot, Blank, respectively, pre-installed OS image, from the system snapshot or an empty disk.

Personally, I was interested in Debian, besides it, Google offers to deploy CentOS, CoreOS, OpenSUSE, Ubuntu, RHEL, Sles and Windows Server 2008.
Created a 10 GB drive with Debian Wheezy in the “B” and “C” Europe area. Then in the "C" deleted. The task is to deploy a working server and make it a mirror. And if so, then we will expand the disk in the “C” area from the snapshot of the disk in the “B” area.
Now we create the instance itself:

The list of possible (available to me) VPS options, though it covers the choice of default firewall options from google: HTTP Traffic and HTTPS Traffic
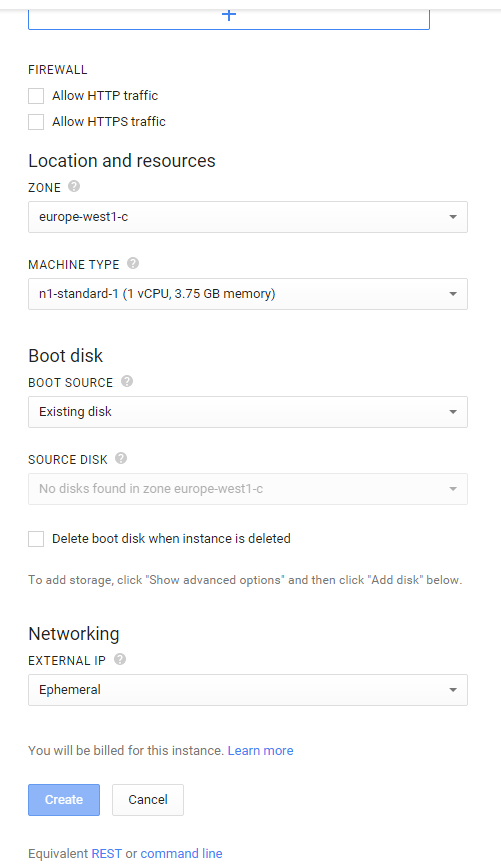
We mark both options, go ahead - select the Exiting Disk and tell which disk to connect to the machine. I must say that the second disk when I hooked to the instance, everything was done “on hot” - / dev / sdb appeared, which I successfully split and mounted without rebooting the instance.
By the way, you can delete the disk during the instance deletion: you need to select the corresponding item below the selection of the disk type.
When creating the Networking section, only the IP address is available - the internal network or a white IP.
By the way, ISPanel still does not understand that there are Amazon, Google and other services that do not have an IP address registered in the network settings. Installation and licensing of the panel are complicated by waiting for technical support or creating a virtual interface with the desired ISPanel address. Well, uncomfortable!
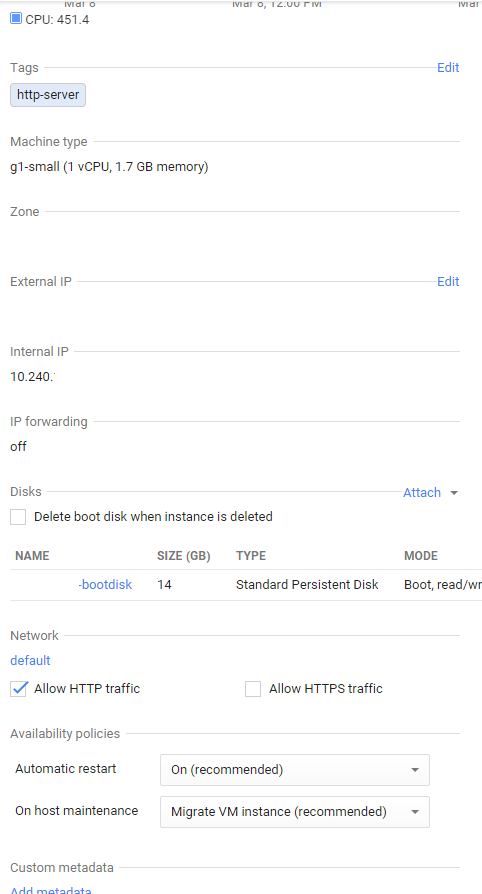
When the instance is created, you can go to its settings and see:
And it will be puzzled with the question: “how do I get access via SSH?”. Here I actually studied the subject for about 30 minutes, the following happened:
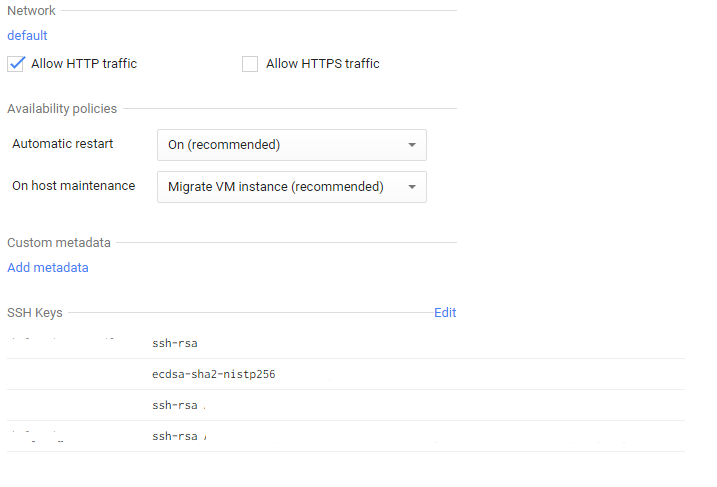
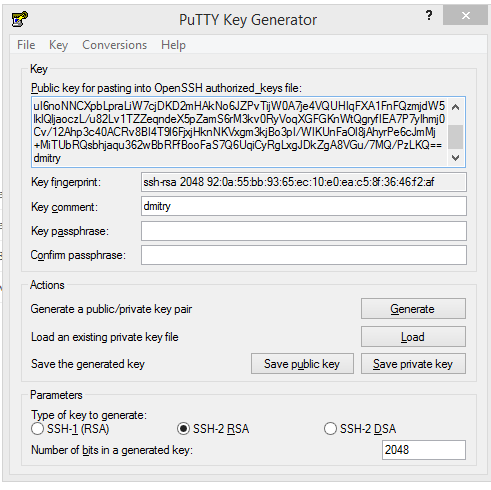
In the SSH key control block, a key is entered that is generated, for example, PuttyGen.
a) Run
b) click Generate
c) chatting with the mouse
d) get the key
d) change the Key Comment to the username
e) Save public key
g) Save private key - do not protect the file with a password
h) Copy / Paste from a window in SSH Keys a string like ssh-rsa ABRAKADABRA dmitry
If we stick a white IP, then we can go log in with the username in the created instance (in Putty, the key file is specified in the settings: Connection-> SSH-> Auth). And you can log into the console via a web interface from Google (at the top of the SSH button). And probably you can configure VPN from the corresponding section to access the closed server, did not try.
The screenshots open areas in which you can create a disc. We are interested in Europe. I draw your attention, it is indicated that the data center "a" in Europe will be closed. An inquisitive reader can search for the location of the centers b, c, and d; in fact, I’m a little concerned about the physical location.
In my account, you can create a “Standard Persistent Disk” with a maximum size of up to 240 Gb. The primitive read / write speed test of the disk is below:
sync; dd if=/dev/zero of=/tempfile bs=1M count=4096; sync && dd if=/tempfile of=/dev/null bs=1M count=4096 && /sbin/sysctl -w vm.drop_caches=3 && dd if=/tempfile of=/dev/null bs=1M count=4096 4096+0 records in 4096+0 records out 4294967296 bytes (4.3 GB) copied, 112.806 s, 38.1 MB/s 4096+0 records in 4096+0 records out 4294967296 bytes (4.3 GB) copied, 52.036 s, 82.5 MB/s vm.drop_caches = 3 4096+0 records in 4096+0 records out 4294967296 bytes (4.3 GB) copied, 52.7394 s, 81.4 MB/s The source type for the disk (Source Type): Image, Snapshot, Blank, respectively, pre-installed OS image, from the system snapshot or an empty disk.
Personally, I was interested in Debian, besides it, Google offers to deploy CentOS, CoreOS, OpenSUSE, Ubuntu, RHEL, Sles and Windows Server 2008.
Created a 10 GB drive with Debian Wheezy in the “B” and “C” Europe area. Then in the "C" deleted. The task is to deploy a working server and make it a mirror. And if so, then we will expand the disk in the “C” area from the snapshot of the disk in the “B” area.
Now we create the instance itself:
The list of possible (available to me) VPS options, though it covers the choice of default firewall options from google: HTTP Traffic and HTTPS Traffic
We mark both options, go ahead - select the Exiting Disk and tell which disk to connect to the machine. I must say that the second disk when I hooked to the instance, everything was done “on hot” - / dev / sdb appeared, which I successfully split and mounted without rebooting the instance.
By the way, you can delete the disk during the instance deletion: you need to select the corresponding item below the selection of the disk type.
When creating the Networking section, only the IP address is available - the internal network or a white IP.
By the way, ISPanel still does not understand that there are Amazon, Google and other services that do not have an IP address registered in the network settings. Installation and licensing of the panel are complicated by waiting for technical support or creating a virtual interface with the desired ISPanel address. Well, uncomfortable!
When the instance is created, you can go to its settings and see:
And it will be puzzled with the question: “how do I get access via SSH?”. Here I actually studied the subject for about 30 minutes, the following happened:
In the SSH key control block, a key is entered that is generated, for example, PuttyGen.
a) Run
b) click Generate
c) chatting with the mouse
d) get the key
d) change the Key Comment to the username
e) Save public key
g) Save private key - do not protect the file with a password
h) Copy / Paste from a window in SSH Keys a string like ssh-rsa ABRAKADABRA dmitry
If we stick a white IP, then we can go log in with the username in the created instance (in Putty, the key file is specified in the settings: Connection-> SSH-> Auth). And you can log into the console via a web interface from Google (at the top of the SSH button). And probably you can configure VPN from the corresponding section to access the closed server, did not try.
2. Instance cloning
It turned out to be simple:
In disks we create a new disk from snapshot in the necessary region and we fasten it to the instance. This completes cloning. It took 10 minutes.
- Compute Engine - New Snapshot
- call snapshot and select the desired drive
- Create
In disks we create a new disk from snapshot in the necessary region and we fasten it to the instance. This completes cloning. It took 10 minutes.
3. Firewall
Compute Engine -> Networks -> Default (Network) -> Firewall rules - New
When setting up a firewall, we are guided by common sense. The syntax is simple.
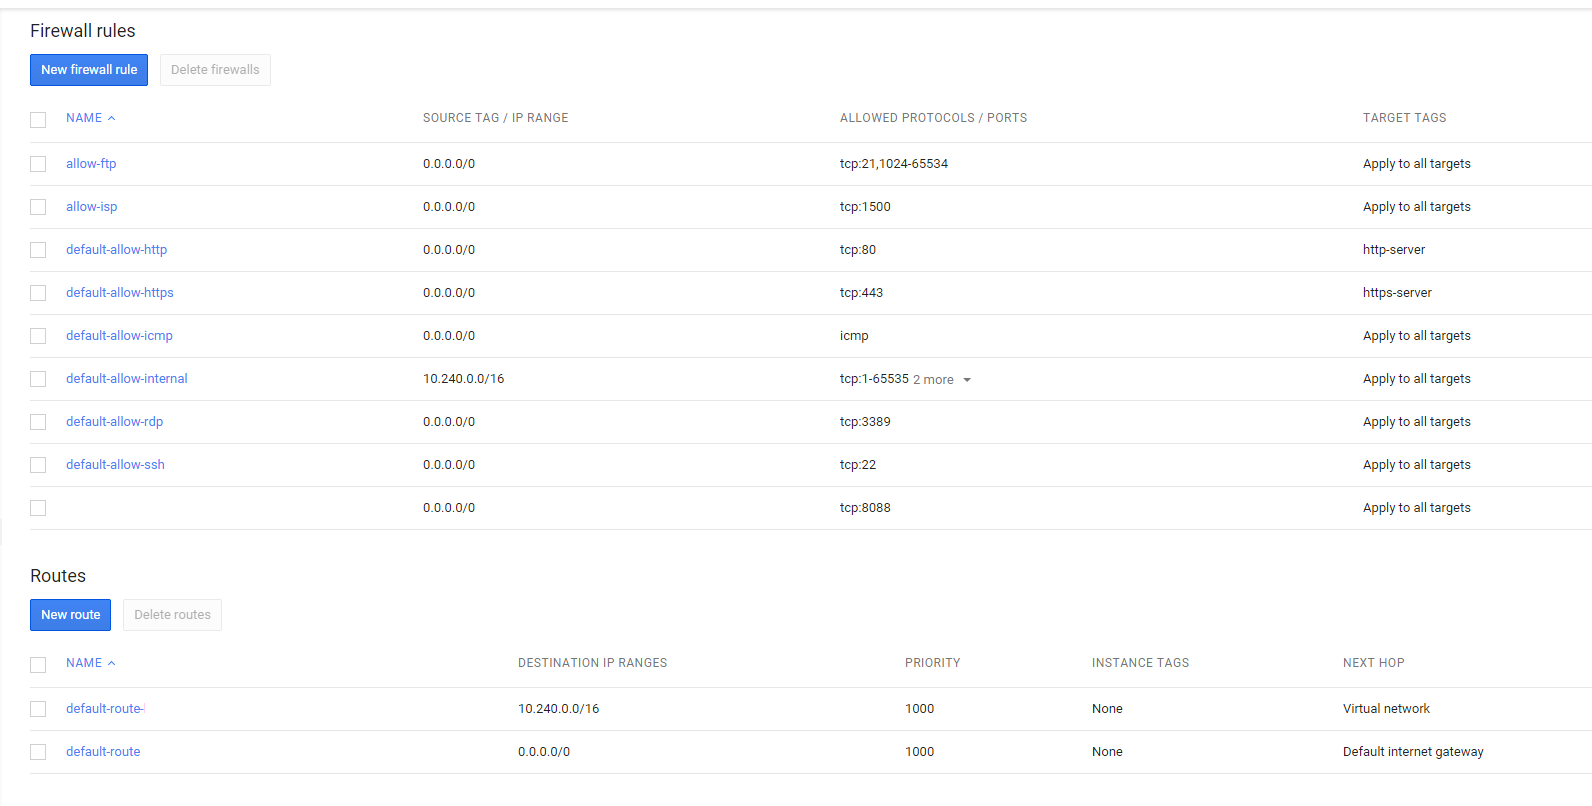
I must say that Google Chrome wonders about 30 minutes and made no rule. Saved Mozilla, but it’s really a long time to make a rule for a firewall, it took me about 3 minutes.
When setting up a firewall, we are guided by common sense. The syntax is simple.
I must say that Google Chrome wonders about 30 minutes and made no rule. Saved Mozilla, but it’s really a long time to make a rule for a firewall, it took me about 3 minutes.
4. Load balancing
I did not understand the difference between Network Load Balancing and HTTP Load Balancing. Both there and there by default http is tested on port 80. We get a new balancer, choose instances that we analyze, assign IP.
I will not add anything more, everything is just like a mallet.
I will not add anything more, everything is just like a mallet.
5. Cloud SQL
To create a cloud-based MySQL instance optimized for databases, go to Storage -> Cloud SQL -> New. I chose the second one in the list: 1Gb of RAM, 250 Gb disk. Tested base 800MB - flies. Well, from the instance, ISPanel was upgraded to the “external” MySQL server.
You can access databases from PHP, Phyton, JAVA, console, and so on. I will give an example for PHP:
And make users through spets.konsol.
And give access to selected instances or IP addresses.

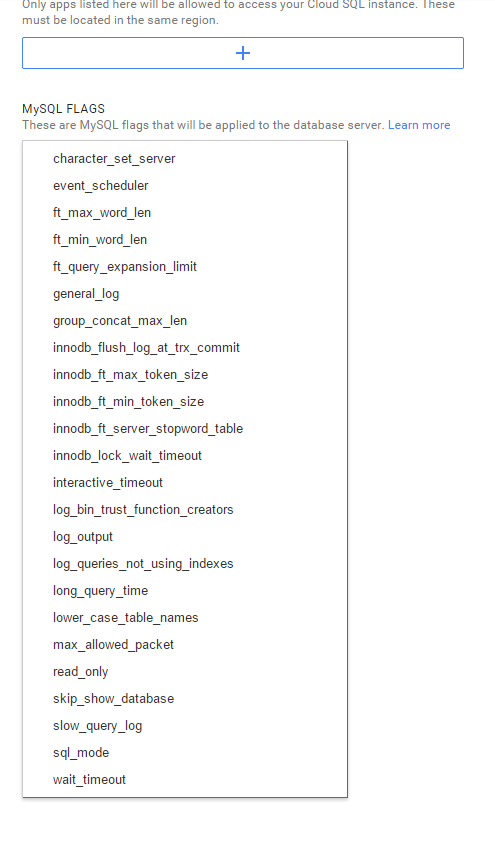
In the Cloud SQL management console, through the EDIT button, you can find the familiar settings for my.cnf.
You can access databases from PHP, Phyton, JAVA, console, and so on. I will give an example for PHP:
// Using PDO_MySQL (connecting from App Engine) $db = new pdo('mysql:unix_socket=/cloudsql/< ID>:< Cloud SQL>'), 'root', // username '' // password ); // Using mysqli (connecting from App Engine) $sql = new mysqli( null, // host 'root', // username '', // password '', // database name null, '/cloudsql/< ID>:< Cloud SQL>' ); // Using MySQL API (connecting from APp Engine) $conn = mysql_connect(':/cloudsql/< ID>:< Cloud SQL>, 'root', // username '' // password ); And make users through spets.konsol.
And give access to selected instances or IP addresses.
In the Cloud SQL management console, through the EDIT button, you can find the familiar settings for my.cnf.
6. Cling Cloud Storage
Unknowingly, I created Bucket from the web interface, although it would be easier to go to the server console and create from there. Google has an API that is preinstalled in instances. I used gsutil:
First you need to update:
Log in:
The link was 10 lines, I cut it a little. From this link we give access from a Google user, we get an ID, which we drive into the verification code:
We have access, in my case, to the Bucket. Well, or we can create:
I threw the file there.
We can synchronize Bucket and system catalog:
And so on and so forth.
In order to mount Bucket gs: // zp-storage / as a directory, you need to use a couple of third-party utilities:
s3fuse is a utility that is used for similar purposes , for example, to mount Amazon S3. They write that with its help Cloud Storage (google) can be mounted, but something I did not find an intelligible config at least with the comment of this action.
gcsfs is a utility that works with Cloud Storage (google) .
From packages on dependences s3fuse did not rise, collected from source codes. The build is ./configure && make && make install, but here’s a list of dependencies:
But gcsfs is from the deb package.
Necessary changes in conf-files for connecting Google Cloud Storage:
The last command launches authorization via WEB using the link of the form
accounts.google.com/o/oauth2/auth?client_idbLaBlABBBBLLLLAAAA
With the receipt of the authorization code, which must be entered in the string to create a connection to the Storage.
I mount it like this:
gsutil Usage: gsutil [-D] [-DD] [-h header]... [-m] [-o] [-q] [command [opts...] args...] First you need to update:
gcloud components update Log in:
root@host:~# gcloud auth login You are running on a GCE VM. It is recommended that you use service accounts for authentication. You can run: $ gcloud config set account ``ACCOUNT'' to switch accounts if necessary. Your credentials may be visible to others with access to this virtual machine. Are you sure you want to authenticate with your personal account? Do you want to continue (Y/n)? y Go to the following link in your browser: https://accounts.google.com/o/oauth2/auth? Enter verification code: The link was 10 lines, I cut it a little. From this link we give access from a Google user, we get an ID, which we drive into the verification code:
We have access, in my case, to the Bucket. Well, or we can create:
:~# gsutil ls gs://storage/ Bucket gsutil mb CommandException: The mb command requires at least 1 argument. Usage: gsutil mb [-c class] [-l location] [-p proj_id] uri.. :~# gsutil ls gs://storage/ gs://storage/gcsfs_0.15-1_amd64.deb I threw the file there.
We can synchronize Bucket and system catalog:
gsutil rsync -d -r gs://zp-storage/ /usr/src And so on and so forth.
In order to mount Bucket gs: // zp-storage / as a directory, you need to use a couple of third-party utilities:
s3fuse is a utility that is used for similar purposes , for example, to mount Amazon S3. They write that with its help Cloud Storage (google) can be mounted, but something I did not find an intelligible config at least with the comment of this action.
gcsfs is a utility that works with Cloud Storage (google) .
From packages on dependences s3fuse did not rise, collected from source codes. The build is ./configure && make && make install, but here’s a list of dependencies:
aptitude install mpi-default-bin mpi-default-dev libboost-all-dev povray libxml++2.6-2 libxml++2.6-dev libfuse-dev libfuse But gcsfs is from the deb package.
Necessary changes in conf-files for connecting Google Cloud Storage:
nano /etc/gcsfs.conf bucket_name=< bucket-> service=google-storage gs_token_file=/etc/gs.token touch /etc/gs.token gcsfs_gs_get_token /etc/gs.token The last command launches authorization via WEB using the link of the form
accounts.google.com/o/oauth2/auth?client_idbLaBlABBBBLLLLAAAA
With the receipt of the authorization code, which must be entered in the string to create a connection to the Storage.
:/etc# /usr/bin/gcsfs Usage: gcsfs [options] <mountpoint> Options: -f stay in the foreground (ie, do not daemonize) -h, --help print this help message and exit -o OPT... pass OPT (comma-separated) to FUSE, such as: allow_other allow other users to access the mounted file system allow_root allow root to access the mounted file system default_permissions enforce permissions (useful in multiuser scenarios) gid=<id> force group ID for all files to <id> config=<file> use <file> rather than the default configuration file uid=<id> force user ID for all files to <id> -v, --verbose enable logging to stderr (can be repeated for more verbosity) -vN, --verbose=N set verbosity to N -V, --version print version and exit I mount it like this:
/usr/bin/gcsfs -o allow_other /<> There is an end to the hautushek who has opened at least one spoiler - well done.
A big request. Relying on the previous experience of writing articles on Habrahabre, I ask you to take a reasonable basis. Otherwise, the risk never to understand what my shortcomings are: in the style of presentation, in specifics, in the perception and presentation of information by me. For each comment I will send positive rays.
UPD <12.03.2015>: It turned out that in the Google Cloud instance, sending over port 25 (and connection to another server on port 25) is closed. Totally. Instead, it is proposed to use a relay mail server with sending on port 587.
Source: https://habr.com/ru/post/252799/
All Articles