Software creation of NinePatchDrawable
The new Android Lollipop has such an interesting component as VectorDrawable . If you use it wisely, you can significantly reduce the volume of the application, saving on graphics resources, plus the use of vector graphics frees us from the dreary process of creating images for different screen densities. The first thought that came to me when I saw VectorDrawable was: “Wow! Can you pull him up like a NinePatch ? ”. It turned out impossible. Here one could be a little upset and be content with the fact that at least icons can be kept in a vector. However, I decided not to stop there. The result was a universal utility that can make NinePatchDrawable out of any Drawable.

In the image you see, a vector is used, but it is spread out in the center. And this is amazing! The ability to stretch the vector only in certain areas provides, in truth, tremendous opportunities. And if you consider that there are projects that allow you to use the vector on earlier versions of the android, vector images begin to show themselves in all their glory.
Before we start the miraculous transformation, let's get into the details and find out how we can achieve the desired result. First, let's try to understand what NinePatchDrawable is. And it consists of two main parts, the first of which is a Bitmap, and the second array of bytes, called “chunk”, contains information about how to stretch this Bitmap. From this it follows that with any Bitmap and the corresponding “chunk” in its hands, it is possible to create NinePatchDrawable to bypass the standard model: create 9.png, put it into a project, compile it.
')
However, in practice, not everything is so simple. The fact is that, in fact, it is not realistic to find documentation about how a “chunk” is formed. Its generation, still at the compilation stage, is handled by the aapt utility, and in the android API there is not a single class that helps in “chunk” generation. I managed to find out what the bulk of the array is. Frankly, I do not fully understand what byte is responsible for what, but this was enough.
Let's sort this array by bytes. Bytes, the purpose of which I do not know, I decided to call the "magic", because of their mystery and mystery. So:
The zero byte stores the boolean value “wasDeserialized”. In all the examples I found, it says that it should be 0x01, but if you specify instead any other value or anything terrible happens, it will automatically be set to true when converting the “chunk” array to a native object.
Padding, XDivs, YDivs and Colors data is stored in int (4 bytes). By the way, this is why Padding does not occupy 4 bytes, by the number of sides, but 16 bytes.
XDivs and YDivs contain areas for stretching along the X and Y axes. The score is kept from scratch. The first number indicates the beginning of the first field, the next at its end, and so on. Then, the following array is described in the same way.
As an example, let's look at the NinePatch image 6 by 6.

Here, a stretchable region along the X axis extends from 2 to 3 pixels, and along the Y axis from 2 to 4. This means that XDivs will consist of [0x02, 0x00, 0x00, 0x00, 0x03, 0x00, 0x00, 0x00], and YDivs of [ 0x02, 0x00, 0x00, 0x00, 0x04, 0x00, 0x00, 0x00]. As the first (second in order) and second (third in order) bytes of the “chunk” array, defining the size of XDivs and YDivs, you should specify 0x02, which means 2 points of 4 bytes each.
For a better understanding of what should be stored in the Colors array, I made some small changes to the previous image, let's look at it again.
As can be seen from the figure, the image can be divided into 9 regions. Colors defines how to draw these regions. There are 2 options:
As it might seem from the name, Colors is responsible for a certain color, however, in this case, its purpose is much more trivial - to indicate the visibility of the region.
For the above image, if we want to leave all the regions visible, we need to specify [0x01, 0x00, 0x00, 0x00] 9 times, and for 3 bytes (4 in order) of the “chunk” array, set the value to 0x09.
A curious note: apparently, the native code involved in drawing is still on the sizes of the Colors array, he himself knows how many regions the image has, and will receive them no matter what size we set for Colors. As a result, there will be an access to the memory area outside our array, as a result, we will get the disappearing sectors that appear, from one drawing to another.
At first, I wondered if this was enough for me to create a full-fledged NinePatch. It turned out enough. The fact is that NinePatch, before using a “chunk”, converts it with the power of the validateNinePatchChunk method into a native Res_png_9patch object. If you look at the source code, you can see by the code, incomprehensible bytes for us are not used, which means you can fill them with any values, such as zeros.
Now, knowing how to generate “chunk”, it will not be difficult to create NinePatch from any image, including Drawable, if you first draw it on a Bitmap. To simplify these steps, I decided to create a class NinePatchBuilder .
The following code shows how to use it in the case of regular Bitmap.
The addStretchSegment methods specify areas for stretching. Since, when creating the NinePatch, images can be used whose size is not known in advance, it was decided to use relative sizes in the range [0, 1]. When you call build, depending on the settings and the size of the Bitmap, an array of “chunk” will be formed and NinePatchDrawable will be created.
This is what happens inside NinePatchBuilder:
The code for the getChunkByteArray method will not be given, since most of its implementation follows from the previously described “chunk” generation algorithm.
Similarly for Drawable. Anything can be a Drawable here, including VectorDrawable. As a result, having only one vector image, we get a complete set of NinePatchDrawable, for all screen densities!
Suppose we have a vector image.
Convert it to NinePatch is easy.
Additionally, you must specify the dimensions in pixels, since not all Drawable have fixed sizes. At the time of the call to build, Drawable will be drawn on the Bitmap and this Bitmap is already used to create the NinePacthDrawable.
Naturally, blindly use Drawable Drawable, not always a good solution, as there are, for example, DrawableContainer and its heirs. To support such complex objects had to go to a certain trick.
This is part of the code from NinePatchBuilder, it creates a new Drawable of the same class as the original using Class.newInstance (), and then fills it with the inflate method. All this is similar to what happens inside a LayoutInflater, with the exception of ResourceWrapper. In it lies the whole essence. If you look into the work of the inflate method, then we will see that the child Drawables are obtained by the getDrawable method from the resources transferred as a parameter. To obtain the desired result, simply override this method.
Thanks to this “tink of ears” we have implemented full support for all heirs of the DrawableContainer with any nesting level, and if you convert a StateListDrawable, then the output will be a StateListDrawable consisting of NinePatchDrawable.
One builder was not enough for me, I decided to go ahead and make a NinePatchInflater class that collects NinePatch from an XML file. As a result, our Drawable can be described as follows:
The file must be in the “xml” folder. Now, the code involved in creating such a drawable can be reduced to a single line.
In addition to making most of the code in a separate file, inflater has another big plus - caching by resource id. The fact is that creating a drawable can be a very expensive operation, especially in our case, when you need to create a bunch of unnecessary objects in the future to get one Drawable. Fortunately, most of the necessary work has already been done in the ConstantState class, we only need to save ConstantState created Drawables in the cache and, if necessary, create new Drawables using the ConstantState.newDrawable () method. I will not go into details, the article turned out to be so expanded, and besides, I didn’t invent anything new, this is how caching takes place in the Resources class.
It turned out quite well, however, to create a full-fledged wrapper over resources so that it would be possible to insert links to these files directly into XML markup, without resorting to writing program code, and it did not work out. As it turned out, when creating a View, in some places, methods with the access modifier “by default” are used, and sometimes the static methods of the Drawable class are called directly. Despite this, I believe that the desired result was achieved, although not fully.
GitHub project: NinePatchBuildUtils
Links for especiallystupid as I am curious:
NinePatch Sources: NinePatch.java and NinePatch.cpp
A place to read about Res_png_9patch: ResourceTypes.h and ResourceTypes.cpp
Thanks for attention!
In the image you see, a vector is used, but it is spread out in the center. And this is amazing! The ability to stretch the vector only in certain areas provides, in truth, tremendous opportunities. And if you consider that there are projects that allow you to use the vector on earlier versions of the android, vector images begin to show themselves in all their glory.
Before we start the miraculous transformation, let's get into the details and find out how we can achieve the desired result. First, let's try to understand what NinePatchDrawable is. And it consists of two main parts, the first of which is a Bitmap, and the second array of bytes, called “chunk”, contains information about how to stretch this Bitmap. From this it follows that with any Bitmap and the corresponding “chunk” in its hands, it is possible to create NinePatchDrawable to bypass the standard model: create 9.png, put it into a project, compile it.
')
However, in practice, not everything is so simple. The fact is that, in fact, it is not realistic to find documentation about how a “chunk” is formed. Its generation, still at the compilation stage, is handled by the aapt utility, and in the android API there is not a single class that helps in “chunk” generation. I managed to find out what the bulk of the array is. Frankly, I do not fully understand what byte is responsible for what, but this was enough.
What is “chunk”?
Let's sort this array by bytes. Bytes, the purpose of which I do not know, I decided to call the "magic", because of their mystery and mystery. So:
- [0] - wasDeserialized flag;
- [1] - indicates the number of points in the XDivs array;
- [2] - indicates the number of points in the array YDivs;
- [3] - indicates the number of points in the Colors array;
- [4-11] - 8 "magic" bytes;
- [12-27] - 16 bytes for Padding;
- [28-31] - 4 "magic" bytes;
- [32- ~] - Next is the enumeration of XDivs, YDivs and Colors arrays.
The zero byte stores the boolean value “wasDeserialized”. In all the examples I found, it says that it should be 0x01, but if you specify instead any other value or anything terrible happens, it will automatically be set to true when converting the “chunk” array to a native object.
Padding, XDivs, YDivs and Colors data is stored in int (4 bytes). By the way, this is why Padding does not occupy 4 bytes, by the number of sides, but 16 bytes.
XDivs and YDivs contain areas for stretching along the X and Y axes. The score is kept from scratch. The first number indicates the beginning of the first field, the next at its end, and so on. Then, the following array is described in the same way.
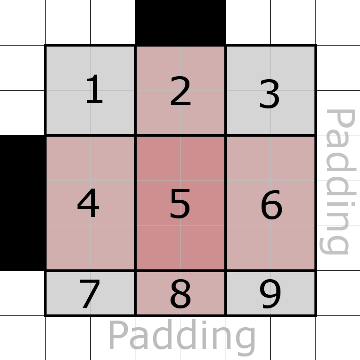
As an example, let's look at the NinePatch image 6 by 6.
Here, a stretchable region along the X axis extends from 2 to 3 pixels, and along the Y axis from 2 to 4. This means that XDivs will consist of [0x02, 0x00, 0x00, 0x00, 0x03, 0x00, 0x00, 0x00], and YDivs of [ 0x02, 0x00, 0x00, 0x00, 0x04, 0x00, 0x00, 0x00]. As the first (second in order) and second (third in order) bytes of the “chunk” array, defining the size of XDivs and YDivs, you should specify 0x02, which means 2 points of 4 bytes each.
For a better understanding of what should be stored in the Colors array, I made some small changes to the previous image, let's look at it again.
As can be seen from the figure, the image can be divided into 9 regions. Colors defines how to draw these regions. There are 2 options:
- 0x00000000 (TRASPARENT) region will be transparent.
- 0x00000001 (NO_COLOR) region will be visible.
As it might seem from the name, Colors is responsible for a certain color, however, in this case, its purpose is much more trivial - to indicate the visibility of the region.
For the above image, if we want to leave all the regions visible, we need to specify [0x01, 0x00, 0x00, 0x00] 9 times, and for 3 bytes (4 in order) of the “chunk” array, set the value to 0x09.
A curious note: apparently, the native code involved in drawing is still on the sizes of the Colors array, he himself knows how many regions the image has, and will receive them no matter what size we set for Colors. As a result, there will be an access to the memory area outside our array, as a result, we will get the disappearing sectors that appear, from one drawing to another.
At first, I wondered if this was enough for me to create a full-fledged NinePatch. It turned out enough. The fact is that NinePatch, before using a “chunk”, converts it with the power of the validateNinePatchChunk method into a native Res_png_9patch object. If you look at the source code, you can see by the code, incomprehensible bytes for us are not used, which means you can fill them with any values, such as zeros.
NinePatchBuilder
Now, knowing how to generate “chunk”, it will not be difficult to create NinePatch from any image, including Drawable, if you first draw it on a Bitmap. To simplify these steps, I decided to create a class NinePatchBuilder .
The following code shows how to use it in the case of regular Bitmap.
NinePatchBuilder ninePatchBuilder = new NinePatchBuilder(getResources()) .addStretchSegmentX(0.49f, 0.51f) .addStretchSegmentY(0.49f, 0.51f) .setBitmap(bitmap); Drawable drawable = ninePatchBuilder.build(); The addStretchSegment methods specify areas for stretching. Since, when creating the NinePatch, images can be used whose size is not known in advance, it was decided to use relative sizes in the range [0, 1]. When you call build, depending on the settings and the size of the Bitmap, an array of “chunk” will be formed and NinePatchDrawable will be created.
This is what happens inside NinePatchBuilder:
// NinePatchBuilder. private Drawable buildFromBitmap(Bitmap bitmap) { return new NinePatchDrawable(mResources, bitmap, getChunkByteArray(bitmap), getPaddingRect(bitmap.getWidth(), bitmap.getHeight()), mSrcName); } The code for the getChunkByteArray method will not be given, since most of its implementation follows from the previously described “chunk” generation algorithm.
Similarly for Drawable. Anything can be a Drawable here, including VectorDrawable. As a result, having only one vector image, we get a complete set of NinePatchDrawable, for all screen densities!
Suppose we have a vector image.
android.xml
<?xml version="1.0" encoding="utf-8"?> <vector xmlns:android="http://schemas.android.com/apk/res/android" android:width="500dp" android:height="500dp" android:viewportWidth="500" android:viewportHeight="500"> <group> <path android:fillColor="#9FBF3B" android:pathData="M301.314,83.298l20.159-29.272c1.197-1.74,0.899-4.024-0.666-5.104c-1.563-1.074-3.805-0.543-4.993,1.199 L294.863,80.53c-13.807-5.439-29.139-8.47-45.299-8.47c-16.16,0-31.496,3.028-45.302,8.47l-20.948-30.41 c-1.201-1.74-3.439-2.273-5.003-1.199c-1.564,1.077-1.861,3.362-0.664,5.104l20.166,29.272 c-32.063,14.916-54.548,43.26-57.413,76.34h218.316C355.861,126.557,333.375,98.214,301.314,83.298" /> <path android:fillColor="#FFFFFF" android:pathData="M203.956,129.438c-6.673,0-12.08-5.407-12.08-12.079c0-6.671,5.404-12.08,12.08-12.08 c6.668,0,12.073,5.407,12.073,12.08C216.03,124.03,210.624,129.438,203.956,129.438" /> <path android:fillColor="#FFFFFF" android:pathData="M295.161,129.438c-6.668,0-12.074-5.407-12.074-12.079c0-6.673,5.406-12.08,12.074-12.08 c6.675,0,12.079,5.409,12.079,12.08C307.24,124.03,301.834,129.438,295.161,129.438" /> <path android:fillColor="#9FBF3B" android:pathData="M126.383,297.598c0,13.45-10.904,24.354-24.355,24.354l0,0c-13.45,0-24.354-10.904-24.354-24.354V199.09 c0-13.45,10.904-24.354,24.354-24.354l0,0c13.451,0,24.355,10.904,24.355,24.354V297.598z" /> <path android:fillColor="#9FBF3B" android:pathData="M140.396,175.489v177.915c0,10.566,8.566,19.133,19.135,19.133h22.633v54.744 c0,13.451,10.903,24.354,24.354,24.354c13.451,0,24.355-10.903,24.355-24.354v-54.744h37.371v54.744 c0,13.451,10.902,24.354,24.354,24.354s24.354-10.903,24.354-24.354v-54.744h22.633c10.569,0,19.137-8.562,19.137-19.133V175.489 H140.396z" /> <path android:fillColor="#9FBF3B" android:pathData="M372.734,297.598c0,13.45,10.903,24.354,24.354,24.354l0,0c13.45,0,24.354-10.904,24.354-24.354V199.09 c0-13.45-10.904-24.354-24.354-24.354l0,0c-13.451,0-24.354,10.904-24.354,24.354V297.598z" /> </group> </vector> Convert it to NinePatch is easy.
NinePatchBuilder ninePatchBuilder = new NinePatchBuilder(resources) .addStretchSegmentX(0.49f, 0.51f) .addStretchSegmentY(0.49f, 0.51f) .setDrawable(R.drawable.android, (int) resources.getDimension(R.dimen.android_width), (int) resources.getDimension(R.dimen.android_height)); Additionally, you must specify the dimensions in pixels, since not all Drawable have fixed sizes. At the time of the call to build, Drawable will be drawn on the Bitmap and this Bitmap is already used to create the NinePacthDrawable.
Special cases
Naturally, blindly use Drawable Drawable, not always a good solution, as there are, for example, DrawableContainer and its heirs. To support such complex objects had to go to a certain trick.
// NinePatchBuilder. if (drawable instanceof DrawableContainer) { final XmlPullParser parser = mResources.getXml(drawableId); final AttributeSet attrs = Xml.asAttributeSet(parser); int type = XmlPullParser.START_DOCUMENT; try { while ((type=parser.next()) != XmlPullParser.START_TAG && type != XmlPullParser.END_DOCUMENT) { // Empty loop } } catch (XmlPullParserException | IOException e) { e.printStackTrace(); } if (type == XmlPullParser.START_TAG) { Drawable result = null; try { result = drawable.getClass().newInstance(); } catch (InstantiationException | IllegalAccessException e) { e.printStackTrace(); } if (result != null) { try { result.inflate(new ResourceWrapper(mResources), parser, attrs); return result; } catch (XmlPullParserException | IOException e) { e.printStackTrace(); } } } } This is part of the code from NinePatchBuilder, it creates a new Drawable of the same class as the original using Class.newInstance (), and then fills it with the inflate method. All this is similar to what happens inside a LayoutInflater, with the exception of ResourceWrapper. In it lies the whole essence. If you look into the work of the inflate method, then we will see that the child Drawables are obtained by the getDrawable method from the resources transferred as a parameter. To obtain the desired result, simply override this method.
// NinePatchBuilder. private class ResourceWrapper extends Resources { public ResourceWrapper(Resources resources) { super(resources.getAssets(), resources.getDisplayMetrics(), resources.getConfiguration()); } @Override public Drawable getDrawable(int id) throws NotFoundException { return buildFromDrawable(id, mDrawableWidth, mDrawableHeight); } @Override public Drawable getDrawable(int id, Theme theme) throws NotFoundException { return buildFromDrawable(id, mDrawableWidth, mDrawableHeight); } } Thanks to this “tink of ears” we have implemented full support for all heirs of the DrawableContainer with any nesting level, and if you convert a StateListDrawable, then the output will be a StateListDrawable consisting of NinePatchDrawable.
XML and caching
One builder was not enough for me, I decided to go ahead and make a NinePatchInflater class that collects NinePatch from an XML file. As a result, our Drawable can be described as follows:
<nine-patch-plus xmlns:auto="http://schemas.android.com/apk/res-auto" auto:src="@drawable/android" auto:width="@dimen/android_width" auto:height="@dimen/android_height" auto:stretchX="0.49, 0.51" auto:stretchY="0.49, 0.51" /> The file must be in the “xml” folder. Now, the code involved in creating such a drawable can be reduced to a single line.
Drawable drawable = NinePatchInflater.inflate(resources, R.xml.vector_drawable_nine_patch); In addition to making most of the code in a separate file, inflater has another big plus - caching by resource id. The fact is that creating a drawable can be a very expensive operation, especially in our case, when you need to create a bunch of unnecessary objects in the future to get one Drawable. Fortunately, most of the necessary work has already been done in the ConstantState class, we only need to save ConstantState created Drawables in the cache and, if necessary, create new Drawables using the ConstantState.newDrawable () method. I will not go into details, the article turned out to be so expanded, and besides, I didn’t invent anything new, this is how caching takes place in the Resources class.
Conclusion
It turned out quite well, however, to create a full-fledged wrapper over resources so that it would be possible to insert links to these files directly into XML markup, without resorting to writing program code, and it did not work out. As it turned out, when creating a View, in some places, methods with the access modifier “by default” are used, and sometimes the static methods of the Drawable class are called directly. Despite this, I believe that the desired result was achieved, although not fully.
GitHub project: NinePatchBuildUtils
How to connect to your project
There are 2 options.
Option 1 (in the forehead):
Option 2 (elegant):
Option 1 (in the forehead):
- Copy the folder with the module "ninepatchbuildutils" to your project
- Add to the settings.gradle file:
include ':ninepatchbuildutils' - Add dependency to file build.gradle of application module:
compile project(':ninepatchbuildutils') - Rebuild project
Option 2 (elegant):
- Download the project from the gita to a separate folder, for example “NinePatchBuildUtils”
- Add to the settings.gradle file:
include ':ninepatchbuildutils' project(':ninepatchbuildutils').projectDir = new File('< >/NinePatchBuildUtils/ninepatchbuildutils/')project(':ninepatchbuildutils').projectDir = new File(settingsDir, '../NinePatchBuildUtils/ninepatchbuildutils/') - Add dependency to file build.gradle of application module:
compile project(':ninepatchbuildutils') - Rebuild project
Links for especially
NinePatch Sources: NinePatch.java and NinePatch.cpp
A place to read about Res_png_9patch: ResourceTypes.h and ResourceTypes.cpp
Thanks for attention!
Source: https://habr.com/ru/post/252775/
All Articles