Broadcast video with Raspberry Pi
So long ago, I became the proud owner of Raspberry Pi. Since then, experiments have not ceased. Now I play with the camera. In this regard, I wanted to realize the broadcast. I hope this article will be useful to newcomers like me.
There are several ways of varying degrees of difficulty to organize the broadcast video from the camera Raspberry Pi. It all depends on where you need to receive the broadcast. Consider some of the options, moving from simple to more complex.
The easiest way to organize the broadcast of video from the Raspberry Pi camera is to install the VLC media player both on the computer and on the “Malinka”. The latter is done by the following command:
')
After that, start recording video and its broadcast. In the example below, a video of 800 by 400 pixels and a frequency of 24fps will be broadcast in h264 format on port number 8160:
We launch on the VLC computer, select in the menu “Open URL” and enter 192.168.0.9 : 8160 (replace 192.168.0.9 with the real IP address of your Raspberry Pi). If you install VLC on your Android device, this method also works. However, for smartphones there is a more convenient way.
This is a more convenient way - the application RaspiCam Remote . Firstly, it does not require installing anything extra on the Raspberry Pi (when using basic functions). Secondly, no manipulation with the start of shooting, as in the previous example, is also required. The application also allows you to apply filters to the picture (if I understood correctly, on the Raspberry Pi side) and save the pictures to the phone’s gallery. For some additional functions, you need to install a couple of third-party applications on the “raspberry”. In particular, for video broadcasting with a frequency of 30fps, VLC is required, and for using a UBS camera, fswebcam is required. In any case, the application is simple and useful, and this is what I liked. In addition, this is one of the easiest ways to test whether a camera is working.
Actually, come to the most important thing. Any browser is now on almost any device connected to the Internet. Broadcasting to the browser is the most requested method. Considering that different web browsers are still determined by which video formats they lose and which ones do not, we don’t make sense at all to get involved with the video in the literal sense. An additional argument is the lack of a microphone on the “raspberry” camera and, as a result, a sound track as such. Therefore, the most reasonable would be to take a photo, not a video. The mechanism is simple: with the standard raspistill command , we take snapshots at intervals and save them into one file, constantly overwriting it. We also install a web server on Raspberry Pi, where we launch a web page with our photo. It is clear that the photo must be updated at the same interval as the shooting (ideally). You can do this, for example, with Javascript:
Time in the time variable in this case is transmitted only in order to avoid caching the image.
If you are far from web programming, there is a great ready-made solution - RPi-Cam-Web-Interface . This is a whole package that installs and configures everything you need (including the server) and gives the output on the local server with the image from the camera and a huge number of settings (up to the possibility of reloading or shutting down the Raspberry Pi). In addition, this package uses the Motion Motion Sensor software and supports Pi-Pan and Pi-Light devices in the presence of these.
Before installing RPi-Cam-Web-Interface, it is imperative to update the system with the sudo rpi-update command and reboot. After that, you need to download the distribution:
RPi-Cam-Web-Interface uses Apache as the server and therefore installs it. For example, I do not need it, since I prefer lighttpd , which I have already installed. In this case, I open the script file and delete the Apache installation from the instructions.
You can also change the directory in which the site will be installed. Now you can run the installation:
After its termination we reboot and now, if in the browser to type the IP of your “raspberry”, a page will open with an image from the camera and settings. By default, the application starts automatically. This can be disabled and started manually. Here is a list of commands:
Read more about this package here and here .
There are several ways of varying degrees of difficulty to organize the broadcast video from the camera Raspberry Pi. It all depends on where you need to receive the broadcast. Consider some of the options, moving from simple to more complex.
VLC media player
The easiest way to organize the broadcast of video from the Raspberry Pi camera is to install the VLC media player both on the computer and on the “Malinka”. The latter is done by the following command:
')
sudo apt-get install vlc -y After that, start recording video and its broadcast. In the example below, a video of 800 by 400 pixels and a frequency of 24fps will be broadcast in h264 format on port number 8160:
raspivid -o - -t 0 -hf -w 800 -h 400 -fps 24 |cvlc -vvv stream:///dev/stdin --sout '#standard{access=http,mux=ts,dst=:8160}' :demux=h264 We launch on the VLC computer, select in the menu “Open URL” and enter 192.168.0.9 : 8160 (replace 192.168.0.9 with the real IP address of your Raspberry Pi). If you install VLC on your Android device, this method also works. However, for smartphones there is a more convenient way.
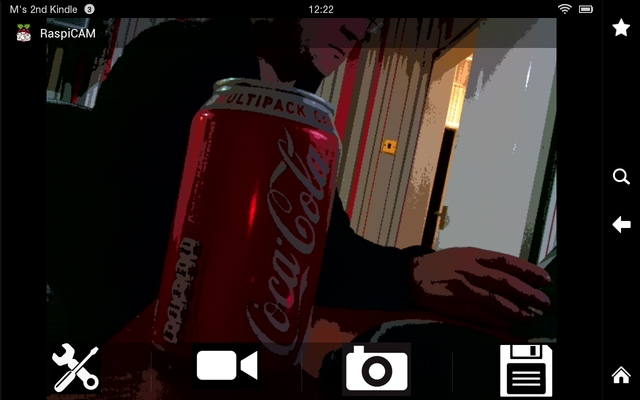
RaspiCam Remote
This is a more convenient way - the application RaspiCam Remote . Firstly, it does not require installing anything extra on the Raspberry Pi (when using basic functions). Secondly, no manipulation with the start of shooting, as in the previous example, is also required. The application also allows you to apply filters to the picture (if I understood correctly, on the Raspberry Pi side) and save the pictures to the phone’s gallery. For some additional functions, you need to install a couple of third-party applications on the “raspberry”. In particular, for video broadcasting with a frequency of 30fps, VLC is required, and for using a UBS camera, fswebcam is required. In any case, the application is simple and useful, and this is what I liked. In addition, this is one of the easiest ways to test whether a camera is working.
Web Browsing
Actually, come to the most important thing. Any browser is now on almost any device connected to the Internet. Broadcasting to the browser is the most requested method. Considering that different web browsers are still determined by which video formats they lose and which ones do not, we don’t make sense at all to get involved with the video in the literal sense. An additional argument is the lack of a microphone on the “raspberry” camera and, as a result, a sound track as such. Therefore, the most reasonable would be to take a photo, not a video. The mechanism is simple: with the standard raspistill command , we take snapshots at intervals and save them into one file, constantly overwriting it. We also install a web server on Raspberry Pi, where we launch a web page with our photo. It is clear that the photo must be updated at the same interval as the shooting (ideally). You can do this, for example, with Javascript:
setInterval(function(){ $("#cam_image").attr("src", "output.jpg?time="+new Date().getTime()); },250); Time in the time variable in this case is transmitted only in order to avoid caching the image.
If you are far from web programming, there is a great ready-made solution - RPi-Cam-Web-Interface . This is a whole package that installs and configures everything you need (including the server) and gives the output on the local server with the image from the camera and a huge number of settings (up to the possibility of reloading or shutting down the Raspberry Pi). In addition, this package uses the Motion Motion Sensor software and supports Pi-Pan and Pi-Light devices in the presence of these.
Before installing RPi-Cam-Web-Interface, it is imperative to update the system with the sudo rpi-update command and reboot. After that, you need to download the distribution:
git clone https://github.com/silvanmelchior/RPi_Cam_Web_Interface.git cd RPi_Cam_Web_Interface chmod u+x RPi_Cam_Web_Interface_Installer.sh RPi-Cam-Web-Interface uses Apache as the server and therefore installs it. For example, I do not need it, since I prefer lighttpd , which I have already installed. In this case, I open the script file and delete the Apache installation from the instructions.
sudo nano ./RPi_Cam_Web_Interface_Installer.sh You can also change the directory in which the site will be installed. Now you can run the installation:
./RPi_Cam_Web_Interface_Installer.sh install After its termination we reboot and now, if in the browser to type the IP of your “raspberry”, a page will open with an image from the camera and settings. By default, the application starts automatically. This can be disabled and started manually. Here is a list of commands:
- ./RPi_Cam_Web_Interface_Installer.sh autostart_yes - enable autoload
- ./RPi_Cam_Web_Interface_Installer.sh autostart_no - disable autoloading
- ./RPi_Cam_Web_Interface_Installer.sh start - manual start
- ./RPi_Cam_Web_Interface_Installer.sh stop - manual shutdown
- ./RPi_Cam_Web_Interface_Installer.sh remove - remove RPi-Cam-Web-Interface and all additional applications
Read more about this package here and here .
Source: https://habr.com/ru/post/252587/
All Articles