WebGL and asyncio multiplayer online shooter, part two
In this article I tried to describe the creation of a browser-based
3D shooter, starting from importing cute tank models to the scene and ending with synchronizing players and bots with each other using websocket and asyncio and balancing them in rooms.Introduction
1. Structure of the game
2. Import models and blender
3. Uploading models in the game with babylon.js and the models themselves
4. Movements, minimap and game sounds in babylon.js
5. Web Sockets and Game Sync
6. Players and their coordination
7. Balancing players by room and object python
8. Asyncio and bot behavior generation
9. Nginx and socket proxying
10. Asynchronous caching through memcache
11. Epilogue and Roadmap
Python3 who is interested in the topic of asynchronous applications in Python3 , WebGL and just games, please under the cat.Introduction
The article itself was conceived as a continuation of the topic of writing asynchronous applications using aiohttp and
asyncio , and if the first part was devoted to how best to make a modular structure like django , on top of aiohttp( asyncio ) , then the second one already wanted to do something more creative.')
Naturally, it seemed to me interesting to make a
3D toy, and where else if not in games, you might need asynchronous programming.We will have a toy without registration, with the ability to fall on each other, bots, rooms, a simple chat, and a simple landscape. As a game model, we take a couple of tanks, as the most simple and familiar, and, at the same time, demonstrative game models. Well, in the framework of the framework, recall the caching through
memcached .For clarity, some processes will be represented by pictures that remotely resemble infographics, because network programming does not always look straightforward and more convenient all the same when the arrows show what is transmitted to whom and what is caused.
Code samples, both in infographics and in the usual format, will often be greatly simplified, for a better understanding of the general scheme of work. Moreover, the full code with the latest fixes can be viewed on github .
But it should be understood that this is not a full-fledged game - in the sense that he wrote
git clone and went to an ATM. Rather, it is an attempt to make a gaming framework, a demo of asyncio and webgl in one bottle. There is no shop window, ratings, thoroughly tested security, etc., but, on the other hand, it seems to me that for an open sourse project, developed occasionally, in my spare time, it turned out to be quite normal.2 Importing models and blender
Naturally, we need
3D models of characters for a toy, we need models to simulate a landscape, buildings, etc.Characters can be people, tanks, airplanes. There are two options - to draw a model, and import already finished. The easiest way is to find ready-made models on one of the specialized sites, for example, here or here . Who is interested in the process of drawing tanks and other models, on YouTube there is a lot of video, on Habré there are materials on this subject .
Let us dwell on the import process itself. Of the formats imported into
blender , the most common are .die .obj .3ds .Import / export has a number of nuances. For example, if we import
.3ds , then, as a rule, the model is imported without textures, but with materials already created. In this case, we just need to load each material from the texture disk. For .obj , as a rule, besides textures, there must be a .mtl file, if it is present, then the probability of problems is usually less.Sometimes after exporting the model to the scene, it may turn out that the
chrome crashes, warning that he has problems with displaying the webgl . In this case, you should try to remove all unnecessary things in the blender, for example, if there are collisions, animations, etc.Then one of the most important moments. For the models that we are going to move around the map,
we need to glue all the objects of which the model consists. Otherwise, we will not be able to move them, visually it will look like that instead of a tank, only his machine gun will go, and if you try to set the required coordinates to a tree, the location on the map will change only the stump of the tree, and everything else will remain in the center of the map.
To solve this problem, there are two ways:
1) Combine all the details of the model and make it a single object. This method is a little faster, but it only works if we have one texture in the form of a
UV sweep. To do this, you can select all objects through the outliner with cipher, they will be highlighted with a characteristic orange color and in the object menu select the join item.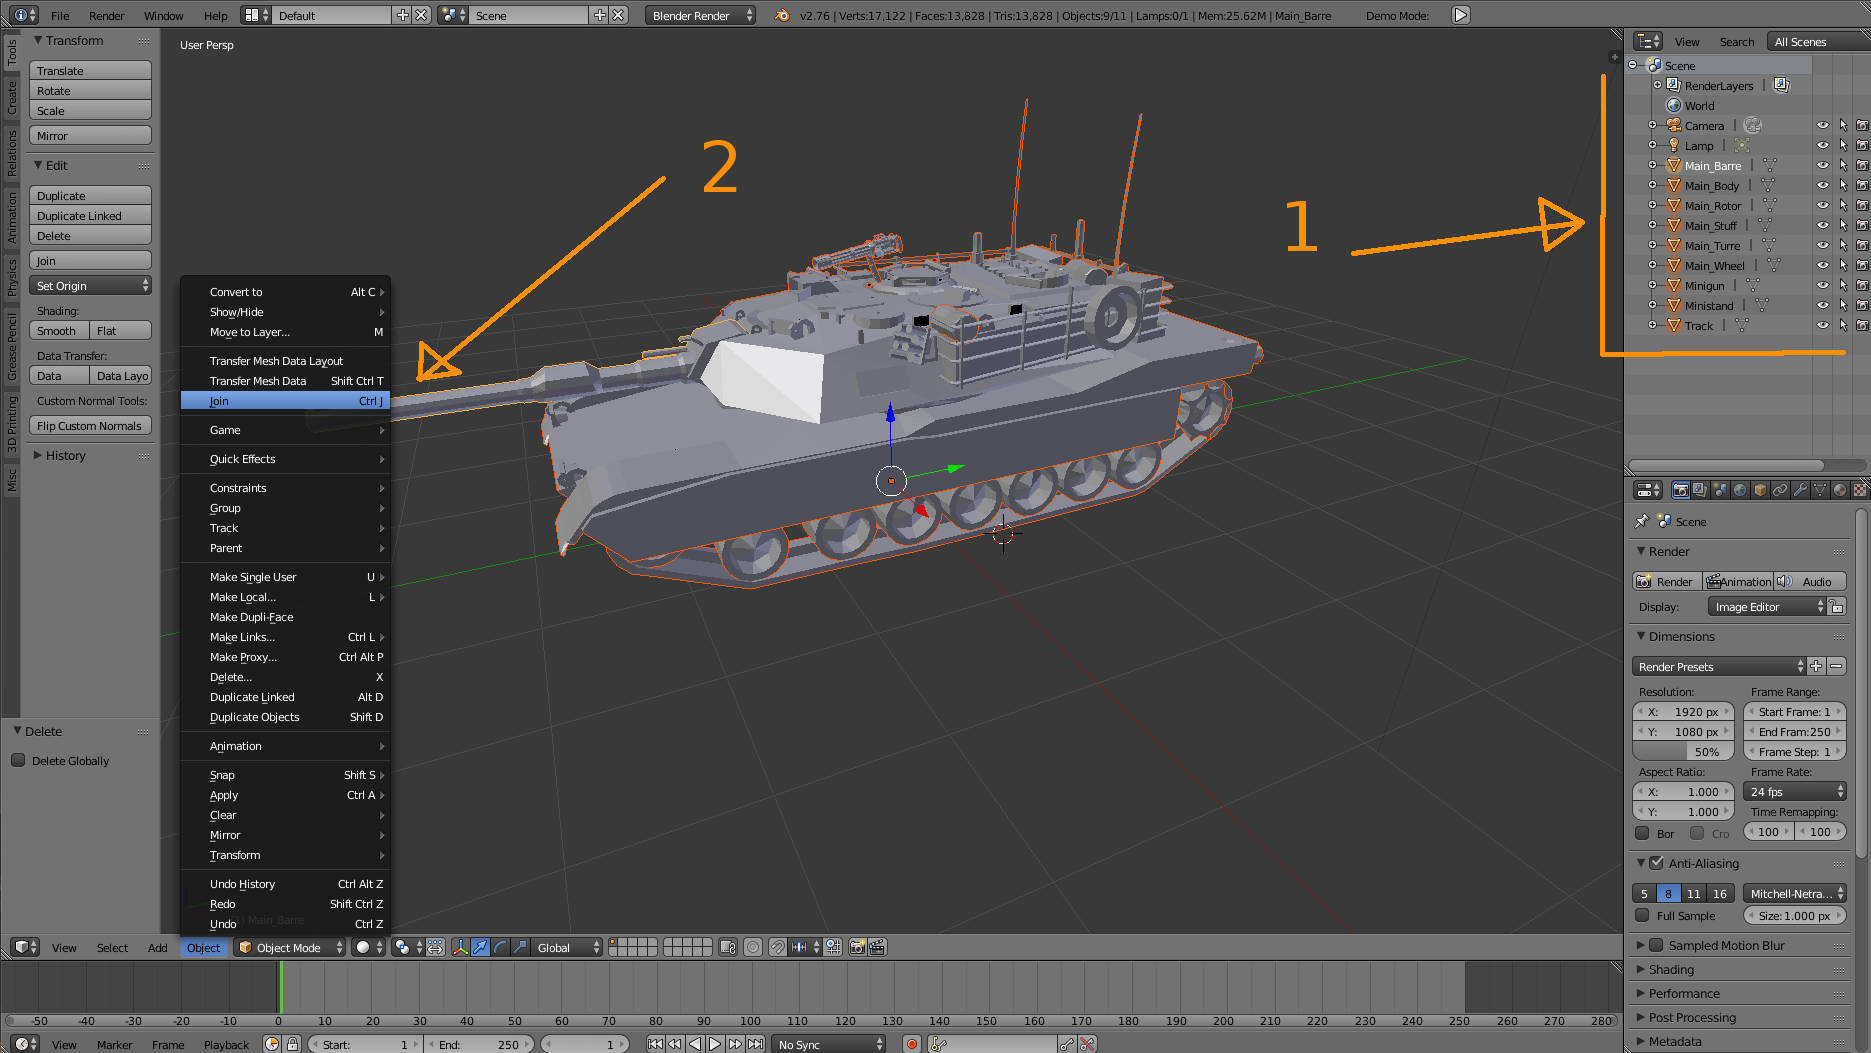
2) The next option is to link all the details on the principle of Parent-Child. In this case, there will be no problems with textures, even if we have our own texture for every detail. To do this, right-click to select the parent object and the child one by one, press
ctrl+P to select object in the menu. As a result, we should see in the autliner that all the objects that make up our model belong to the same parent.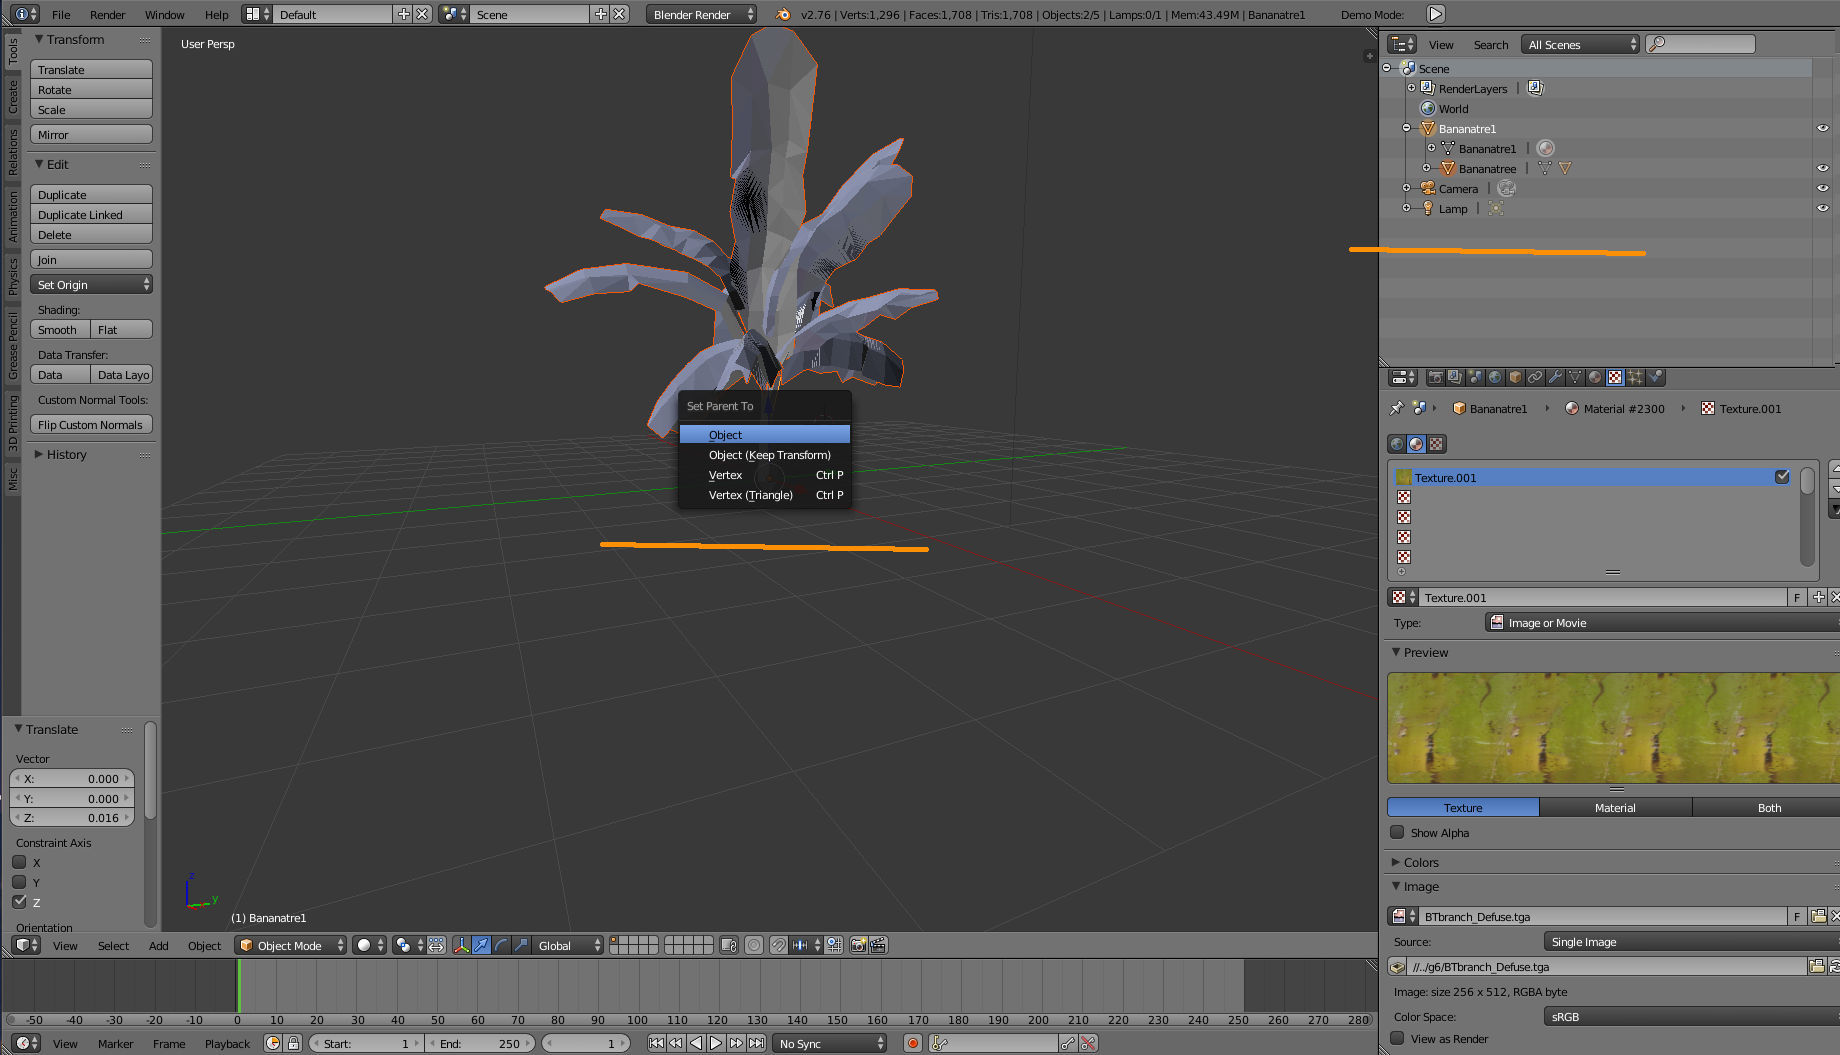
And yet, I would like to insert such a remark that quite often some kind of model may, for some unknown reason, not be imported into a blender or imported as some sort of junk. And very often it happens that some textures that come with the model do not want to be applied. In such a case, nothing can be done and we must go to other options.
3. Uploading models in the game with babylon.js and the models themselves
The loading of models itself looks quite simple, we indicate the location of the mesh on the disk:
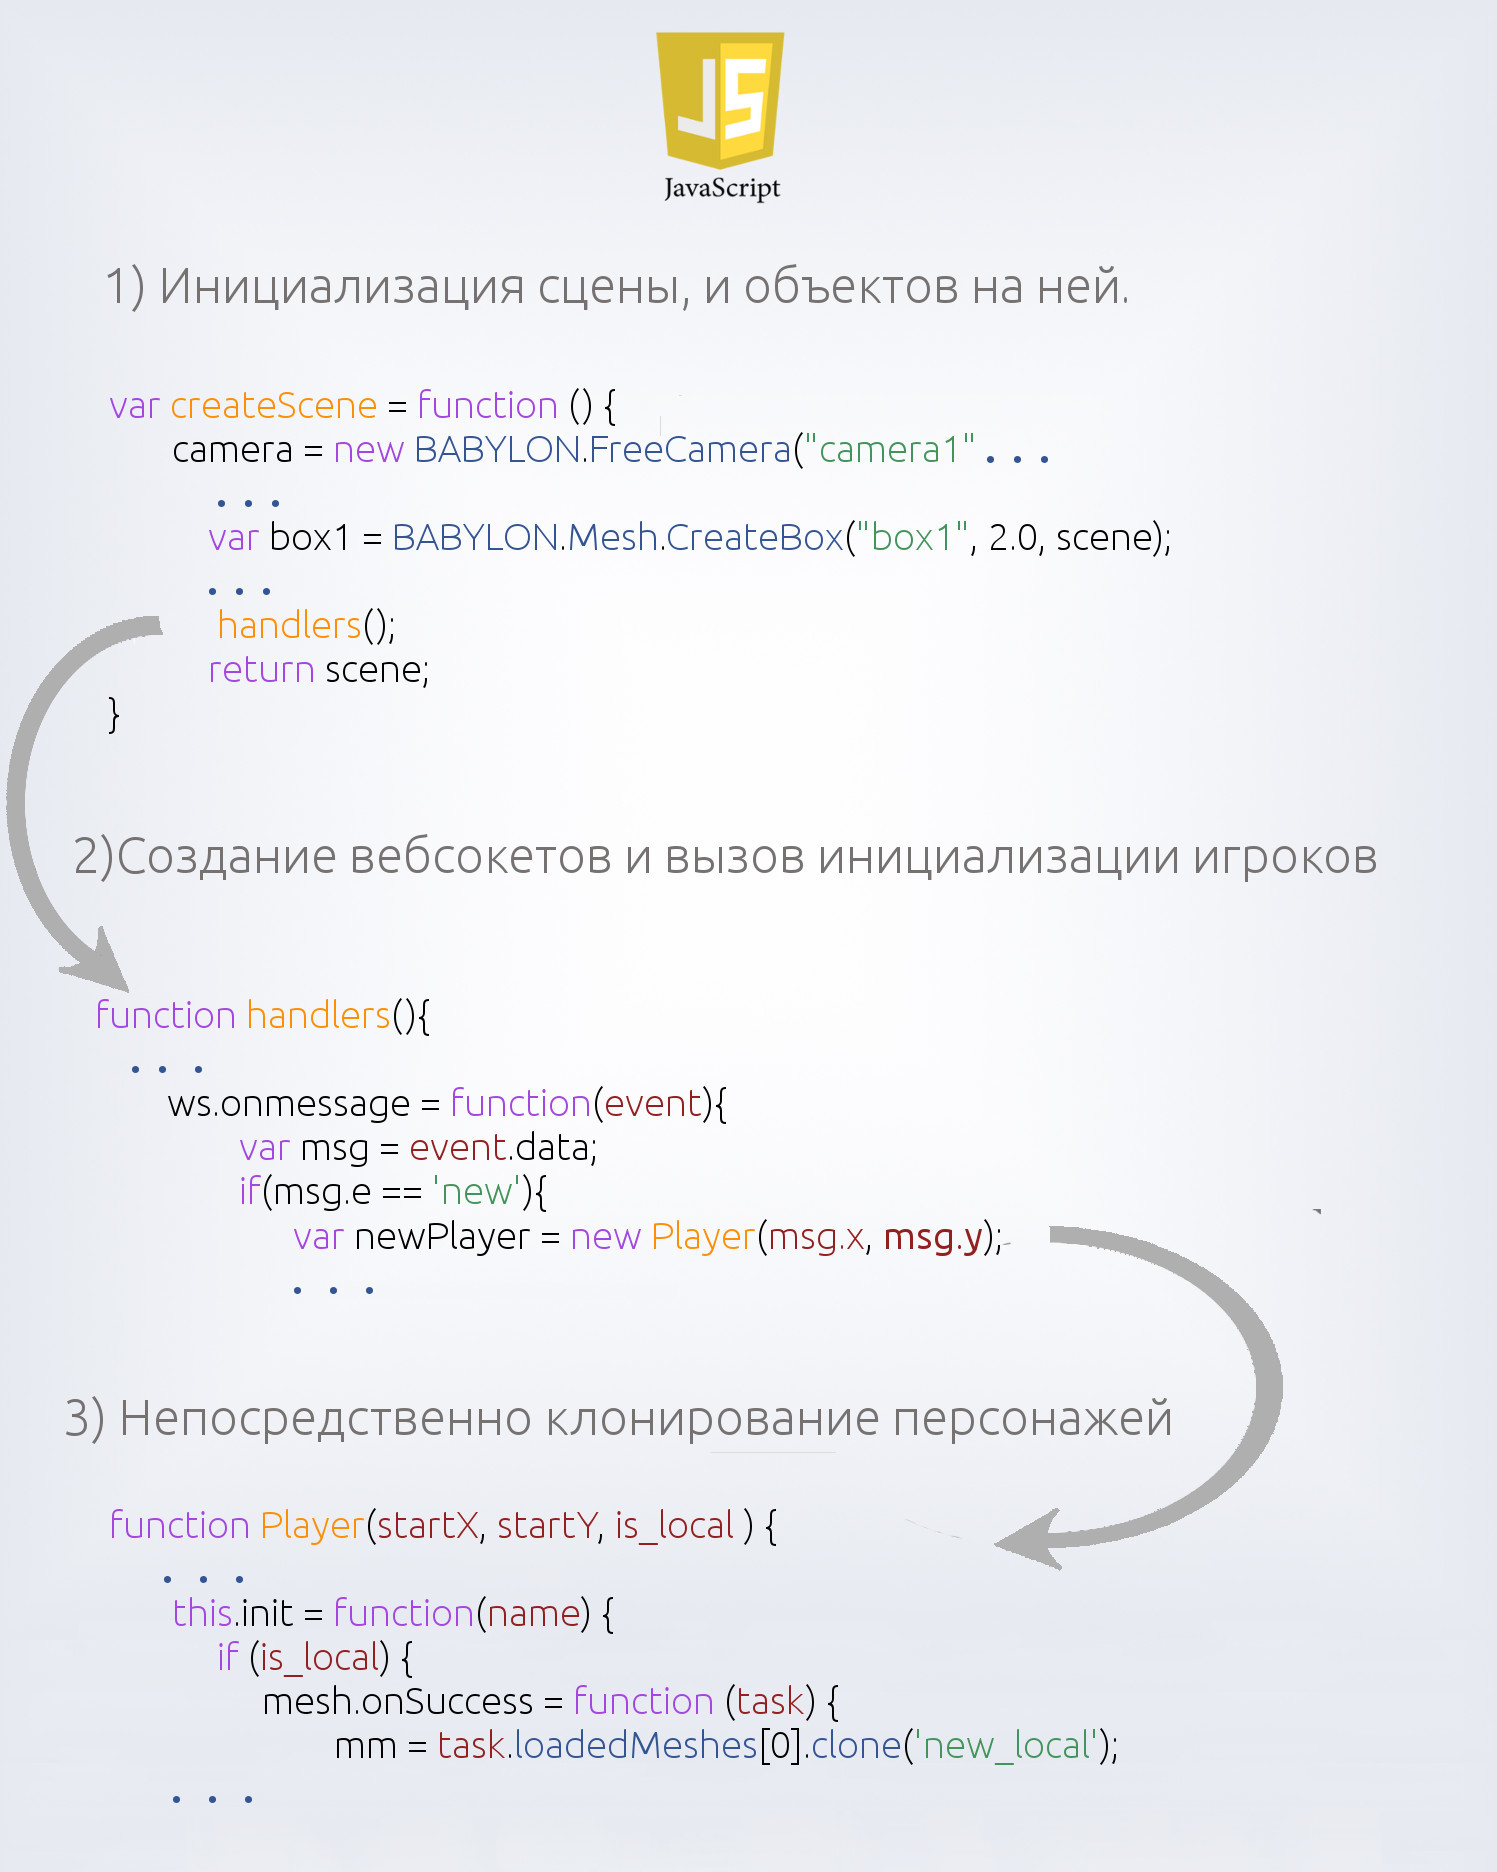
loader = new BABYLON.AssetsManager(scene); mesh = loader.addMeshTask('enemy1', "", "/static/game/t3/", "t.babylon"); After this, we can check in any place that our model is already loaded and further set its position and convert, if necessary.
mesh.onSuccess = function (task) { task.loadedMeshes[0].position = new BABYLON.Vector3(10, 2, 20); }; One of the most common operations in our case is the cloning of objects, for example, there are trees, so as not to load each tree separately, you can simply load it once and clone around the scene with different coordinates:
var palm = loader.addMeshTask('palm', "", "/static/game/g6/", "untitled.babylon"); palm.onSuccess = function (task) { var p = task.loadedMeshes[0]; p.position = new BABYLON.Vector3(25, -2, 25); var p1 = p.clone('p1'); p1.position = new BABYLON.Vector3(10, -2, 20); var p2 = p.clone('p2'); p2.position = new BABYLON.Vector3(15, -2, 30); }; Cloning also plays an important role in the
AssetsManager case. He draws a simple screensaver until the main part of the scene is loaded, and makes sure that everything we loader.onFinish into loader.onFinish . var createScene = function () { . . . } var scene = createScene(); loader.onFinish = function (tasks) { engine.runRenderLoop(function () { scene.render(); }); }; 
We must avoid further loading of anything during the game, for various reasons. Therefore, all characters are loaded at initialization, and in the processing of sockets and in the class responsible for the appearance and behavior of players, we clone the equipment we need, etc. The scheme looks something like this:
Further, I would like to write a little about the models themselves, and even though this version of the map is more an experiment than a ready-made solution, it doesn’t hurt to understand the overall picture.
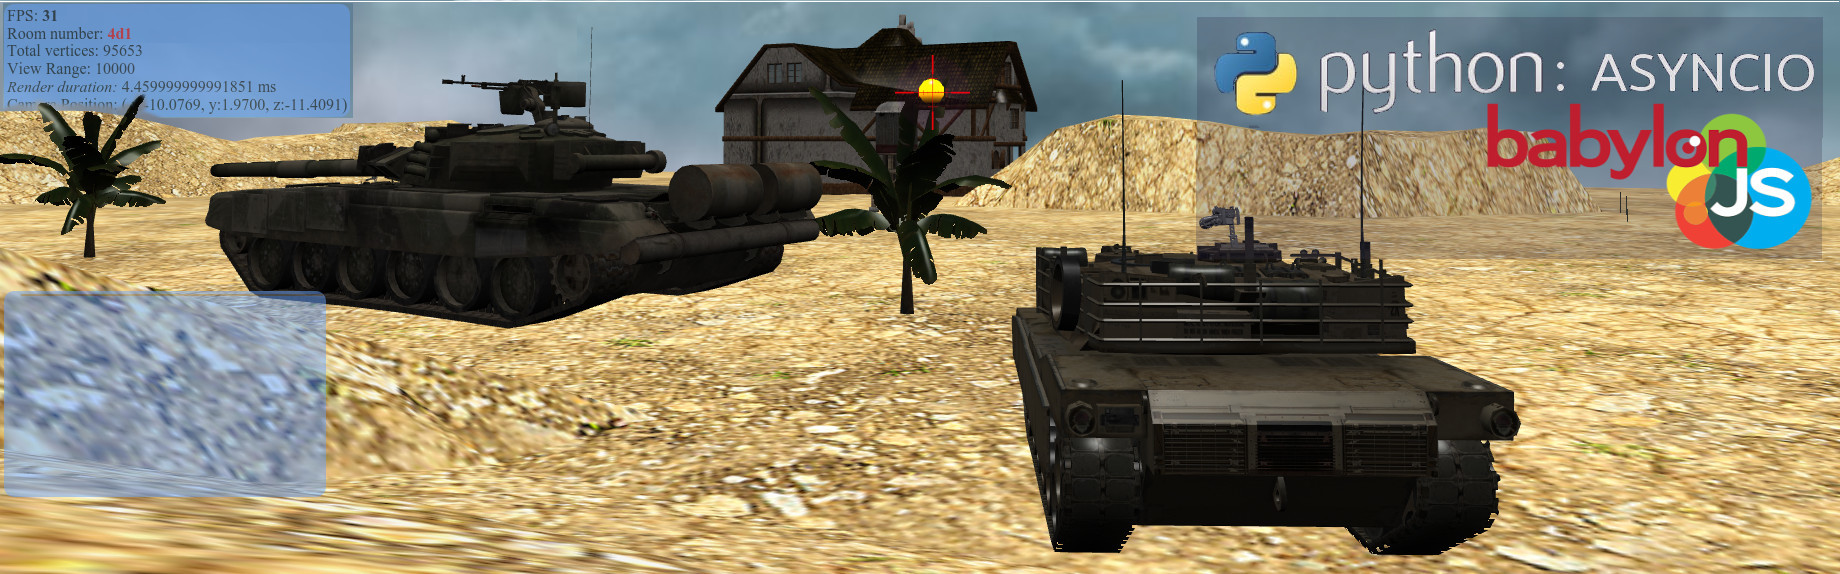
Characters, in this case, we have two types of tanks, T-90 and Abrams. Since we don’t have the game logic of victories and defeats now, and in the case of the framework, it is implied that we need to invent all this in each individual case. Therefore, now there is no choice and the first person always plays Abrams, and the bot and all other players are visible as T-90.
On the map itself, we see some relief, it is created very simply using the
babylon.js called heightMap . To do this, you need to apply a black-and-white picture on the soil texture depending on where the light surface is and where the dark and mountains form. hills, some of the characteristics can be specified in the parameters, the more blurred the transition between dark and white, the gentler the slope. var ground = BABYLON.Mesh.CreateGroundFromHeightMap("ground", "/static/HMap.png", 200, 200, 70, 0, 10, scene, false); var groundMaterial = new BABYLON.StandardMaterial("ground", scene); groundMaterial.diffuseTexture = new BABYLON.Texture("/static/ground.jpg", scene); ground.material = groundMaterial; 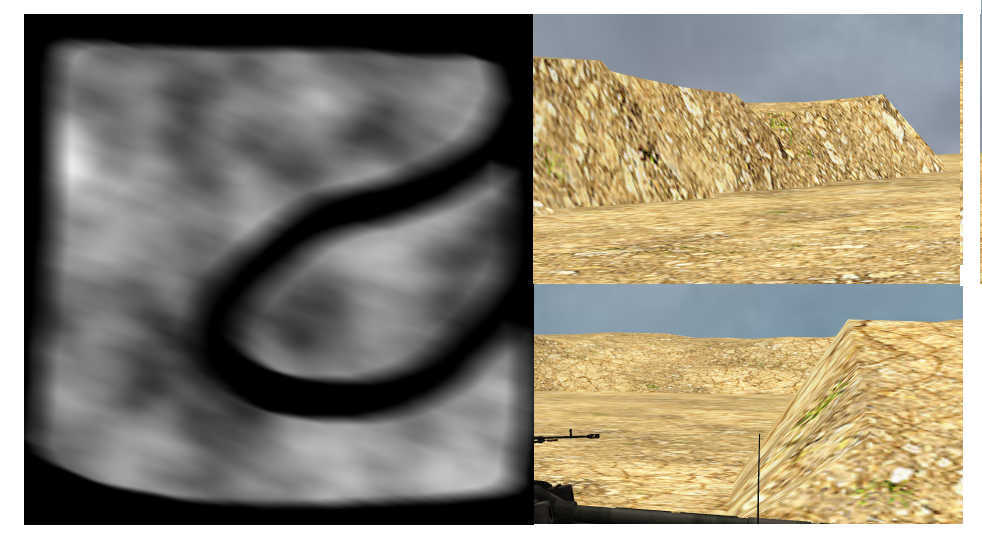
Next we have a small entourage in the form of a house, a water tower near it, several trees and a little grass.
The grass came out with us as low poly as possible, just a plane with a texture on it. And this plane is tilted in different places. In general, the lower the polygonal models, the better in terms of performance, but for obvious reasons, entertainment will suffer.
Of course, you can make the choice in the settings "graphics quality", but not in our case.
Unlike grass, banana palm has quite a few peaks, so it was decided to leave only a couple of pieces on the map.
The more vertices on the map, the lower can be
FPS and so on.
The house stands a little apart, and it was decided to cover it all the same with a transparent cube with collisions.
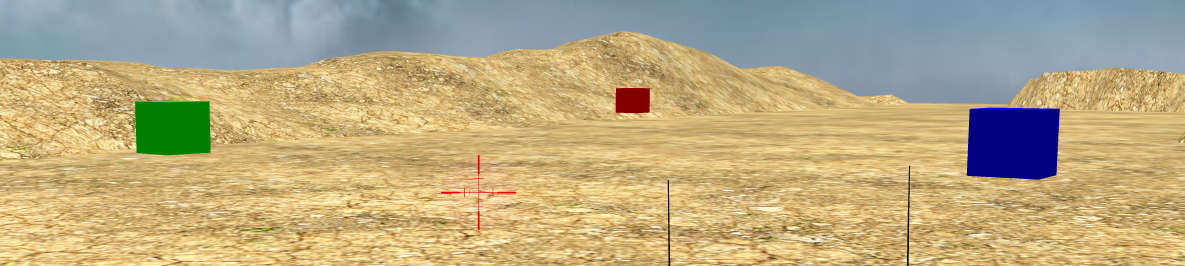
And the last thing we have left is three multi-colored cubes, they are not synchronized for everyone and represent simple targets. When hit in each, it lights up and disappears.
4. Movements, minimap and game sounds in babylon.js
Speaking of movements, it’s mostly about the first person, since the movements of other players and bots are always just a change of position, which is most often transmitted using sockets from the server, which will be described below.
Motion in itself is simply control of the camera and the visible part of the player. For example, the player turns to the right, which means we must turn the camera to the right as to where we are looking, or turn the stage to the desired degree. Also, a model depicting, for example, some means of defeating opponents, should also turn.
Basically, in games made by
babylon.js for the movement from the first person, there are two cameras:FreeCamera- as a rule, is the parent of the character and the character just follows it, it is very convenient to use for the turn of technology, for people and for all flying,FreeCamerahas the ability to adjust the inertia and speed of movement, which is also very important.FollowCamera- on the contrary, it is a camera that follows some object; it is more convenient to use it for cases when the control from the mouse and keyboard is different. That is, the review does not depend on the direction of movement.
Examples:
//FollowCamera var camera = new BABYLON.FollowCamera("camera1", new BABYLON.Vector3(0, 2, 0), scene); camera.target = mesh; ``````javascript //FreeCamera var camera = new BABYLON.FreeCamera("camera1", new BABYLON.Vector3( 0, 2, 0), scene); mesh.parent = camera; During the movement there should be some sounds, during the hit, during the shot, during the movement, etc.
babylon.js has a good sound management API . The topic of sound management is quite extensive, so we’ll look at just a few small examples.Initialization example:
var music = new BABYLON.Sound("Music", "music.wav", scene, null, { playbackRate:0.5, // . volume: 0.1, // . loop: true, // . autoplay: true // . }); An example of the sound of a shot - when clicking, we check that the interlock is removed and reproduce the sound of a single shot.
var gunS = new BABYLON.Sound("gunshot", "static/gun.wav", scene); window.addEventListener("mousedown", function (e) { if (!lock && e.button === 0) gunS.play(); }); The sound of the movement of technology hang on the event of pressing the arrows forward and backward and, accordingly, the start of playback. On the key release event, we stop the playback.
var ms = new BABYLON.Sound("mss", "static/move.mp3", scene, null, { loop: true, autoplay: false }); document.addEventListener("keydown", function(e){ switch (e.keyCode) { case 38: case 40: case 83: case 87: if (!ms.isPlaying) ms.play(); break; } }); document.addEventListener("keyup", function(e){ switch (e.keyCode) { case 38: case 40: case 83: case 87: if (ms.isPlaying) ms.pause(); break; } }); Minimap
Any shooter should have a minimap on which you can see either only your players or all at once, you can see the buildings and the general landscape, in our case, if you look closely, you can see the shells. There are several ways to do this in
babylon.js . Probably the easiest is to create another camera, place it on top of the map and place the view from this camera in the corner we need.
In our case, we take
freeCamera and tell her that it should be placed on top: camera2 = new BABYLON.FreeCamera("minimap", new BABYLON.Vector3(0,170,0), scene); The higher the
Y coordinate, the fuller the overview, but the finer the details on the map.Further we speak to the camera how we will place the image from it on the screen.
camera2.viewport = new BABYLON.Viewport(x, y, width, height); And the last thing - you need to add both cameras to the scene (when the camera alone does not have to do this):
scene.activeCameras.push(camera); scene.activeCameras.push(camera2); 5. Web Sockets and Game Sync
The entire basic structure of the game is built on the
websoket , the player performs an action, mouse rotation or keystroke, an event is hung up on this movement, in which the coordinates of the player’s location are transmitted to the server, and the server transmits them to all game participants who are in this game. the room.Initially, since we use
FreeCamera , it is a parent object, therefore, we use its coordinates. For example:camera.cameraRotation- contains theXandYcoordinates of the rotation along the axes.camera.position- containsX,YandZcoordinates of the mesh location on the map.
In the picture below, we see an approximate process from the beginning of opening a connection to the server and creating a new player, before exchanging messages when reacting to some user actions.

6. Server side device
Above, we saw a brief scheme, as it were, very briefly, but now let us dwell in more detail on how the server part works. In the function of the socket handler, after receiving the next message, we watch its
action , then what action did the player perform and in accordance with this call the desired function, event handler: async def game_handler(request): . . . async for msg in ws: if msg.tp == MsgType.text: if msg.data == 'close': await ws.close() else: e = json.loads( msg.data ) action = e['e'] if action in handlers: handler = handlers[action] handler(ws, e) . . . For example, if
move came to us, it means that the player has moved to some coordinates. In the handler function of this action, we simply assign these coordinates to the Player class, it processes them and returns them, and we transmit them to all the other players in the room at the moment. def h_move(me, e): me.player.set_pos(e['x'], e['y'], e['z']) mess = dict(e="move", id=me.player.id, **me.player.pos_as_dict) me.player.room.send_all(mess, except_=(me.player,)) Of course, all that the
Player class with coordinates is doing now is simply passing them to the bot so that it will be guided by them. But ideally, he should check the entire map with the coordinates, and if the player hit the obstacle, he, for example, to avoid cheating, should not let him seep through the wall, if the script is changed on the client. class Player(list): . . . def __init__(self, client, room, x=0, y=0, z=0, a=0, b=0): list.__init__(self, (x, y, z, a, b)) self._client = client self._room = room Player.last_id += 1 self._id = Player.last_id room.add_player(self) . . . def set_rot(self, a, b): self[3:5] = a, b def getX(self): return self[0] . . . def setX(self, newX): self[0] = newX . . . x = property(getX, setX) . . . @property def pos_as_dict(self): return dict(zip(('x', 'y', 'z'), self.pos)) In the
Player class we use property , for more convenient work with coordinates. Who cares, Habré was the best material on this topic.7. Balancing players by room
An important part of any game is to separate players into different clans, rooms, planets, countries, etc. Just because otherwise they will not fit on one card. In our case, the system is still quite simple - if there are more players in one room than is set in the settings (4 by default with the bot), then we create a new room and send the rest of the players there, and so on.
At the moment, all the information about which player in which room, etc., is stored in memory, since, since we do not yet have showcases and ratings, there is no point in using some kind of base.
The number of the room is assigned to the player when he enters the game from the starting page, which is located on the route
/pregame . When you press a button, ajax triggered, which, if successful, redirects the player to the desired room. if (data.result == 'ok') { window.location = '/game#'+data.room; On the server side, we simply go through the
rooms dictionary, which contains a list of all the rooms and players located in them, and if the number of players does not exceed the specified value, then we return the room id client. And if the number of players is more, then we create a new room. def check_room(request): found = None for _id, room in rooms.items(): if len(room.players) < 3: found = _id break else: while not found: _id = uuid4().hex[:3] if _id not in rooms: found = _id Room class is responsible for working with rooms. His general scheme of work looks like this:
Here we see that it interacts with the
Player class, perhaps the whole scheme does not look quite linear, but in the end it will make it quite convenient to write such chains: # me.player.room.send_all( {"e" : "move", . . . }) # me.player.room.players # me.player.room.add_player(self) # me.player.room.remove_player( me.player ) I would like to talk a little about
me.player , because for some of my colleagues this caused questions, me is a socket that is passed as a parameter in functions that serve events: def h_new(me, e): me.player = Player(me, Room.get( room_id ), x, z) Here, in fact, as the translator would say, is a play on words. Since we know that everything in python is an object.
This is what will happen more clearly:
player = Player( Room.get(room_id), x, z) player.me = me me.player = player And we get two links, the
player module and the .player object of me , both are equal and refer to the same object in memory that will exist as long as there is at least one link.This can be seen in an even simpler example:
>>> a = {1} >>> b = a >>> b.add(2) >>> b {1, 2} >>> a {1, 2} In this example,
b and a are simply references to one common value. >>> a.add(3) >>> a {1, 2, 3} >>> b {1, 2, 3} We look further:
>>> class A(object): ... pass ... >>> a = A() >>> a.player = b >>> a.player {1, 2, 3} >>> b {1, 2, 3} >>> a.__dict__ {'player': {1, 2, 3}} The properties of objects are simply syntactic sugar. In this case, they are simply saved to the
__dict__ dictionary __dict__As a result, we have now killed one of our links
a , but instead we created another that belongs to the newly created object, and in fact lies in the __dict__ dictionary of this object. >>> a <__main__.A object at 0x7f3040db91d0> 8. Asyncio and bot behavior generation
In any normal game there must be at least one bot, and our game is no exception. Of course, so far all that our bot can do is to move in concentric circles, gradually approaching the coordinates where the player is located. If a new player has entered, the bot switches its attention to it.
Lines that send a message to all players in the room about the coordinates along which the bot moves.
mess = dict(e="move", bot=1, id=self.id, **self.pos_as_dict) self.room.send_all(mess, except_=(self,)) :

Room __init__ Bot . def __init__ Bot asyncio.async(self.update()) , .,
await , -. , class , , . , await , .__next__() . — next async — ., 100 , .
:
import asyncio async def test( name ): ctr = 0 while True: await asyncio.sleep(2) ctr += 1 print("Task {}: test({})".format( ctr, name )) asyncio.ensure_future( test("A") ) asyncio.ensure_future( test("B") ) asyncio.ensure_future( test("C") ) loop = asyncio.get_event_loop() loop.run_forever( ) ,
asyncio.ensure_future , , asyncio.sleep(2) ). , , , , , , , . , , .9. Nginx
—
Nginx , websocket http . , , : server { server_name aio.dev; location / { proxy_pass http://127.0.0.1:8080; } } , — ,
5.5.5.10 loalhost .:
server { server_name aio.dev; location / { proxy_pass http://5.5.0.10:8080; } } ,
nginx , proxy_pass http://127.0.0.1:8080Nginx -a, , : server { server_name aio.dev; location / { proxy_pass http://127.0.0.1:8080; } location /ws { proxy_pass http://127.0.0.1:8080; proxy_http_version 1.1; proxy_set_header Upgrade $http_upgrade; proxy_set_header Connection "upgrade"; } } 80
var uri = "ws://aio.dev:80/ws" , Nginx 80 , listen .Nginx -, websoket -, http .10. .
, , .
memcached async def . - , — , , .., , . memcached svetlov , ., , beaker . , , memcached.
memcached pickle . — aiohttp , CIMultiDict , , Cython aiohttp . dct = CIMultiDict() print( dct ) <CIMultiDict {}> dct = MultiDict({'1':['www', 333]}) print( dct ) <MultiDict {'1': ['www', 333]}> dct = MultiDict([('a', 'b'), ('a', 'c')]) print( dct ) <MultiDict {'a': 'b', 'a': 'c'}> dct = dict([('a', 'b'), ('a', 'c')]) print( dct ) {'a': 'c'} , ,
pickle . , , CIMultiDict pickle . d = MultiDict([('a', 'b'), ('a', 'c')]) prepared = [(k, v) for k, v in d.items()] saved = pickle.dumps(prepared) restored = pickle.loads(saved) refined = MultiDict( restored ) def cache(name, expire=0): def decorator(func): async def wrapper(request=None, **kwargs): args = [r for r in [request] if isinstance(r, aiohttp.web_reqrep.Request)] key = cache_key(name, kwargs) mc = request.app.mc value = await mc.get(key) if value is None: value = await func(*args, **kwargs) v_h = {} if isinstance(value, web.Response): v_h = value._headers value._headers = [(k, v) for k, v in value._headers.items()] await mc.set(key, pickle.dumps(value, protocol=pickle.HIGHEST_PROTOCOL), exptime=expire) if isinstance(value, web.Response): value._headers = v_h else: value = pickle.loads(value) if isinstance(value, web.Response): value._headers = CIMultiDict(value._headers) return value return wrapper return decorator , .
from core.union import cache @cache('list_cached', expire=10 ) async def list_tags(request): return templ('list_tags', request, {}) Afterword
, ,
WebGL asyncio . , . , , .Star Wars , , .
, , , , .
, , , , , .
Ping
, .. . , , . .
, , , , . , , .
Roadmap —
Client:
- , .
- — ,
- /
- like Urban Terror
Server:
- ( , , ..)
Roadmap —
- CMS
- ( ERP)
- Report Designer
- Web MongoDB
- -
- , . .
First part
babylon.js three.js
github
readthedocs
3D
3D Blender
babylon.js
ello world asynio
Sleep
pep-0492
svetlov aiohttp
memcached
babylon.js
aiohttp github
aiohttp readthedocs
yield from
aio-libs —
:
http://www.dabeaz.com/generators/Generators.pdf
http://www.dabeaz.com/coroutines/Coroutines.pdf
http://www.dabeaz.com/finalgenerator/FinalGenerator.pdf
Source: https://habr.com/ru/post/252575/
All Articles