Documentation in Doxygen
This article is included in the resulting series of articles on the Doxygen documentation system:
This is the second article from the mentioned cycle, which followed the introductory article on the Doxygen documentation system (if you are not familiar with this system, I advise you to pay attention to this article and get acquainted with it at least in general terms). In the comments thereto, an important question was raised about the design of documentation in Doxygen, and this question is relevant, since it often uses the standard design, which, although practical, is rather unattractive.
')
In this article I will answer this question. To do this, we will review the general principles of the Doxygen documentation, get acquainted with them, and look at examples of what can be achieved based on them.
Customize the appearance of the documentation
First, we will look at what functionality Doxygen provides for customizing the design (it should be noted that the settings described below mainly refer to the generated HTML document). In general, this section is described in detail in the official documentation ; I will only note the main details in it and dilute it for clarity with examples.
Appearance settings
Project Icon
The simplest thing you can customize in the design is the project icon. To do this, specify the path to the icon in the settings file in the PROJECT_LOGO option:
PROJECT_LOGO = <__> Color scheme
In order to simply change the color scheme of an HTML page, use the following options in the settings file:
| Option | Value |
| HTML_COLORSTYLE_HUE | Indicates the color scheme tone. |
| HTML_COLORSTYLE_SAT | Indicates the brightness of the color scheme. |
| HTML_COLORSTYLE_GAMMA | Specifies a gamut of color scheme |
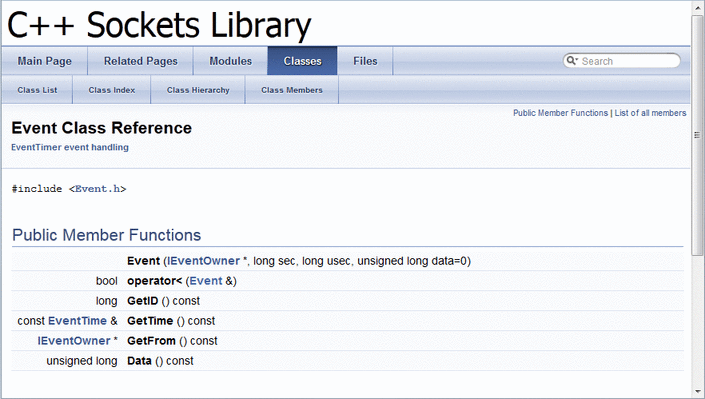
Navigation tools
The main tools for navigating documentation in Doxygen are: a tabbed menu and a hierarchical tree. They are presented below in the screenshot.

To customize the display of these elements, use the following options in the settings file:
| Option | Value |
| DISABLE_INDEX | Disables tabbed menu display. |
| GENERATE_TREEVIEW | Shows whether or not to display a hierarchical tree |
Dynamic documentation content
In order to make HTML documentation more interactive, Doxygen provides a number of options that are disabled by default:
| Option | Value |
| HTML_DYNAMIC_SECTIONS | If this option is set, Doxygen will minimize certain elements of the HTML documentation (for example, columns) that the user can optionally later reveal. |
| INTERACTIVE_SVG | In case graph construction is enabled using Graphviz and SVG is specified as a graph construction format, Doxygen will create interactive SVG files that can be enlarged and moved. |
Header, Footer and Cascading Style Sheet
To customize fonts, colors, indents and other details of the HTML documentation, you can change the standard cascading style sheet. In addition, Doxygen allows you to change the title and footer for each HTML page it generates, for example, so that the generated documentation matches the external style of the rest of your site.
In order to get the corresponding files for further editing, run the command:
doxygen -w html header.html footer.html customdoxygen.css It will create three files:
- header.html is an HTML fragment that Doxygen uses to start the HTML page. Please note that this snippet contains a couple of special commands starting with a dollar sign: they will be automatically replaced when creating the documentation;
- footer.html is an HTML snippet that Doxygen uses to complete the HTML page. Here you can also meet special teams, which were mentioned earlier;
- customdoxygen.css is the default cascading style sheet. It is recommended only to look at this file and change certain settings by placing them in a separate file.
After you edit these files, you must specify Doxygen so that it uses them when building the documentation, instead of the standard files. This is done using the following commands:
| Option | Value |
| HTML_HEADER | Specifies the path to a custom HTML file that describes the header (in the example above, this is the path to header.html) |
| HTML_FOOTER | Specifies the path to a custom HTML file that describes the footer (in the example above, this is the path to footer.html) |
| HTML_EXTRA_STYLESHEET | Specifies the path to the custom cascading style sheet. Please note that it will be used along with the standard style sheet and therefore it is enough to describe only what you have changed. |
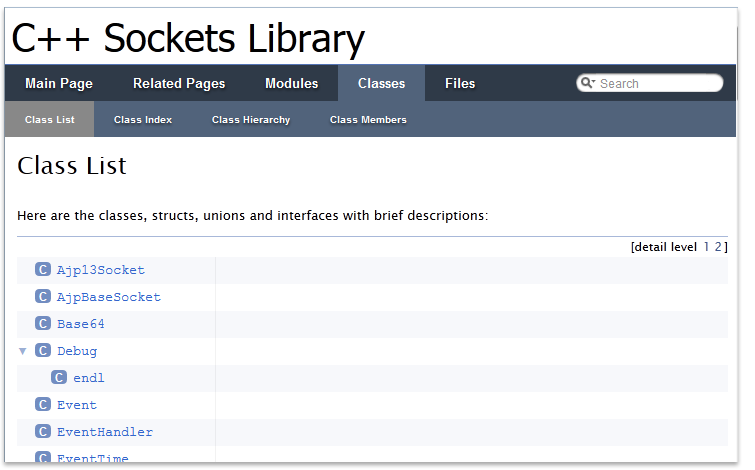
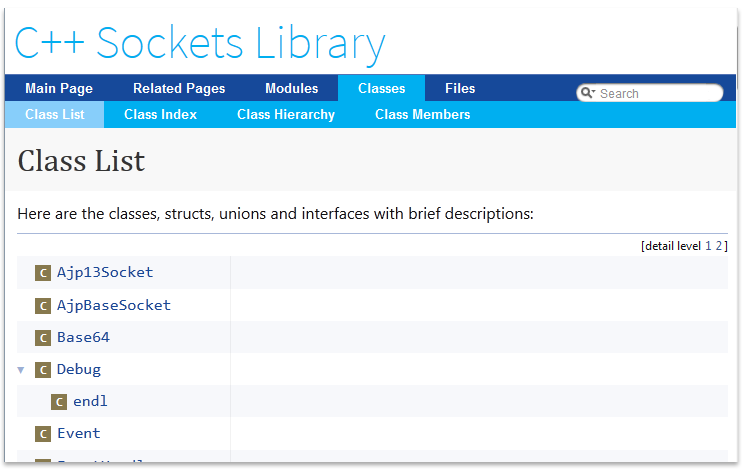
An example of a design change
Next, we consider beautiful examples of various styles and design solutions, but for now just to show for confidence in our own abilities, how to change the style.
Let's make for example the title of the documentation in bold and change its colors, for this we create a style sheet style.css with the following content (projectname is the id of the block with the name of the project, you can make sure of this by opening the same header.html file):
#projectname { color: #3B5588; font-weight: bold; } After that, in the settings file, in the HTML_EXTRA_STYLESHEET option , specify the path to the created file and create the documentation. The result will look like this (the previous version is shown for comparison):

In the same way you can change the style of everything else, so go for it!
Setting up the documentation structure
Earlier we considered how you can change the appearance of the documentation, but changing it will not affect the structure of the documentation in any way; there is another approach to change it.
To do this, use a special file that describes the structure of the document using the XML markup language. Doxygen then uses it to determine what information needs to be displayed, in what order, and also in part about how to display it.
In the same way as when changing the design of the documentation, you first need to get the default file for such a file. To do this, use the -l (from layout) command :
doxygen -l [_] The top level of this file is as follows:
<doxygenlayout version="1.0"> <navindex> ... </navindex> <class> ... </class> <namespace> ... </namespace> <file> ... </file> <group> ... </group> <directory> ... </directory> </doxygenlayout> Details of work with this structure are described in the relevant section of official documentation.
We only note that after you have created your file, you need to change the LAYOUT_FILE option in the configuration file, indicating the path to this file:
LAYOUT_FILE = <__> Structure change example
Again, in order to gain confidence in our capabilities, we will make a small change in this structure.
First, we will generate a file with a structure (as was done above), and then add a new tab to the menu. Tabs are added using the tab tag, and in this case, when adding a new tab, you must specify the user type for it.
Further, since we want to add a tab to the menu, we need to find the appropriate section (for the menu this is navindex ) and add our tab to it:
<navindex> ... <tab type="user" url="http://www.habrahabr.ru" title=""/> </navindex> Pay attention to the value of the url and title parameters, the first one provides the transition to habrahabr.ru when clicking on this tab, and the second one reflects the text on the tab.
The result will look like this:

Documentation examples
After we figured out how to customize the paperwork, it's time to look at the ready-made examples that can be used for your projects.
Qt4 theme
Below is a sample of the documentation created on the basis of the theme that copies the fourth version of Qt documentation .

Bootstrap theme
Especially for fans of Bootstrap was created the corresponding theme .

Two more examples
On the following link you can read and download at once two topics for documentation.
Conclusion
Summing up, I would like to note that it was quite difficult to find ready-made topics for documentation, but in fact the functionality that Doxygen provides for setting up the layout is very extensive and makes it easy to customize the documentation to suit your taste, so I will hope that this article will help you to do Your documentation is more beautiful and more pleasant for the reader.
Thanks for attention!
Source: https://habr.com/ru/post/252443/
All Articles