Configuring Amazon Elastic Load Balancing: with email forwarding and redirects
The release time of my weekend project was approaching. Mobile apps were uploaded to the app stores and we were waiting for a response from Apple, since the Google Play checkout is pretty quick and painless. All server application code was already written, there was nothing to do, and free time was about a week. I thought that it would be nice to acquire a load balancer in advance so as not to spend a lot of time setting it up in the future, and besides, setting up after the release would most likely cause the server to stop servicing users for a while. For hosting servers, we used Amazon EC2, and therefore we chose Amazon Balancer (ELB) as the load balancer.
As it was
The domain was registered at Internet.bs , on ec2 the server was assigned a permanent ip address via elastic ip. Accordingly, the domain registrar had an A record (A record), which indicated this ip. Also, a good registrar provided the opportunity to set up email forwarding, which I gladly took advantage of to receive mail sent to feeback@imyarek.com to my inbox. Also, the registrar was able to redirect from one subdomain name to another, which I used to redirect all users from www.namere.com to name.com. When I moved, I wanted to save it all, without installing additional servers and applications, and even more so there was no desire to write additional code.
Relocation: ELB, Route53 and NS Records
The first thing I did was set up ELB. Everything is quite simple here: in EC2, on the Load Balancers tab, click Create Create Load Balancer and select which server ports to correspond to which ELB ports through the convenient dialog, configure Health Check (periodically checking the availability of some URL on the ELB server will determine which servers are alive, and which ones should not be sent requests, because they do not respond), and choose the server to which the load will be distributed. All these parameters can then be changed on the already running ELB. By the way, if your web application uses HTTPS, I recommend to configure it on ELB, and use http on application servers, this will relieve your servers. In our case, this allowed us to process several times more requests per second.
')
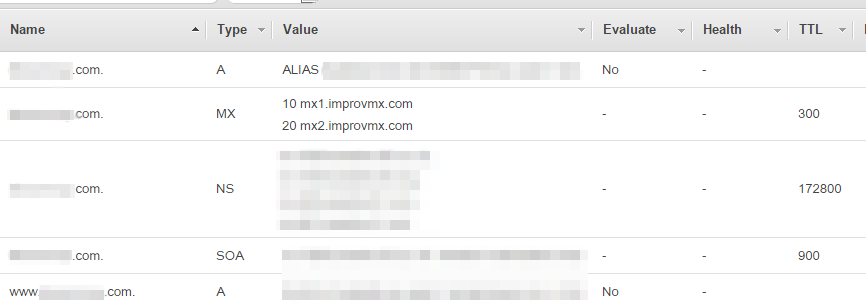
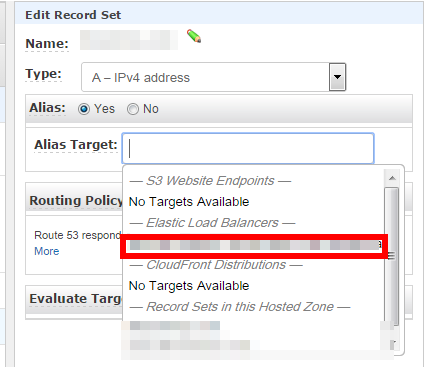
Then it was time to bind the domain to ELB, because, although ELB was not configured, the server with the application was still used directly. Since ELB has a dynamic ip address, linking it simply with the help of A record will not work. To do this, you will have to use another Amazon service - Route 53. To do this, you need to create a hosted zone with our domain name. This will create 2 entries - NS and SOA. To bind a domain to a hosted zone, you need to create or replace an NS record at the domain registrar with values from the NS record of the hosted zone. Next, you need to specify what our domain will correspond to, for this you need to create an A (A record) record in the Hosted Zone with the alias option selected and select our ELB in the Alias Target drop-down list.
After that, our server became available again at the old address. But he began to respond only to requests to the address without www, and the address from www did not respond at all.
We configure 301 Redirect to the domain without www from the domain with www
You can configure and vice versa, the setting will be completely similar. Why 301 Redirect and not another A record pointing to the same ELB? From the point of view of search engines, in this case we will have two sites with completely identical content, and the search engines do not like this to say the least.
Setting up a redirect was not as easy as it could be done with our registrar. As a solution on the forums and on Stack Overflow, set up a redirect to Apache or nginx, but these solutions did not suit us, since our application server is Apache Tomcat. I did not want to set another server in front of him - the response time grew unpleasantly. It was also proposed to write the code with the appropriate logic, but did not want to do this at all.
The solution was found, though not at all obvious. To do this, we will need to create S3 Bucket with the name of the domain from which we want to redirect users. It is important to create it with the domain name, otherwise you will not be able to link this bucket to the domain in Route 53 later. Enter the name of the domain to which it will redirect users and save the configuration.
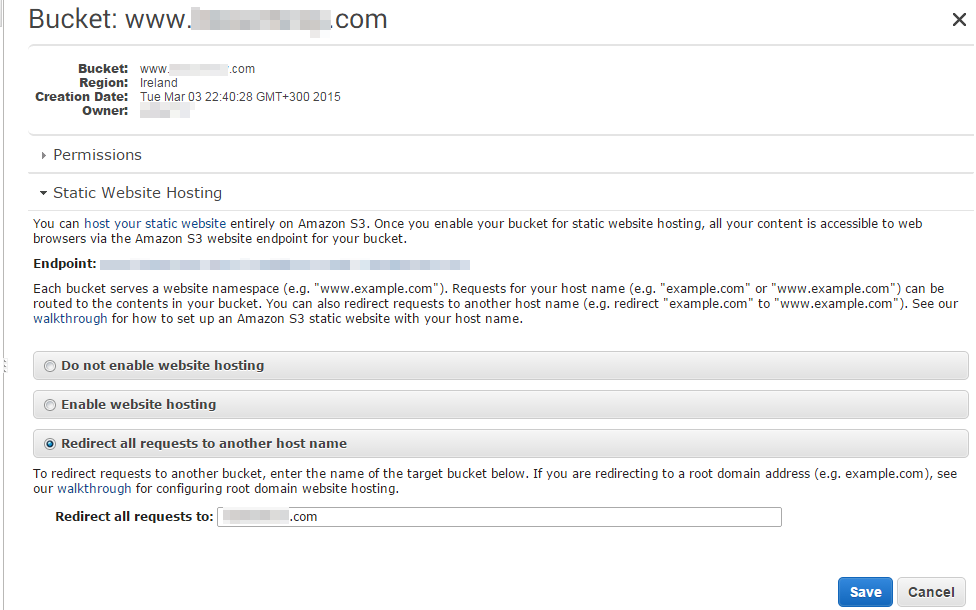
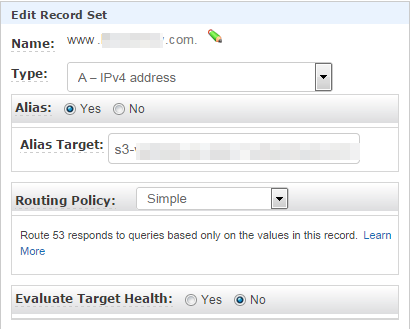
Then in Route 53 in the Hosted Zone of our domain we create an A record for the domain name with www (or without) with the alias option and specify our created S3 bucket as the alias target.
Great, now our domain is available with www and without www and even correctly redirects the user to our chosen option.
Email forwarding
Unfortunately, it is impossible to configure Email Forwarding with Amazon services, because there is simply no such service. But I found the excellent service ImprovMX , which allowed me to set up email forwarding in just a minute. Instructions for setting up (if you can call it that, because only one action is required) is on the site itself. All you need to do is to create an MX record with the following content in Hosted Zone:
10 mx1.improvmx.com 20 mx2.improvmx.com It remains only to enter the domain name and the mailbox to which the letters will be redirected to the site.
Conclusion
What we got in the end: load sharing between our application servers, while maintaining the necessary functionality - redirecting to a domain without www from the domain c www and email forwarding. Bonus received an increase in performance, as well as the ability to quickly increase productivity by simply adding multiple servers. Thanks for attention.
Source: https://habr.com/ru/post/252435/
All Articles