Air Native Extensions (ANE) Development for OS X
Hello to all habouiers. I would like to share the experience of creating native extensions for OS X.
AIR is simply amazing in its cross-platform environment. While it does not come to the use of some unique chips for the platform. I faced this problem when I was given the task of turning a browser flash-game into a desktop for OS X. I did all this using the AIR environment in a few hours and I will not describe this process, since in Google for this The topic is full of information. The most interesting thing began when it became necessary to connect various Apple services to the game, such as GameCenter, In-App-Purchase, etc. And here I am faced with difficulties. The fact is that there are a lot of ready-made ANEs, including free ones. But the trouble is that all these solutions work only for iOS. For OS X, there is neither the fact that ready-made libraries, but even information on the creation of these libraries had to be collected bit by bit from a couple of Internet resources of many years ago, constantly bumping into some kind of pitfalls or even icebergs.
Now I want to collect all the accumulated knowledge and experience in one place and share with you in order to at least a little reduce the pain that you have to go through, if you decide to create native libraries for poppy too. Although after the four developed extensions for OS X, they do not seem to be so complicated and tricky.
So. For work, I used:
AIR 16;
Flex 4.6.0;
Adobe Flash Builder 4.6 or IntelliJ IDEA 14 (Flash Builder was used to write the library, although the same can be done in IntelliJ IDEA. But I developed the project in IntelliJ IDEA. There’s a matter of taste, I suppose);
Xcode 6.1.1;
OS X Yosemite (10.10.1);
')
I will divide the whole process of creating ANE into 3 parts.
I think it is more logical to start creating native extensions with writing the native code itself, although in any case, you will most likely have to return to changing the native code more than once.
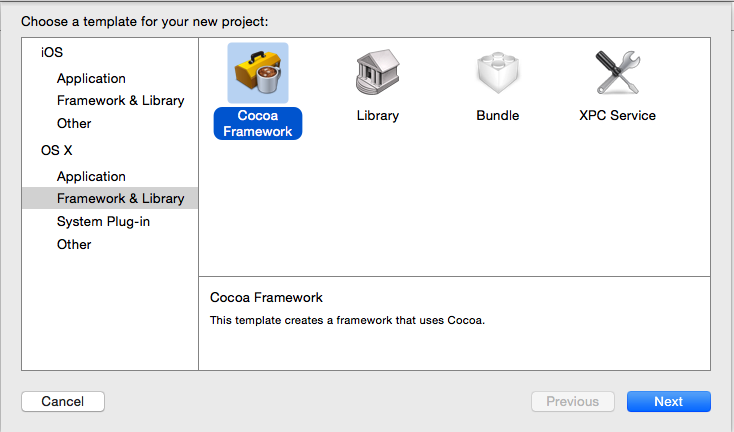
We start by creating a new project in Xcode. File -> New -> Project ... (Cmd + Shift + N). Next, select OX X -> Framework & Library -> Cocoa Framwork.
We invent a name for our framework. The name can be any, further, it will not be used in any way in our future native library.

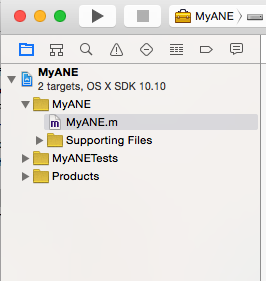
After that we have an empty project with one header file.
If the native library is planned for the implementation of simple single functions that somehow must be performed in Objective-C, then we can do without the header file using only the implementation file (* .m). But I will describe the work with a full-fledged class.
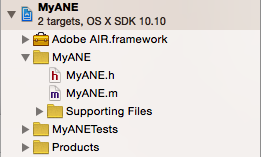
Before writing code, you need to add the Adobe AIR.framework library to your project. Click the right button on the project, and select Add files to "...". I hope you already have a fresh version of the AIR environment, because it is in it that the library that we need is stored. You can find it here: ../AIR_FOLDER/runtimes/air/mac/Adobe AIR.framework.
After this, the project will look something like this:
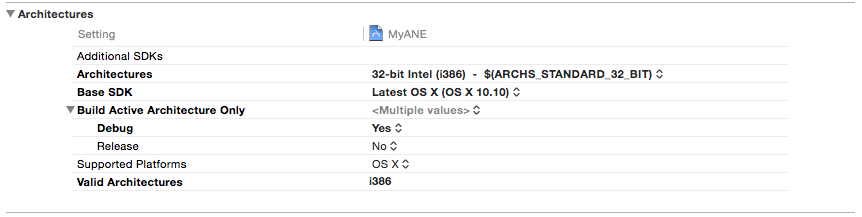
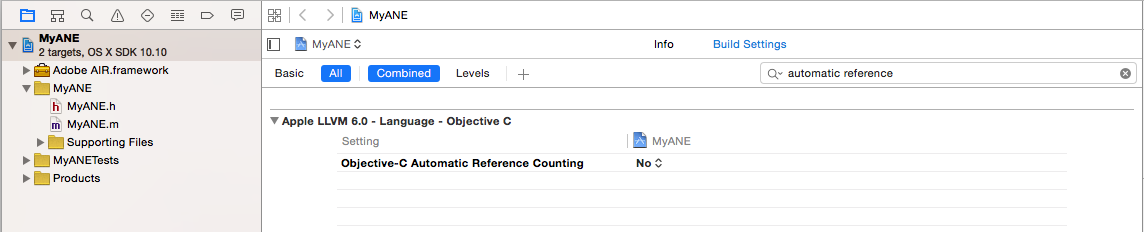
You also need to install a 32-bit target platform (i386) for the project (not for the target). At the time of this writing, Adobe AIR.framework worked only for 32-bit platforms. In the same project settings in Build Settings, we search for automatic reference, and set Objective-C Automatic Reference Counting to No.
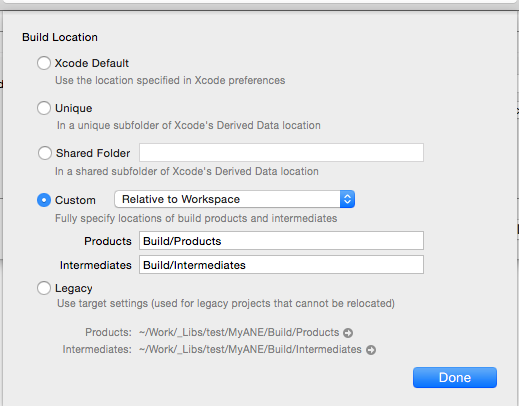
I am also changing the paths of the output files so that they are in the same place as the source. Who is more convenient.
First of all, we need to define initializers of the context and the library itself (optionally, finalizers can also be defined).
First, we define the context initializer. It will be called, oddly enough, when the context is initialized in the as3 part, but more on that later. It is very important, when using several native libraries in a project, to call initializers with unique names. The context initializer also defines the functions that will be available from the as3 code.
So. We declare the context initializer as follows:
It should be noted that the NSLog function, which displays a message in the console, will also output a message in the form of a trace in the IDE console, in which you are developing the main project.
Now we define the initializer of the library itself. In it we will indicate a link to the contextizer and context finalizer. We will use it later when building the library:
Next, we describe our only function available from the action script code. Inside this function, we can call various native Objective-C methods, including using the iOS SDK:
For convenience, you can use the directive:
Using the directive described above, the function can be defined much simpler and shorter:
Making the build (Command + B). As a result, in the path that we indicated at the very beginning, a framework would appear, with a name identical to the name that we indicated, again at the beginning.
The simplest Objective-C library is ready. The only thing she can do is output a string in the trace. But to demonstrate the work will come down. Now we need to create the second half of our ANE - AS3 library.
To create a library on Action Script, you can use any IDE with the ability to develop in ActionScript. But I used the IDE standard for such purposes - Flash Builder.
Creating a library is very simple: File -> New -> Flex Library Project.
We call our library, and we will definitely connect the Adobe AIR libraries. In essence, we do this for a single class that will allow us to work with the context.

Immediately create a new ActionScript class (it is possible, and even more convenient to create it in the package by default), inheriting it from flash.events.EventDispatcher (in general, you can inherit from anything, but you can not inherit at all, but the EventDispatcher class will allow an instance of dispatch events, which is very useful when working with the iOS SDK, where some of the requested data (GC friends list, IAP list available) does not come immediately). This will be our main class, which we will use when working with the library.
In the beginning, we need to get an ex-instance of the context. This is done as follows:
The static createExtensionContext method creates an ExtensionContext instance. Here we must pass the id of our extension, in this case “my.awesome.native.extension”, as well as the context type. The type must be specified only in the case of several library implementations. If a single implementation is planned, then null can be passed as a type.
Only one (singleton) instance of the context of the same specific type can be used in the project at a time. Personally for me, after a heap of native extensions created, there was no need for a multiple implementation of this extension itself. So in this case, having a single implementation, we will have, in principle, one instance for the whole ANE. Therefore, the constructor must be called once, and in the future just to get the already created object.
The easiest way to do this is to refer to a certain static function that will return an instance of the object, or create a new one through the constructor, if there is none.
To begin with we will describe the designer (which we will never call from the project):
You also need to check that ANE is trying to run on a Mac.
Now we will describe the function to which we will access each time we need to get an instance of our library.
At this stage, we have completed initialization. You can now use methods from Objective-C. You can call a function from the native code using the class method of the call context instance (), which as an argument must pass one of the function names specified in the context initializer in the native code, as well as the function parameters. In this example, we have described only one function with the name "initLibrary". It does not accept any parameters, well, we will not pass anything.
Save the project. The library is automatically compiled, and by default, placed in the bin directory, in the root of the project.
Thus, we have provided the most basic functionality. Now you can go to the last part.
Finally, we have 2 pieces of the native library. All you need is to combine them into a full ANE.
First we need a descriptor in which we describe our extension. It will be the following * .xml file:
Here:
id is the id of the sub-area, which must match the id that we specified when creating the context instance in the as3 part.
nativeLibrary - compiled framework from Objective-C
initializer, finalizer - the initializer and finalizer of the library (not the context), which was also described in the Ojbective-C part.
It is also recommended to do an implementation for the default platform in which the native code is missing. Well, follow the recommendations, it is not difficult.
The last piece of our library is ready, and now we can proceed to the assembly. And here begins the most interesting.
For convenience, I would advise you to make a separate folder for the assembly, otherwise it will be just confusion and porridge, which is already enough here. I use the following folder structure:
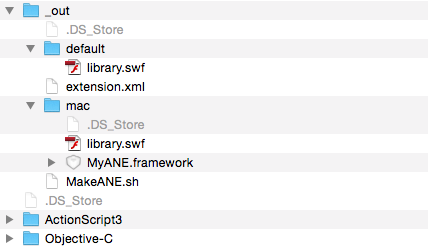
where
Separately by library.sfw. Yes, this is a piece of a library piece, which should be separate, but at the same time, the as3 piece assembled is also necessary for us. To get it, you need to unzip the collected as3 library as a normal zip-archive (saving this same as3 library).
Now all we need is to build the extension using the AIR Developer Tool (ADT). You can find it here: ../AIR_FOLDER/bin/adt
To build, I use the following script (from the _out folder):
AIR_FOLDER / bin / adt -package -target ane MyANE.ane extension.xml -swc ../ActionSript3/bin/MyANE.swc -platform MacOS-x86 -C mac. -platform default -C default.
Now we have a ready MyANE.ane file, which is the compiled native library. But even this is not the end. This fun begins when we try to use the native library in an OS X project. Again, there are a lot of tutorials and various FAQs for iOS, but as it turned out, OS X needs to perform other rituals with a tambourine, and not only.
So, we have a hand-written library. Here it is, ready * .ane file. Take it and use it. But no. In order to use the native library in OS X during development, it is not needed. But of course, our efforts were not in vain. We just need to do the following (I will describe the process for IntelliJ IDEA, but for Flash Builder the process is similar, in some cases even easier):
Now we can use native extensions when debugging. But there is something else. As you probably know, in the iOS SDK there are a number of classes that will work correctly only when they are launched from the Finder. To do this, using the same IntelliJ IDEA, you can build a native bundle and use it. But the problem is that the previous method of integrating the native extension will not allow us to assemble the bundle. But the assembly can still be useful to us, so we need to work a little more. Remember our * .ane? So now it is his time.
Now you can build a native bundle. This is done simply Build-> Package AIR Application. I use * .app as my goal.
Well, at the output we get a ready-made, native bundle, with a working project that ANE will use.
That's all. Thank you for your attention, I hope this article will be useful for someone. This is my first article on Habré, so I would really like to hear constructive criticism and advice on how to improve the article. Also I will definitely answer questions in the comments, and, if possible, supplement the article.
If there is interest in this topic, I would also like to tell about the exchange of various data between as3 and native code, about events and much more (although this is already more general concepts for which to find information is a little easier).
AIR is simply amazing in its cross-platform environment. While it does not come to the use of some unique chips for the platform. I faced this problem when I was given the task of turning a browser flash-game into a desktop for OS X. I did all this using the AIR environment in a few hours and I will not describe this process, since in Google for this The topic is full of information. The most interesting thing began when it became necessary to connect various Apple services to the game, such as GameCenter, In-App-Purchase, etc. And here I am faced with difficulties. The fact is that there are a lot of ready-made ANEs, including free ones. But the trouble is that all these solutions work only for iOS. For OS X, there is neither the fact that ready-made libraries, but even information on the creation of these libraries had to be collected bit by bit from a couple of Internet resources of many years ago, constantly bumping into some kind of pitfalls or even icebergs.
Now I want to collect all the accumulated knowledge and experience in one place and share with you in order to at least a little reduce the pain that you have to go through, if you decide to create native libraries for poppy too. Although after the four developed extensions for OS X, they do not seem to be so complicated and tricky.
So. For work, I used:
AIR 16;
Flex 4.6.0;
Adobe Flash Builder 4.6 or IntelliJ IDEA 14 (Flash Builder was used to write the library, although the same can be done in IntelliJ IDEA. But I developed the project in IntelliJ IDEA. There’s a matter of taste, I suppose);
Xcode 6.1.1;
OS X Yosemite (10.10.1);
')
I will divide the whole process of creating ANE into 3 parts.
Part one. Objective c
I think it is more logical to start creating native extensions with writing the native code itself, although in any case, you will most likely have to return to changing the native code more than once.
We start by creating a new project in Xcode. File -> New -> Project ... (Cmd + Shift + N). Next, select OX X -> Framework & Library -> Cocoa Framwork.
We invent a name for our framework. The name can be any, further, it will not be used in any way in our future native library.
After that we have an empty project with one header file.
If the native library is planned for the implementation of simple single functions that somehow must be performed in Objective-C, then we can do without the header file using only the implementation file (* .m). But I will describe the work with a full-fledged class.
Before writing code, you need to add the Adobe AIR.framework library to your project. Click the right button on the project, and select Add files to "...". I hope you already have a fresh version of the AIR environment, because it is in it that the library that we need is stored. You can find it here: ../AIR_FOLDER/runtimes/air/mac/Adobe AIR.framework.
After this, the project will look something like this:
You also need to install a 32-bit target platform (i386) for the project (not for the target). At the time of this writing, Adobe AIR.framework worked only for 32-bit platforms. In the same project settings in Build Settings, we search for automatic reference, and set Objective-C Automatic Reference Counting to No.
I am also changing the paths of the output files so that they are in the same place as the source. Who is more convenient.
First of all, we need to define initializers of the context and the library itself (optionally, finalizers can also be defined).
First, we define the context initializer. It will be called, oddly enough, when the context is initialized in the as3 part, but more on that later. It is very important, when using several native libraries in a project, to call initializers with unique names. The context initializer also defines the functions that will be available from the as3 code.
So. We declare the context initializer as follows:
FREContext AirCtx = nil; // void MyAwesomeNativeExtensionContextInitializer(void* extData, const uint8_t* ctxType, FREContext ctx, uint32_t* numFunctionsToTest, const FRENamedFunction** functionsToSet) { NSLog(@"[MyANE.Obj-C] Entering ContextInitinalizer()"); *numFunctionsToTest = 1; // , as3 . . - . FRENamedFunction* func = (FRENamedFunction*) malloc(sizeof(FRENamedFunction) * *numFunctionsToTest); func[0].name = (const uint8_t*) "initLibrary"; // , as3. func[0].functionData = NULL; // NULL. NULL. func[0].function = &init; // FREObject() ojbective-c // // func[n].name = (const uint8_t*) "name"; // func[n].functionData = data; // func[n].function = &function; *functionsToSet = func; AirCtx = ctx; NSLog(@"[MyANE.Obj-C] Exiting ContextInitinalizer()"); } It should be noted that the NSLog function, which displays a message in the console, will also output a message in the form of a trace in the IDE console, in which you are developing the main project.
Now we define the initializer of the library itself. In it we will indicate a link to the contextizer and context finalizer. We will use it later when building the library:
void MyAwesomeNativeExtensionInitializer(void** extDataToSet, FREContextInitializer* ctxInitializerToSet, FREContextFinalizer* ctxFinalizerToSet ) { NSLog(@"[MyANE.Obj-C] Entering ExtInitializer()"); *extDataToSet = NULL; *ctxInitializerToSet = &MyAwesomeNativeExtensionContextInitializer; // *ctxFinalizerToSet = &MyAwesomeNativeExtensionContextFinalizer; // () NSLog(@"[MyANE.Obj-C] Exiting ExtInitializer()"); } Next, we describe our only function available from the action script code. Inside this function, we can call various native Objective-C methods, including using the iOS SDK:
FREObject (init) (FREContext context, void* functionData, uint32_t argc, FREObject argv[]){ NSLog(@"[MyANE.Obj-C] Hello World!"); return nil; } For convenience, you can use the directive:
#define DEFINE_ANE_FUNCTION(fn) FREObject (fn)(FREContext context, void* functionData, uint32_t argc, FREObject argv[]) Using the directive described above, the function can be defined much simpler and shorter:
DEFINE_ANE_FUNCTION(init){ NSLog(@"[MyANE.Obj-C] Hello World!"); return nil; } Making the build (Command + B). As a result, in the path that we indicated at the very beginning, a framework would appear, with a name identical to the name that we indicated, again at the beginning.
The simplest Objective-C library is ready. The only thing she can do is output a string in the trace. But to demonstrate the work will come down. Now we need to create the second half of our ANE - AS3 library.
Source
MyANE.h
#import <Adobe AIR/Adobe AIR.h> #import <Foundation/Foundation.h> //! Project version number for MyANE. FOUNDATION_EXPORT double MyANEVersionNumber; //! Project version string for MyANE. FOUNDATION_EXPORT const unsigned char MyANEVersionString[]; @interface MyANE : NSObject @end MyANE.m
#import "MyANE.h" #define DEFINE_ANE_FUNCTION(fn) FREObject (fn)(FREContext context, void* functionData, uint32_t argc, FREObject argv[]) @implementation MyANE @end FREContext AirCtx = nil; DEFINE_ANE_FUNCTION(init){ NSLog(@"[MyANE.Obj-C] Hello World!"); return nil; } void MyAwesomeNativeExtensionContextInitializer(void* extData, const uint8_t* ctxType, FREContext ctx, uint32_t* numFunctionsToTest, const FRENamedFunction** functionsToSet) { NSLog(@"[MyANE.Obj-C] Entering ContextInitinalizer()"); *numFunctionsToTest = 1; FRENamedFunction* func = (FRENamedFunction*) malloc(sizeof(FRENamedFunction) * *numFunctionsToTest); func[0].name = (const uint8_t*) "initLibrary"; func[0].functionData = NULL; func[0].function = &init; *functionsToSet = func; AirCtx = ctx; NSLog(@"[MyANE.Obj-C] Exiting ContextInitinalizer()"); } void MyAwesomeNativeExtensionContextFinalizer(FREContext ctx) { } void MyAwesomeNativeExtensionInitializer(void** extDataToSet, FREContextInitializer* ctxInitializerToSet, FREContextFinalizer* ctxFinalizerToSet ) { NSLog(@"[MyANE.Obj-C] Entering ExtInitializer()"); *extDataToSet = NULL; *ctxInitializerToSet = &MyAwesomeNativeExtensionContextInitializer; *ctxFinalizerToSet = &MyAwesomeNativeExtensionContextFinalizer; NSLog(@"[MyANE.Obj-C] Exiting ExtInitializer()"); } void MyAwesomeNativeExtensionFinalizer(void* extData) { } Part two. Action script
To create a library on Action Script, you can use any IDE with the ability to develop in ActionScript. But I used the IDE standard for such purposes - Flash Builder.
Creating a library is very simple: File -> New -> Flex Library Project.
We call our library, and we will definitely connect the Adobe AIR libraries. In essence, we do this for a single class that will allow us to work with the context.
Immediately create a new ActionScript class (it is possible, and even more convenient to create it in the package by default), inheriting it from flash.events.EventDispatcher (in general, you can inherit from anything, but you can not inherit at all, but the EventDispatcher class will allow an instance of dispatch events, which is very useful when working with the iOS SDK, where some of the requested data (GC friends list, IAP list available) does not come immediately). This will be our main class, which we will use when working with the library.
In the beginning, we need to get an ex-instance of the context. This is done as follows:
var extCtx:ExtensionContext = ExtensionContext.createExtensionContext("my.awesome.native.extension", null); The static createExtensionContext method creates an ExtensionContext instance. Here we must pass the id of our extension, in this case “my.awesome.native.extension”, as well as the context type. The type must be specified only in the case of several library implementations. If a single implementation is planned, then null can be passed as a type.
Only one (singleton) instance of the context of the same specific type can be used in the project at a time. Personally for me, after a heap of native extensions created, there was no need for a multiple implementation of this extension itself. So in this case, having a single implementation, we will have, in principle, one instance for the whole ANE. Therefore, the constructor must be called once, and in the future just to get the already created object.
The easiest way to do this is to refer to a certain static function that will return an instance of the object, or create a new one through the constructor, if there is none.
To begin with we will describe the designer (which we will never call from the project):
private static var _instance:MyANE; // private var extCtx:ExtensionContext; // public function MyANE(target:IEventDispatcher=null) { if (!_instance) { if (this.isSupported) { extCtx = ExtensionContext.createExtensionContext("my.awesome.native.extension", null); // if (extCtx != null) { trace('[MyANE.AS3] extCtx is okay'); } else { trace('[MyANE.AS3] extCtx is null.'); } } _instance = this; } else { throw Error('[MyANE.AS3] This is a singleton, use getInstance, do not call the constructor directly'); // , } } You also need to check that ANE is trying to run on a Mac.
public function get isSupported():Boolean { return Capabilities.manufacturer.indexOf('Macintosh') > -1; } Now we will describe the function to which we will access each time we need to get an instance of our library.
public static function getInstance():MyANE { return _instance != null ? _instance : new MyANE(); } At this stage, we have completed initialization. You can now use methods from Objective-C. You can call a function from the native code using the class method of the call context instance (), which as an argument must pass one of the function names specified in the context initializer in the native code, as well as the function parameters. In this example, we have described only one function with the name "initLibrary". It does not accept any parameters, well, we will not pass anything.
public function init():void { extCtx.call("initLibrary"); } Save the project. The library is automatically compiled, and by default, placed in the bin directory, in the root of the project.
Thus, we have provided the most basic functionality. Now you can go to the last part.
Source
package { import flash.events.EventDispatcher; import flash.events.IEventDispatcher; import flash.external.ExtensionContext; import flash.system.Capabilities; public class MyANE extends EventDispatcher { private static var _instance:MyANE; private var extCtx:ExtensionContext; public function MyANE(target:IEventDispatcher=null) { if (!_instance) { if (this.isSupported) { extCtx = ExtensionContext.createExtensionContext("my.awesome.native.extension", null); if (extCtx != null) { trace('[MyANE.AS3] extCtx is okay'); } else { trace('[MyANE.AS3] extCtx is null.'); } } _instance = this; } else { throw Error('[MyANE.AS3] This is a singleton, use getInstance, do not call the constructor directly'); } } public function get isSupported():Boolean { return Capabilities.manufacturer.indexOf('Macintosh') > -1; } public static function getInstance():MyANE { return _instance != null ? _instance : new MyANE(); } public function init():void { extCtx.call("initLibrary"); } } Part Three Build a library
Finally, we have 2 pieces of the native library. All you need is to combine them into a full ANE.
First we need a descriptor in which we describe our extension. It will be the following * .xml file:
<extension xmlns="http://ns.adobe.com/air/extension/3.9"> <id>my.awesome.native.extension</id> <versionNumber>1.0.0</versionNumber> <platforms> <platform name="MacOS-x86"> <applicationDeployment> <nativeLibrary>MyANE.framework</nativeLibrary> <initializer>MyAwesomeNativeExtensionInitializer</initializer> <finalizer>MyAwesomeNativeExtensionFinalizer</finalizer> </applicationDeployment> </platform> <platform name="default"> <applicationDeployment/> </platform> </platforms> </extension> Here:
id is the id of the sub-area, which must match the id that we specified when creating the context instance in the as3 part.
nativeLibrary - compiled framework from Objective-C
initializer, finalizer - the initializer and finalizer of the library (not the context), which was also described in the Ojbective-C part.
It is also recommended to do an implementation for the default platform in which the native code is missing. Well, follow the recommendations, it is not difficult.
The last piece of our library is ready, and now we can proceed to the assembly. And here begins the most interesting.
For convenience, I would advise you to make a separate folder for the assembly, otherwise it will be just confusion and porridge, which is already enough here. I use the following folder structure:
where
- _out is the build folder itself.
- default - implementation for the default platform
- library.sfw - swf obtained by unarchiving the collected as3 part
- mac - implementation for the mac platform
- library.sfw - swf obtained by unarchiving the collected as3 part
- MyANE.framework - assembled Objective-C part
- extension.xml - an extension handle
- MakeANE.sh - just a script to quickly build the library
- default - implementation for the default platform
- ActionScript3 and Objective-C are project library parts folders.
Separately by library.sfw. Yes, this is a piece of a library piece, which should be separate, but at the same time, the as3 piece assembled is also necessary for us. To get it, you need to unzip the collected as3 library as a normal zip-archive (saving this same as3 library).
Now all we need is to build the extension using the AIR Developer Tool (ADT). You can find it here: ../AIR_FOLDER/bin/adt
To build, I use the following script (from the _out folder):
AIR_FOLDER / bin / adt -package -target ane MyANE.ane extension.xml -swc ../ActionSript3/bin/MyANE.swc -platform MacOS-x86 -C mac. -platform default -C default.
Now we have a ready MyANE.ane file, which is the compiled native library. But even this is not the end. This fun begins when we try to use the native library in an OS X project. Again, there are a lot of tutorials and various FAQs for iOS, but as it turned out, OS X needs to perform other rituals with a tambourine, and not only.
Part last. Integration of the native library into the project
So, we have a hand-written library. Here it is, ready * .ane file. Take it and use it. But no. In order to use the native library in OS X during development, it is not needed. But of course, our efforts were not in vain. We just need to do the following (I will describe the process for IntelliJ IDEA, but for Flash Builder the process is similar, in some cases even easier):
- Unzip the * .ane file as a normal zip archive into a folder that has the name exactly as the id of our extension + .ane at the end. In our case, it will be "my.awesome.native.extension.ane". This folder is better to copy to the new directory inside the project. For example, I have this libs-ane, which already contains unzipped extensions.
- In IntelliJ IDEA, in the project settings, we DO NOT add this directory depending.
- In another directory inside the project, add the collected as3 library. I have this directory called libs-swc.
- This directory is already added to the project dependencies. The type of connection is Merged.
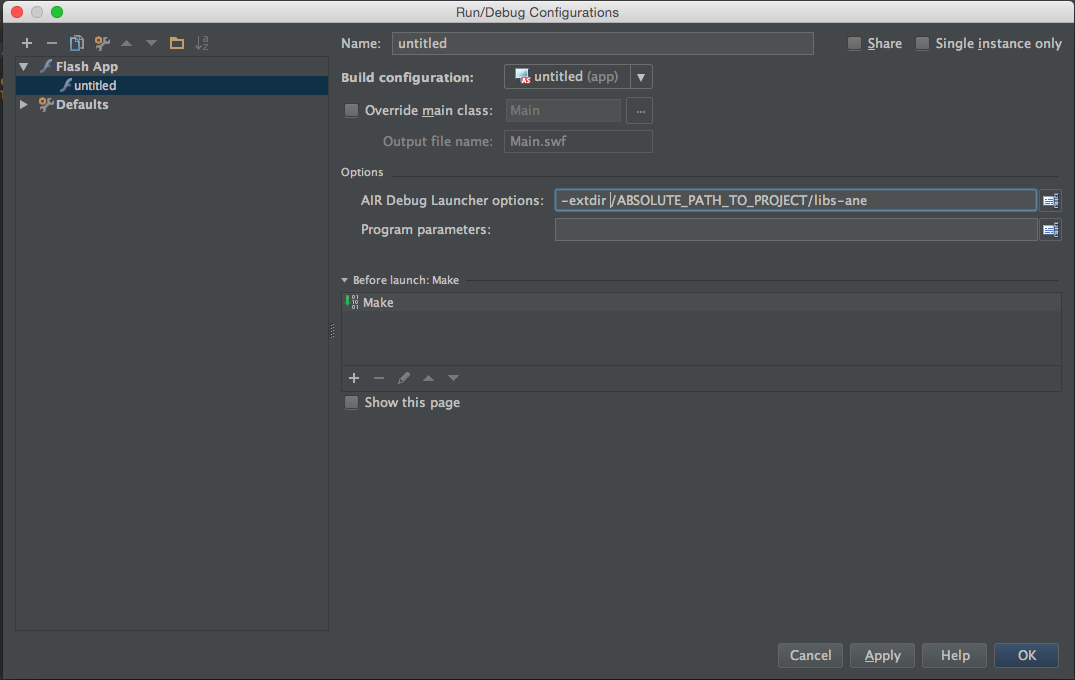
- In the ADL startup parameters, you must add the following option -extdir / ABSOLUTE_PATH_TO_PROJECT / libs-ane. In IntelliJ IDEA, these parameters are found in Run-> Edit Configurations-> AIR Debug Launcher Options.
- In the project descriptor, add the id of the native extension in the extensions block
<extensions> <extensionID>my.awesome.native.extension</extensionID> </extensions>
Now we can use native extensions when debugging. But there is something else. As you probably know, in the iOS SDK there are a number of classes that will work correctly only when they are launched from the Finder. To do this, using the same IntelliJ IDEA, you can build a native bundle and use it. But the problem is that the previous method of integrating the native extension will not allow us to assemble the bundle. But the assembly can still be useful to us, so we need to work a little more. Remember our * .ane? So now it is his time.
- All * .ane needs to be added to the next separate directory, again inside the project. I have this folder called anes.
In IntelliJ IDEA, in the project settings we also add this directory depending. The type of connection will become ANE and cannot be changed (that is why it is impossible to simultaneously assemble a bundle and work in debug mode). In the future, for debugging, we remove this directory from the dependencies, and to add a bundle, we add it. - But in any case, we need anes to be an external library. To do this, I use an additional build-config.xml file, in which I describe additional build parameters. In this build-config.xml, you must specify the anes directory as the path of the external library. The simplest option might look like this:
<?xml version="1.0"?> <flex-config> <target-player>16.0.0</target-player> <swf-version>23</swf-version> <compiler> <external-library-path> <path-element>${flexlib}/libs/player/{targetPlayerMajorVersion}.{targetPlayerMinorVersion}/playerglobal.swc</path-element> <path-element>anes</path-element> </external-library-path> <as3>true</as3> <library-path> <path-element>libs-swc</path-element> </library-path> </compiler> </flex-config>
To use an additional build-config file, you need to add it in the project settings. Project Structure -> Additional compiler configuration file.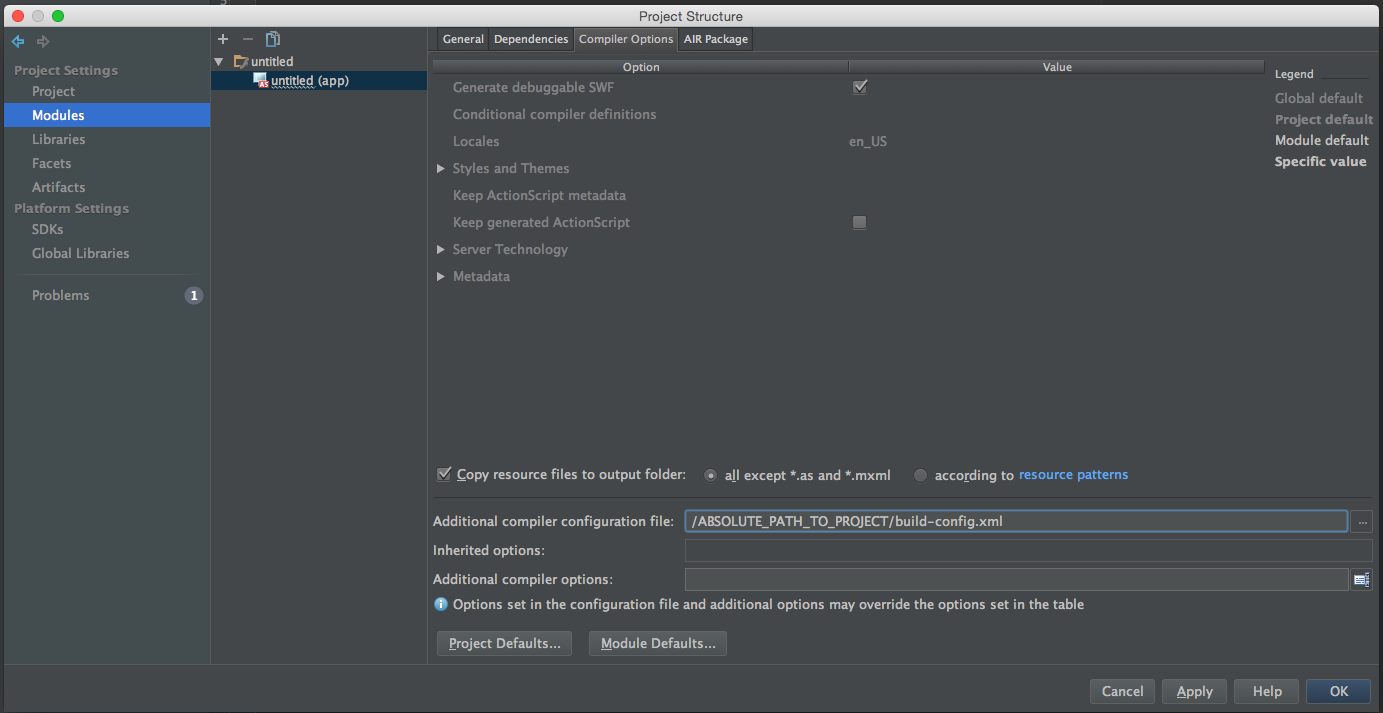
Well, or even easier all the same in the Additional compiler options, you can add a parameter: "-external-library-path path-element anes"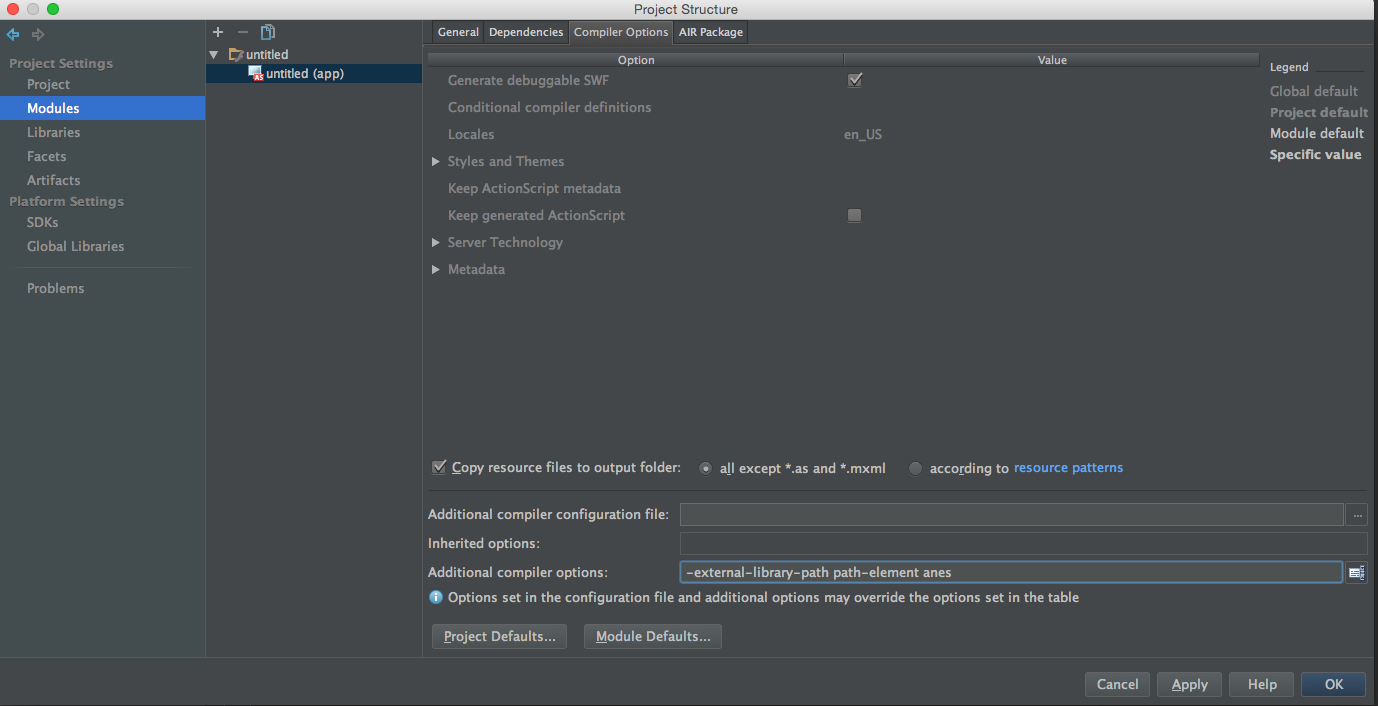
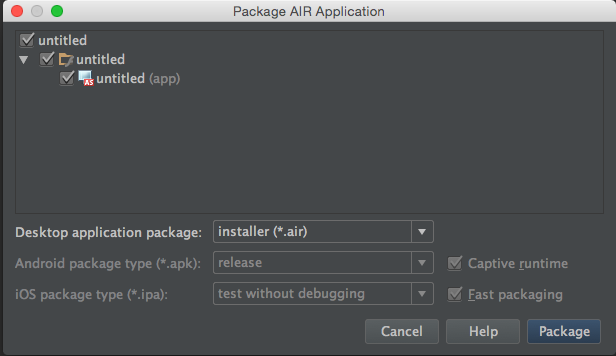
Now you can build a native bundle. This is done simply Build-> Package AIR Application. I use * .app as my goal.
Well, at the output we get a ready-made, native bundle, with a working project that ANE will use.
That's all. Thank you for your attention, I hope this article will be useful for someone. This is my first article on Habré, so I would really like to hear constructive criticism and advice on how to improve the article. Also I will definitely answer questions in the comments, and, if possible, supplement the article.
If there is interest in this topic, I would also like to tell about the exchange of various data between as3 and native code, about events and much more (although this is already more general concepts for which to find information is a little easier).
Source: https://habr.com/ru/post/252217/
All Articles