Documenting code efficiently with Doxygen
This article is included in the resulting series of articles on the Doxygen documentation system:
This is the first and main article from the mentioned cycle and it is an introduction to the Doxygen source documentation system, which today, according to developers, has actually become the standard for documenting software written in C ++, and has received even less widespread among a number of other languages.
')
In this article, we will first get acquainted with the system itself and its capabilities, then we will deal with its installation and basic operating principles, and, finally, we will complete our acquaintance with various examples of documentation, examples of how to document certain parts of the code. In a word, we will get acquainted with everything that will allow you to get comfortable and start working with this wonderful system.
Introduction
Most likely, each of us came across the results of the work of various documentation generators. The general principle of their work is the following: the input source code, and sometimes other program components, is delivered to the input of such a generator, and the output creates ready-made documentation for distribution and use.
The Doxygen system under consideration just performs this task: it allows you to generate, on the basis of the source code containing special comments, beautiful and convenient documentation containing references, class diagrams, calls, etc. in various formats: HTML, LaTeX, CHM, RTF, PostScript, PDF, man pages.
In order to create a general impression of the system, below are examples of various documentation for APIs created using Doxygen (note that the latter examples have made noticeable changes compared to the standard documentation generated by this system):
- CrystalSpace Game Engine API Documentation
- Visualization Toolkit Documentation
- Abiword source documentation
- KDE API documentation
- Drupal API documentation
The attentive reader probably paid attention to the fact that in most examples Doxygen is used to document software written in C ++, but in fact this system supports a much larger number of other languages: C, Objective-C, C #, PHP, Java, Python , IDL, Fortran, VHDL, Tcl, and partly D.
However, following the established tradition, in the examples I will use C ++, but this should not confuse you if you prefer another supported language, since you will not even notice a particular difference in practice, and most of the following will be true for your language.
 By the way, the list of projects using Doxygen is available on the official website , and most of these projects are free. Therefore, those who wish can download the source of this or that project and see how the developers implemented the documentation there.
Installation and Setup
You can download the latest version of Doxygen on the official website , the distributions of which are available for most popular operating systems. In addition, you can use your package manager. In addition, for comfortable and full-featured work, it is recommended to install Graphviz .
Further work with Doxygen is very trivial: just run the program, indicating the path to the file with the settings.
doxygen <config_file> But in this file and all the subtleties. The fact is that each project has its own settings file, in which the path to the source code of the project, the path by which the documentation should be created, as well as a large number of other various options, which are described in detail in the documentation , and which allow you to customize as much as possible project documentation to fit your needs.
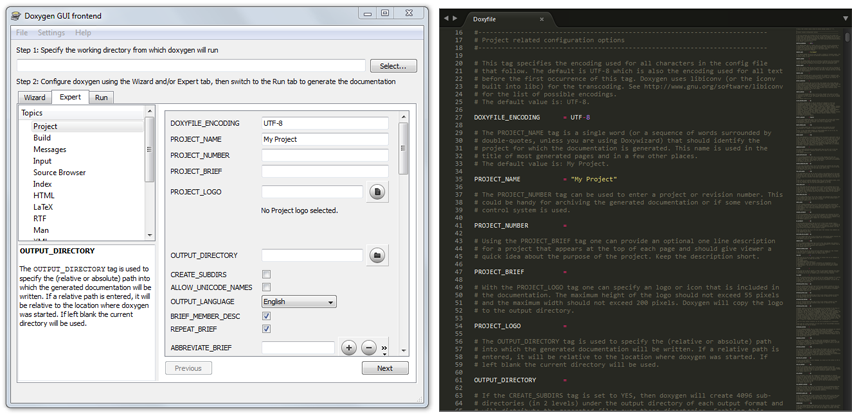
In principle, for editing this file and, in general, working with Doxygen, you can use the Doxywizard program, which most often comes with Doxygen and which makes it a bit more convenient to work with the settings file (Doxywizard on the left; the file opened in a text editor on the right):
So, let's start creating a file with settings. In general, if you use Doxywizard, it will be created automatically, otherwise, to create this file, you need to run the Doxygen program with the -g key (from generate):
doxygen -g <config_name> Consider the basic options that you might need to create your first documentation:
| Tag | Purpose | Default |
| DOXYFILE_ENCODING | Encoding that is used for all characters in this settings file. | UTF-8 |
| OUTPUT_LANGUAGE | Sets the language in which the documentation will be generated. | English |
| PROJECT_NAME | The name of the project, which can be a single word or a sequence of words (if you edit outside of Doxywizard, you must put the sequence of words in double quotes) | My project |
| PROJECT_NUMBER | This tag can be used to indicate the project number or its version. | - |
| PROJECT_BRIEF | A brief one-line description of the project, which is located on top of each page and gives a general idea of the purpose of the project | - |
| OUTPUT_DIRECTORY | The absolute or relative path through which the documentation will be generated. | Current directory |
| INPUT | A list of files and / or directories, separated by a space, which contain the source code of the project | Current directory |
| RECURSIVE | It is used if it is necessary to scan the source codes in the subfolders of the specified directories. | NO |
To generate it, you can use the Doxywizard (to do this, specify the working directory from which source codes will be taken, go to the “Run” tab and click “Run doxygen”) or launch Doxygen, specifying the path to the settings file as a parameter:
doxygen <config_file> Doxygen documentation basics
Now that we have figured out how to set up Doxygen and work with it, it’s time to figure out how to document the code, basic principles and approaches.
Documentation of the code in Doxygen is carried out using the documentation block. However, there are two approaches to its placement:
- It can be placed before or after the declaration or definition of a class, member of a class, function, namespace, etc .;
- Or it can be located in an arbitrary place (and even another file), but for this you will need to explicitly indicate in it which element of the code it belongs to. We will not consider this approach, since even developers recommend avoiding it, but if you're interested, you can read more about it in the documentation .
Structurally, any documenting block is a commentary, simply decorated in a special way, so it is natural that its appearance depends on the language used (for more details, see the corresponding section of the documentation ). Therefore, we will focus on the syntax for C-like languages (C / C ++ / C # / Objective-C / PHP / Java).
Immediately, we note that, in general, there are two main types of documenting blocks: a multi-line block and a single-line block.
The difference between them is slightly stronger than between single-line and multi-line comments. The fact is that the text written in a single-line block refers to a brief description of the documenting element (akin to the title), and the text written in a multi-line block refers to a detailed description. This difference should not be forgotten.
Multi line block
We said that any block is a comment made in a special way. Therefore, it is necessary to determine how in such a "special way". In general, there are a number of ways to describe a multi-line block, and the choice of a particular method depends on your preferences:
- JavaDoc style (recalls the usual C comment, but starting with two asterisks):
/** * ... ... * ... ... */
In this case, the stars do not have to be put on each line. Such a record would be equivalent:/** ... ... ... ... */ - Qt style in which at the beginning instead of the second asterisk an exclamation mark is put:
/*! * ... ... * ... ... */
What has been said about the non-binding nature of intermediate stars also remains valid. In addition to these two styles, there is also a series, but for now we will not dwell on them.
At the same time note again that the text written in such a comment relates to a detailed description.
To specify a brief description, the \ brief command can be used. The text indicated after the command, up to the end of the paragraph, will refer to the brief description, and an empty line is used to separate the detailed description and brief description.
/*! \brief . */ Single line block
To describe a single-line block, again, there are a number of ways to design, consider two of them:
- You can use a special comment in C ++ style:
/// - You can use a comment similar to the previous one, only instead of an extra slash, it has an exclamation mark:
//!
- To specify a detailed description in a single-line document block, the \ details command can be used:
/// \details - The documenting blocks, following each other, are combined into one (and regardless of the style used and whether they are multiline or one-line).
For example, the following two ways of documenting will give the same result:/// \brief /// \details/// /*! */
Placing the documenting block after the element
In all the previous examples, it was assumed that the documenting unit preceded the documented element, but sometimes there are situations when it is more convenient to place it after the documented element. To do this, add the marker "<" to the block, as in the example below:
int variable; ///< Sample documentation
Now we will consider how it will look in practice. Below is the documented code of a certain class in accordance with the rules that we considered earlier.
/*! \brief , : , Doxygen */ class Parent { public: Parent(); ~Parent(); }; As a result, on the basis of these comments, Doxygen will generate the following beautifully designed page (here is a clipping from it):

Now that we have learned the basics, it's time to get acquainted with how to detail the documentation. Instruments for this are commands.
Teams
We managed to get acquainted with several of the teams in Doxygen (we are talking about \ brief and \ details ), but in fact there are much more of them. Full list of them is given in the official documentation .
In general, any command in Doxygen is a word in English prefixed by the symbol "\" or "@" (both entries are identical) and there are a lot of such commands, about two hundred. For example, here’s some of these commands:
| Team | Value |
| \ authors | Indicates the author or authors |
| \ version | Used to indicate the version |
| \ date | Designed to indicate the date of development |
| \ bug | Enumeration of known errors |
| \ warning | Warning for use |
| \ copyright | Used license |
| \ example | The command that is added to the comment to specify a link to the source code with an example (added after the command) |
| \ todo | The command is used to describe the changes that need to be made (TODO). |
/*! \brief \author Norserium \version 1.0 \date 2015 \warning , Parent */ class Son : public Parent { public: Son(); ~Son(); }; 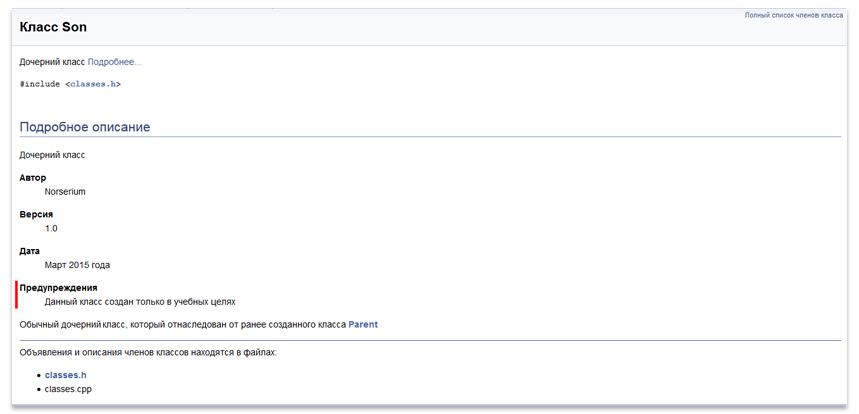
Further, the following notation will be used when describing the arguments of a command, when its general format is given:
| Designation | Value |
| <...> | Angle brackets indicate that the argument is a single word. |
| (...) | Parentheses indicate that the argument is all the text down to the end of the line where the command is placed. |
| {...} | The curly braces indicate that the argument is the entire text up to the next paragraph. Paragraphs are separated by a blank line or a separator command. |
Documenting the main elements of the source code
Now we can consider the specific features of documenting the various elements of the source code, ranging from files in general and ending with classes, structures, functions and methods.
Documenting file
A good practice is to add a documenting block to the beginning of the file, describing its purpose. In order to indicate that this block refers to a file, you must use the \ file command (and you can specify the path to the file to which this block belongs as a parameter, but by default, the file to which the block is added is usually , meets our needs).
/*! \file \brief , */ #ifndef CLASSES_H #define CLASSES_H ... #endif // CLASSES_H Documenting functions and methods
When documenting functions and methods, it is often necessary to specify the input parameters, the value returned by the function, as well as possible exceptions. Consider the corresponding teams in sequence.
Options
To specify the parameters, you must use the \ param command for each of the parameters of the function, and the syntax of the command is as follows:
\param [<>] <_> {_} Consider the value of the components of the command:
- The parameter name is the name by which this parameter is known in the code being documented;
- The parameter description is a simple text description of the parameter used ..
- Direction is an optional attribute that indicates the purpose of the parameter and can have three values "[in]", "[out]", "[in, out]";
Immediately proceed to the example:
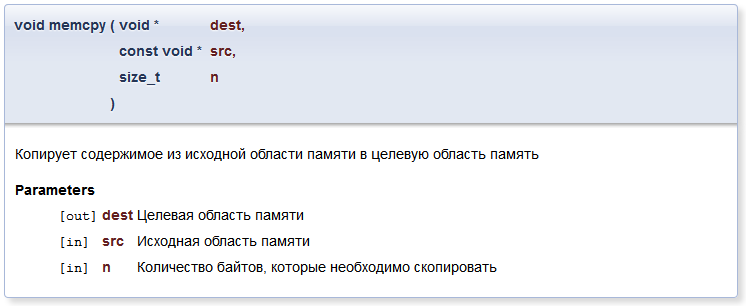
/*! \param[out] dest \param[in] src \param[in] n , */ void memcpy(void *dest, const void *src, size_t n); As a result, we get the following neat function documentation:
Return value
For the description of the return value, use the \ return command (or its equivalent \ returns ). Its syntax is as follows:
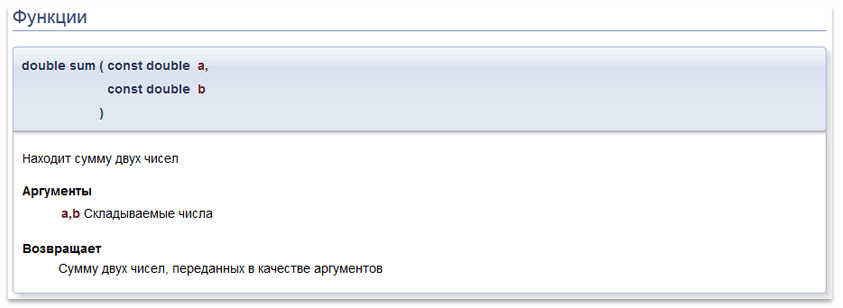
\return {__} Consider an example with a description of the return value (note that the parameters are described using one command and as a result, they are placed together in the description):
/*! \param a,b \return , */ double sum(const double a, const double b); We get the following result:
Exceptions
To specify an exception, use the \ throw command (or its synonyms: \ throws , \ exception ), which has the following format:
\throw <-> {} The simplest example is below:
\throw std::bad_alloc Documenting classes
Classes can also be documented simply by preceding them with a documenting unit. At the same time, Doxygen receives a huge amount of information automatically, taking into account the syntax of the language, so the task of documenting classes is greatly simplified. So when documenting Doxygen automatically determines methods and class members, levels of access to functions, friendly functions, etc.
If your language does not explicitly support certain concepts, such as access levels or the creation of methods, but their presence is implied and I would like to highlight it somehow in the documentation, then there are a number of commands (for example, \ public , \ private , \ protected, \ memberof ), which allow you to specify Doxygen explicitly about them.
Documenting transfers
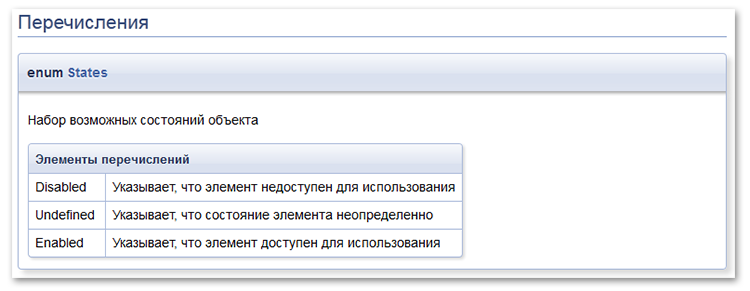
Documenting enumerations is not much different from documenting other elements. Consider an example that illustrates how you can conveniently document them:
/// enum States { Disabled, ///< , Undefined, ///< , Enabled, ///< , } That is, the description of the states is indicated, in fact, after them themselves with the help of a brief or detailed description (in this case it does not matter).
The result will be as follows:
Modules
Special attention should be paid to the creation of modules in the documentation, since this is one of the most convenient ways to navigate through it and an effective tool for its structuring. An example of good grouping by modules can be found here .
Next, we briefly review the main points and give an example, but if you want to understand all the intricacies, then you will have to refer to the relevant section of the documentation .
Module creation
To declare a module, it is recommended to use the \ defgroup command , which must be enclosed in a documenting block:
\defgroup <> ( ) The module identifier is a unique word written in Latin, which will later be used to refer to this module; the module title is an arbitrary word or sentence (preferably a short one) that will be displayed in the documentation.
Please note that when describing a module, you can add a brief and detailed description to it, which allows you to reveal the purpose of a particular module, for example:
/*! \defgroup maze_generation \brief , . : Eller's algorithm, randomized Kruskal's algorithm, cellular automaton algorithm, randomized Prim's algorithm. */ Placement of the documented element in the module
In order to include one or another documented element in the module, there are two approaches.
The first approach is to use the \ ingroup command :
\ingroup <> ( ) Its disadvantage is that this command should be added to the documenting blocks of each element of the source code, since there can be quite a lot of them within one module.
Therefore, there is a need for a different approach, and the second approach is to use the beginning and end commands of the group: @ { and @} . It should be noted that they are used along with the \ defgroup , \ addtogroup and \ weakgroup commands .
An example of use is shown below:
/*! \defgroup <> ( ) @{ */ _ /*! @} */ The meaning of the example should be clear: we declare the module, and then add to it certain documented elements that are framed with the symbols of the beginning and end of the module.
However, the module must be defined once, and this declaration will be only in one file, and it often happens that the elements of one module are separated by different files and, therefore, it becomes necessary to use the \ addtogroup command , which does not override the group, but adds one or another item:
/*! \addtogroup <> [( )] @{ */ _ /*! @} */ Module name is optional. The point is that this command can be used as an analogue of the \ defgroup command , and if the corresponding module has not been defined, it will be created with the appropriate name and identifier.
Finally, the \ weakgroup command is similar to the \ addtogroup command , the difference is that it just has a lower priority than it in case of conflicts related to the assignment of the same element to different modules.
Creating a submodule
To create a submodule, when defining it, it is sufficient to attribute it to one or another submodule, like any other documented element.
An example is shown below:
/*! \defgroup main_module */ /*! \defgroup second_module \ingroup main_module */ An example of creating several modules
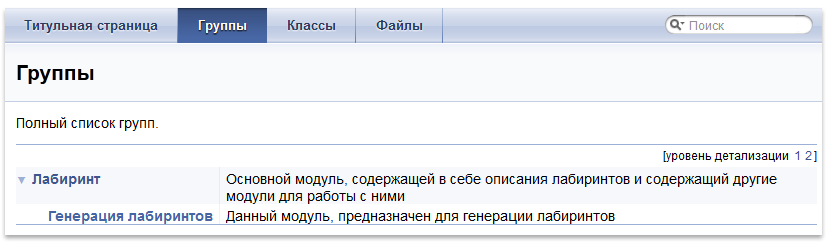
The following is a detailed example of creating a module:
File generate_maze.h
/*! \defgroup generate_mazes \ingroup maze \brief , . : Eller's algorithm, randomized Kruskal's algorithm, cellular automaton algorithm, randomized Prim's algorithm. */ ///@{ /*! \brief \param width, height \returns , Maze */ Maze generateEller(int width, int height); /*! \brief \param width, height \returns , Maze */ Maze generateKruskal(int width, int height); /*! \brief \param width, height \returns , Maze */ Maze generatePrim(int width, int height); /*! \brief \param width, height \returns , Maze */ Maze generateCellular(int width, int height); ///@} maze.h
/*! \defgroup maze \brief , */ ///@{ class Maze { /* */ }; ///@} , , , , .
:

, , , , , .
- , .
\code \endcode
– \code \endcode , :
\code [ {<>}] ... \endcode , , , .
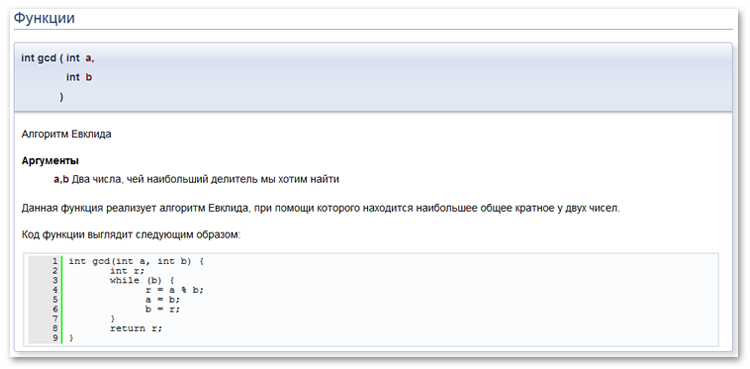
:
/*! \brief \param a,b , , . : \code int gcd(int a, int b) { int r; while (b) { r = a % b; a = b; b = r; } return r; } \endcode */ int gcd(int a, int b); :
. :
EXAMPLE_PATH = __ , , .
\example
, .
\example <_> «», , , .
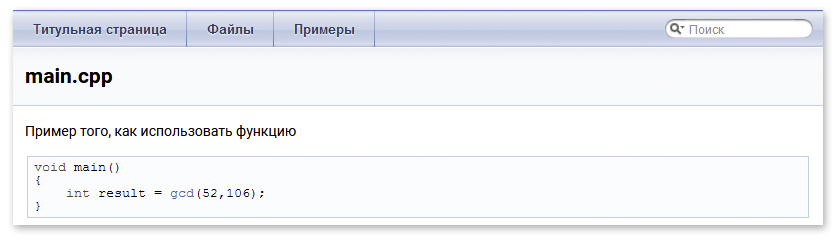

gcd.h
/*! \brief \param a,b , , . */ int gcd(int a, int b); /*! \example main.cpp , */ examples/main.cpp
, EXAMPLE_PATH = examples
void main() { int result = gcd(52,106); } \include
, \include , :
\include <_> ( \code \endcode).
\snippet
\snippet , , . , :
\snippet <_> ( _ ) :
/// [ _ ] ... /// [ _ ] , Doxygen , , , .., . :
INLINE_SOURCES = YES LaTeX
Doxygen TeX , . , : HTML LaTeX , , , .
:
- MathJax , :
USE_MATHJAX = YES - . , : latex , dvips , gs . .
. :
- , "\f$". :
\f$(x_1,y_1)\f$ \f$(x_2,y_2)\f$ \f$\sqrt{(x_2-x_1)^2+(y_2-y_1)^2}\f$.
: and
and 

- , . "\f[", "\f]". :
\f[ |I_2|=\left| \int_{0}^T \psi(t) \left\{ u(a,t)- \int_{\gamma(t)}^a \frac{d\theta}{k(\theta,t)} \int_{a}^\theta c(\xi)u_t(\xi,t)\,d\xi \right\} dt \right| \f]
:
- "\f{environment}", environment – LaTeX. LaTeX . An example is shown below:
\f{eqnarray*}{ g &=& \frac{Gm_2}{r^2} \\ &=& \frac{(6.673 \times 10^{-11}\,\mbox{m}^3\,\mbox{kg}^{-1}\, \mbox{s}^{-2})(5.9736 \times 10^{24}\,\mbox{kg})}{(6371.01\,\mbox{km})^2} \\ &=& 9.82066032\,\mbox{m/s}^2 \f}
(, eqnarray* – ):
LaTeX:
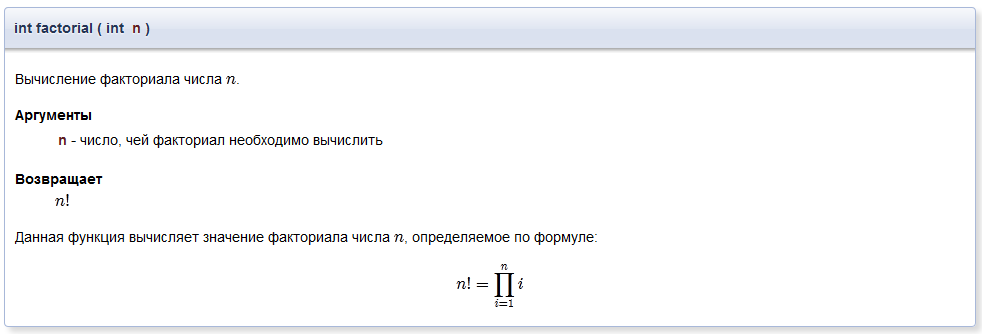
/*! \brief \f$ n \f$ \param n - , \return \f$ n! \f$ \f$ n \f$, : \f[ n! = \prod_{i = 1}^ni \f] */ int factorial(int n); The result is shown below:
Markdown
Markdown – ( , , , ). 1.8.0. Doxygen ( , , HTML , , , ).
, , «» :
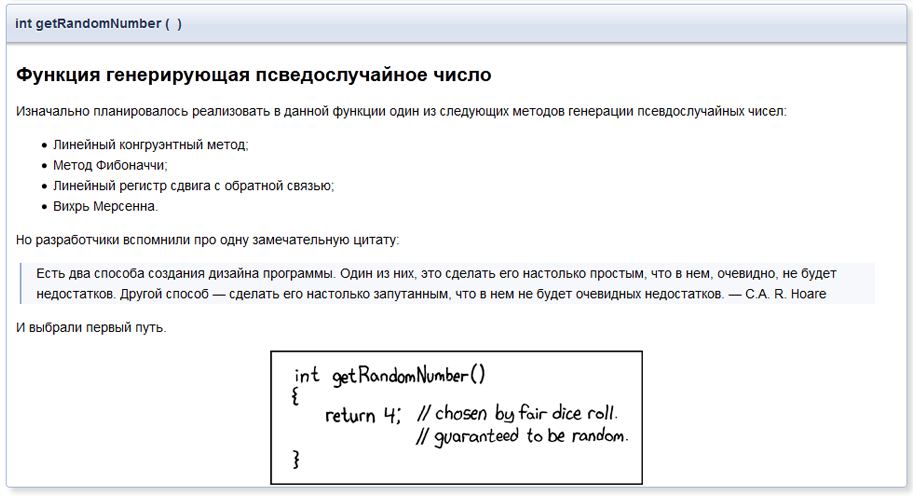
/*! ------------------------------------------ : - ; - ; - ; - . : > . , , , , . — , . > — CAR Hoare .  */ int getRandomNumber(); The result is shown below:
Summing up
. , , , , : , Doxygen, , , , .
Thanks for attention!
 1. , ;
2. , Doxygen, ( Doxygen ).
3. : , Doxygen .
Source: https://habr.com/ru/post/252101/
All Articles