Visual Studio Extensibility. Part One: MSBuild
Hi Habr, in these articles I will try to highlight the theme of Microsoft Visual Studio extensions (and also MSBuild), because This area is extremely poorly documented and generally covered with a veil of some mysteriousness.
I am a professional C ++ developer with quite a lot of experience, as well as a big fan of Microsoft products and, above all, my main development tool - Visual Studio. Not so long ago, as a hobby, I started programming microcontrollers, and I chose microcontrollers from Microchip. The only thing that did not suit me was the use of development tools provided by Microchip itself. I can’t say anything bad about these products, I just don’t want to install multiple IDEs on my work (or home) computer, so the thought was born of integrating the XC8 compiler from Microchip into Microsoft Visual Studio. Later I saw another plus in this idea - many of my (and not only my) projects are directly or indirectly connected to connecting them to a computer, so I have to develop a response software part - it would be great to combine them into one solution with the firmware project . Having picked up a large amount of time, I realized that the topic of integrating something in Visual Studio is such a white spot: there is no normal description, few descriptions on blogs, and the worst is that there are practically no examples. Having collected some information, bit by bit, having understood something from the description and relying on the method of scientific typing, I decided to share the acquired knowledge. So let's go.
Well, since we decided to expand the functionality of Visual Studio by screwing a third-party compiler, then let's expand it as much as possible. To do this, determine the list of what we want to do:
')
Well, let's try to implement at least some of the requirements from this list.
Let's start with the theory:
In view of the above, in order to expand the capabilities of the studio, we will first of all have to study the device of the assembly system called MSBuild.
Immediately make a reservation: I had an old VIsual Studio 2010 on hand — so the whole description would be for her, but I believe that from 2012 and 2013 studios everything will be the same.
So open a studio, create a Blank Solution and add an Empty Project to it (the project in the C ++ category is closer to me, so I chose it)

I called both the project and the solution “test” and made them lie in the same directory (this is convenient for our experiments, I will explain later) - thus getting the test.sln and test.vcxproj files
Now we close the studio and take some kind of text editor (better with XML syntax highlighting - basically the same studio will suit, just another copy of it) and open test.vcxproj as a text file.
Let's see what test.vcxproj has inside:
The most important thing to see here is:
Everything else can be safely removed. I also suggest deleting the test.filters file so that the virtual directories in the project do not interfere with us.
The above file is absolutely valid from the point of view of the studio and MSBuild, it can be opened and even assembled.
I also suggest to immediately deal with the build of our project from the command line:
You can write a script to automate this process so that it is more convenient to check the assembly for errors and other things.
Now we begin to understand what is responsible for the properties of the project and in general, what makes our project - the project of the studio. And do it all the lines:
I import files from the directory C: \ Program Files \ MSBuild \ Microsoft.Cpp \ v4.0
You can certainly try to see them, but I'm afraid a person who has never understood MSBuild will hardly understand something, and the desire to understand this will disappear instantly. So I suggest not to look there yet, because you can spend a lot of time (as the author did) and still do not understand anything.
Important !!: With every edit of vcxproj and related files, you must restart the studio completely! It was experimentally established that Visual Studio is caching something (most likely * .props and * .targets files) - therefore, a simple Unload Project / Reload Project is not enough! That is why I initially created a sln file next to vcxproj , so that it would be convenient to restart without changing the directory.
So let's just delete the lines with the Import tag and see what happens.
The file should be like this:
Opening it in the studio - we are surprised to find that the file is still valid. But to collect it is no longer possible, we get the message:
1> Error: The “ConfigurationGeneral” rule is missing from the project.
While we do not want to collect the project - so do not pay attention to it.
Let's see what we have in the properties of the project - and observe the following picture:

Beauty! We have removed all unnecessary, most likely, removed everything.
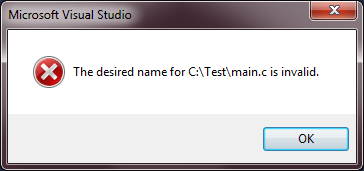
If we try to add a file to the project, then we will fail, the studio gives an error.
Lyrical digression :
The reader may ask the question, but how does the studio still determine that this is a C ++ project — elementary by the vcxproj extension, which explicitly points to Visual C ++. This question may seem rather silly to the reader, but when you experiment with a project for a long time, which is actually no longer a C ++ project, and the studio still tries to behave according to the C ++ rules, you completely forget about the extension of the file itself - and it has cardinal significance . We will get rid of it, but only in one of the following parts of this story.
The reader probably already guessed that we will create our own * .props and * .targets files , but in the beginning there is a bit of theory:
For further narration, I propose to move from abstraction to the specific task of screwing the XC8 compiler from Microchip to Visual Studio. The XC8 compiler must be downloaded from the Microchip website and installed.
Digression : In general, the * .targets files as well as the * .props are in certain folders of MSBuild itself, but for now we will not do that, because this already refers to the tasks of the distribution of the new extension and, in general, to the installer tasks, and for our experiments it is most convenient to store everything in one directory next to the project.
Create an XC8.targets file in the directory next to test.vcxproj .
XC8.targets content:
From the file it is clear that we are trying to determine the schema of the property page (PropertyPageSchema) and include the file XC8.Items.xml . As the reader guessed, in the XC8.Items.xml file we will describe the types of files that will participate in our project. Specifically for the XC8 compiler, these are * .c files ; * .h; * .asm and so on.
Create XC8.Items.xml by placing it in the directory with our project.
Content XC8.Items.xml :
As you can see in this file, we have defined the types of files that we need in the project. And using the FileExtension tag, we identified the extensions of these files.
Now, finally, import XC8.targets into our project, for this we use the Import tag.
Contents test.vcxproj :
Now open the studio and try to add the simplest file main.c
File Contents:
Voila - now the file has been added. Let's look at the file properties:

We see that in the Item Type drop-down list, the elements that we specified in the XC8.Items.xml file are displayed .
Important !!: The main tag in the XC8.Items.xml file, in general, is ContentType with the ItemType attribute . It is the value of the ItemType attribute that we will use in the future as the main one.
Let's save our test.vcxproj in the studio, close the studio, and then see its text:
We see that we have added another ItemGroup tag inside, which is the Compile tag. The name of this tag is what we specified as the value of the ItemType attribute of the ContentType tag in the XC8.Items.xml file. As the dear reader has already guessed, with the help of this mechanism new files for the assembly are included in our project.
Now we will deal with the project properties. For this you need to include 2 files in our XC8.targets :
And, as usual, you need to create the XC8.General.xml and XC8.General.PS.xml files in the project directory.
Immediately make a reservation: why do I need the second XC8.General.PS.xml file , I, until the end, did not find out, because He was present in all the materials that I studied - I decided to leave him, calling in accordance with our project. If someone has information on this issue - please share.
Content:
Now let's turn to the XC8.General.xml file in it, we will describe the properties of our project, namely, the General properties page. I remind you: it was this page that Visual Studio asked us for when trying to build a project. Property pages in a project are described by a Rule tag. Without further ado, I’ll just bring in my XC8.General.xml file and then try to explain its structure.
The file is quite voluminous, but I still did not want to remove it under the spoiler, because it is important.
So, the Rule tag has several important attributes:
The Rule.Categories tag is used to define categories within the property page. We have two such categories:
It is clear that you can define such categories as you wish.
The Rule.DataSource tag defines where property values will be stored. We have ProjectFile specified - i.e. in the project file. I did not change the Persistence attribute, because I can’t imagine where else the project settings can be stored as not in the file of this project itself, in our case in test.vcxproj .
Tags with the end of Property, as you already guessed - these are the properties that will be displayed in the properties window of our project.
Consider the basic attributes of properties:
There are a lot of attributes and properties of the attributes - the reader can get acquainted with them by the link: Microsoft.Build.Framework.XamlTypes Namespace . But be prepared not to find there any intelligible description, such a feeling that this documentation was made automatically by some kind of generator, without descriptions. The only good news is that the assignment of many attributes is understandable by their names.
Now open our project in the studio and look at the project properties window.

If we try to build a project, we will see another error: error MSB4057: The target “build” does not exist in the project. which tells us about the absence of a Target tag called build .
On this first part of the story, I finish, we have achieved a certain result. Next time I will tell you how to create a Target , Task , define default values and studio macros.
Project files can be downloaded here.
MSDN: Microsoft.Build.Framework.XamlTypes Namespace
Project: vs-android
Article on Habré: Minimal project MsBuild
MSDN: Walkthrough. Creating an MSBuild project file from scratch
As well as the scientific method in the directory C: \ Program Files \ MSBuild \ Microsoft.Cpp \ v4.0 \
Prologue
I am a professional C ++ developer with quite a lot of experience, as well as a big fan of Microsoft products and, above all, my main development tool - Visual Studio. Not so long ago, as a hobby, I started programming microcontrollers, and I chose microcontrollers from Microchip. The only thing that did not suit me was the use of development tools provided by Microchip itself. I can’t say anything bad about these products, I just don’t want to install multiple IDEs on my work (or home) computer, so the thought was born of integrating the XC8 compiler from Microchip into Microsoft Visual Studio. Later I saw another plus in this idea - many of my (and not only my) projects are directly or indirectly connected to connecting them to a computer, so I have to develop a response software part - it would be great to combine them into one solution with the firmware project . Having picked up a large amount of time, I realized that the topic of integrating something in Visual Studio is such a white spot: there is no normal description, few descriptions on blogs, and the worst is that there are practically no examples. Having collected some information, bit by bit, having understood something from the description and relying on the method of scientific typing, I decided to share the acquired knowledge. So let's go.
Action plan
Well, since we decided to expand the functionality of Visual Studio by screwing a third-party compiler, then let's expand it as much as possible. To do this, determine the list of what we want to do:
')
- So that when viewing Project Properties in Visual Studio, we’ll have our own properties.
- Determine your own set of file extensions that could be included in the project.
- It is natural to determine your build system so that our compilers, linkers, etc. are called.
- Create your own project type so that the studio can open the file with our own extension.
- Create a wizard to generate this type of project.
Well, let's try to implement at least some of the requirements from this list.
Part 1: MSBuild
Let's start with the theory:
- Microsoft Visual Studio is a little less than fully built on COM technology. Therefore, we must be ready to face it. Although we still try to avoid it.
- Any Microsoft Visual Studio project is an MSBuild script.
In view of the above, in order to expand the capabilities of the studio, we will first of all have to study the device of the assembly system called MSBuild.
Immediately make a reservation: I had an old VIsual Studio 2010 on hand — so the whole description would be for her, but I believe that from 2012 and 2013 studios everything will be the same.
So open a studio, create a Blank Solution and add an Empty Project to it (the project in the C ++ category is closer to me, so I chose it)
I called both the project and the solution “test” and made them lie in the same directory (this is convenient for our experiments, I will explain later) - thus getting the test.sln and test.vcxproj files
Now we close the studio and take some kind of text editor (better with XML syntax highlighting - basically the same studio will suit, just another copy of it) and open test.vcxproj as a text file.
Let's see what test.vcxproj has inside:
test.vcxproj
<?xml version="1.0" encoding="utf-8"?> <Project DefaultTargets="Build" ToolsVersion="4.0" xmlns="http://schemas.microsoft.com/developer/msbuild/2003"> <ItemGroup Label="ProjectConfigurations"> <ProjectConfiguration Include="Debug|Win32"> <Configuration>Debug</Configuration> <Platform>Win32</Platform> </ProjectConfiguration> <ProjectConfiguration Include="Release|Win32"> <Configuration>Release</Configuration> <Platform>Win32</Platform> </ProjectConfiguration> </ItemGroup> <PropertyGroup Label="Globals"> <ProjectGuid>{E1064D79-B415-4EDC-9FAC-C50E4102268B}</ProjectGuid> <RootNamespace>test</RootNamespace> </PropertyGroup> <Import Project="$(VCTargetsPath)\Microsoft.Cpp.Default.props" /> <PropertyGroup Condition="'$(Configuration)|$(Platform)'=='Debug|Win32'" Label="Configuration"> <ConfigurationType>Application</ConfigurationType> <UseDebugLibraries>true</UseDebugLibraries> <CharacterSet>MultiByte</CharacterSet> </PropertyGroup> <PropertyGroup Condition="'$(Configuration)|$(Platform)'=='Release|Win32'" Label="Configuration"> <ConfigurationType>Application</ConfigurationType> <UseDebugLibraries>false</UseDebugLibraries> <WholeProgramOptimization>true</WholeProgramOptimization> <CharacterSet>MultiByte</CharacterSet> </PropertyGroup> <Import Project="$(VCTargetsPath)\Microsoft.Cpp.props" /> <ImportGroup Label="ExtensionSettings"> </ImportGroup> <ImportGroup Label="PropertySheets" Condition="'$(Configuration)|$(Platform)'=='Debug|Win32'"> <Import Project="$(UserRootDir)\Microsoft.Cpp.$(Platform).user.props" Condition="exists('$(UserRootDir)\Microsoft.Cpp.$(Platform).user.props')" Label="LocalAppDataPlatform" /> </ImportGroup> <ImportGroup Label="PropertySheets" Condition="'$(Configuration)|$(Platform)'=='Release|Win32'"> <Import Project="$(UserRootDir)\Microsoft.Cpp.$(Platform).user.props" Condition="exists('$(UserRootDir)\Microsoft.Cpp.$(Platform).user.props')" Label="LocalAppDataPlatform" /> </ImportGroup> <PropertyGroup Label="UserMacros" /> <PropertyGroup /> <ItemDefinitionGroup Condition="'$(Configuration)|$(Platform)'=='Debug|Win32'"> <ClCompile> <WarningLevel>Level3</WarningLevel> <Optimization>Disabled</Optimization> </ClCompile> <Link> <GenerateDebugInformation>true</GenerateDebugInformation> </Link> </ItemDefinitionGroup> <ItemDefinitionGroup Condition="'$(Configuration)|$(Platform)'=='Release|Win32'"> <ClCompile> <WarningLevel>Level3</WarningLevel> <Optimization>MaxSpeed</Optimization> <FunctionLevelLinking>true</FunctionLevelLinking> <IntrinsicFunctions>true</IntrinsicFunctions> </ClCompile> <Link> <GenerateDebugInformation>true</GenerateDebugInformation> <EnableCOMDATFolding>true</EnableCOMDATFolding> <OptimizeReferences>true</OptimizeReferences> </Link> </ItemDefinitionGroup> <ItemGroup> </ItemGroup> <Import Project="$(VCTargetsPath)\Microsoft.Cpp.targets" /> <ImportGroup Label="ExtensionTargets"> </ImportGroup> </Project> The most important thing to see here is:
- ProjectConfiguration tag.
- ProjectGuid tag.
- files that are connected with the Import tag.
Everything else can be safely removed. I also suggest deleting the test.filters file so that the virtual directories in the project do not interfere with us.
<?xml version="1.0" encoding="utf-8"?> <Project DefaultTargets="Build" ToolsVersion="4.0" xmlns="http://schemas.microsoft.com/developer/msbuild/2003"> <ItemGroup Label="ProjectConfigurations"> <ProjectConfiguration Include="Debug|Win32"> <Configuration>Debug</Configuration> <Platform>Win32</Platform> </ProjectConfiguration> <ProjectConfiguration Include="Release|Win32"> <Configuration>Release</Configuration> <Platform>Win32</Platform> </ProjectConfiguration> </ItemGroup> <PropertyGroup Label="Globals"> <ProjectGuid>{E1064D79-B415-4EDC-9FAC-C50E4102268B}</ProjectGuid> <RootNamespace>test</RootNamespace> </PropertyGroup> <Import Project="$(VCTargetsPath)\Microsoft.Cpp.Default.props" /> <Import Project="$(VCTargetsPath)\Microsoft.Cpp.targets" /> </Project> The above file is absolutely valid from the point of view of the studio and MSBuild, it can be opened and even assembled.
I also suggest to immediately deal with the build of our project from the command line:
- We start Microsoft Visual Studio Command Prompt
- Go to the directory where test.vcxproj is located
- Run msbuild test.vcxproj / p: Configuration = Debug / p: Platform = Win32
You can write a script to automate this process so that it is more convenient to check the assembly for errors and other things.
Now we begin to understand what is responsible for the properties of the project and in general, what makes our project - the project of the studio. And do it all the lines:
<Import Project="$(VCTargetsPath)\Microsoft.Cpp.Default.props" /> <Import Project="$(VCTargetsPath)\Microsoft.Cpp.targets" /> I import files from the directory C: \ Program Files \ MSBuild \ Microsoft.Cpp \ v4.0
You can certainly try to see them, but I'm afraid a person who has never understood MSBuild will hardly understand something, and the desire to understand this will disappear instantly. So I suggest not to look there yet, because you can spend a lot of time (as the author did) and still do not understand anything.
Important !!: With every edit of vcxproj and related files, you must restart the studio completely! It was experimentally established that Visual Studio is caching something (most likely * .props and * .targets files) - therefore, a simple Unload Project / Reload Project is not enough! That is why I initially created a sln file next to vcxproj , so that it would be convenient to restart without changing the directory.
So let's just delete the lines with the Import tag and see what happens.
The file should be like this:
test.vcxproj
<?xml version="1.0" encoding="utf-8"?> <Project DefaultTargets="Build" ToolsVersion="4.0" xmlns="http://schemas.microsoft.com/developer/msbuild/2003"> <ItemGroup Label="ProjectConfigurations"> <ProjectConfiguration Include="Debug|Win32"> <Configuration>Debug</Configuration> <Platform>Win32</Platform> </ProjectConfiguration> <ProjectConfiguration Include="Release|Win32"> <Configuration>Release</Configuration> <Platform>Win32</Platform> </ProjectConfiguration> </ItemGroup> <PropertyGroup Label="Globals"> <ProjectGuid>{E1064D79-B415-4EDC-9FAC-C50E4102268B}</ProjectGuid> <RootNamespace>test</RootNamespace> </PropertyGroup> </Project> Opening it in the studio - we are surprised to find that the file is still valid. But to collect it is no longer possible, we get the message:
1> Error: The “ConfigurationGeneral” rule is missing from the project.
While we do not want to collect the project - so do not pay attention to it.
Let's see what we have in the properties of the project - and observe the following picture:
Beauty! We have removed all unnecessary, most likely, removed everything.
If we try to add a file to the project, then we will fail, the studio gives an error.
Lyrical digression :
The reader may ask the question, but how does the studio still determine that this is a C ++ project — elementary by the vcxproj extension, which explicitly points to Visual C ++. This question may seem rather silly to the reader, but when you experiment with a project for a long time, which is actually no longer a C ++ project, and the studio still tries to behave according to the C ++ rules, you completely forget about the extension of the file itself - and it has cardinal significance . We will get rid of it, but only in one of the following parts of this story.
The project is empty. Proceed to the filling.
The reader probably already guessed that we will create our own * .props and * .targets files , but in the beginning there is a bit of theory:
- files * .props and * .targets do not necessarily have to have the extension * .props and * .targets - this is actually something like the include files (include). But we will not violate the hegemony of the studio and leave the usual extensions.
- * .props are usually responsible for project properties and environment variables.
- * .targets are responsible for the assembly - they describe what to do with the files (or maybe not with the files) that are added to the project, i.e. all possible actions / tasks (Tasks) and for the types of project files defined by the scheme (ProjectSchema) and rules (Rules).
File * .targets.
For further narration, I propose to move from abstraction to the specific task of screwing the XC8 compiler from Microchip to Visual Studio. The XC8 compiler must be downloaded from the Microchip website and installed.
Digression : In general, the * .targets files as well as the * .props are in certain folders of MSBuild itself, but for now we will not do that, because this already refers to the tasks of the distribution of the new extension and, in general, to the installer tasks, and for our experiments it is most convenient to store everything in one directory next to the project.
Create an XC8.targets file in the directory next to test.vcxproj .
XC8.targets content:
<Project ToolsVersion="4.0" xmlns="http://schemas.microsoft.com/developer/msbuild/2003"> <!-- Properties --> <ItemGroup> <PropertyPageSchema Include="XC8.Items.xml"/> </ItemGroup> </Project> From the file it is clear that we are trying to determine the schema of the property page (PropertyPageSchema) and include the file XC8.Items.xml . As the reader guessed, in the XC8.Items.xml file we will describe the types of files that will participate in our project. Specifically for the XC8 compiler, these are * .c files ; * .h; * .asm and so on.
Create XC8.Items.xml by placing it in the directory with our project.
Content XC8.Items.xml :
<?xml version="1.0" encoding="utf-8"?> <ProjectSchemaDefinitions xmlns="http://schemas.microsoft.com/build/2009/properties"> <ContentType Name="CCode" DisplayName="C Code" ItemType="Compile"> </ContentType> <ContentType Name="AsmCode" DisplayName="Asm Code" ItemType="Compile"> </ContentType> <ContentType Name="Header" DisplayName="C/C++ Header" ItemType="Include"> </ContentType> <ContentType Name="Text" DisplayName="Text file" ItemType="None"> </ContentType> <ItemType Name="Compile" DisplayName="XC8 Compiler"/> <ItemType Name="Include" DisplayName="C header"/> <ItemType Name="None" DisplayName="Does not participate in build"/> <FileExtension Name=".c" ContentType="CCode"/> <FileExtension Name=".cc" ContentType="CCode"/> <FileExtension Name=".s" ContentType="AsmCode"/> <FileExtension Name=".asm" ContentType="AsmCode"/> <FileExtension Name=".h" ContentType="Header"/> <FileExtension Name=".txt" ContentType="Text"/> </ProjectSchemaDefinitions> As you can see in this file, we have defined the types of files that we need in the project. And using the FileExtension tag, we identified the extensions of these files.
Now, finally, import XC8.targets into our project, for this we use the Import tag.
Contents test.vcxproj :
<?xml version="1.0" encoding="utf-8"?> <Project DefaultTargets="Build" ToolsVersion="4.0" xmlns="http://schemas.microsoft.com/developer/msbuild/2003"> <ItemGroup Label="ProjectConfigurations"> <ProjectConfiguration Include="Debug|Win32"> <Configuration>Debug</Configuration> <Platform>Win32</Platform> </ProjectConfiguration> <ProjectConfiguration Include="Release|Win32"> <Configuration>Release</Configuration> <Platform>Win32</Platform> </ProjectConfiguration> </ItemGroup> <PropertyGroup Label="Globals"> <ProjectGuid>{E1064D79-B415-4EDC-9FAC-C50E4102268B}</ProjectGuid> <RootNamespace>test</RootNamespace> </PropertyGroup> <Import Project="XC8.targets" /> </Project> Now open the studio and try to add the simplest file main.c
File Contents:
main.c
#include <xc.h> int main() { return 0; } Voila - now the file has been added. Let's look at the file properties:
We see that in the Item Type drop-down list, the elements that we specified in the XC8.Items.xml file are displayed .
Important !!: The main tag in the XC8.Items.xml file, in general, is ContentType with the ItemType attribute . It is the value of the ItemType attribute that we will use in the future as the main one.
Let's save our test.vcxproj in the studio, close the studio, and then see its text:
<?xml version="1.0" encoding="utf-8"?> <Project DefaultTargets="Build" ToolsVersion="4.0" xmlns="http://schemas.microsoft.com/developer/msbuild/2003"> <ItemGroup Label="ProjectConfigurations"> <ProjectConfiguration Include="Debug|Win32"> <Configuration>Debug</Configuration> <Platform>Win32</Platform> </ProjectConfiguration> <ProjectConfiguration Include="Release|Win32"> <Configuration>Release</Configuration> <Platform>Win32</Platform> </ProjectConfiguration> </ItemGroup> <PropertyGroup Label="Globals"> <ProjectGuid>{E1064D79-B415-4EDC-9FAC-C50E4102268B}</ProjectGuid> <RootNamespace>test</RootNamespace> </PropertyGroup> <ItemGroup> <Compile Include="main.c" /> </ItemGroup> <Import Project="XC8.targets" /> </Project> We see that we have added another ItemGroup tag inside, which is the Compile tag. The name of this tag is what we specified as the value of the ItemType attribute of the ContentType tag in the XC8.Items.xml file. As the dear reader has already guessed, with the help of this mechanism new files for the assembly are included in our project.
Now we will deal with the project properties. For this you need to include 2 files in our XC8.targets :
<Project ToolsVersion="4.0" xmlns="http://schemas.microsoft.com/developer/msbuild/2003"> <!-- Properties --> <ItemGroup> <PropertyPageSchema Include="XC8.Items.xml"/> <PropertyPageSchema Include="XC8.General.xml"> <Context>Project</Context> </PropertyPageSchema> <PropertyPageSchema Include="XC8.General.PS.xml"> <Context>PropertySheet</Context> </PropertyPageSchema> </ItemGroup> </Project> And, as usual, you need to create the XC8.General.xml and XC8.General.PS.xml files in the project directory.
Immediately make a reservation: why do I need the second XC8.General.PS.xml file , I, until the end, did not find out, because He was present in all the materials that I studied - I decided to leave him, calling in accordance with our project. If someone has information on this issue - please share.
Content:
XC8.General.PS.xml
<?xml version="1.0" encoding="utf-8"?> <Rule Name="ConfigurationGeneral" DisplayName="General" PageTemplate="generic" Description="General" xmlns="http://schemas.microsoft.com/build/2009/properties"> <Rule.Categories> <Category Name="General" DisplayName="General" Description="General" /> </Rule.Categories> <Rule.DataSource> <DataSource Persistence="ProjectFile" Label="Configuration" /> </Rule.DataSource> </Rule> Now let's turn to the XC8.General.xml file in it, we will describe the properties of our project, namely, the General properties page. I remind you: it was this page that Visual Studio asked us for when trying to build a project. Property pages in a project are described by a Rule tag. Without further ado, I’ll just bring in my XC8.General.xml file and then try to explain its structure.
<?xml version="1.0" encoding="utf-8"?> <Rule Name="ConfigurationGeneral" DisplayName="General" PageTemplate="generic" Description="General" SwitchPrefix="-" xmlns="http://schemas.microsoft.com/build/2009/properties"> <Rule.Categories> <Category Name="General" DisplayName="General" Description="General" /> <Category Name="ProjectDefaults" DisplayName="Project Defaults" Description="Project Defaults" /> </Rule.Categories> <Rule.DataSource> <DataSource Persistence="ProjectFile" Label="Configuration" /> </Rule.DataSource> <!-- General --> <StringProperty Name="OutDir" DisplayName="Output Directory" Description="Specifies a relative path to the output file directory; can include environment variables." Category="General" Default="$(SolutionDir)$(Configuration)\" Subtype="folder" F1Keyword="VC.Project.VCConfiguration.OutputDirectory"> <StringProperty.DataSource> <DataSource Persistence="ProjectFile" Label="" /> </StringProperty.DataSource> </StringProperty> <StringProperty Name="IntDir" DisplayName="Intermediate Directory" Description="Specifies a relative path to the intermediate file directory; can include environment variables." Category="General" Default="$(Configuration)\" Subtype="folder" F1Keyword="VC.Project.VCConfiguration.IntermediateDirectory"> <StringProperty.DataSource> <DataSource Persistence="ProjectFile" Label="" /> </StringProperty.DataSource> </StringProperty> <StringProperty Name="TargetName" DisplayName="Target Name" Description="Specifies a file name that this project will generate." F1Keyword="VC.Project.VCConfiguration.TargetName" Category="General" Default="$(ProjectName)" > <StringProperty.DataSource> <DataSource Persistence="ProjectFile" Label="" /> </StringProperty.DataSource> </StringProperty> <StringListProperty Name="ExtensionsToDeleteOnClean" DisplayName="Extensions to Delete on Clean" Description="Semi-colon delimited wildcard specification for which files in the intermediate directory to delete on clean or rebuild." Category="General" Separator=";" F1Keyword="VC.Project.VCConfiguration.DeleteExtensionsOnClean"> <StringListProperty.DataSource> <DataSource Persistence="ProjectFile" Label="" /> </StringListProperty.DataSource> </StringListProperty> <StringProperty Name="BuildLogFile" DisplayName="Build Log File" Description="Specifies the build log file to write to when build logging is enabled." F1Keyword="VC.Project.VCConfiguration.BuildLogFile" Category="General" Default="$(ProjectDir)\$(MSBuildProjectName).log" Subtype="file"> <StringProperty.DataSource> <DataSource Persistence="ProjectFile" ItemType="BuildLog" PersistedName="Path" /> </StringProperty.DataSource> </StringProperty> <StringProperty Name="Chip" DisplayName="Select Processor" Description="This option selects the processor target for compilation. A list of available processors can be obtained by using the chipinfo option." Category="ProjectDefaults" Switch="-chip="/> <BoolProperty Name="QuietMode" DisplayName="Quiet Mode" Description="This option suppresses the Microchip copyright message, and any summary information usually printed by the compiler." Category="ProjectDefaults" Default="false" Switch="Q"/> <BoolProperty Name="VerboseMode" DisplayName="Verbose Mode" Description="This option is used to display the command lines used to invoke each of the compiler passes." Category="ProjectDefaults" Default="false" Switch="V"/> </Rule> The file is quite voluminous, but I still did not want to remove it under the spoiler, because it is important.
So, the Rule tag has several important attributes:
- Name = "ConfigurationGeneral" - the studio is looking for a rule with exactly this value of the Name attribute. If you do not have a rule with the name ConfigurationGeneral, then most likely you will fail.
- DisplayName = "General" is the name that will be displayed in the project configuration window, you can name it as you like. I left, canonically: "General."
- Description = "General" - description. I hope to clarify is not required.
- SwitchPrefix = "-" - this attribute defines the prefix of the command key when they are transferred to the build system. Suppose your compiler keys start with "/" (example: / Ipath determines the path of the included files) - respectively, the value of this attribute will be "/", the XC8 compiler all keys start with "-", which is actually written to me. If you have keys of different formats, then this attribute can be left empty or not specified at all.
- xmlns is an attribute of the behavior of the document as a whole, namespaces, etc. It makes no sense to change it accordingly.
- PageTemplate - defines the display of the property page in the project settings, we will work with the generiic and tool templates - I will show all the difference between them later in the screenshots (in the next part).
The Rule.Categories tag is used to define categories within the property page. We have two such categories:
- General - the general settings of the project - usually all sorts of ways.
- ProjectDefaults - settings for the features of our XC8 project - I brought the keys here, which should be passed on to the compiler and to the linker.
It is clear that you can define such categories as you wish.
The Rule.DataSource tag defines where property values will be stored. We have ProjectFile specified - i.e. in the project file. I did not change the Persistence attribute, because I can’t imagine where else the project settings can be stored as not in the file of this project itself, in our case in test.vcxproj .
Tags with the end of Property, as you already guessed - these are the properties that will be displayed in the properties window of our project.
- StringProperty - string.
- StringListProperty - list of strings. For example, listing Include directories or, like here, combing files when cleaning a project (Clean).
- IntProperty is numeric, but for some reason it behaves like a string, so this moment remains a mystery.
- BoolProperty - flag.
- EnumProperty is an enumeration, I will talk about it later. In our file XC8.General.xml there are none.
Consider the basic attributes of properties:
- Name - the name. It is important because can participate in the ad macro studio (those who $ (BlaBlaBla) ). How to do this I will tell later.
- DisplayName - the display name.
- Description - the description. It is displayed below - when this property is selected in the project properties window.
- Category - determines in which category our property will be displayed. In our case, categories 2: General and ProjectDefaults .
- Subtype - defines a subtype of the StringProperty property. Of those that I've seen is folder and file , but their behavior is almost the same.
- F1Keyword - defines help for this property.
- Default - this attribute is supposed to determine the default value of the property, but it does not do this - perhaps this is just a hint (which I also did not find anywhere else) . To determine the default property values, there is a completely different mechanism, which I will discuss in the next part of the story.
- Switch - determines the key of this property. Ultimately, it is added to the SwitchPrefix attribute of the Rule tag and is passed to the assembly. In the case of the QuietMode property , this will be "-Q"
There are a lot of attributes and properties of the attributes - the reader can get acquainted with them by the link: Microsoft.Build.Framework.XamlTypes Namespace . But be prepared not to find there any intelligible description, such a feeling that this documentation was made automatically by some kind of generator, without descriptions. The only good news is that the assignment of many attributes is understandable by their names.
Now open our project in the studio and look at the project properties window.
If we try to build a project, we will see another error: error MSB4057: The target “build” does not exist in the project. which tells us about the absence of a Target tag called build .
On this first part of the story, I finish, we have achieved a certain result. Next time I will tell you how to create a Target , Task , define default values and studio macros.
Project files can be downloaded here.
Materials that allowed me to study the question:
MSDN: Microsoft.Build.Framework.XamlTypes Namespace
Project: vs-android
Article on Habré: Minimal project MsBuild
MSDN: Walkthrough. Creating an MSBuild project file from scratch
As well as the scientific method in the directory C: \ Program Files \ MSBuild \ Microsoft.Cpp \ v4.0 \
Source: https://habr.com/ru/post/251795/
All Articles