Using texture detailing to achieve the highest quality realism (more)
I propose to readers of Habrakhabr the translation of the publication “ Using detail textures for extra realism close-up ” from the Unity company's blog.
Additional material for this article link
Detail Textures on the texture pattern that will disappear on the surface when the camera is gradually moving away. This can be used to simulate dirt, weather conditions or other similar details on the surface, without adding extra costs to rendering (rendering) when the camera is too far away to see the difference.
')
Detail Textures on a black and white image that are used to lighten or darken another selected texture. Where a pixel has a brightness value of 0 to 127 , the image will be darkened ( 0 means maximum dimming), when the value is between 129 and 255 , the image will be lit ( 255 means maximum illumination). The value is exactly 128 neutral and will leave part of the image (with pixels of brightness 128 ) unchanged.

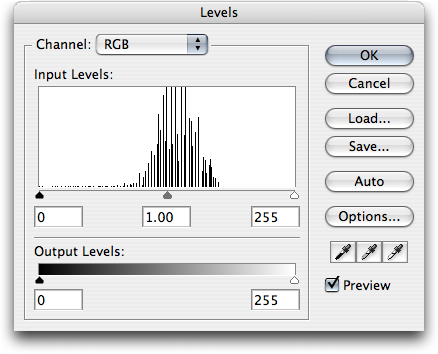
If the image detail has an average brightness of more or less than 128 , the whole image will appear brighter or darker, this will give the wrong effect when the camera is approaching. Therefore, it is important to ensure that the brightness level in the image is approximately symmetrically equal to 128 . You can check this out in many image editing softwares by looking at the image histogram (image histogram) or adjusting the brightness level (Levels adjustment) (as a rule, it also shows a histogram). If the histogram shows a symmetrical “bulge” (bulge), that is, slightly to the left or right of the center, you can use the “bulge” brackets with the min / max arrows to adjust the level so as to get a brightness equal to 128 .
In order to avoid the visibility of frames, when a detailed texture is wrapped (wraps) over a different texture, you should ideally use an image that can be tiled without leaving the boundaries of another texture. If the image is created using the noise function in the graphics editor, the result will be that our detailed texture will be without artifacts. In addition, filters such as the Difference Clouds often have a setting that will result in a quality wrap of the image. Simple effects that can make quite effective detail maps for simulating dirt, grainy surfaces or erosion.
After you save the image to a Unity project, you can select it to see its import settings in the Inspector panel.
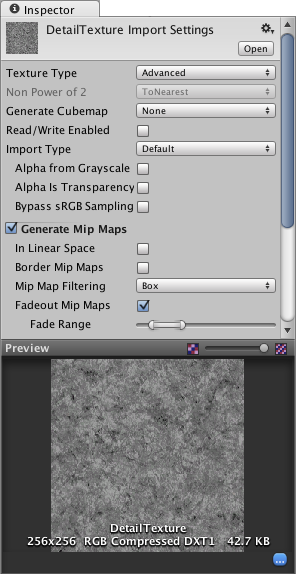
Set the texture type to Advanced , then turn on the Generate Mip Maps parameter and turn on the Fadeout Mip Maps parameter. You should see the range slider in the Fade Range parameter; numeric values for the range are not specified, but the default settings are suitable for most cases. If you reduce the values in this controller, then the detailed texture will be visible from a short distance. If you increase this range, it will be visible from a distance. the Fade Range shows the distance at which the detailed texture will fade out until it becomes invisible.
To use a detailed texture, you must set the material using the Diffuse Detail shader using the menu in the Material Inspector .

In addition to the base texture , you will see a second window (Detail) for setting the detailed texture you just imported.
As a rule, you want to set your own tiling values more (usually set around 10).
Detail material can now be applied to any suitable object to display the detail effect.
Additional material for this article link
Detail Textures on the texture pattern that will disappear on the surface when the camera is gradually moving away. This can be used to simulate dirt, weather conditions or other similar details on the surface, without adding extra costs to rendering (rendering) when the camera is too far away to see the difference.
')
Getting texture
Detail Textures on a black and white image that are used to lighten or darken another selected texture. Where a pixel has a brightness value of 0 to 127 , the image will be darkened ( 0 means maximum dimming), when the value is between 129 and 255 , the image will be lit ( 255 means maximum illumination). The value is exactly 128 neutral and will leave part of the image (with pixels of brightness 128 ) unchanged.
If the image detail has an average brightness of more or less than 128 , the whole image will appear brighter or darker, this will give the wrong effect when the camera is approaching. Therefore, it is important to ensure that the brightness level in the image is approximately symmetrically equal to 128 . You can check this out in many image editing softwares by looking at the image histogram (image histogram) or adjusting the brightness level (Levels adjustment) (as a rule, it also shows a histogram). If the histogram shows a symmetrical “bulge” (bulge), that is, slightly to the left or right of the center, you can use the “bulge” brackets with the min / max arrows to adjust the level so as to get a brightness equal to 128 .
In order to avoid the visibility of frames, when a detailed texture is wrapped (wraps) over a different texture, you should ideally use an image that can be tiled without leaving the boundaries of another texture. If the image is created using the noise function in the graphics editor, the result will be that our detailed texture will be without artifacts. In addition, filters such as the Difference Clouds often have a setting that will result in a quality wrap of the image. Simple effects that can make quite effective detail maps for simulating dirt, grainy surfaces or erosion.
Import texture settings in Unity
After you save the image to a Unity project, you can select it to see its import settings in the Inspector panel.
Set the texture type to Advanced , then turn on the Generate Mip Maps parameter and turn on the Fadeout Mip Maps parameter. You should see the range slider in the Fade Range parameter; numeric values for the range are not specified, but the default settings are suitable for most cases. If you reduce the values in this controller, then the detailed texture will be visible from a short distance. If you increase this range, it will be visible from a distance. the Fade Range shows the distance at which the detailed texture will fade out until it becomes invisible.
Material for detailed texture
To use a detailed texture, you must set the material using the Diffuse Detail shader using the menu in the Material Inspector .
In addition to the base texture , you will see a second window (Detail) for setting the detailed texture you just imported.
As a rule, you want to set your own tiling values more (usually set around 10).
Detail material can now be applied to any suitable object to display the detail effect.
Source: https://habr.com/ru/post/251607/
All Articles