Vagrant for kids, or as on Windows it is easy to get a customized server for developing web applications
Hello, my dear lover of working with Composer, creating your next cool project on one of the trendy frameworks. Or, perhaps, you are a front-end master writing complex stuff in JS and CSS, compiling them from jsx and less files, installing libraries through Bower, and collecting a project in some Grunt, running the unit tests along the way and , of course, then pouring it all on github ... If all this is part of your everyday life, then praise the Almighty, congratulations: you passed all these tests and did not even break your brain. From now on, you are one of those lucky ones who have spent more than one week, understanding how to properly set up this whole bunch of tools, and also, you are one of those who can dominate, dominate and humiliate your knowledge in Habr's comments on articles other, less agile and intelligent colleagues in the workshop ...
But ... maybe you are just one of those who only dream of suchperversions and manipulations of the masters of developing modern web applications?) Then I hurry to please you: I learned a couple of useful things here the other day and realized that this is a real gift for novice developers. And I decided to write this article.
For several years now I have been hearing about Vagrant, and you, too, probably also had a faint earful about this tool for quickly deploying configured virtual machines. But, every time I read another article about Vagrant, I was repelled by the excessive complexity of the instructions to it. I do not like to fill my head with extra information: somehow it was easier all this time to put everything you need through “sudo apt-get install [program-name]” and manually add new configs to nginx, taking the old ones as a basis. But, having read the instructions in the Laravel documentation the other day, I realized that everything was not so scary, and the desire to teach my friend to programming was the last factor that made me use my Vagrant to tweak my car ...
The Laravel developers have created their own virtual machine image for Vagrant, which already contains all the tools and tools you need for a happy development. As a result, in conjunction with a small utility Homestead, also carefully provided by Laravel to work with their image, working with him is really easier than ever. A list of the main components installed in their image can be found in the documentation . Among other tools not listed in it are such things as, for example, composer and git. In general, there is already everything you need. We with you need only a little understanding of how Vagrant and Homestead work and calmly use the whole thing in our daily work.
')
And it is not necessary to use this set only for projects based on Laravel: the Homestead script provides simple tools for conducting development of several projects at once, through a simple configuration file allowing you to manage databases and nginx server configurations. As a result, we get almost an analogue of Denwer, but at the same time we are dealing with a full-fledged linux server, which, if necessary, we can easily start managing manually and install other components on it, and thus grow into more serious and experienced developers.
In fact, all that needs to be done is to install VirtualBox and Vagrant on your computer and dig out a bit with their settings. In the article, I will only talk about Windows users, since Linux users, I think, will be able to do everything themselves according to the instructions in the documentation. Of course, everything is not without problems. If your Windows username is written in Russian letters (like mine), then get ready for errors during the execution of commands. In this case, I recommend creating a system environment variable VAGRANT_HOME with an indication of a folder without Russian characters (do not know how to do this? Read about it here , for example), and also open VirtualBox settings and specify the virtual machine storage folder, which also does not Russian characters. Everything, now these tools will have to work correctly and not produce errors.
So, we have created the basis for ourselves, it's time to write some commands :) We press the Win + R keys on the keyboard, we drive the phrase “cmd” into the opened window, press Enter and get to the command line. By the way, you may have to restart the machine after installing Vagrant to make its command available in the console. So, for starters, let's just try to type the word “vagrant” in the console and check if our tool is installed correctly:
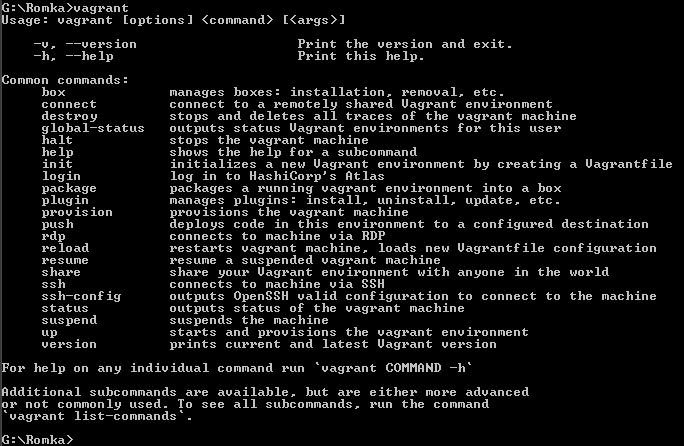
I am fine. If you have problems, check your PATH variable , it should be the path to the Vagrant binary. And reboot the machine if you have not done so.
Further in the official documentation we are offered to clone with git or, even worse, install the Homestead library via composer on your computer. I don’t have git on Windows, nor even composer. And in general: I was going to install this virtual machine myself just to save myself from the manual hassle of installing all these tools ... Therefore, let's still not engage in distortions and simply, in the old manner, download the zip-archive from github -the pages of this library on your computer and unpack it in some daddy :)
Unpacked? Now, to install the library on a computer, you need to run the homestead init command. But the trouble is again: this team will work with us only when Composer and the main Laravel libraries are installed on our computer. Another option is to execute the init.sh script, which is right next to it, but we still need a Linux interpreter to execute it. In general, again to put a bunch of all sorts of things ... As you can see, under Windows there is no simple solution. So let's do a couple of things again manually: open the contents of the init.sh file and examine it. There are only 11 lines of code. As we see, in order to “install” the library, we just need to copy several files into the ~ / .homestead folder (the ~ sign denotes the current user's home directory, I have this “C: \ Users \ Ahmadullin \”). If we analyze how their scripts work, we will come to the conclusion that we need the following files from there:
Create a folder .homestead in the user's home directory and copy these files into it: this will be the folder with your control scripts through which we will manage our virtual machine. By the way, you will not be able to create a file that starts from a point, through the standard Windows interface. Use to solve this problem with something like Far or Total Commander. So, in the end, I got the following picture:

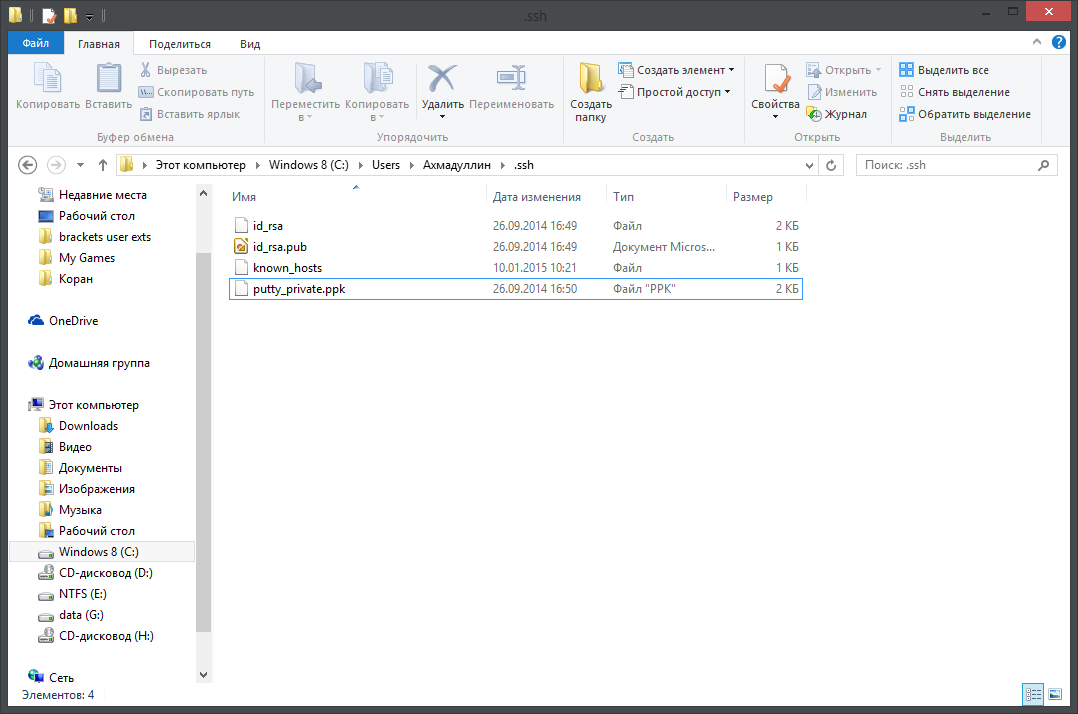
Doom ... It is quite another matter. We are almost ready to complete the work with our virtual machine. To access our machine, we also need to create SSH keys for ourselves. Here we will be helped by the tool kit of the Putty program, which we will later use to control our server. Download the PuttyGen program and generate our private and public keys with it, and save them in the ~ / .ssh folder. To generate, you should click the “Generate” button, then move the mouse a little in the center of the program to generate a random key, and then you can save your key. Also, when saving, the program will offer to fill in the “key passphrase” - but at this stage we don’t need it, so save your key without a password and do not pay attention to the fact that Putty will warn against creating such a key. After all, we have only a test machine, and not a real combat server, so all this is not so bad.
Save the public key under the following name: "~ / .ssh / id_rsa.pub". At the same time, we need to save the private key in two formats: standard for Putty (the Save private key button, the file name is ~ / .ssh / putty_private.ppk, for example), and the OpenSSH format (the Export OpenSSH key item in the Conversions menu). The file name must be "~ / .ssh / id_rsa"). We need the first private key in order to later connect to the server through the Putty program, and the second one to configure and initialize the server through the Homestead scripts. As a result, we should have something like this with the key files:
Now it only remains to specify some settings for our server before launching, if there is a need for this. Open the Homestead.yaml file in any editor. This is the only configuration file through which we can specify all the main parameters of our virtual machine. The default settings are already well written, and for a start, we don’t have to change anything here, I’ll only briefly explain its contents: the " folders " section indicates the relationship between the virtual machine directories and your real system so that you can easily edit the files in the virtual machine through your favorite editor in the main system. The " sites " section is the nginx settings, and again, everything is very simple: we just set the domain and directory connection on the server. The " databases " section lists the names of the databases that will be created when the virtual machine is initialized. That's all you need to know about configuring our system.
PS Yes, and since in the “folders” section, the default is the connection of the ~ / Code folder with a similar folder in the virtual machine, do not forget to create this directory in your user’s folder. Subsequently, through it we will be able to work with the files of your server.
PPS Also, keep in mind that the yaml format is slightly different in its approach to data storage. Therefore, if you add your own parameters there, bear in mind that the number of spaces here is important, since the data hierarchy is specified through them. Therefore, set exactly such indents for new objects that already exist in the file. You can read more about this format, for example, in Wikipedia .
And finally, we come to the most interesting ...
Let's try to start our virtual machine! Open the command line to the ~ / .homestead folder and execute the magic command in it:
If you did everything correctly, then you start downloading the VirtualBox image from the Laravel developers, and the picture will be something like this:

If Vagant informed you about any problem, do not despair: carefully study the text of the error and try to drive its text into Google. Most likely, there are already many people who are faced with a similar problem and have somehow solved it. If the image was successfully downloaded to your computer, and the error occurred during the boot process, then try opening VirtualBox and launching it manually, without Vagrant, and see what happens. Vagrant is, in fact, just an add-on over VirtualBox, and you can easily run the virtual machine it has assembled by itself, if necessary.
If everything went fine ... Then, after a few minutes of Vagrant's work, your virtual machine is fully configured and installs all the necessary components and parameters. And you can already safely connect to your full-fledged server. For this you can use, for example, Putty.
Let 's download the putty.exe file and connect with it to our server. Set up the program as follows: specify the server address, port and user , and also in the section " Connection -> SSH -> Auth " do not forget to specify the address to the private key generated by you, and then save all these settings in the session under some name , so as not to drive them every time you start the program, and boldly press the "Open" button. If you were attentive and did everything correctly, the terminal window of your own virtual server will open before you:

PS On some machines, the following problem was identified: Vagrant for some reason does not accept the key file created in Putty and generates its own, in his opinion, more secure. This key is stored at "~ \ .homestead \ .vagrant \ machines \ default \ virtualbox \ private_key". If you cannot connect with your key to the server, it means that you need to use the key generated by the Vagrant. Before using it, open the PuttyGen program again, import the file created by Vagrant into the program (Conversions -> Import key) and save in the putty format (“save private key” button), and after that use this file to connect to the server via putty.
Well done, fighter! The first frontier on the way of conquering the world of professional development of web applications is passed. Now, let's write a couple more commands and install Laravel, just to make sure that everything is working correctly on our server. Enter the following two commands in turn on your server:
And go and have some tea. When you come back, open the same ~ / Code folder that you created in your home directory, and if everything went well, then you should expect a surprise there :)
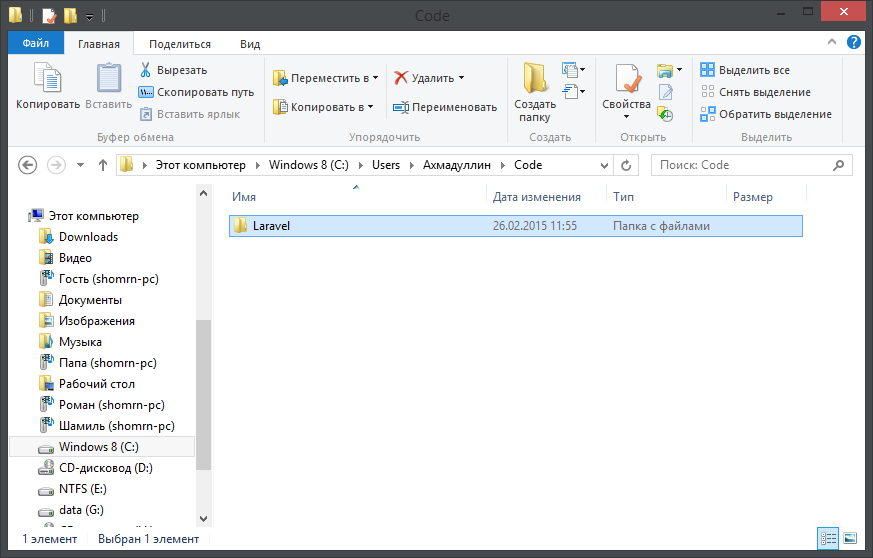
So: the server fooled something at home, and at the output we got a Laravel folder on our real computer with all the necessary framework files. It remains to do just a little to see our application in the browser: open the hosts file in administrator mode to be able to edit it, and add the following line there:
Now open the homestead.app address in your browser. Well, what can be seen? I have this picture:

If you squint enough, you can see the Laravel logo :) Well, you can still select the letters with the mouse, so it will be more visible. As an exercise, let's fix this a little. You can open the file " ~ \ Code \ Laravel \ resources \ views \ welcome.blade.php " and delete the lines "color: # B0BEC5;" and "font-family: 'Lato';" in the first twenty lines of the source code from there. And then save this file and refresh your page. It seems so better ?)
In general, this is almost everything. If you have reached this part of the article, and you have succeeded, this means that you are a great young man, and you now have a full-fledged own web server, in which you already have all the necessary technologies for work. It remains only to tell a little about how to stop it, update its configuration and completely remove it from the system. To do this, use the following Vagrant commands, and do not forget that you must be in the ~ / .homestead directory:
Everything written in this article is a very brief description of all the features of Vagrant, study the official documentation and other articles on this tool if you have a desire to understand it more deeply. And I also advise you to read the comments on this article, there are also sometimes different smart people write useful things. Well, that's all. It seems the article is over. I hope she will benefit people. And all the best to you, dear developers :)
But ... maybe you are just one of those who only dream of such
For several years now I have been hearing about Vagrant, and you, too, probably also had a faint earful about this tool for quickly deploying configured virtual machines. But, every time I read another article about Vagrant, I was repelled by the excessive complexity of the instructions to it. I do not like to fill my head with extra information: somehow it was easier all this time to put everything you need through “sudo apt-get install [program-name]” and manually add new configs to nginx, taking the old ones as a basis. But, having read the instructions in the Laravel documentation the other day, I realized that everything was not so scary, and the desire to teach my friend to programming was the last factor that made me use my Vagrant to tweak my car ...
The Laravel developers have created their own virtual machine image for Vagrant, which already contains all the tools and tools you need for a happy development. As a result, in conjunction with a small utility Homestead, also carefully provided by Laravel to work with their image, working with him is really easier than ever. A list of the main components installed in their image can be found in the documentation . Among other tools not listed in it are such things as, for example, composer and git. In general, there is already everything you need. We with you need only a little understanding of how Vagrant and Homestead work and calmly use the whole thing in our daily work.
')
And it is not necessary to use this set only for projects based on Laravel: the Homestead script provides simple tools for conducting development of several projects at once, through a simple configuration file allowing you to manage databases and nginx server configurations. As a result, we get almost an analogue of Denwer, but at the same time we are dealing with a full-fledged linux server, which, if necessary, we can easily start managing manually and install other components on it, and thus grow into more serious and experienced developers.
Presetting
In fact, all that needs to be done is to install VirtualBox and Vagrant on your computer and dig out a bit with their settings. In the article, I will only talk about Windows users, since Linux users, I think, will be able to do everything themselves according to the instructions in the documentation. Of course, everything is not without problems. If your Windows username is written in Russian letters (like mine), then get ready for errors during the execution of commands. In this case, I recommend creating a system environment variable VAGRANT_HOME with an indication of a folder without Russian characters (do not know how to do this? Read about it here , for example), and also open VirtualBox settings and specify the virtual machine storage folder, which also does not Russian characters. Everything, now these tools will have to work correctly and not produce errors.
So, we have created the basis for ourselves, it's time to write some commands :) We press the Win + R keys on the keyboard, we drive the phrase “cmd” into the opened window, press Enter and get to the command line. By the way, you may have to restart the machine after installing Vagrant to make its command available in the console. So, for starters, let's just try to type the word “vagrant” in the console and check if our tool is installed correctly:
I am fine. If you have problems, check your PATH variable , it should be the path to the Vagrant binary. And reboot the machine if you have not done so.
Further in the official documentation we are offered to clone with git or, even worse, install the Homestead library via composer on your computer. I don’t have git on Windows, nor even composer. And in general: I was going to install this virtual machine myself just to save myself from the manual hassle of installing all these tools ... Therefore, let's still not engage in distortions and simply, in the old manner, download the zip-archive from github -the pages of this library on your computer and unpack it in some daddy :)
Unpacked? Now, to install the library on a computer, you need to run the homestead init command. But the trouble is again: this team will work with us only when Composer and the main Laravel libraries are installed on our computer. Another option is to execute the init.sh script, which is right next to it, but we still need a Linux interpreter to execute it. In general, again to put a bunch of all sorts of things ... As you can see, under Windows there is no simple solution. So let's do a couple of things again manually: open the contents of the init.sh file and examine it. There are only 11 lines of code. As we see, in order to “install” the library, we just need to copy several files into the ~ / .homestead folder (the ~ sign denotes the current user's home directory, I have this “C: \ Users \ Ahmadullin \”). If we analyze how their scripts work, we will come to the conclusion that we need the following files from there:
- src / stubs / Homestead.yaml - in the folder ~ / .homestead
- src / stubs / after.sh - to the ~ / .homestead folder
- src / stubs / aliases - to the ~ / .homestead folder
- Vagrantfile
- scripts / * (all files in this folder)
Create a folder .homestead in the user's home directory and copy these files into it: this will be the folder with your control scripts through which we will manage our virtual machine. By the way, you will not be able to create a file that starts from a point, through the standard Windows interface. Use to solve this problem with something like Far or Total Commander. So, in the end, I got the following picture:
Doom ... It is quite another matter. We are almost ready to complete the work with our virtual machine. To access our machine, we also need to create SSH keys for ourselves. Here we will be helped by the tool kit of the Putty program, which we will later use to control our server. Download the PuttyGen program and generate our private and public keys with it, and save them in the ~ / .ssh folder. To generate, you should click the “Generate” button, then move the mouse a little in the center of the program to generate a random key, and then you can save your key. Also, when saving, the program will offer to fill in the “key passphrase” - but at this stage we don’t need it, so save your key without a password and do not pay attention to the fact that Putty will warn against creating such a key. After all, we have only a test machine, and not a real combat server, so all this is not so bad.
Save the public key under the following name: "~ / .ssh / id_rsa.pub". At the same time, we need to save the private key in two formats: standard for Putty (the Save private key button, the file name is ~ / .ssh / putty_private.ppk, for example), and the OpenSSH format (the Export OpenSSH key item in the Conversions menu). The file name must be "~ / .ssh / id_rsa"). We need the first private key in order to later connect to the server through the Putty program, and the second one to configure and initialize the server through the Homestead scripts. As a result, we should have something like this with the key files:
Now it only remains to specify some settings for our server before launching, if there is a need for this. Open the Homestead.yaml file in any editor. This is the only configuration file through which we can specify all the main parameters of our virtual machine. The default settings are already well written, and for a start, we don’t have to change anything here, I’ll only briefly explain its contents: the " folders " section indicates the relationship between the virtual machine directories and your real system so that you can easily edit the files in the virtual machine through your favorite editor in the main system. The " sites " section is the nginx settings, and again, everything is very simple: we just set the domain and directory connection on the server. The " databases " section lists the names of the databases that will be created when the virtual machine is initialized. That's all you need to know about configuring our system.
PS Yes, and since in the “folders” section, the default is the connection of the ~ / Code folder with a similar folder in the virtual machine, do not forget to create this directory in your user’s folder. Subsequently, through it we will be able to work with the files of your server.
PPS Also, keep in mind that the yaml format is slightly different in its approach to data storage. Therefore, if you add your own parameters there, bear in mind that the number of spaces here is important, since the data hierarchy is specified through them. Therefore, set exactly such indents for new objects that already exist in the file. You can read more about this format, for example, in Wikipedia .
And finally, we come to the most interesting ...
Starting a virtual server
Let's try to start our virtual machine! Open the command line to the ~ / .homestead folder and execute the magic command in it:
vagrant up If you did everything correctly, then you start downloading the VirtualBox image from the Laravel developers, and the picture will be something like this:
If Vagant informed you about any problem, do not despair: carefully study the text of the error and try to drive its text into Google. Most likely, there are already many people who are faced with a similar problem and have somehow solved it. If the image was successfully downloaded to your computer, and the error occurred during the boot process, then try opening VirtualBox and launching it manually, without Vagrant, and see what happens. Vagrant is, in fact, just an add-on over VirtualBox, and you can easily run the virtual machine it has assembled by itself, if necessary.
If everything went fine ... Then, after a few minutes of Vagrant's work, your virtual machine is fully configured and installs all the necessary components and parameters. And you can already safely connect to your full-fledged server. For this you can use, for example, Putty.
Connect to server
Let 's download the putty.exe file and connect with it to our server. Set up the program as follows: specify the server address, port and user , and also in the section " Connection -> SSH -> Auth " do not forget to specify the address to the private key generated by you, and then save all these settings in the session under some name , so as not to drive them every time you start the program, and boldly press the "Open" button. If you were attentive and did everything correctly, the terminal window of your own virtual server will open before you:
PS On some machines, the following problem was identified: Vagrant for some reason does not accept the key file created in Putty and generates its own, in his opinion, more secure. This key is stored at "~ \ .homestead \ .vagrant \ machines \ default \ virtualbox \ private_key". If you cannot connect with your key to the server, it means that you need to use the key generated by the Vagrant. Before using it, open the PuttyGen program again, import the file created by Vagrant into the program (Conversions -> Import key) and save in the putty format (“save private key” button), and after that use this file to connect to the server via putty.
Well done, fighter! The first frontier on the way of conquering the world of professional development of web applications is passed. Now, let's write a couple more commands and install Laravel, just to make sure that everything is working correctly on our server. Enter the following two commands in turn on your server:
cd Code composer create-project laravel/laravel Laravel --prefer-dist And go and have some tea. When you come back, open the same ~ / Code folder that you created in your home directory, and if everything went well, then you should expect a surprise there :)
So: the server fooled something at home, and at the output we got a Laravel folder on our real computer with all the necessary framework files. It remains to do just a little to see our application in the browser: open the hosts file in administrator mode to be able to edit it, and add the following line there:
192.168.10.10 homestead.app Now open the homestead.app address in your browser. Well, what can be seen? I have this picture:
If you squint enough, you can see the Laravel logo :) Well, you can still select the letters with the mouse, so it will be more visible. As an exercise, let's fix this a little. You can open the file " ~ \ Code \ Laravel \ resources \ views \ welcome.blade.php " and delete the lines "color: # B0BEC5;" and "font-family: 'Lato';" in the first twenty lines of the source code from there. And then save this file and refresh your page. It seems so better ?)
In general, this is almost everything. If you have reached this part of the article, and you have succeeded, this means that you are a great young man, and you now have a full-fledged own web server, in which you already have all the necessary technologies for work. It remains only to tell a little about how to stop it, update its configuration and completely remove it from the system. To do this, use the following Vagrant commands, and do not forget that you must be in the ~ / .homestead directory:
# vagrant up # vagrant halt # Homestead. # - , # Vagrant vagrant provision # . # , , # vagrant destroy # Vagrant' # , Windows, # , , , # "ssh" . # , # , - : Putty # , vagrant ssh Everything written in this article is a very brief description of all the features of Vagrant, study the official documentation and other articles on this tool if you have a desire to understand it more deeply. And I also advise you to read the comments on this article, there are also sometimes different smart people write useful things. Well, that's all. It seems the article is over. I hope she will benefit people. And all the best to you, dear developers :)
Source: https://habr.com/ru/post/251529/
All Articles