The output temperature, traffic jams and exchange rates on the LED matrix Raspberry Pi
There is a Raspberry Pi on hand with such a thing connected to it:

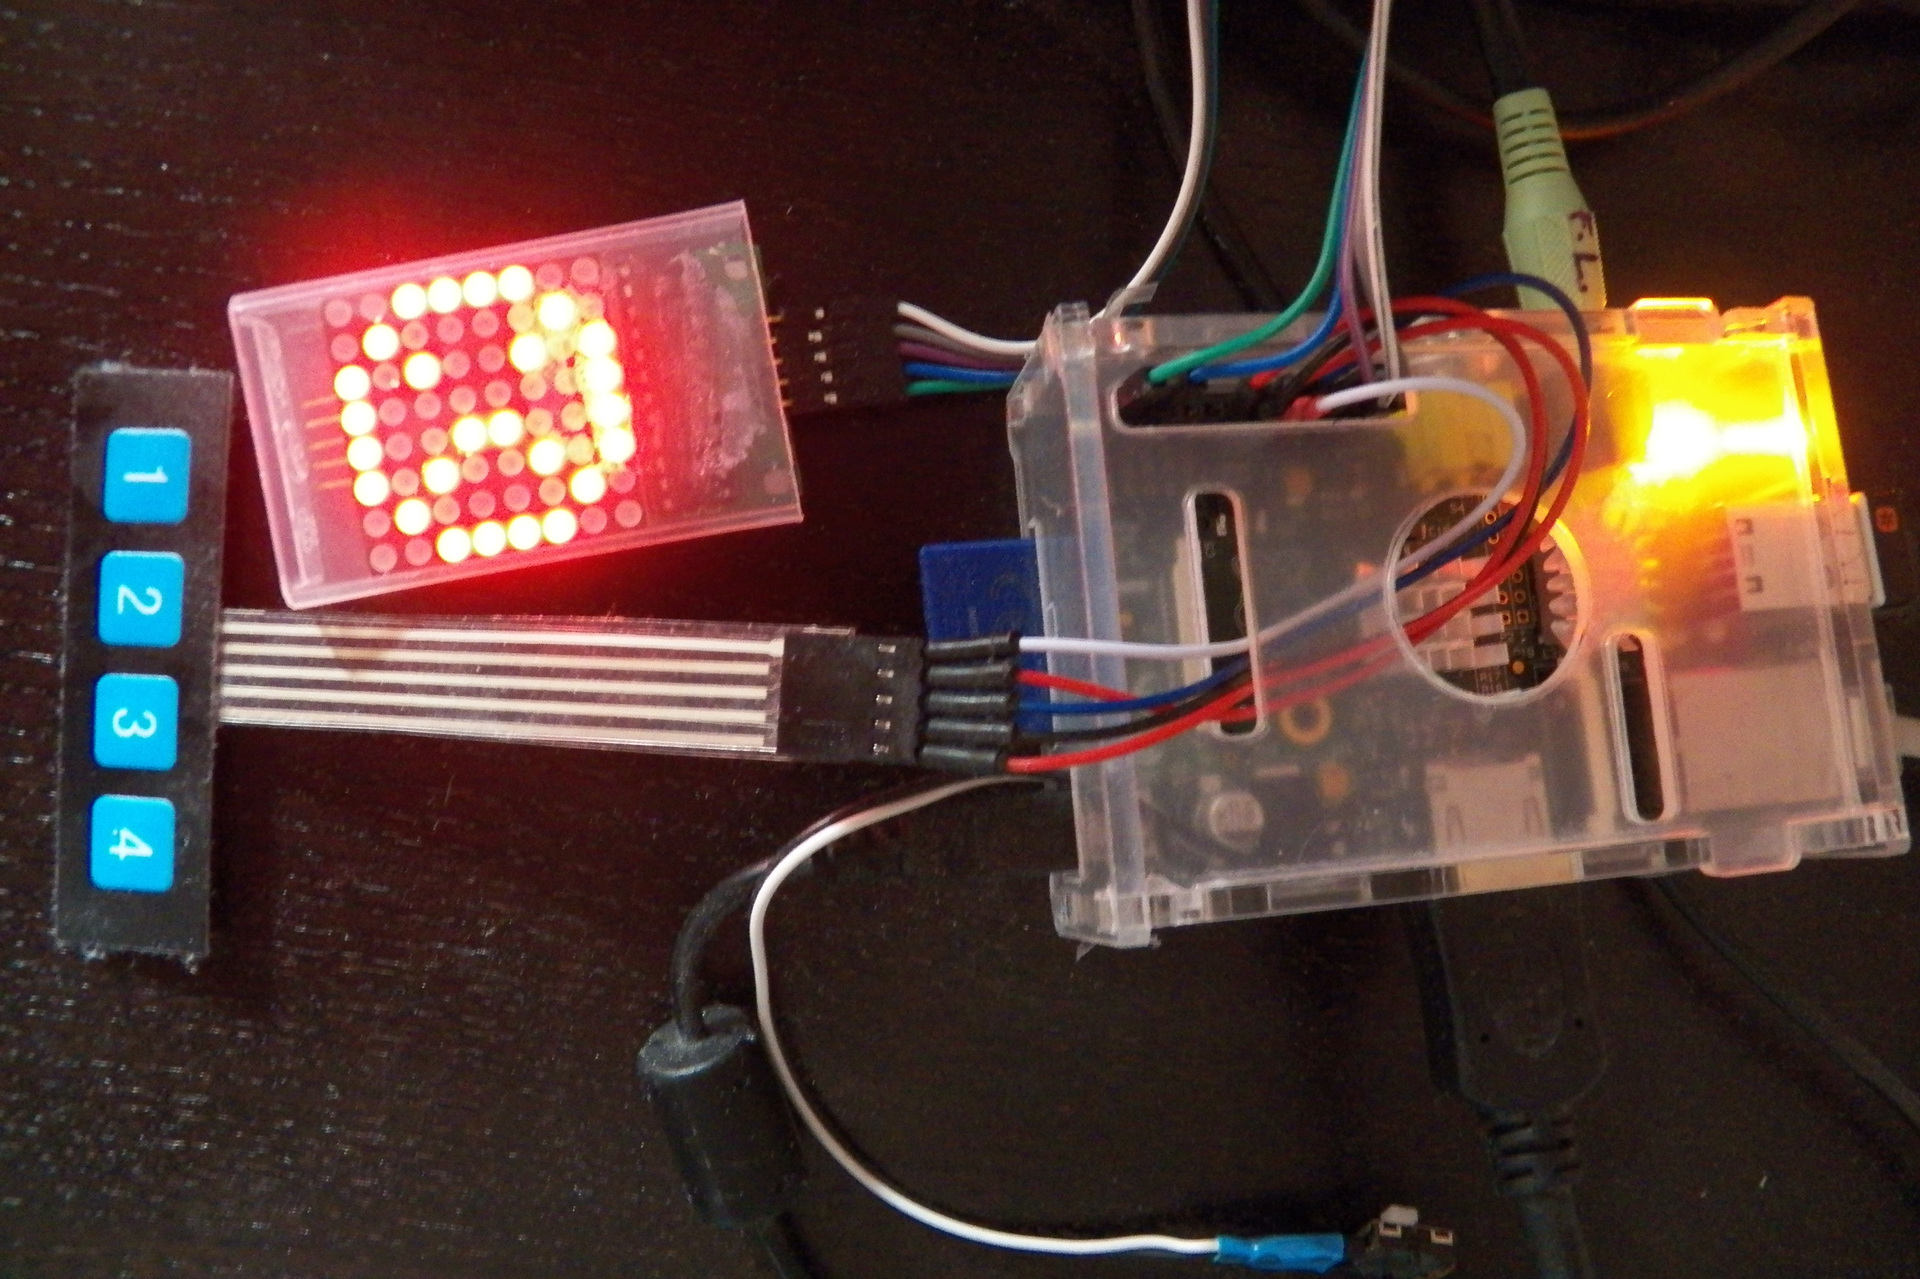
There is still a button. So there was a desire by pressing a button to display something useful on the LED matrix, and not pampering . And still to learn a python - OOP, flows, parsing and other. We can say that this is my first useful python project. So this article will be at the same time useful for those who want to make a home informer, and, moreover, I hope, instructive.
For the correct operation of the matrix with python, we need this kind of thing . And we will load information for a conclusion with
')
These services are taken for example, completely free. You can use anything else. If you wish, you can withdraw and traffic jams on Yandex, but they are not so easy to get.
To reduce the number of API calls, you can cache the results once every half hour and when you click the button, read the cached value.
Now we will start the most interesting. In order for the buttons connected to the copy to start doing something, you need to write a script daemon that would react to changes in the state of GPIO. Consider an example of such a script written in Python that will handle long and short presses of each button and their combinations.
Suppose we have four buttons. I wrote to handle the buttons sequentially, without a loop. It's easier and I do not think that someone will have so many buttons that you have to write a cycle.
The logic is simple. We are transferring the specified GPIO pin to high voltage read mode. Next, we enter an infinite loop with a small pause, in which we remember the current values of the pins and compare them with the previous ones. If the value is different, the status of the button has changed. And by adding another timer, we can make the trigger of a long button press according to this logic: if the button was pressed and now not pressed, and it took more than 2 seconds from the time, we react to long button presses.
Similarly, you can handle combinations of buttons by adding the condition for two (or more) buttons at the same time. So, the following script handles long and short pressing of four buttons and simultaneous pressing of the first and second.
When you click a particular button or combination, the corresponding bash script from the / leds + buttons folder will be called. Create dummy files with the corresponding name as in the script. An example of such a file (button1long):
Now from our Python script make a demon. Create a file in the /etc/init.d folder called buttondaemon
Now we have to bring something to the LED-matrix. Create a python script that will work out at the touch of a button. For some reason, the urlget runs for at least a second in two seconds, while the same link is opened by the browser instantly. In order to see the beginning of the script, and not stick 2 seconds in an empty matrix, the script will show the animation while the data is loaded.
First show the current temperature and precipitation. To understand that the temperature on the screen, in the upper right corner, we will show a point symbolizing the degree sign.
To show two-digit numbers on the screen compactly, draw tsiferki in the amount of 3x6:
About precipitation separately. I wanted to show them on the same screen with the temperature. Therefore, they are displayed in the form of points from zero to three in the upper left corner.
All requests for traffic and exchange rates do this time against the background in parallel streams. The change of data on the matrix is animated by a shift. If you cannot upload any data, a sad smiley will be shown instead.
Having tested that everything works, let's hang up the call to the informer on the button:
The result of all this should be something like this - 7 degrees, clearly, traffic jams 2 points, the euro exchange rate to hryvnia 32.02:
Thanks for attention!
There is still a button. So there was a desire by pressing a button to display something useful on the LED matrix, and not pampering . And still to learn a python - OOP, flows, parsing and other. We can say that this is my first useful python project. So this article will be at the same time useful for those who want to make a home informer, and, moreover, I hope, instructive.
For the correct operation of the matrix with python, we need this kind of thing . And we will load information for a conclusion with
')
- bank-ua.com
- worldweatheronline.com
These services are taken for example, completely free. You can use anything else. If you wish, you can withdraw and traffic jams on Yandex, but they are not so easy to get.
Getting points Yandex.Probok
We will need:
PHP web server — for example, www.penguintutor.com/linux/light-webserver ;
xvfb - sudo apt-get install xvfb;
CutyCapt - cutycapt.sourceforge.net ;
Result: a picture with jams and a text file with the value of the points of jams.
save.php
probki.html
Now, if you open this file in the browser, we will see a map with traffic jams, a weather widget and traffic jams, and most importantly, a probki.txt file with the value of traffic jams and their picture will appear in the "@" folder. After that we can force our server to open this page automatically according to the set schedule. So, add the following to cron:
PHP web server — for example, www.penguintutor.com/linux/light-webserver ;
xvfb - sudo apt-get install xvfb;
CutyCapt - cutycapt.sourceforge.net ;
Result: a picture with jams and a text file with the value of the points of jams.
save.php
<?php $f = "@/probki.txt"; $fileHandle = fopen($f, 'w') or die("Unable to open the ".$f); fwrite($fileHandle, $_GET["val"]); fclose($fileHandle); echo file_get_contents($f); ?> probki.html
<!DOCTYPE html PUBLIC "-//W3C//DTD XHTML 1.0 Transitional//EN" "http://www.w3.org/TR/xhtml1/DTD/xhtml1-transitional.dtd"> <html xmlns="http://www.w3.org/1999/xhtml"> <head> <title></title> <meta http-equiv="Content-Type" content="text/html; charset=utf-8" /> <script src="//api-maps.yandex.ru/2.1/?lang=ru_RU" type="text/javascript"></script> <style> html, body, #map { width: 100%; height: 100%; padding: 0; margin: 0; } </style> <script type="text/javascript"> ymaps.ready(init); function init () { var myMap = new ymaps.Map("map", { // . . center: [50.47,30.54], zoom: 12, controls: [] }); // "" . var actualProvider = new ymaps.traffic.provider.Actual({}, { infoLayerShown: true }); // . actualProvider.setMap(myMap); actualProvider.state.events.add("change", function () { var jamlevel = actualProvider.state.get("level"); if (jamlevel!== null) { // - PHP , , . document.getElementById("val").src="save.php?val="+jamlevel; } }); } </script> </head> <body bgcolor="#555555"> <!-- --> <div style="position: absolute;left: 30px; top: 0px; z-index: 2;"> <a href="http://clck.yandex.ru/redir/dtype=stred/pid=7/cid=1228/*http://pogoda.yandex.ru/kyiv"><img src="http://info.weather.yandex.net/kyiv/2_white.uk.png" border="0" alt="$ <img width="1" height="1" src="http://clck.yandex.ru/click/dtype=stred/pid=7/cid=1227/*http://img.yandex.ru/i/pix.gif" alt="" border="0"/></a> </div> <!-- --> <div style="position: absolute; right: 30px; top: 0px; z-index: 3;"> <img src="http://info.maps.yandex.net/traffic/kiev/tends_200.png" alt=" ." border="0"/> </div> <div id="map"> </div><!-- PHP --> <img id="val" src="" style="display:none" /> </body> </html> Now, if you open this file in the browser, we will see a map with traffic jams, a weather widget and traffic jams, and most importantly, a probki.txt file with the value of traffic jams and their picture will appear in the "@" folder. After that we can force our server to open this page automatically according to the set schedule. So, add the following to cron:
/usr/bin/xvfb-run -a -s "-screen 0 1600x1200x16" /usr/bin/CutyCapt --url=http://mywebsite/probki.html --out=/var/www/mywebsite/@/probki.jpg --javascript=on --delay=5000 --min-width=1600 --min-height=1200 To reduce the number of API calls, you can cache the results once every half hour and when you click the button, read the cached value.
Caching weather, exchange rates and traffic jams
#!/bin/bash ########################################################### echo $(date +%F/%T%Z) "UpdateInfo started" > /var/log/updateinfo rm -f /var/www/mywebsite/@/currrate.xml /usr/bin/wget http://bank-ua.com/export/currrate.xml -P /var/www/mywebsite/@/ -q -N echo $(date +%F/%T%Z) "UpdateInfo currate" >> /var/log/updateinfo rm -f /var/www/mywebsite/@/weather.json /usr/bin/wget "http://api.worldweatheronline.com/free/v1/weather.ashx?q=Kyyiv&format=json&extra=localObsTime&num_of_days=5&includelocation=yes&lang=uk&key=13a4e16719a757403c5db6f4a8f3067e4534b4d8" -O /var/www/mywebsite/@/weather.json -q -N echo $(date +%F/%T%Z) "UpdateInfo weather" >> /var/log/updateinfo rm -f /var/www/mywebsite/@/probki.jpg rm -f /var/www/mywebsite/@/probki.txt /usr/bin/xvfb-run -a -s "-screen 0 1600x1200x16" /usr/bin/CutyCapt --url=http://mywebsite/probki.php --out=/var/www/mywebsite/@/probki.jpg --javascript=on --delay=5000 --min-width=1600 --min-height=1200 echo $(date +%F/%T%Z) "UpdateInfo Traffic" >> /var/log/updateinfo Now we will start the most interesting. In order for the buttons connected to the copy to start doing something, you need to write a script daemon that would react to changes in the state of GPIO. Consider an example of such a script written in Python that will handle long and short presses of each button and their combinations.
Suppose we have four buttons. I wrote to handle the buttons sequentially, without a loop. It's easier and I do not think that someone will have so many buttons that you have to write a cycle.
The logic is simple. We are transferring the specified GPIO pin to high voltage read mode. Next, we enter an infinite loop with a small pause, in which we remember the current values of the pins and compare them with the previous ones. If the value is different, the status of the button has changed. And by adding another timer, we can make the trigger of a long button press according to this logic: if the button was pressed and now not pressed, and it took more than 2 seconds from the time, we react to long button presses.
Similarly, you can handle combinations of buttons by adding the condition for two (or more) buttons at the same time. So, the following script handles long and short pressing of four buttons and simultaneous pressing of the first and second.
buttondaemon.py
# This Python file uses the following encoding: utf-8 import RPi.GPIO as GPIO import time import os import sys import logging logger = logging.getLogger('buttons_daemon') hdlr = logging.FileHandler('/MyLogs/main.log') formatter = logging.Formatter('%(asctime)s %(levelname)s %(message)s') hdlr.setFormatter(formatter) logger.addHandler(hdlr) logger.setLevel(logging.WARNING) suffix = " > /dev/null&" #adjust for where your switch is connected button1Pin = 18 button2Pin = 13 button3Pin = 16 button4Pin = 15 prev_input1 = 0 prev_input2 = 0 prev_input3 = 0 prev_input4 = 0 btimer12 = 0 btimer1= 0 btimer2= 0 btimer3= 0 btimer4= 0 GPIO.setmode(GPIO.BOARD) GPIO.setup(button1Pin,GPIO.IN, pull_up_down=GPIO.PUD_DOWN) GPIO.setup(button2Pin,GPIO.IN, pull_up_down=GPIO.PUD_DOWN) GPIO.setup(button3Pin,GPIO.IN, pull_up_down=GPIO.PUD_DOWN) GPIO.setup(button4Pin,GPIO.IN, pull_up_down=GPIO.PUD_DOWN) while True: #assuming the script to call is long enough we can ignore bouncing input1 = GPIO.input(button1Pin) input2 = GPIO.input(button2Pin) input3 = GPIO.input(button3Pin) input4 = GPIO.input(button4Pin) if (input1): btimer1 += 1 if (input2): btimer2 += 1 if (input3): btimer3 += 1 if (input4): btimer4 += 1 #Some button up if ((not input1) and (not input2) and (not input3) and (not input4) and ( (prev_input1) or (prev_input2) or (prev_input3) or (prev_input4) ) ): #Button 12 if ((prev_input1) and (prev_input2) and (not prev_input3) and (not prev_input4) ): if ((btimer1>20) and (btimer2>20)): logger.warning("Button12 long"); os.system("sudo /leds+buttons/button12long"+suffix) else: logger.warning("Button12"); os.system("sudo /leds+buttons/button12"+suffix) #Button 1 if ((prev_input1) and (not prev_input2) and (not prev_input3) and (not prev_input4) ): if (btimer1>20): logger.warning("Button1 long"); os.system("sudo /leds+buttons/button1long"+suffix) else: logger.warning("Button1"); os.system("sudo /leds+buttons/button1"+suffix) #Button 2 if ((prev_input2) and (not prev_input1) and (not prev_input3) and (not prev_input4) ): if (btimer2>20): logger.warning("Button2 long"); os.system("sudo /leds+buttons/button2long"+suffix) else: logger.warning("Button2"); os.system("sudo /leds+buttons/button2"+suffix) #Button 3 if ((prev_input3) and (not prev_input2) and (not prev_input1) and (not prev_input4) ): if (btimer3>20): logger.warning("Button3 long"); os.system("sudo /leds+buttons/button3long"+suffix) else: logger.warning("Button3"); os.system("sudo /leds+buttons/button3"+suffix) #Button 4 if ((prev_input4) and (not prev_input2) and (not prev_input3) and (not prev_input1) ): if (btimer4>20): logger.warning("Button4 long"); os.system("sudo /leds+buttons/button4long"+suffix) else: logger.warning("Button4"); os.system("sudo /leds+buttons/button4"+suffix) btimer1=0 btimer2=0 btimer3=0 btimer4=0 prev_input1 = input1 prev_input2 = input2 prev_input3 = input3 prev_input4 = input4 time.sleep(0.2) When you click a particular button or combination, the corresponding bash script from the / leds + buttons folder will be called. Create dummy files with the corresponding name as in the script. An example of such a file (button1long):
#!/bin/bash echo Button 1 pressed | wall #Do something exit Now from our Python script make a demon. Create a file in the /etc/init.d folder called buttondaemon
buttondaemon
The start command starts our Python script, and the stop command stops it. Give all the scripts the necessary rights. Now we can try typing in the console:
and shake the buttons, depending on what is displayed on the screen. Voila!
#! /bin/sh # /etc/init.d/buttondaemon ### BEGIN INIT INFO # Provides: buttondaemon # Required-Start: $remote_fs $syslog # Required-Stop: $remote_fs $syslog # Default-Start: 2 3 4 5 # Default-Stop: 0 1 6 # Short-Description: Daemon to control button events # Description: Daemon which starts python script to control GPIO button events. ### END INIT INFO # If you want a command to always run, put it here # Carry out specific functions when asked to by the system case "$1" in start) echo "Starting button daemon" # run application you want to start sudo python /leds+buttons/buttondaemon.py& ;; stop) echo "Stopping button daemon" # kill application you want to stop kill -9 $(ps -ef | grep -v "grep" | grep buttondaemon.py | awk '{ print $2 }') &> /dev/null ;; *) echo "Usage: /etc/init.d/buttondaemon {start|stop}" exit 1 ;; esac exit 0 The start command starts our Python script, and the stop command stops it. Give all the scripts the necessary rights. Now we can try typing in the console:
sudo /etc/init.d/buttondaemon start and shake the buttons, depending on what is displayed on the screen. Voila!
Now we have to bring something to the LED-matrix. Create a python script that will work out at the touch of a button. For some reason, the urlget runs for at least a second in two seconds, while the same link is opened by the browser instantly. In order to see the beginning of the script, and not stick 2 seconds in an empty matrix, the script will show the animation while the data is loaded.
First show the current temperature and precipitation. To understand that the temperature on the screen, in the upper right corner, we will show a point symbolizing the degree sign.
To show two-digit numbers on the screen compactly, draw tsiferki in the amount of 3x6:
digits.py
#!/usr/bin/env python # -*- coding: utf-8 -*- rows = 6 columns = 3 symbol = [[[0 for x in range(columns)] for x in range(rows)] for x in range(10)] symbol[1] = [ [0,0,1], [0,1,1], [0,0,1], [0,0,1], [0,0,1], [0,0,1], ] symbol[2] = [ [1,1,1], [0,0,1], [1,1,1], [1,0,0], [1,0,0], [1,1,1], ] symbol[3] = [ [1,1,1], [0,0,1], [0,1,1], [0,0,1], [0,0,1], [1,1,1], ] symbol[4] = [ [1,0,0], [1,0,0], [1,0,1], [1,1,1], [0,0,1], [0,0,1], ] symbol[5] = [ [1,1,1], [1,0,0], [1,1,1], [0,0,1], [0,0,1], [1,1,1], ] symbol[6] = [ [1,1,1], [1,0,0], [1,1,1], [1,0,1], [1,0,1], [1,1,1], ] symbol[7] = [ [1,1,1], [0,0,1], [0,1,0], [0,1,0], [0,1,0], [0,1,0], ] symbol[8] = [ [1,1,1], [1,0,1], [0,1,0], [1,0,1], [1,0,1], [1,1,1], ] symbol[9] = [ [1,1,1], [1,0,1], [1,0,1], [1,1,1], [0,0,1], [1,1,1], ] symbol[0] = [ [1,1,1], [1,0,1], [1,0,1], [1,0,1], [1,0,1], [1,1,1], ] About precipitation separately. I wanted to show them on the same screen with the temperature. Therefore, they are displayed in the form of points from zero to three in the upper left corner.
All requests for traffic and exchange rates do this time against the background in parallel streams. The change of data on the matrix is animated by a shift. If you cannot upload any data, a sad smiley will be shown instead.
informer.py
#!/usr/bin/env python # -*- coding: utf-8 -*- import max7219.led as led import max7219.font as font import threading, sys, time import digits import urllib2 import json import xml.etree.ElementTree as ET debug=0 def log(message): if debug==1: print(message) device = led.matrix(cascaded=1) device.brightness(0) hourglass = [ [0,1,1,1,1,1,1,0], [0,1,0,0,0,0,1,0], [0,0,1,0,0,1,0,0], [0,0,0,1,1,0,0,0], [0,0,0,1,1,0,0,0], [0,0,1,0,0,1,0,0], [0,1,0,0,0,0,1,0], [0,1,1,1,1,1,1,0], ] jopa = [ [0,0,1,1,1,1,1,0], [0,1,1,1,1,1,1,1], [0,1,0,0,1,0,0,1], [0,1,1,1,1,1,1,1], [0,0,1,1,0,1,1,0], [0,0,1,1,1,1,1,0], [0,0,1,1,1,1,1,0], [0,0,1,0,1,0,1,0], ] sad = [ [0,0,1,1,1,1,0,0], [0,1,0,0,0,0,1,0], [1,0,1,0,0,1,0,1], [1,0,0,0,0,0,0,1], [1,0,0,1,1,0,0,1], [1,0,1,0,0,1,0,1], [0,1,0,0,0,0,1,0], [0,0,1,1,1,1,0,0], ] #Thread with wait animation class TAnimationThread (threading.Thread): def __init__(self, threadID): threading.Thread.__init__(self) self.threadID = threadID self.Continue=True def run(self): log("Starting animation") counter=0 while (self.Continue): DrawAnimation(counter) counter+=1 if counter==7: counter=0 time.sleep(0.8) def stop(self): self.Continue = False log("Stopping animation") def DrawAnimation(counter): #draw log("Drawing animation"+str(counter)) if counter==0: for j in range(8): for i in range(8): if hourglass[j][i] == 1: device.pixel(i, 7-j, 1, redraw=False) elif counter>0 and counter<5: device.pixel(1+counter, 1, 1, redraw=False) elif counter==5 or counter==6: device.pixel(counter-2, 2, 1, redraw=False) else: device.clear() device.flush() def fetch_traffic(url): global TrafficData try: response = urllib2.urlopen(url) TrafficData = int(response.read()) log("Traffic fetched") except BaseException: TrafficData=-100 log(TrafficData) def fetch_currrate(url): global CurrencyData try: response = urllib2.urlopen(url) root = ET.fromstring(response.read()) CurrencyData=float(root[16][5].text)/100 log("Currency fetched") except BaseException: CurrencyData=-100 log(CurrencyData) #Let's begin log("Starting animation thread") AnimationThread = TAnimationThread(1) AnimationThread.start() log("Starting traffic thread") TrafficThread = threading.Thread(target=fetch_traffic, args=("http://tarasius.name/@/probki.txt",)) TrafficThread.start() CurrencyThread = threading.Thread(target=fetch_currrate, args=("http://tarasius.name/@/currrate.xml",)) CurrencyThread.start() # Get and show temperature log("Starting weather fetch") try: response = urllib2.urlopen("http://tarasius.name/@/weather.json") data = json.loads(response.read()) response.close() temp = int(data["data"]["current_condition"][0]["temp_C"]) precip = float(data["data"]["current_condition"][0]["precipMM"]) temp1 = abs(temp)/10 temp2 = abs(temp)%10 except BaseException: temp=-100 precip=-100 temp1=-100 temp2=-100 log("Stopping animation thread") AnimationThread.stop() device.clear() device.flush() m = [[0 for x in range(8)] for x in range(64)] if precip==-100: #cloudcover was unavailable for j in range(8): for i in range(8): if sad[i][j] == 1: m[j][7-i]=1 #draw cloudcover elif precip>1.5: m[0][7] = 1 m[2][7] = 1 m[4][7] = 1 elif precip<=1.5 and precip>0.5: m[1][7] = 1 m[3][7] = 1 elif precip<=0.5 and precip>0.1: m[2][7] = 1 if temp>-100: if temp<0: #Draw minus m[0][3] = 1 if temp1==0: m[1][3]=1 m[2][3]=1 m[3][3]=1 if temp1<>0: #Draw first digit for j in range(digits.rows): for i in range(digits.columns): if digits.symbol[temp1][j][i] == 1: m[i+1][5-j] = 1 #draw second digit for j in range(digits.rows): for i in range(digits.columns): if digits.symbol[temp2][j][i] == 1: m[i+5][5-j] = 1 #draw celsium sign m[7][7] = 1 log("Drawing temperature") for i in range(8): for j in range(8): if m[j][i]==1: device.pixel(j, i, 1, redraw=False) device.flush() time.sleep(5) #Show traffic #Draw first digit TrafficThread.join() if TrafficData==10: for j in range(8): for i in range(8): if jopa[j][i] == 1: m[10+i][j]=1 elif TrafficData==-100: for j in range(8): for i in range(8): if sad[j][i] == 1: m[10+i][7-j]=1 else: #draw car m[10][6]=1 m[10][3]=1 m[11][7]=1 m[11][6]=1 m[11][5]=1 m[11][4]=1 m[11][3]=1 m[11][2]=1 m[12][5]=1 m[12][4]=1 TrafficData = TrafficData%10 #draw second digit for j in range(digits.rows): for i in range(digits.columns): if digits.symbol[TrafficData][j][i] == 1: m[i+15][5-j]=1 log("Drawing traffic") for step in range(9): device.clear() for i in range(8): for j in range(8): if m[i+step+2][j]==1: device.pixel(i, j, 1, redraw=False) device.flush() time.sleep(0.2) time.sleep(5) #Show currency CurrencyThread.join() if CurrencyData==-100: for j in range(8): for i in range(8): if sad[j][i] == 1: m[22+i][7-j]=1 else: cur=str(CurrencyData) for d in range(5): if cur[d]==".": digit=-1 else: digit=int(cur[d]) if digit==-1: m[22+d*5][0]=1 else: for j in range(digits.rows): for i in range(digits.columns): if digits.symbol[digit][j][i] == 1: m[i+21+d*5][5-j]=1 log("Drawing currency") for step in range(36): device.clear() for i in range(8): for j in range(8): if m[i+step+11][j]==1: device.pixel(i, j, 1, redraw=False) device.flush() time.sleep(0.2) device.clear() device.flush() sys.exit() Having tested that everything works, let's hang up the call to the informer on the button:
#!/bin/bash echo "Button 1 pressed" | wall python /leds+buttons/informer.py > /dev/null& exit The result of all this should be something like this - 7 degrees, clearly, traffic jams 2 points, the euro exchange rate to hryvnia 32.02:
Thanks for attention!
Source: https://habr.com/ru/post/251439/
All Articles