How to create a subdomain in VestaCP
Visiting the support forum of the VestaCP panel, I noticed that users often ask how to create a subdomain in VestaCP. Actually, it is very simple. First you need to go to the panel itself:
Next we need to go to the WEB tab:
')

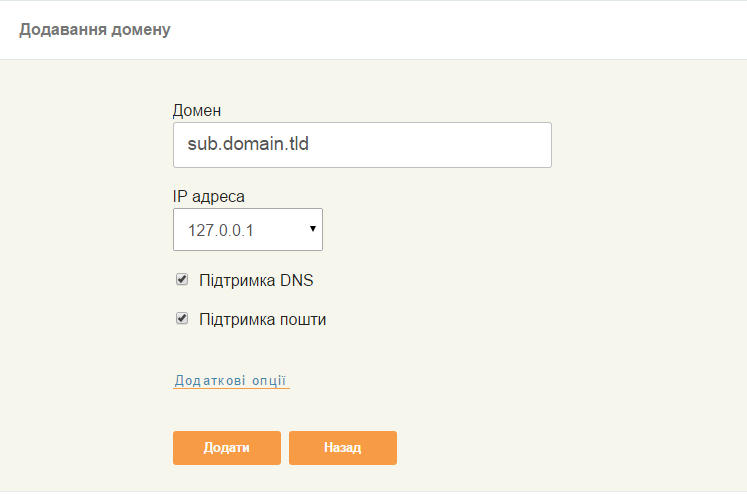
Click the button Add WEB domain:

In the Domain field, enter the name of your subdomain (for example, if your site is domain.tld, then the subdomain name will be sub.domain.tld). I decided to leave all other parameters unchanged:
Now, when we return to the WEB tab, we will see that our subdomain is now in the list of domains:

This completes the addition of a subdomain.
An interesting feature of VestaCP is that a separate folder is created for subdomains. This does not suit some users, so they wonder whether it can be done so that the subdomain uses a folder from the main domain (for example, domain.tld is the sub directory, that is, domain.tld / sub). You can resolve this issue by editing the domain configuration files. I note that CentOS is installed on my server.
To do this, we need to connect to the server using SSH:
Next we need to go to the folder with the virtual host configuration files:
where $ user is your username. Next you need to create (use the touch filename command) files httpd.sub.domain.tld.conf, nginx.sub.domain.tld.conf, shttpd.sub.domain.tld.conf, snginx.sub.domain.tld.conf and edit with a convenient editor (the last two, if you use a secure SSL connection on your site).
Create the file httpd.sub.domain.tld.conf with the following contents:
For a secure connection, create the file shttpd.sub.domain.tld.conf, and perform a similar operation.
We also create the file nginx.sub.domain.tld.conf and add to it:
For a secure connection, create the file snginx.sub.domain.tld.conf, and repeat the steps.
After editing the files, the main thing is to save the changes. To check we have done everything right, you need to restart HTTPd and Nginx:
and visit our subdomain.
For Debian / Ubuntu, the file name is different - instead of httpd it will be apache2, that is, apache2.sub.domain.tld.conf. The service restart command is also different:
That's all.
Next we need to go to the WEB tab:
')
Click the button Add WEB domain:
In the Domain field, enter the name of your subdomain (for example, if your site is domain.tld, then the subdomain name will be sub.domain.tld). I decided to leave all other parameters unchanged:
Now, when we return to the WEB tab, we will see that our subdomain is now in the list of domains:
This completes the addition of a subdomain.
An interesting feature of VestaCP is that a separate folder is created for subdomains. This does not suit some users, so they wonder whether it can be done so that the subdomain uses a folder from the main domain (for example, domain.tld is the sub directory, that is, domain.tld / sub). You can resolve this issue by editing the domain configuration files. I note that CentOS is installed on my server.
To do this, we need to connect to the server using SSH:
ssh user@your.server Next we need to go to the folder with the virtual host configuration files:
cd /home/$user/conf/web where $ user is your username. Next you need to create (use the touch filename command) files httpd.sub.domain.tld.conf, nginx.sub.domain.tld.conf, shttpd.sub.domain.tld.conf, snginx.sub.domain.tld.conf and edit with a convenient editor (the last two, if you use a secure SSL connection on your site).
Create the file httpd.sub.domain.tld.conf with the following contents:
DocumentRoot /home/admin/web/domain.tld/public_html/sub For a secure connection, create the file shttpd.sub.domain.tld.conf, and perform a similar operation.
We also create the file nginx.sub.domain.tld.conf and add to it:
root /home/$user/web/domain.tld/public_html/sub; For a secure connection, create the file snginx.sub.domain.tld.conf, and repeat the steps.
After editing the files, the main thing is to save the changes. To check we have done everything right, you need to restart HTTPd and Nginx:
service httpd restart & service nginx restart and visit our subdomain.
For Debian / Ubuntu, the file name is different - instead of httpd it will be apache2, that is, apache2.sub.domain.tld.conf. The service restart command is also different:
/etc/init.d/apache2 restart & /etc/init.d/nginx restart That's all.
Source: https://habr.com/ru/post/251407/
All Articles