Creating MMC Management Console
Have you seen the cockpit? Everything is at hand, no unnecessary gestures. In order to take off, the pilot does not go to the other end of the aircraft to turn on the engine.

So in the situation with MMC consoles. You create for yourself a “control panel” and in certain situations press the necessary “buttons”.
The publication is designed for system administrators who want to get acquainted with the method of creating Windows management consoles by using mmc.exe.
')
Microsoft responds :
I prefer to characterize the MMC console as a control panel. By adding all the necessary tools to it, you can save great time. Everything you need is always in front of you, in one place.
Pros of use:
+ You are not constantly looking for shortcuts to used snap-ins, programs, scripts;
+ To start the working day, you need to run only one file;
+ Ability to create your own console for different tasks, projects, or under each serviced office.
The modular system allows you to combine different snap-ins in one place, it can be both a server resource monitor and the most common web browser. We will look at the latest MMC version 3.0 that comes with Windows Server 2003 SP2, Windows Server 2003 R2, Windows Vista, Windows 7 and Windows Server 2008. The history of management consoles began with MMC 1.0 and Windows 95.
The management console is located at the path C: \ Windows \ System32 \ mmc.exe .

Launching the console in this way, we will open it in the Author mode, i.e. we can make changes to the structure. MMC consoles have two launch modes:
You can change the launch mode in the console itself or, for example, for authoring mode, start with the / a parameter. We will look at this moment at the end, when we will create our first console.
The empty console looks like this:

To run 32-bit MMC consoles on 64-bit systems, you need to start the console with the / 32 switch.
If you run a 64-bit console on a 32-bit system, it will be completed.
We decided that the console should simplify the system administration process. For clarity, I propose to highlight a set of snap-ins and functionality that a typical system administrator has in one or another form at any of the companies:
Having chosen the most basic, let's start creating our own management console.
The process of adding snap-ins to the console is intuitive: File - Add or remove snap- ins ...

To add some snap-ins, you will not need to immediately make any additional settings:

When adding others, you will be prompted to configure them immediately:
When adding a number of snap-ins, it is proposed to select a computer for management. For example, when adding Computer Management and Services snap-ins. Since we plan to use the console to control other computers, you should pay attention to the checkbox and put it down:
If you make a snap universal, to connect to any computer, then the best option at this point - the local computer . If there is a “other computer”, then each time the console created by us starts, there will be requests to the remote computer ... And if it is turned off? It will have to wait until the equipment understands this and gives an error.
After clicking on OK, we will get a console with snap-ins added by us:

But we are not satisfied with how it looks, we want to hide some elements. The Action field takes up too much space, we want to get rid of it and, for example, get rid of the status bar . View settings can be made in the View - Configure ... menu of the console.

Here we can remove and enable the display of the elements we need. Put down the checkboxes and see the result:

On the taskbar of some snap-ins, we can see a set of some standard actions and properties. Other snap-ins may not have a standard taskbar at all.
The Service snap-in, for example, contains buttons that allow you to Stop and Restart the service. We can change the appearance of the taskbar and add to it the actions that we need.
To do this, we first click on the snap-in in the root of the console (in this case, click on Services (local) ) and fall into the Actions menu - New view of the taskbar ...

The taskbar view creation wizard opens. Click next.

Choose a style for our new taskbar. We draw attention to the fact that the wizard gives us hints on what style is suitable for what and shows in the preview window how it will look like:

In the next step, we select to which console elements we add the taskbar type we created. If you select the item For all items that have the type of the selected item , then if we had another Service snap-in in the console, this view would also apply to it. If you select To selected item in the tree , the view is applied only to the selected snap-in in the console root.

Now we need to give the name of the taskbar and, if we want, add a description.

In the final step, we are asked to click on the Done button to add a new task to the newly created taskbar.

Since we didn’t remove the checkbox at the last step, the task creation wizard opens before us.

Select the type of team for the task being created. We are given three types to choose from:
We will select the menu command item .

From the command source select Element in the results pane .

Specify the name and optional description of our team.

Choose the desired task icon from the existing ones or load your own.

At the final step, click Finish . If we want to add another task, set the corresponding checkbox

After completing the wizard, choosing a service on the taskbar we created, we will see the task we added, Restart, when clicked, the service will restart.


You can add such taskbars with tasks for any snap-in.
The next step, we will add to the root of our console an item from which we will run our working scripts and scripts: File - Add or remove a snap-in ...
Add a snap folder :

At the root of the console, rename it and create a new taskbar: Action - New view of the taskbar ...

For convenience, we select the panel style without a list and apply it to the selected list item.

We finish the creation by choosing a name and adding a description.
Launch the task creation wizard and this time select the item Command of the operating system :

To run, for example, a PowerShell script, in the Command field, write powershell , and in the Parameters field — the path to the script. In our case, we specify the path to the script C: \ Console \ script \ new-user.ps1 .
If we save our console in the folder C: \ Console , then before the script we can specify the path script \ new-user.ps1 .

Add a name and description, select the task icon and complete the creation.

When selecting the Scripts folder in the root of the console, we see the link to the script just created.

This way you can add all the utilities and scripts we need.
In order to add another task, after exiting the wizard, we select the necessary equipment in the console root: Action - Edit the taskbar view ...
General tab for setting the style of displaying the taskbar.

Tasks tab to add new tasks, delete and modify existing ones.

To add a new task, click the Create ... button, the New Task Wizard opens and we can add a new task, similar to the previous one. We, for example, add a link to the execution of the .reg file. To do this, when creating a command in the field, assign the path C: \ Console \ Settings.reg .
To run, for example, an .exe file with parameters, we will need to enter the path to the file in the Command field and run parameters in the Parameters field.

Next, we proceed to add to the links to network resources. These can be either folders located locally on a computer or on the network, or links to web pages.
File - Add or Remove Snap-In ...
Since we want all the resources to be ordered, we add a new snap-in. Folder and so that other snap-ins can be added to it, click on the Advanced button and set the Allow to change parent snap-in checkbox.

In the Parent snap -in drop-down list, select Folder and add another snap-in - Link to the web resource :

If the location is online, enter the path. For example, on server1, the shared folder is soft

Enter the name and click Done.


In the root of the console, rename our folder, for example, to Network resources. We open it and we see the link to the network folder created by us soft . Clicking on the soft folder, we will see its contents.
As mentioned earlier, this way you can add links to local and network folders, as well as web resources.

Finally, we will add the Remote Desktops snap-in to our console.

After adding a snap, we right-click on it and select the item Add a new connection ....

Enter the computer name or ip-address and name to connect.

When choosing our terminal, we will connect to it from the console window.

In the beginning, we talked about the fact that some of the snap-ins work either with the current local computer or with other remote ones.
Take, for example, the Computer Management snap -in . Make a right click on the snap - Connect to another computer ....

Enter the name of another computer, click OK .

If the computer exists, we get the console to control another computer.

If not, we see an error.

Now we need to save our new console. File - Save As ....
When you exit the console, we will receive suggestions to save the changes.

When you re-open the console, we will re-enter it in the Author mode, allowing you to make changes in the structure. But we, for example, do not want the end user to make any changes. To do this, change the default startup mode.
Select File - Options ...

We select, for example, User - full access . Click Apply and OK .
This mode will allow working with existing snap-ins and will not allow adding or removing new ones.

We leave from equipment with preservation.
If at exit, for example, we had the Computer Management snap-in, while saving and after re-opening the console, we will also see the expanded Computer Management snap-in.

This is where we’ve finished creating our management console. It is fully ready for use by the system administrator.
Create consoles, experiment, simplify work!
So in the situation with MMC consoles. You create for yourself a “control panel” and in certain situations press the necessary “buttons”.
The publication is designed for system administrators who want to get acquainted with the method of creating Windows management consoles by using mmc.exe.
')
What is MMC?
Microsoft responds :
The Microsoft Management Console (MMC) is a place to store and display administration tools created by Microsoft and other software vendors. These tools are called snap-ins and are used to manage Windows hardware, software, and network components. Some of the tools located in the Administration folder, such as Computer Management, are MMC snap-ins.
Introduction
I prefer to characterize the MMC console as a control panel. By adding all the necessary tools to it, you can save great time. Everything you need is always in front of you, in one place.
Pros of use:
+ You are not constantly looking for shortcuts to used snap-ins, programs, scripts;
+ To start the working day, you need to run only one file;
+ Ability to create your own console for different tasks, projects, or under each serviced office.
The modular system allows you to combine different snap-ins in one place, it can be both a server resource monitor and the most common web browser. We will look at the latest MMC version 3.0 that comes with Windows Server 2003 SP2, Windows Server 2003 R2, Windows Vista, Windows 7 and Windows Server 2008. The history of management consoles began with MMC 1.0 and Windows 95.
The management console is located at the path C: \ Windows \ System32 \ mmc.exe .
Launching the console in this way, we will open it in the Author mode, i.e. we can make changes to the structure. MMC consoles have two launch modes:
- Author's - in which we will have complete freedom of action and we will be able to remove and add accessories;
- User - prohibiting changes in the structure and suitable for the end user.
You can change the launch mode in the console itself or, for example, for authoring mode, start with the / a parameter. We will look at this moment at the end, when we will create our first console.
The empty console looks like this:
The moment about the bit console (MMC32 and MMC64)
To run 32-bit MMC consoles on 64-bit systems, you need to start the console with the / 32 switch.
If you run a 64-bit console on a 32-bit system, it will be completed.
"My first console"
We decided that the console should simplify the system administration process. For clarity, I propose to highlight a set of snap-ins and functionality that a typical system administrator has in one or another form at any of the companies:
- Snap Active Directory;
- DHCP snap-in;
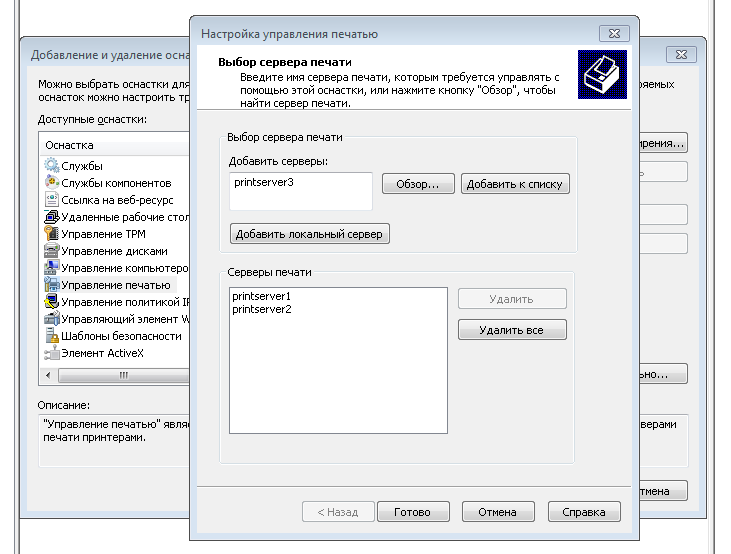
- Manage print servers;
- Computer management;
- Service management;
- A set of scripts and utilities;
- Network Resource Kit;
- A set of remote desktops;
Having chosen the most basic, let's start creating our own management console.
The process of adding snap-ins to the console is intuitive: File - Add or remove snap- ins ...
To add some snap-ins, you will not need to immediately make any additional settings:
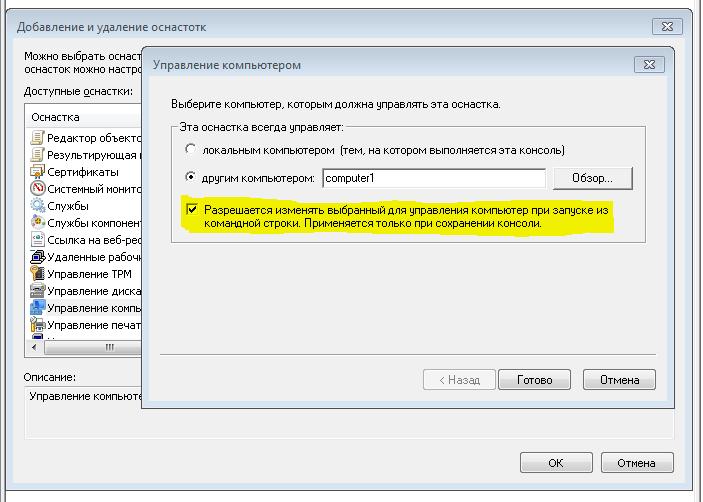
When adding others, you will be prompted to configure them immediately:
When adding a number of snap-ins, it is proposed to select a computer for management. For example, when adding Computer Management and Services snap-ins. Since we plan to use the console to control other computers, you should pay attention to the checkbox and put it down:
Allow to change the selected control computer when starting from the command line. Used when saving the console.
If you make a snap universal, to connect to any computer, then the best option at this point - the local computer . If there is a “other computer”, then each time the console created by us starts, there will be requests to the remote computer ... And if it is turned off? It will have to wait until the equipment understands this and gives an error.
After clicking on OK, we will get a console with snap-ins added by us:
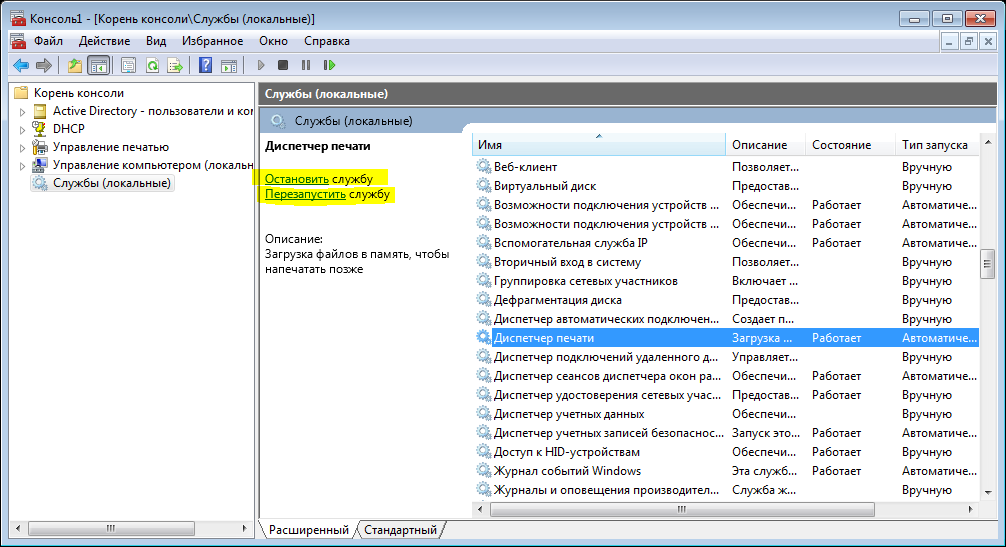
But we are not satisfied with how it looks, we want to hide some elements. The Action field takes up too much space, we want to get rid of it and, for example, get rid of the status bar . View settings can be made in the View - Configure ... menu of the console.
Here we can remove and enable the display of the elements we need. Put down the checkboxes and see the result:
On the taskbar of some snap-ins, we can see a set of some standard actions and properties. Other snap-ins may not have a standard taskbar at all.
The Service snap-in, for example, contains buttons that allow you to Stop and Restart the service. We can change the appearance of the taskbar and add to it the actions that we need.
To do this, we first click on the snap-in in the root of the console (in this case, click on Services (local) ) and fall into the Actions menu - New view of the taskbar ...
The taskbar view creation wizard opens. Click next.
Choose a style for our new taskbar. We draw attention to the fact that the wizard gives us hints on what style is suitable for what and shows in the preview window how it will look like:
In the next step, we select to which console elements we add the taskbar type we created. If you select the item For all items that have the type of the selected item , then if we had another Service snap-in in the console, this view would also apply to it. If you select To selected item in the tree , the view is applied only to the selected snap-in in the console root.
Now we need to give the name of the taskbar and, if we want, add a description.
In the final step, we are asked to click on the Done button to add a new task to the newly created taskbar.
Since we didn’t remove the checkbox at the last step, the task creation wizard opens before us.
Select the type of team for the task being created. We are given three types to choose from:
- Menu command - launches standard snap menu command.
- Team operating system - allows us to run a program, script or script.
- Transition Command — Displays the taskbar for an item in the favorites list MMC.
We will select the menu command item .
From the command source select Element in the results pane .
Specify the name and optional description of our team.
Choose the desired task icon from the existing ones or load your own.
At the final step, click Finish . If we want to add another task, set the corresponding checkbox
After completing the wizard, choosing a service on the taskbar we created, we will see the task we added, Restart, when clicked, the service will restart.
You can add such taskbars with tasks for any snap-in.
The next step, we will add to the root of our console an item from which we will run our working scripts and scripts: File - Add or remove a snap-in ...
Add a snap folder :
At the root of the console, rename it and create a new taskbar: Action - New view of the taskbar ...
For convenience, we select the panel style without a list and apply it to the selected list item.
We finish the creation by choosing a name and adding a description.
Launch the task creation wizard and this time select the item Command of the operating system :
To run, for example, a PowerShell script, in the Command field, write powershell , and in the Parameters field — the path to the script. In our case, we specify the path to the script C: \ Console \ script \ new-user.ps1 .
If we save our console in the folder C: \ Console , then before the script we can specify the path script \ new-user.ps1 .
Add a name and description, select the task icon and complete the creation.
When selecting the Scripts folder in the root of the console, we see the link to the script just created.
This way you can add all the utilities and scripts we need.
In order to add another task, after exiting the wizard, we select the necessary equipment in the console root: Action - Edit the taskbar view ...
General tab for setting the style of displaying the taskbar.
Tasks tab to add new tasks, delete and modify existing ones.
To add a new task, click the Create ... button, the New Task Wizard opens and we can add a new task, similar to the previous one. We, for example, add a link to the execution of the .reg file. To do this, when creating a command in the field, assign the path C: \ Console \ Settings.reg .
To run, for example, an .exe file with parameters, we will need to enter the path to the file in the Command field and run parameters in the Parameters field.
Next, we proceed to add to the links to network resources. These can be either folders located locally on a computer or on the network, or links to web pages.
File - Add or Remove Snap-In ...
Since we want all the resources to be ordered, we add a new snap-in. Folder and so that other snap-ins can be added to it, click on the Advanced button and set the Allow to change parent snap-in checkbox.
In the Parent snap -in drop-down list, select Folder and add another snap-in - Link to the web resource :
If the location is online, enter the path. For example, on server1, the shared folder is soft
Enter the name and click Done.
In the root of the console, rename our folder, for example, to Network resources. We open it and we see the link to the network folder created by us soft . Clicking on the soft folder, we will see its contents.
As mentioned earlier, this way you can add links to local and network folders, as well as web resources.
Finally, we will add the Remote Desktops snap-in to our console.
After adding a snap, we right-click on it and select the item Add a new connection ....
Enter the computer name or ip-address and name to connect.
When choosing our terminal, we will connect to it from the console window.
In the beginning, we talked about the fact that some of the snap-ins work either with the current local computer or with other remote ones.
Take, for example, the Computer Management snap -in . Make a right click on the snap - Connect to another computer ....
Enter the name of another computer, click OK .
If the computer exists, we get the console to control another computer.
If not, we see an error.
Now we need to save our new console. File - Save As ....
When you exit the console, we will receive suggestions to save the changes.
When you re-open the console, we will re-enter it in the Author mode, allowing you to make changes in the structure. But we, for example, do not want the end user to make any changes. To do this, change the default startup mode.
Select File - Options ...
We select, for example, User - full access . Click Apply and OK .
This mode will allow working with existing snap-ins and will not allow adding or removing new ones.
We leave from equipment with preservation.
If at exit, for example, we had the Computer Management snap-in, while saving and after re-opening the console, we will also see the expanded Computer Management snap-in.
This is where we’ve finished creating our management console. It is fully ready for use by the system administrator.
Create consoles, experiment, simplify work!
Additional Information
Source: https://habr.com/ru/post/251155/
All Articles